by
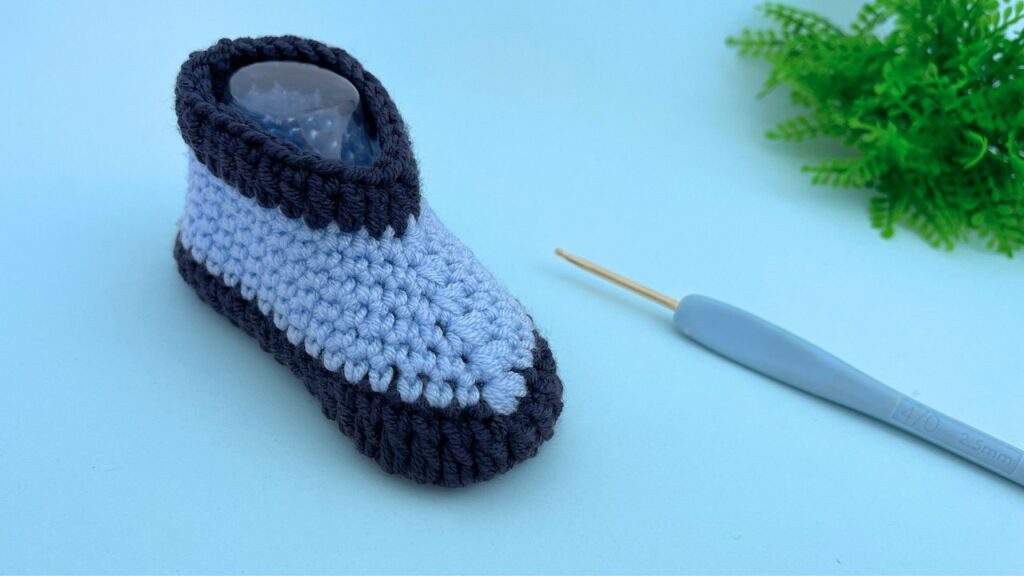
by Welcome to a unique crochet project that results in a perfectly formed, cozy bootie with minimal assembly! Unlike traditional flat-sole patterns, the “Seamless Cloud Top” bootie begins in the round, creating a cylinder that quickly takes on the shape of a foot through carefully placed decreases.
This pattern is designed for the 3–6 month size, offering a beautiful, slightly chunky texture achieved through simple double crochet and single crochet stitches.
Project Specifications
- Skill Level: Intermediate
- Finished Size: 3–6 Months (approx. 10–11 cm sole length)
- Gauge: 5 DC rows x 12 DC stitches should measure 5 cm x 5 cm (2″ x 2″).
- Key Techniques: Starting in the Round, 3-Stitch Single Crochet Decrease.
Sizing Principle
The foundation chain determines the final foot circumference. For the desired sole length (L), the starting chain length must be roughly double the length (2 x L).
- For this 3-6 month size (L ≈ 10 cm), we use a chain length of about 20 cm.
- Crucial: The starting chain must be an odd number of stitches to ensure the toe decreases line up properly.
Materials Checklist
| Item | Specification | Notes |
| Yarn A (Main Body) | 50g of DK Weight (Category 3 / Light Worsted) Baby Yarn. | Choose a soft, washable acrylic or cotton blend. |
| Yarn B (Toe/Shaping) | Small amount of DK Weight yarn in a contrasting or coordinating color. | |
| Hook | 3.5 mm (E-4 US) crochet hook. | Or size needed to obtain gauge. |
| Needle | Tapestry needle. | Essential for joining the sole and weaving ends. |
| Notions | Scissors, stitch marker, pins. | We recommend leaving a very long tail on Yarn A for the final sole seam. |
Part 1: The Seamless Foundation & Foot Body (Yarn A)
We begin by creating a wide tube that will become the ankle and upper foot.
Foundation Round:
- Leaving a 40 cm (16 inch) tail for later seaming, Chain 39.
- Join the chain into a loop by working a slip stitch (sl st) into the very first chain made.
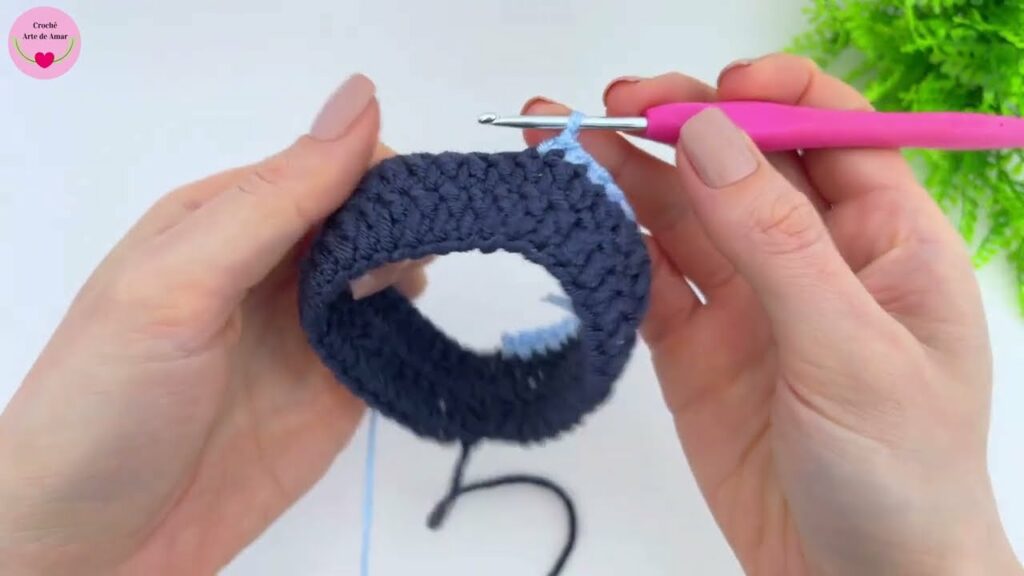
Round 1 (DC Body):
- Ch 1. SC into the same stitch. Ch 1. (This counts as your first DC).
- DC into the next stitch and into every chain around.
- Join with a sl st to the top of the starting SC/Ch 1. (39 DC stitches).
Round 2 (DC Body):
- Ch 1. SC into the same stitch. Ch 1. (Counts as first DC).
- DC into the next stitch and into every stitch around.
- Join with a sl st to the top of the starting SC/Ch 1. (39 DC stitches).
Fasten off Yarn A, leaving the long tail from the foundation chain loose for later. Weave in the tail from the Round 2 fasten-off.
Part 2: Strategic Toe Shaping (Yarn B)
We now switch to a contrasting color and use single crochet (SC) to create the systematic decreases that form the rounded toe.
Preparation:
Identify the exact center stitch opposite the seam (where you joined your rounds). This center point is where your decreases will be focused.
Round 3 (First Decrease Round):
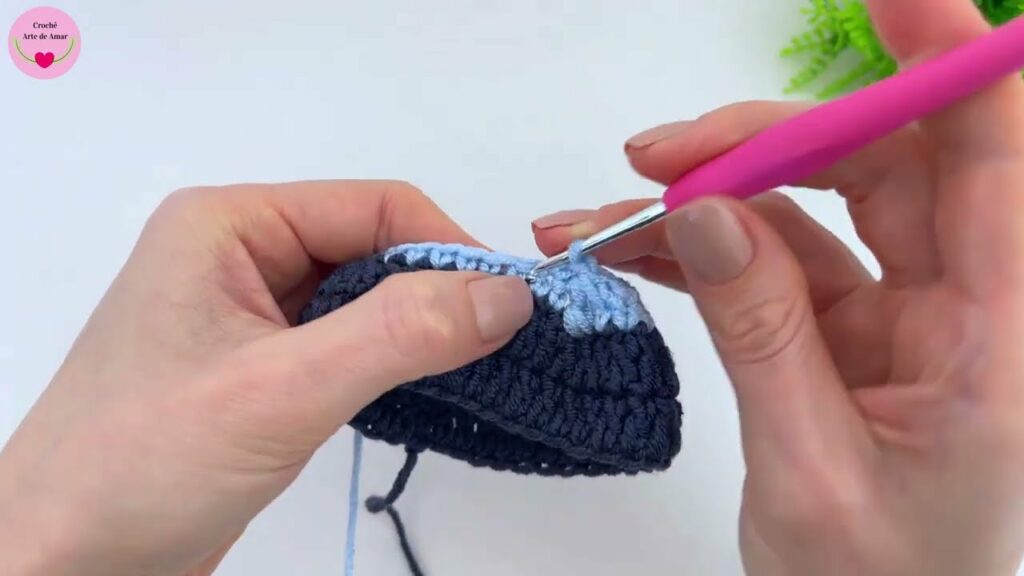
Join Yarn B with a SC in the stitch immediately following the Round 2 join [03:38].
- SC in the next 18 stitches. (You should now be 1 stitch before the center stitch).
- 3-SC Decrease (3 SC tog): Insert hook into next stitch, yarn over, pull up a loop (3 loops on hook). Repeat in the next 2 stitches. Yarn over, pull through all 4 loops on the hook. (This reduced 3 stitches to 1).
- SC in the remaining 18 stitches.
- Join with a sl st to the first SC. (Total 37 stitches).
Round 4 (Second Decrease Round):
- Ch 1 (does not count as stitch). SC in the same stitch.
- SC in the next 16 stitches (17 SC total). (You should be 1 stitch before the decrease you made in the previous round).
- 3-SC Decrease (3 SC tog): Work the decrease over the next 3 stitches (the stitch before the old decrease, the top of the old decrease, and the stitch after the old decrease).
- SC in the remaining 17 stitches.
- Join with a sl st to the first SC. (Total 35 stitches).
Round 5 (Third Decrease Round):
Repeat Round 4, working 16 SC on each side of the center decrease. (Total 33 stitches).
Round 6 (Fourth Decrease Round):
Repeat Round 4, working 15 SC on each side of the center decrease. (Total 31 stitches).
Round 7 (Fifth Decrease Round):
Repeat Round 4, working 14 SC on each side of the center decrease. (Total 29 stitches).
Round 8 (Sixth Decrease Round):
Repeat Round 4, working 13 SC on each side of the center decrease. (Total 27 stitches) [08:05].
Fasten off Yarn B.
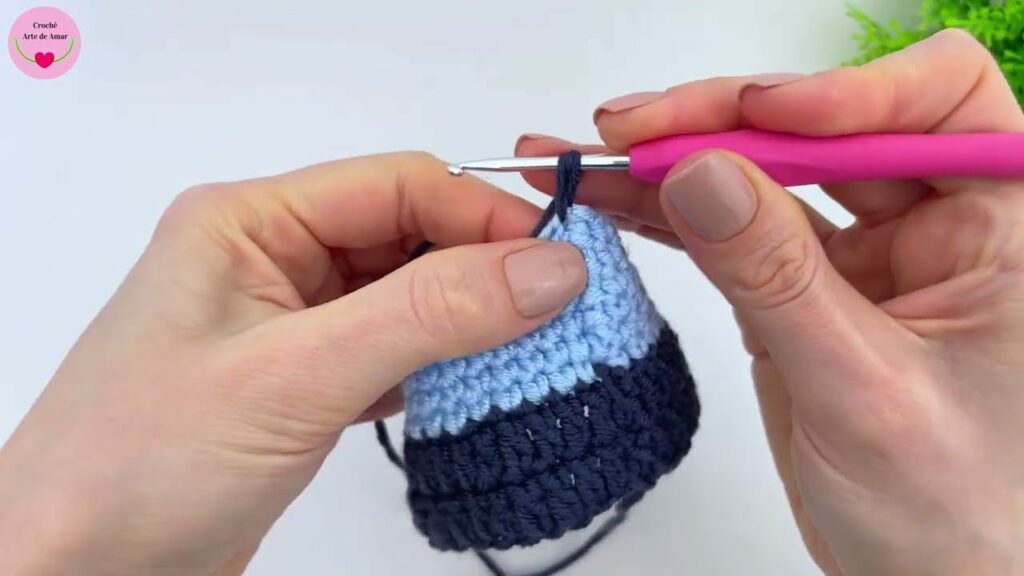
Part 3: The Ankle Cuff (Yarn A)
Switch back to the main color for a neat, finished edge at the ankle.
Round 9 (Cuff):
- Join Yarn A with a sl st to any stitch at the top opening.
- Ch 1. SC in the same stitch. Ch 1 (counts as first DC).
- DC in the next stitch and in every stitch around.
- Join with a sl st to the top of the starting SC/Ch 1. (27 DC stitches).
Fasten off Yarn A and weave in the end securely.
Part 4: Final Assembly (Closing the Sole)
This is the final step where we use the long tail left at the very beginning to close the bottom of the bootie.
- Thread the Tail: Locate the long starting tail (40 cm) of Yarn A and thread it onto your tapestry needle.
- Heel Shaping: From the center back heel seam, work a running stitch (in and out) for about 3-4 cm (approx. 1 inch) up the sides of the foundation chain. Pull the yarn taut to gather the heel slightly, creating a rounded cup shape. Knot this section securely.
- Sole Seam: Now, using a mattress stitch or whipstitch, seam the remaining edges of the foundation chain together, working through the outer loops of the foundation chain stitches on both sides to create a flat, subtle seam for the sole of the foot.
- Final Secure: When you reach the toe end, knot the yarn firmly multiple times and weave the remaining tail up into the fabric of the sole before trimming.
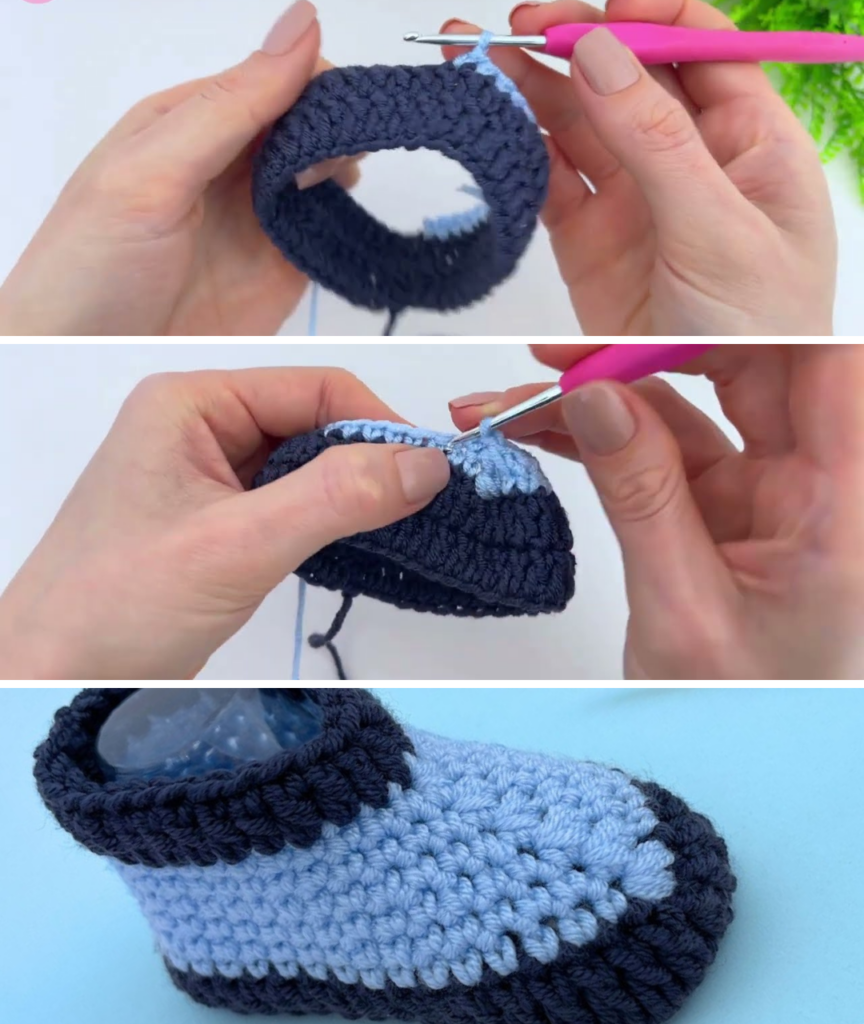
Finishing & Styling
Turn the bootie right side out. The decreases should form a neat, closed toe, and the heel should have a gentle curve.
- Customization: For added detail, you can thread a thin ribbon or a simple crocheted cord through the stitches of the final DC cuff round to cinch the top and tie a decorative bow.
- Modeling: The sole will adapt best to the baby’s foot after it has been modeled slightly—give it a gentle stretch and shape with your hands.
Your seamless “Cloud Top” Bootie is now complete! Enjoy creating this unique and quick-to-finish baby gift.
Video tutorial: