by
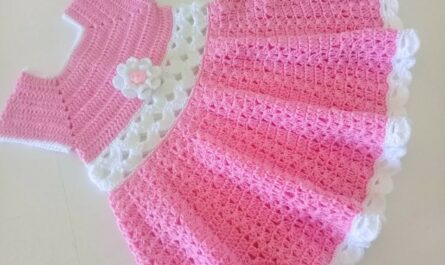
by A crochet baby frock dress is one of the sweetest handmade items you can create. With its classic flared skirt, delicate texture, and endless customization options, a baby frock makes a thoughtful gift or a keepsake garment for your little one. This guide walks you through the complete process of designing and crocheting your own baby frock, from stitch to finish.
📋 What You’ll Learn

- Materials and tools required
- Baby dress sizing guide
- Step-by-step pattern for a top-down frock
- Decorative edging and finishing tips
- Optional variations and styling
🧵 Materials Needed
| Item | Recommended Details |
|---|---|
| Yarn | Soft baby-friendly yarn (cotton or acrylic, DK/light worsted) |
| Hook | 3.5 mm to 4.5 mm (check your yarn label) |
| Buttons | Small buttons for back closure |
| Tapestry needle | For weaving in ends |
| Stitch markers | To mark armholes and increases |
| Scissors | For trimming yarn ends |
| Measuring tape | To measure length and width as you go |
🧶 Choose a soft, non-irritating yarn — cotton or hypoallergenic blends are ideal for baby wear.
📏 Baby Frock Sizing Guide
| Age Range | Chest (inches) | Length (inches) |
|---|---|---|
| 0–3 months | 16″ | 12″ |
| 3–6 months | 17″ | 13″ |
| 6–12 months | 18″ | 14–15″ |
| 12–18 months | 19″ | 16–17″ |
📝 This tutorial follows a 0–3 month size, but you can scale up using the chart.
📚 Stitch Abbreviations (US Terms)
| Abbreviation | Stitch |
|---|---|
| ch | Chain |
| sl st | Slip stitch |
| sc | Single crochet |
| dc | Double crochet |
| dc2tog | Double crochet decrease (2 dc together) |
| st(s) | Stitch(es) |
| sk | Skip |
| sp | Space |
👗 Basic Construction Overview
This crochet baby frock is made top-down in one piece, featuring:
- A circular yoke
- Divided armholes
- A flared, decorative skirt
- Optional back opening with button(s)
- Optional decorative sleeves and edging
✂️ Step-by-Step Pattern: Crochet Baby Frock (0–3 months)
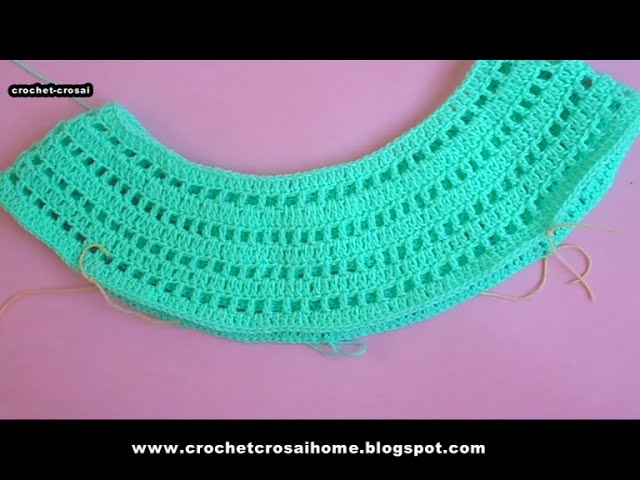
🧍 Part 1: Yoke (Top of the Dress)
Foundation:
Ch 56. (You may adjust in multiples of 8.)
Row 1:
Dc in 4th ch from hook and each across (total 54 dc). Ch 2, turn.
Row 2 (Increase Row):
Place markers at stitches: 13, 27, 41 (4 increase points).
Dc in each st, and 2 dc in each marked st to form the raglan-style increases. (4 extra stitches added)
Repeat this row until you reach about 76–80 dc in total and the yoke measures around 4–4.5 inches deep.
🧵 Part 2: Divide for Armholes
When yoke is wide enough:
- Dc across front until first marked increase
- Chain 5–6 (creates underarm), skip all sleeve stitches
- Dc across the back, chain 5–6 again, skip other sleeve
- Dc across the remaining front
You’ll now be working only on the body/skirt section in the round.
👗 Part 3: Frock Skirt
Round 1:
Dc in each dc and chain space around. Join with sl st. Ch 2.
Round 2 (Start flare):
(Dc in next 2 sts, 2 dc in next st) repeat around for slight increase.
Round 3 and onward:
Work any decorative stitch pattern you prefer. Here are two options:
💠 Option A: Shell Stitch Pattern
Row Repeat:
(Skip 2 sts, 5 dc in next st, skip 2 sts, sc in next) repeat around.
This gives a lacy, wavy skirt look.
✨ Option B: V-Stitch Pattern
Row Repeat:
(Dc, ch 1, dc) in same stitch, skip 1 st repeat around.
This gives a breezier, more open stitch for summer dresses.
Continue repeating your chosen pattern until the skirt measures around 8 inches (or desired length from underarm).
🎀 Optional Sleeves (Cap Sleeves)
Rejoin yarn at armhole:
- Rnd 1: Sc or dc around the sleeve opening
- Rnd 2: Add a scalloped edge with (sc, skip 1, 3 dc in next st, skip 1) repeat
- Fasten off and weave in ends
🔘 Back Opening & Button
To make dressing easier:
- Leave a 1–1.5″ opening at the center back of the yoke
- Edge it with sc rows for stability
- Sew a small button and create a chain loop as a buttonhole
This avoids needing to stretch the neckline too much when dressing the baby.
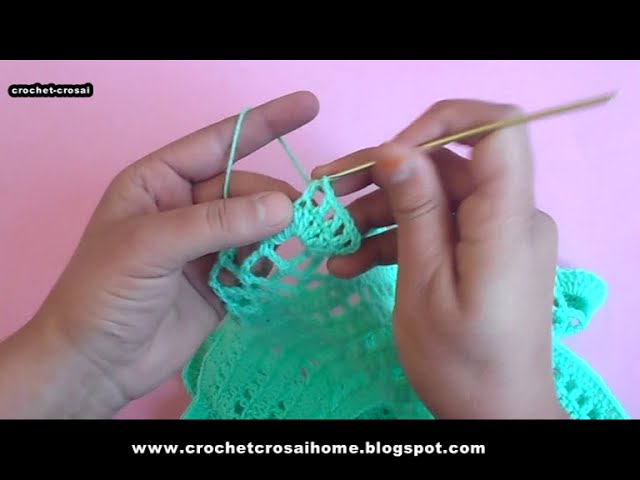
🧶 Edging
Neckline & Skirt Hem:
Add a decorative edge to finish:
- Picot Edge: (Sc in st, ch 3, sl st into first ch) repeat
- Shell Edge: (5 dc in one st, skip 2, sc in next) repeat
🧺 Finishing Up
- Block gently using steam or damp towel to even the stitches
- Sew buttons and weave in all yarn tails
- Add embellishments: Crochet flowers, bows, or embroidery
🎨 Optional Customizations
| Feature | Ideas |
|---|---|
| Colorwork | Striped yoke, gradient skirt |
| Texture | Mix solid rows with lacy rows |
| Lining | Sew in a soft cotton lining for formality |
| Accessories | Add matching baby booties or headband |
✅ Tips for Best Results
- Always check gauge with a small swatch
- Use stitch markers to avoid losing track of increases
- Keep your tension loose for baby garments
- Try it on a doll or baby mannequin to check sizing
- Choose buttons carefully (avoid choking hazards)

💡 Final Thoughts
Crocheting a baby frock dress is both a creative and sentimental project. Whether you want a simple everyday dress or an heirloom christening frock, the crochet techniques are easy to learn and fun to master.
Video Tutorial: