by
by Welcome to a pattern that captures the essence of handmade tradition! These “Heirloom Textured Rib Booties” are a variation of the classic flat-sole baby shoe, elevated by the dense, ribbed texture created using the Half Double Crochet (HDC) worked in the back loop only. The result is a stretchy, cozy, and professional-looking slipper perfect for the newest member of your family.

Project At-A-Glance
- Skill Level: Easy-Intermediate (Requires familiarity with working in loops).
- Finished Size: Approximately 9.5 cm (3.75 inches) sole length.
- Key Technique: Half Double Crochet in the Back Loop Only (HDC BLO).
- Construction: Start with a flat rectangle foundation (the sole/body), then shape the toe and heel.
Sizing and Adjustment Note
The length of your starting chain directly dictates the finished sole length. To customize the size:
- Measure the desired sole length (L).
- The initial chain should measure approximately 2 x L (double the desired sole length) when relaxed.
- For this 0-3 month pattern (L ≈ 9.5 cm), we aim for a starting chain of about 20 cm.
Tools & Materials
| Item | Specification | Why We Use It |
| Yarn | 50g of DK Weight (Light Worsted / Category 3) Baby Yarn. | Softness, breathability, and ease of care. |
| Hook | 3.5 mm (E-4 US) crochet hook. | The standard size for DK weight yarn to achieve a snug gauge. |
| Needle | Tapestry needle with a large eye. | Essential for neat seams and gathering the toe and heel. |
| Notions | Scissors, stitch marker. | For securing and marking the body of the shoe. |
Part 1: The Foundation Body (Sole and Side)
This initial rectangle forms the entire foundation of the bootie. The HDC BLO technique starts here to create a subtle, horizontal ribbing across the shoe.
Initial Chain:
Chain 50. (Approx. 20 cm).
Row 1 (Setup):
HDC in the 3rd chain from the hook (the 2 skipped chains count as the first HDC) and HDC in each remaining chain across. (49 HDC stitches).
Row 2 (Ribbing Begins):
Chain 2 (counts as HDC), turn. HDC in the Back Loop Only (BLO) of the second stitch and in the BLO of every stitch across. Make the final HDC through both loops of the top of the turning chain from the previous row. (49 HDC).
Row 3–10 (Continue Ribbing):
Repeat Row 2 until your rectangle reaches a height of approximately 5 cm (2 inches). This creates a total of 10 textured rows.
Fasten off the yarn securely and weave in the end on the inside (wrong side) of the fabric.
Part 2: The Ankle Cuff and Shaping
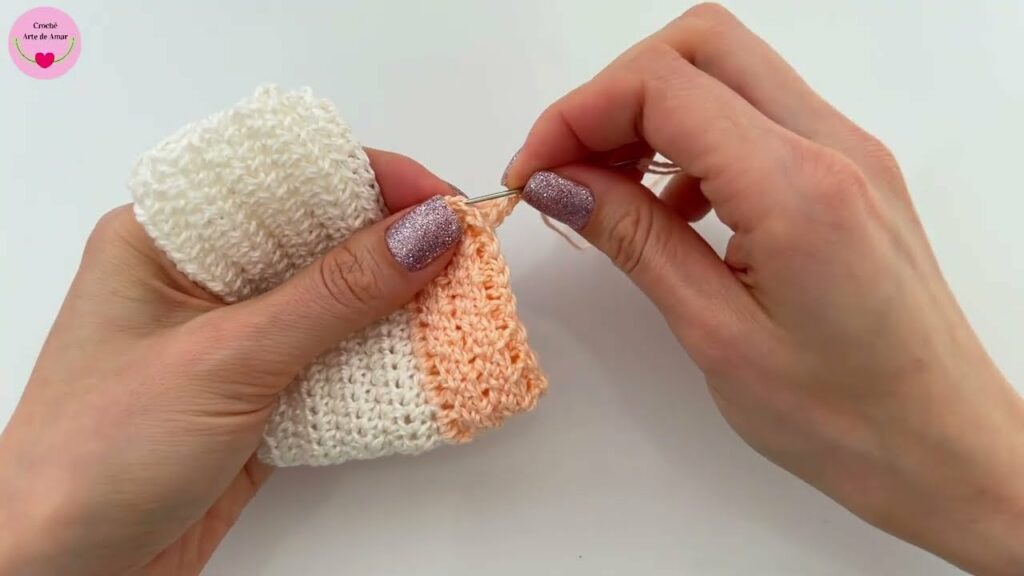
This is where we introduce a contrasting color and a vertical rib to form the stretchy ankle cuff, while simultaneously defining the top opening of the shoe.
Preparation:
Lay your rectangle flat, with the ribbing running horizontally. We need to center the work for the cuff.
- Count 10 stitches in from the right edge and place a marker.
- Count 29 stitches across from that first marker and place a second marker.
- You should now have 10 unworked stitches at the beginning, 29 stitches for the cuff, and 10 unworked stitches at the end–[00:05:30].
Row 1 (Cuff Foundation – New Color):
Join your new color with a Slip Stitch at the first marker. Chain 1 (does not count as a stitch). Single Crochet (SC) into the same stitch and SC in the next 28 stitches. (29 SC).
Row 2 (Defining the Cuff):
Chain 2 (counts as HDC), turn. HDC in each of the 29 SC stitches across. (29 HDC).
Row 3 (Vertical Rib):
Chain 1, turn. SC in the first stitch. SC in the Back Loop Only (BLO) of the next 27 stitches. SC in the final stitch, through both loops. (29 SC).
- Working SC BLO in the cuff provides a tight, vertical rib that helps keep the bootie on the baby’s foot.
Row 4–10 (Repeat Ribbing):
Repeat Row 2 and Row 3, alternating between the HDC row and the SC BLO row, until the cuff portion measures approximately 3.5 cm (1.4 inches) tall.
Fasten off the yarn, leaving a very long tail (at least 45 cm) for the final seam.
Part 3: Assembly & Final Stitching
This is the final transformation from flat fabric to a three-dimensional bootie, using the assembly methods from the tutorial.
1. Seaming the Back Heel
- Fold the entire piece in half lengthwise, with the textured sides facing inward (wrong side out).
- Thread the long tail from the cuff (Part 2) onto your tapestry needle.
- Whipstitch or slip stitch the top edge of the cuff together, continuing the seam down through the unworked stitches of the main body (the initial 10-stitch margin). This creates the secure back heel.
- Secure and weave in the yarn end.
2. Gathering the Toe (The Rounded Edge)
- Thread a separate length of Yarn B (or Yarn A if you prefer) onto your tapestry needle.
- Starting at the bottom corner where the heel seam meets the sole, work a running stitch (a simple zigzag) through the outside loops along the entire edge of the initial chain.
- Pull the yarn tail gently but firmly to cinch the opening completely shut, forming a perfectly rounded toe.
- Knot the yarn securely multiple times to maintain the shape. Weave the ends back into the cinched area.
3. Gathering the Heel (The Foot Curve)
- Thread a separate length of Yarn A onto your tapestry needle.
- Starting from the center bottom of the heel seam, work a simple running stitch along the bottom edge of the foundation rows, moving towards the toe for about 3 cm.
- Cinch this small section to create a slight curve, which helps the flat sole mold better to the baby’s foot.
- Knot and weave in the end.
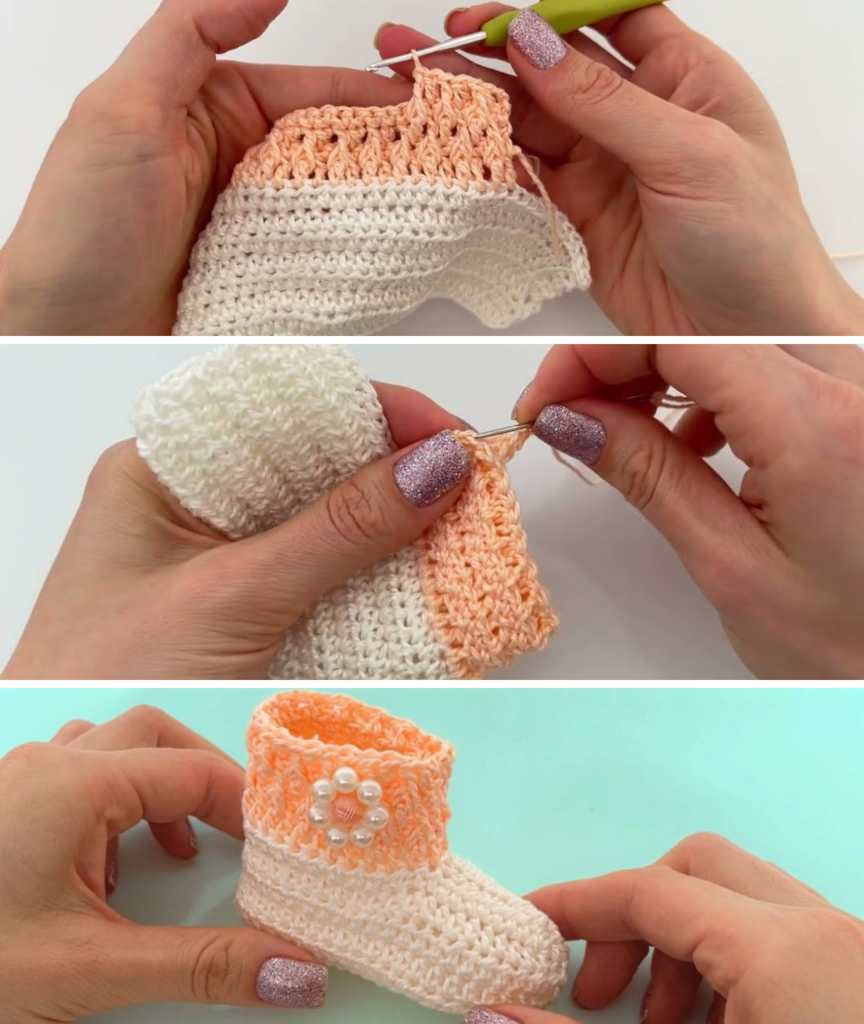
Finishing Touches
Turn the completed bootie right side out. The ribbed texture should now run both horizontally on the body and vertically on the cuff.
- Decoration: For a girl’s bootie, consider sewing small crochet flowers or a simple bow made of silk ribbon to the front ankle area.
- For Boys: Use a bold color for the cuff (Part 2) and add a small, flat wooden button to the side seam for a rugged, yet soft, look.
This beautiful, detailed Heirloom Bootie is now ready for a tiny foot! Happy crafting!
Video tutorial: