by
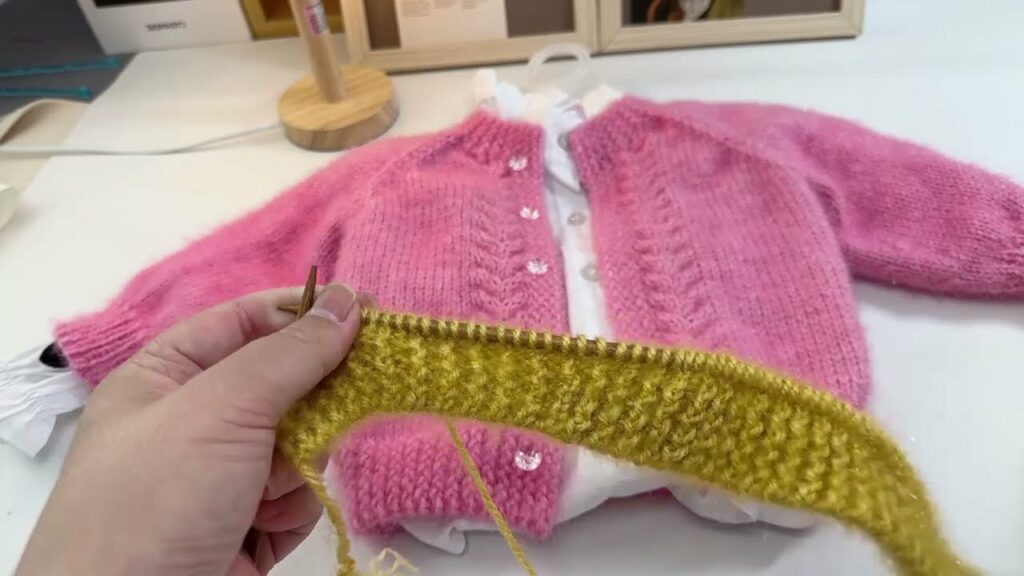
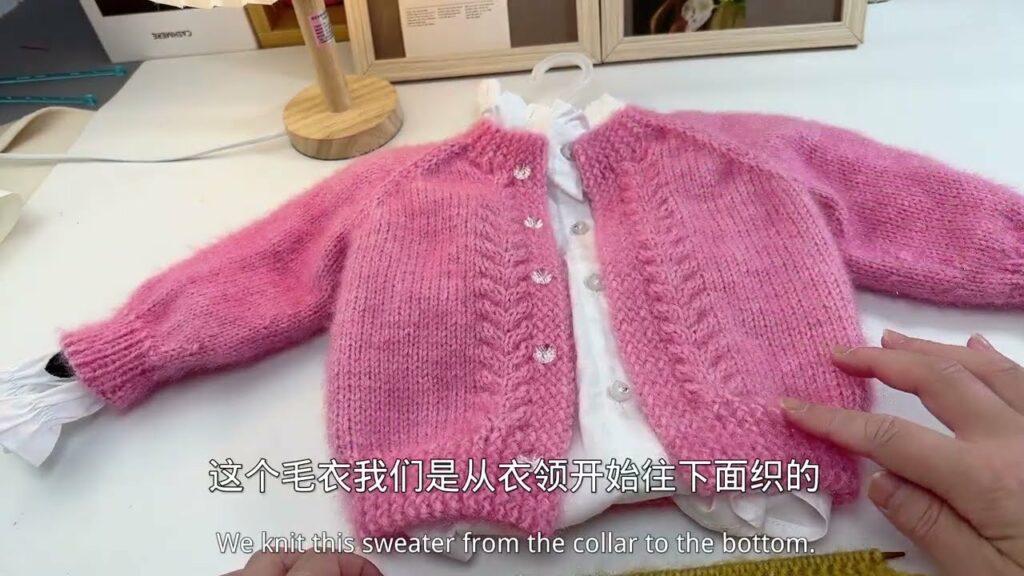
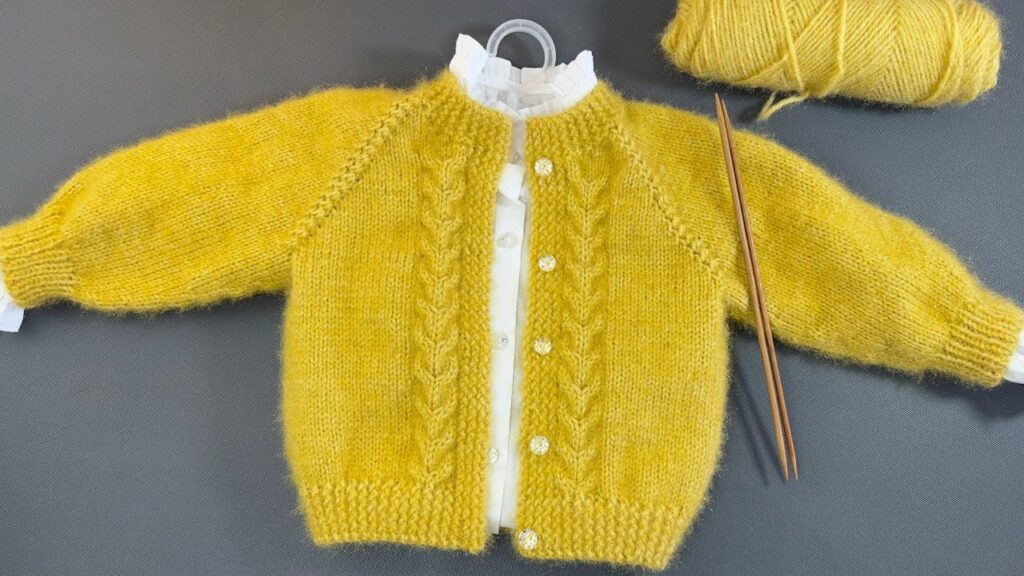
by This knitting pattern is inspired by the techniques shown in the video, creating a seamless, top-down, double-breasted baby cardigan (or sweater) suitable for a child aged 1-2 years. The design features a signature 2-stitch twisted cable running down the raglan lines, which gives the garment its unique, tailored structure.

Project Overview
| Feature | Detail |
| Construction | Top-Down, Seamless, Flat (Back and Forth) |
| Fit | Relaxed Cardigan, Double-Breasted Opening |
| Key Element | 2-Stitch Twisted Cable Raglan Lines |
| Skill Level | Intermediate |
Materials
- Yarn: Light Worsted or DK Weight yarn (The video uses a yarn described as “亮彩限” – Bright Color thread/yarn). Approximately 400-500 yards (365 – 450m).
- Needles:
- Main: 4.5 mm (US 7) circular needles (or straight needles, based on preference).
- Ribbing: 4.0 mm (US 6) circular needles.
- Notions:
- Stitch markers (4 locking or split markers for raglan lines, plus a unique marker for the right front edge).
- Scrap yarn or extra cable/cord for holding sleeve stitches.
- Cable needle (optional, but helpful).
- Tapestry needle for weaving in ends.
- Buttons: 5-7 buttons (approximately 1.5 cm / 0.6 inches).
Gauge
Important: Always check your gauge. A change in gauge will affect the final size of the garment.
- In Stockinette Stitch (Knit on RS, Purl on WS) using 4.5 mm needles: 20 stitches and 28 rows = 4 inches (10 cm).
Finished Measurements (Approximate, for 1-2 Years)
| Measurement | Metric | Imperial |
| Total Length (Neck to Hem) | 33 cm | 13 inches |
| Yoke Depth (Shoulder to Armpit) | 15 cm | 6 inches |
| Body Length (Underarm to Hem) | 18.5 cm | 7.3 inches |
Abbreviations
- K: Knit
- P: Purl
- RS: Right Side
- WS: Wrong Side
- St(s): Stitch(es)
- M1L: Make One Left (Lifted increase from the bar between stitches, or a method that creates a tight, non-hole increase).
- k2tog: Knit two stitches together (right-leaning decrease).
- ssp: Slip, Slip, Purl.
- W&T: Wrap and Turn (used for Short Rows).
- T1: Twist 1: Knit the second stitch on the left needle through the back loop, then knit the first stitch, and slip both off the needle. (Used for the 2-stitch raglan cable).
- T4F: Twist 4 Front: Slip 2 sts onto cable needle, hold in front, K2, K2 from cable needle (Used for the main 8-st cable pattern).
- T4B: Twist 4 Back: Slip 2 sts onto cable needle, hold in back, K2, K2 from cable needle (Used for the main 8-st cable pattern).
Special Stitch Notes
- Placket/Border (7 sts): Knit in 1×1 Ribbing (K1, P1) on the 4.0mm needle. On the RS, use twisted knit and twisted purl to create a firmer, more defined edge, or simply follow the stitch (K the knits, P the purls) for a standard rib. The video uses a twisted knit approach for stability.
- 2-Stitch Raglan Cable (Spine): On every RS row, work these two stitches as a left-leaning cable (e.g., T1). On WS rows, Purl these two stitches.
- Yoke Increase: In the rows where increases are worked (RS rows), M1L is placed before the 2-stitch spine and M1R (Make One Right) is placed after the 2-stitch spine. The increase is worked immediately adjacent to the spine stitches.
Pattern Instructions
Step 1: Neckband (Starting Flat)
Using 4.0 mm needles and the alternating long-tail cast-on (or a stretchy cast-on of your choice), cast on 80 stitches.
Rows 1-8 (Ribbing):
Work 1×1 Ribbing (K1, P1) across all 80 stitches.
Switch to 4.5 mm needles after Row 8.
Step 2: Yoke Setup and Division
Switch to 4.5 mm needles.
Row 9 (RS – Transition Row):
Knit all stitches across. This row creates the first ridge of garter stitch and is the last row before dividing for the yoke. [05:54]
Row 10 (WS – Purl Row & First Buttonhole):
Work in pattern across all 80 stitches, inserting the first buttonhole.
- Placket: P1, K1, P1, K1 (4 sts)
- Buttonhole: K2tog, Yarn Over (YO), P1, K1 (the YO creates the hole)
- Rest of Row: Purl to the end of the row.
Row 11 (RS – Division Row):
This row sets up the raglan lines. Place markers and switch to the main 4.5 mm needle if you haen’t already.
| Section | Stitches | Action (Place Marker) |
| Right Placket | 7 sts | Work Placket pattern (Twisted Rib). |
| Right Front | 9 sts | K9. |
| Raglan Line 1 | 2 sts | Place M1, K2 (Twisted Cable spine), Place M2. |
| Right Sleeve | 9 sts | K9. |
| Raglan Line 2 | 2 sts | Place M3, K2 (Twisted Cable spine), Place M4. |
| Back | 22 sts | K22. |
| Raglan Line 3 | 2 sts | Place M5, K2 (Twisted Cable spine), Place M6. |
| Left Sleeve | 9 sts | K9. |
| Raglan Line 4 | 2 sts | Place M7, K2 (Twisted Cable spine), Place M8. |
| Left Front | 9 sts | K9. |
| Left Placket | 7 sts | Work Placket pattern. |
(Total Stitches: 80, 8 markers placed)
Step 3: Short Row Shaping (Grown-up Neckline)
This technique raises the back of the neck for a better fit. The working yarn starts on the RS.
- Row 1 (RS – Start Short Rows): Work in pattern (Placket, K, M1, Cable, M1, K) until 1 stitch before M8. Knit that stitch. W&T.
- Row 2 (WS): Purl to M1. Slip M1, P2 (Cable spine), Slip M2, Purl to 1 stitch before end. Purl that stitch. W&T.
- Row 3 (RS): Work in pattern to the wrapped stitch. Work the wrap and the wrapped stitch together as K, K1 more. W&T.
- Row 4 (WS): Work in pattern to the wrapped stitch. Work the wrap and the wrapped stitch together as P, P1 more. W&T.
- Row 5 (RS): Work in pattern to the wrapped stitch. Work the wrap and the wrapped stitch together as K, K2 more. W&T (This is the first 2-stitch turn).
- Row 6 (WS): Work in pattern to the wrapped stitch. Work the wrap and the wrapped stitch together as P, P2 more. W&T.
- Row 7 (RS): Work in pattern to the wrapped stitch. Work the wrap and the wrapped stitch together as K, K3 more. W&T (This is the first 3-stitch turn).
- Row 8 (WS): Work in pattern to the wrapped stitch. Work the wrap and the wrapped stitch together as P, P3 more. W&T.
This completes the short row shaping. You will now work full rows across the entire piece. Continue to increase on every RS row.
Step 4: Yoke Shaping and Main Cable Integration
You will work 16 increase repeats (sets of 2 rows) to achieve the final yoke depth. Total Yoke Rows: 32.
| Row | Side | Action | Notes |
| Increase Row | RS | Work Placket, M1, K to M, M1, T1, M1, K to M, repeat 3 times. K to end, work Placket. | Increase 8 sts per RS row (4 sections x 2 increases). |
| Plain Row | WS | Work Placket, Purl to end, work Placket. | Do not increase on WS rows. |
Important Stitch Timing:
- 2-Stitch Raglan Cable (Spine): Work the T1 (Twist 1) on every RS row.
- Buttonholes: Continue to work a buttonhole on the Right Placket every 18 rows (9 increase repeats).
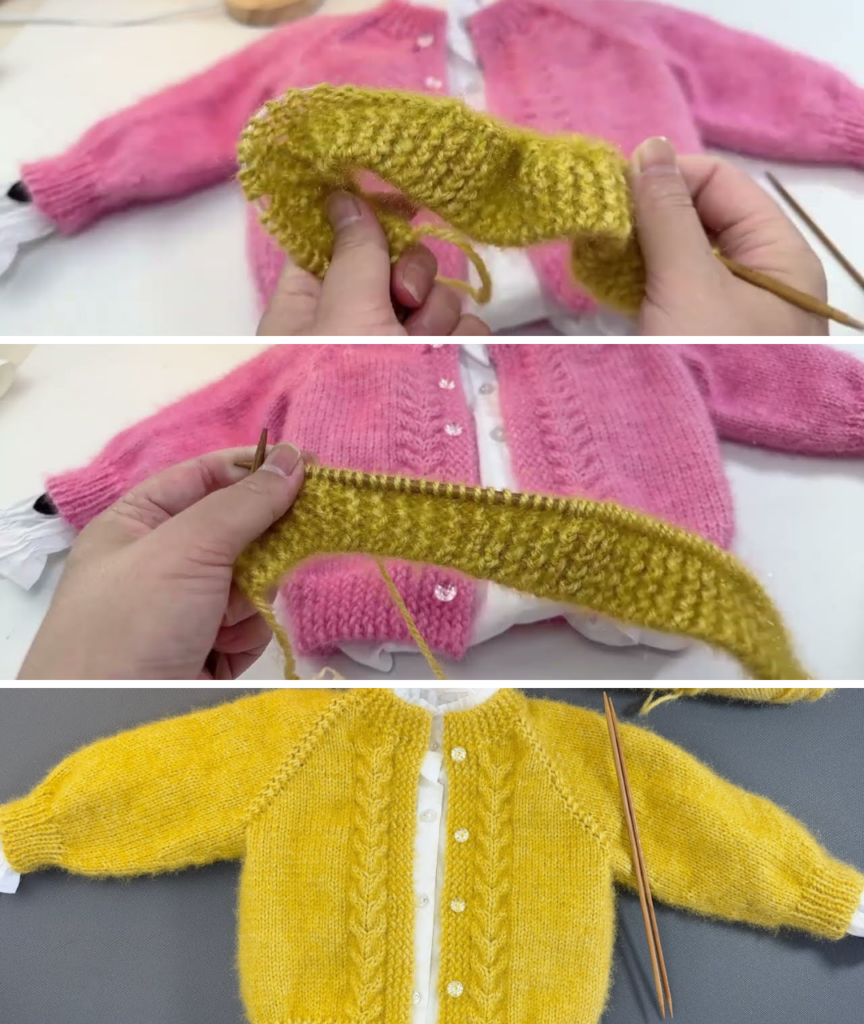
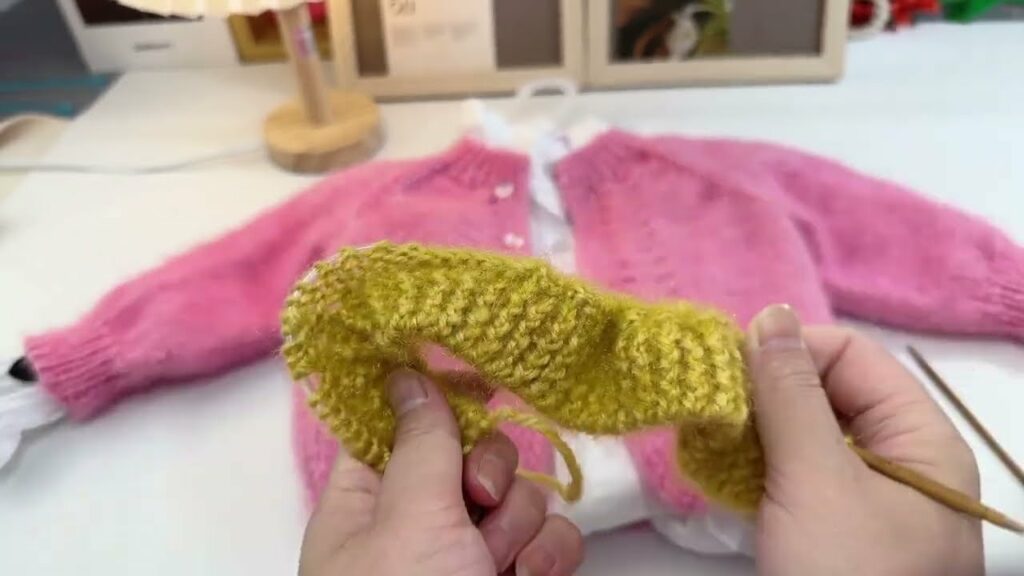
Main Cable Panel Integration:
After 3 full increase repeats (6 rows) past the short row shaping, start integrating the 8-stitch Main Cable Panel in the center of the Right Front and Left Front panels.
- Setup: On a RS row, identify 10 stitches in the center of the front panel (the stitch count has increased significantly by now).
- Work 1 Purl (P1), then the 8-stitch Cable Panel (K8), then P1. The surrounding stitches are Knit.
- Cable Twist: Twist the 8-stitch cable (T4F + T4B) on the 6th RS row (every 6th row).
Continue Yoke Shaping for a total of 16 increase repeats. (Total increase: $16 \text{ repeats} \times 8 \text{ sts} = 128 \text{ sts}$ added).
Step 5: Armhole Separation
After completing the 16th increase row (or when the yoke measures 15 cm / 6 inches from the shoulder) on a RS row, you will separate the body and sleeves.
Separation Row (RS):
- Work Right Placket (7 sts).
- Work Right Front stitches in pattern.
- Slip M1.
- Remove M2, M3, M4, M5.
- Move all Right Sleeve stitches (including the 2-stitch spine/cable from M1 and M5) onto a piece of scrap yarn or a holder. Do not knit them.
- Underarm Cast-On: Using the backwards loop method, cast on 6 stitches for the underarm.
- Work Back stitches in pattern.
- Slip M6.
- Remove M7, M8.
- Move all Left Sleeve stitches (including the 2-stitch spine/cable from M6 and M8) onto a piece of scrap yarn or a holder. Do not knit them.
- Underarm Cast-On: Cast on 6 stitches for the second underarm.
- Work Left Front stitches in pattern.
- Work Left Placket (7 sts).
Next Row (WS): Work across all body stitches (Front, Back, and new cast-on stitches) in pattern. Purl the 6 underarm cast-on stitches. Do not forget to pick up the 6th underarm stitch from the running thread to close the gap on the WS row.

Step 6: Body
The body is now worked flat, back and forth.
- Continue in the established pattern:
- Plackets: 7 sts in rib/border pattern.
- Main Body: Stockinette Stitch with the Main Cable Panel continuing on the two front sections.
- Cable Twist: Remember to twist the 8-stitch cable every 6th RS row.
- Buttonholes: Continue to work buttonholes every 18 rows on the Right Placket.
- Knit the body until it measures 18.5 cm (7.3 inches) from the underarm, or desired length.
Step 7: Body Hem
Switch to 4.0 mm needles.
Ribbing Rows: Work 1×1 Ribbing (K1, P1) across all stitches, maintaining the twisted rib on the 7-stitch plackets.
- The video recommends 10 rows of ribbing.
Bind Off: Bind off all stitches in the 1×1 Rib pattern for a stretchy finish.
Step 8: Sleeves
The sleeves are worked in the round. Switch to the 4.5 mm needles.
- Pick Up Stitches: Place the held sleeve stitches onto the main 4.5mm needle.
- Pick Up Underarm: Pick up 6 stitches from the underarm cast-on section.
- Set Up: Place a marker to indicate the beginning of the round (BOR).
- Knit 6 rounds in Stockinette Stitch (Knit every round).
Decrease Section:
To shape the sleeve, decreases are worked evenly and consistently. The video recommends decreasing once every 6 rounds.
- Decrease Round (Every 6th Round): K1, k2tog, knit to 3 stitches before BOR, ssk, K1.
- (Decreases 2 stitches per decrease round)
- Repeat the Decrease Round every 6th round 6 times (or until the sleeve reaches the wrist).
Cuff Decrease:
On the next round, work a general decrease to prepare for the cuff:
- (K3, k2tog) repeat around.
- Result: The stitch count should be reduced for a snug cuff.
Cuff Ribbing:
Switch to 4.0 mm needles.
Work 10 rounds of 1×1 Ribbing (K1, P1) in the round.
Bind Off: Bind off all stitches loosely in the 1×1 Rib pattern.
Step 9: Finishing
- Weave Ends: Use a tapestry needle to weave in all loose yarn ends, securing them into the back of the knitting.
- Block: Gently wash and block the cardigan to the correct measurements. This will help flatten the stockinette and open up the cable patterns.
- Attach Buttons: Sew the chosen buttons onto the Left Placket, aligning them directly across from the buttonholes worked into the Right Placket.
Your “Double-Twist” Baby Cardigan is now complete!
Video tutorial: