 by
by There’s a unique joy in creating something truly special for a little one, and a handmade baby sweater or jumper fits that bill perfectly. It’s not just a garment; it’s a hug made with yarn, offering warmth, softness, and a personal touch that store-bought items can’t replicate.
Before we dive in, let’s clarify a common term. When we talk about “two-needle” sweaters, we’re typically referring to knitting, which uses two needles to create loops. Crochet, on the other hand, uses a single hook. But don’t worry! With a crochet hook, you can achieve incredibly beautiful textures, including ones that mimic the look of knitted fabric. This guide will focus on crocheting these adorable garments, helping you create a cozy and charming piece for the baby in your life.
Why Crochet Baby Sweaters/Jumpers?
Crocheting for babies offers a multitude of benefits, making it a favorite project for many crafters:
- Unmatched Softness & Comfort: You have complete control over yarn selection, ensuring hypoallergenic, extra-soft, and gentle fibers against a baby’s delicate skin.
- Perfect, Customizable Fit: Babies grow incredibly fast and come in all shapes and sizes. Handmade garments can be tailored to specific measurements, ensuring a better, more comfortable fit than generic store-bought items.
- Unique & Adorable Style: The possibilities are endless! Experiment with a vast array of colors, charming stitch patterns, and delightful embellishments to create a truly one-of-a-kind piece that stands out.
- Practicality & Durability: By choosing the right machine-washable yarns, you can create garments that withstand frequent laundering – a must for active babies!
- Heirloom Potential: A lovingly crocheted sweater often becomes a treasured keepsake, passed down through generations, holding sentimental value.
- Rewarding Project: Baby garments are relatively small, making them quicker to complete than adult wearables. This offers satisfying gratification and a boost in skill development.
Understanding the Baby Sweater/Jumper Aesthetic: Yarn & Stitch Choices
The success of your baby sweater hinges significantly on your yarn and stitch pattern choices, which directly impact the garment’s feel, drape, and durability.
Yarn Selection: Crucial for Baby Wear
Prioritize yarns that are incredibly soft, easy to care for, and safe for a baby’s sensitive skin.
- Weight:
- DK (Double Knitting, Category 3) or Worsted (Category 4): These are the most common and versatile weights for baby garments, offering a good balance of warmth and definition.
- Sport (Category 2): For lighter, finer garments, ideal for warmer climates or if you desire a more delicate fabric.
- Fiber:
- Baby-Specific Acrylics: These are highly recommended. They are engineered to be ultra-soft, hypoallergenic, often anti-pilling, and most importantly, machine washable and dryable – essential for baby clothes.
- Superwash Merino Wool: Offers excellent softness, warmth, and breathability. Superwash varieties are treated to be machine washable, making them a practical choice.
- Cotton/Cotton Blends: Good for babies with very sensitive skin or for garments in warmer climates. They are breathable and offer good stitch definition but are less elastic than wool or acrylic.
- Avoid: Anything scratchy (like some coarse wools), highly delicate fibers that require hand-washing only (unless you’re prepared for meticulous care), or novelty yarns with small pieces (like sequins or tiny beads) that could be choking hazards.
- Color: Pastels, brights, and cheerful variegated yarns are all popular. Consider gender-neutral options for gifts or if the baby’s gender is unknown.
Stitch Patterns: Focus on Softness & Flexibility
Choose stitches that create a flexible fabric that allows for easy movement and is comfortable against a baby’s skin.
- “Knit-Look” Stitches (if you want that knitted appearance):
- Tunisian Knit Stitch (TKS): This stitch, worked with a special Tunisian hook, beautifully mimics the look of classic stockinette stitch knitting.
- Slip Stitch in the Back Loop Only (SL ST BLO): Creates a dense, ribbed fabric that can look very similar to garter stitch knitting.
- Half Double Crochet in the Back Loop Only (HDC BLO): Produces horizontal rows that resemble a knit rib or garter stitch, offering good stretch.
- Camel Stitch (HDC in the 3rd loop): By working HDC into the horizontal bar on the back of the stitch, you create a distinct texture that resembles knit-purl ribbing.
- Other Drapable & Comfortable Stitches:
- Half Double Crochet (HDC): A great all-around stitch for baby garments. It works up faster than single crochet, creates a moderate density, and has a nice drape.
- Double Crochet (DC): Works up very quickly, creating a softer, more open fabric.
- Single Crochet (SC): Creates a very dense and sturdy fabric. If used throughout, consider going up a hook size or two to ensure it’s not too stiff for baby.
- Shell or V-stitch: These add a lovely decorative texture and openwork without being overly complex.
- Texture: Generally, opt for gentle textures. Avoid overly bumpy or raised stitches that might irritate a baby’s delicate skin.
Design Elements
Consider these features to make your baby garment practical and adorable:
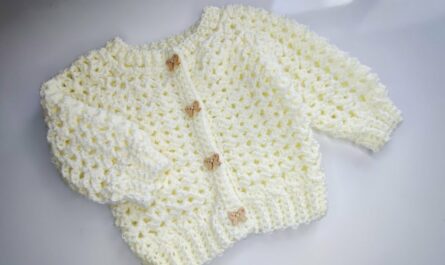
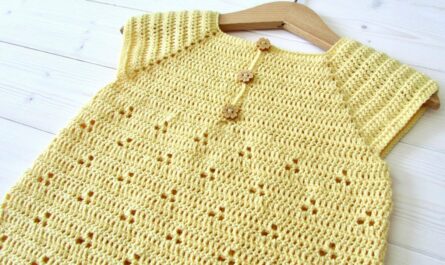
- Neckline: A wide-enough opening is crucial for easy dressing over a baby’s head. Crew necks often benefit from a button-up placket on the shoulder or back. V-necks are also good for easy dressing.
- Closures: If using buttons, choose sturdy, flat, baby-safe ones with no small parts that could break off. Sew them on extremely securely. Snaps or ties are also options.
- Fit: Aim for comfortable ease that allows for layering clothes underneath and unrestricted movement for the baby.
- Details: Ribbed cuffs and hems (often created with SC in BLO or post stitches) provide a neat finish and gentle stretch. Simple collars or even an attached hood can add extra charm and warmth.
Planning Your Baby Sweater/Jumper Project
A meticulous planning phase is essential for a successful, well-fitting baby garment.
- Size Selection:
- Crucial: Babies grow incredibly fast. Relying solely on age ranges (e.g., 0-3 months, 6-12 months) can be misleading. Always use the baby’s current measurements for the most accurate fit.
- Key Measurements:
- Chest Circumference: The most important measurement for garment width.
- Full Length: From the top of the shoulder to the desired hemline.
- Sleeve Length: From the shoulder (or armpit, depending on construction) to the wrist.
- Head Circumference: Especially vital for pullover necklines to ensure it slips on easily.
- Ease: Add positive ease (meaning the finished garment will be slightly larger than the body measurement) for comfort, layering over other clothes, and to allow for some growth.
- Pattern Selection (ESSENTIAL!):
- Absolute Must: A well-written crochet pattern is paramount for a successful garment. Look for patterns specifically for baby sweaters or jumpers.
- Look for:
- Clear sizing charts with finished garment measurements for each size.
- Precise stitch counts for each row/round.
- Detailed shaping instructions (necklines, armholes, sleeves, button bands).
- CRITICALLY, comprehensive gauge information and clear instructions on how to achieve it.
- Clear photos and diagrams to guide you.
- Common Construction Methods:
- Top-Down (Seamless): Highly popular for baby garments. You start at the neckline/yoke and work downwards. This method results in minimal seaming, allows for trying the garment on as you go (on the baby, a doll, or a baby garment form), and can easily be adjusted for length.
- Panel Construction (Seamed): Involves crocheting separate flat panels (front, back, sleeves) and then meticulously seaming them together. This method often provides a more structured fit.
- Gauge Swatch (NON-NEGOTIABLE!):
- This is the single most critical step in garment crocheting! It determines whether your finished garment will match the pattern’s intended size.
- Crochet a large swatch (at least 4×4 inches / 10×10 cm) using your chosen yarn and hook in the main stitch pattern of the sweater.
- Wash and block your swatch exactly as you intend to wash and block the finished sweater. This is crucial because yarn can change (stretch, bloom, slightly shrink) after laundering, which affects the final fit.
- Measure your stitches and rows per inch/cm accurately. If your gauge doesn’t match the pattern’s, adjust your hook size (go up for fewer stitches per inch, down for more stitches per inch) until it matches. A small discrepancy in gauge will lead to a significant sizing error in your final garment.
Materials You’ll Need
- Yarn: (As detailed in the “Aesthetic” section). The quantity will vary based on your chosen size and yarn weight (typically 2-5 skeins for a baby sweater).
- Crochet Hook(s): The size recommended by your pattern, adjusted based on your gauge swatch. You might need different hook sizes for specific elements like ribbing.
- Notions:
- Stitch Markers: Essential for marking beginnings of rounds, increase/decrease points, raglan lines (for top-down), and buttonhole placement.
- Tapestry Needle: For neatly weaving in all yarn ends and for seaming your panels (if applicable).
- Scissors.
- Measuring Tape: Crucial for checking gauge and garment dimensions as you progress.
- Stitch Holders or Waste Yarn: To temporarily hold sleeve stitches if you’re working a top-down construction.
- Buttons/Snaps: Choose sturdy, flat, baby-safe fasteners with no small parts that could break off.
- Blocking Mats & T-pins (Highly Recommended): For professional shaping and finishing.
Key Crochet Techniques for Baby Sweaters/Jumpers
Beyond your fundamental crochet stitches (chain, slip stitch, single crochet, half double crochet, double crochet), you’ll focus on:
- Working in Rows: For creating flat panels (front, back, sleeves) if you’re using a seamed construction, or for working plackets and ribbed bands.
- Working in the Round: For seamless bodies and sleeves if you’re using a top-down construction.
- Increasing Stitches: Used to shape the yoke, body flare, or expand the sleeve width. Your pattern will provide specific instructions.
- Decreasing Stitches: Used for shaping armholes, necklines, and tapering sleeves towards the cuff.
- Ribbing: Crucial for cuffs, hems, and necklines, providing elasticity, a neat finish, and preventing curling.
- Single Crochet in the Back Loop Only (SC in BLO): Creates a dense, horizontal rib that resembles knit garter stitch.
- Front Post/Back Post Double Crochet (FPDC/BPDC): Creates a more elastic, vertical, knit-like rib.
- Buttonholes:
- Chain-Space Buttonholes: The simplest and most common method (chain a few stitches, skip corresponding stitches, work into the chain space on the next row).
- Seaming (if using panels): The Mattress Stitch creates neat, almost invisible vertical seams, which are ideal for garments.
- Plackets/Openings: For pullovers, you’ll often crochet a short opening (placket) at the neck or shoulder with buttons to make it easier to get the sweater over a baby’s head.
Step-by-Step Construction Flows (Conceptual Guides)
Here are conceptual guides for the two most common methods for crocheting baby sweaters:
A. Top-Down Sweater/Jumper (Seamless Construction)
This method is very popular for baby items due to minimal seaming and easy length adjustments.
- Preparation: Read your pattern thoroughly, make your gauge swatch (and wash/block it!), and gather all your materials.
- Crochet the Yoke (Neckline Start):
- Begin with the pattern’s specified foundation chain or starting ring for the neckline.
- Place stitch markers at the designated “raglan points” (four points for raglan yokes that divide front, back, and sleeves) or evenly for a circular yoke.
- Work the yoke rows/rounds, making increases at the marked points according to your pattern (often every other row). This expands the yoke to shape the shoulders and upper body.
- Continue until the yoke reaches the appropriate circumference to fit around the baby’s chest and upper arm.
- Optional Placket: If making a pullover, your pattern might instruct you to work a section of the yoke flat for a few rows/rounds to create a neck opening/placket, then rejoin in the round.
- Separate Body & Sleeves:
- Carefully put the stitches designated for the sleeves onto stitch holders or waste yarn.
- Chain a few stitches under each arm (these are the underarm chains) to add ease and allow for comfortable movement.
- Join the front and back sections of the remaining stitches to form the main body of the garment.
- Crochet the Body:
- Continue working in the round until the garment reaches the desired length from the underarm to the hem.
- Add the bottom ribbing or border according to your pattern.
- Crochet the Sleeves:
- Join your yarn at the center of the underarm of one set of held sleeve stitches.
- Work the sleeve in the round, following your pattern’s instructions for length and any tapering (decreases) towards the wrist.
- Add the cuff ribbing.
- Repeat for the second sleeve.
- Finishing:
- If you created a neck placket, finish by adding buttonholes and securely sewing on baby-safe buttons.
- Weave in Ends & Block: Meticulously weave in all loose yarn ends. Gently wash/wet and block the finished garment to shape and set stitches.
B. Panel Construction (Seamed)
This method is straightforward for creating defined shapes and can be a good option for beginners.
- Preparation: Read your pattern thoroughly, make your gauge swatch (and wash/block it!), and gather all your materials.
- Crochet the Back Panel:
- Begin by casting on the specified number of stitches for the lower back hem.
- Work upwards in your chosen main stitch pattern.
- Shape Armholes & Neckline: Follow your pattern’s instructions to decrease stitches or skip stitches at the beginning/end of rows to create the armhole shaping and back neckline curve.
- Work until the panel reaches the desired shoulder height. Bind off all stitches.
- Crochet the Front Panel(s):
- Cast on stitches for the lower front hem.
- Work upwards in your chosen main stitch pattern, shaping armholes identically to the back.
- Shape Neckline: The front neckline is usually lower than the back. Shape it according to your pattern, often incorporating a separate button band or placket if it’s a pullover.
- Work until the panel(s) reach the desired shoulder height. Bind off stitches.
- Crochet the Sleeves (Two):
- Cast on stitches for the cuff.
- Work upwards in your chosen stitch pattern, increasing evenly along the sides to achieve the desired arm width.
- Work until the desired sleeve length. Bind off.
- Seaming:
- Lay all finished panels flat.
- Shoulder Seams: Join the front and back panels together at the shoulders using the Mattress Stitch for an invisible vertical seam.
- Side Seams: Join the front and back panels along the sides from the hem up to the armholes.
- Sleeve Seams: Join each sleeve lengthwise.
- Set in Sleeves: Carefully attach the finished sleeves into the armholes of the body of the garment, distributing the fabric evenly.
- Add Finishing Details:
- Neckline Band/Collar: If not integrated, pick up stitches evenly around the neckline and work a few rows of ribbing or a simple collar.
- Button Bands/Plackets: If your sweater has an opening, create the button bands (either picked up stitches or separate crocheted strips) and add buttonholes.
- Attach Fasteners: Securely attach baby-safe buttons or snaps, aligning them carefully with any buttonholes.
- Weave in Ends & Block: Meticulously weave in all loose yarn ends. Gently wash/wet and block the finished garment to shape and set stitches.

Tips for Success
- Read the Pattern Meticulously: Do not skim! Understand every instruction, abbreviation, and diagram before you even pick up your hook.
- Don’t Skip the Gauge Swatch! (This cannot be overstressed for a well-fitting baby garment).
- Use Stitch Markers Religiously! They are invaluable for marking the beginning of rounds, increase/decrease points, raglan lines, and other critical shaping areas.
- Count Your Stitches! Make it a habit to regularly verify your stitch counts at the end of each row or round, especially where shaping occurs. Catching errors early saves immense frustration later.
- Choose Child-Friendly Yarn: Prioritize softness, durability, and ease of care. Babies need garments that can withstand frequent washing.
- Secure Fasteners: If using buttons or snaps, sew them on extremely securely to prevent them from becoming choking hazards. Double-stitch them for extra peace of mind.
- Weave in Ends Meticulously: Loose yarn ends are not just untidy; they can be a potential hazard for babies. Ensure all ends are tightly woven in and trimmed.
- Blocking is Your Friend: It truly transforms crocheted fabric. Blocking evens out stitches, enhances drape, and sets the final shape, making your baby sweater look professional and polished.
Caring for Your Crocheted Baby Garment
Proper care will ensure your handmade baby sweater or jumper stays beautiful and cozy for a long time:
- Follow Yarn Label Care Instructions Strictly: This is your primary guide for appropriate washing and drying methods for your specific yarn.
- Gentle Washing: Machine wash on a gentle/delicate cycle with cool water (if suitable for your yarn). For more delicate items or wool, hand wash gently in cool water with a mild detergent.
- Reshape and Lay Flat to Dry: Gently squeeze out excess water (never wring or twist!). Reshape the garment back to its original dimensions (referencing your pattern’s schematic if needed) and lay it flat on a clean towel or a mesh drying rack to air dry completely.
- Never Hang Wet: The weight of a wet crocheted garment will cause it to stretch and distort significantly if hung to dry.
Conclusion
Crocheting a baby sweater or jumper is a truly joyful and rewarding project. It allows you to create a custom-fit, adorable, and uniquely personal garment that will keep a little one warm and comfortable. By understanding the basics, choosing the right materials, and paying attention to detail, you’ll be able to stitch a beautiful and cherished piece that will be loved for years to come. Happy crocheting for the little loves in your life!
Video Tutorial ;