 by
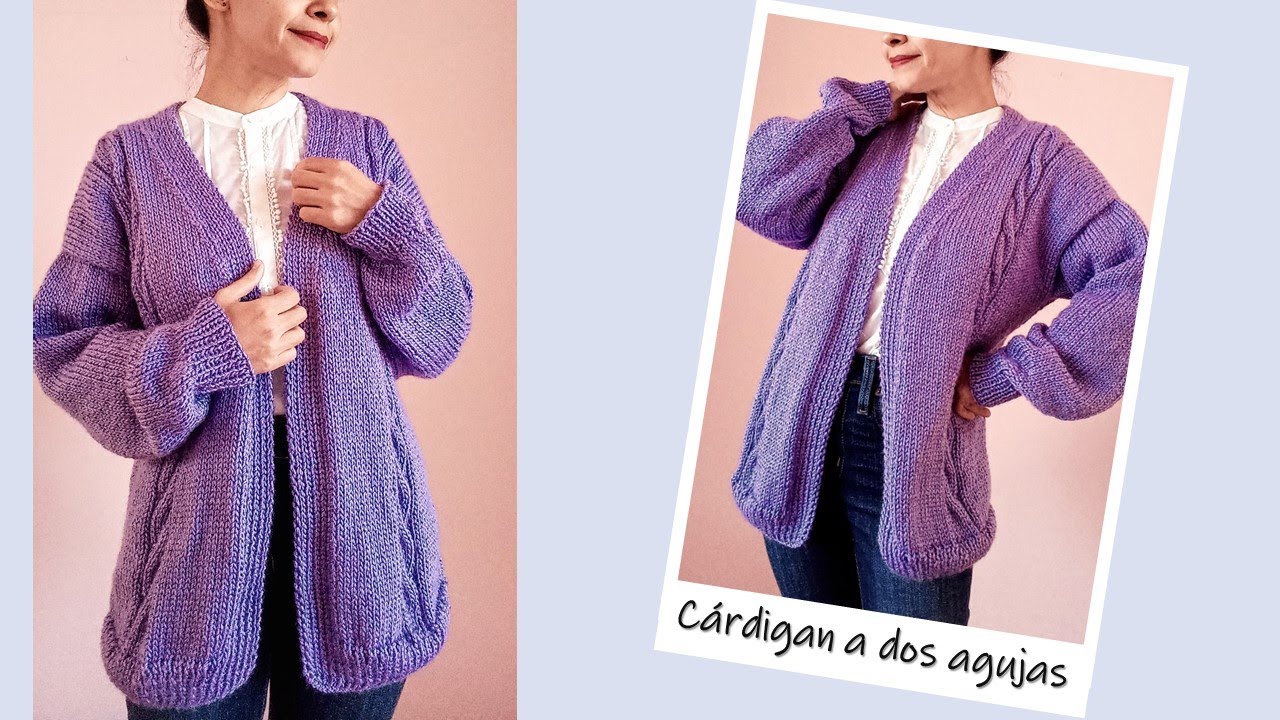
by A knitted cardigan is more than just a piece of clothing; it’s a versatile layering essential, a cozy embrace, and a testament to the timeless art of handmade fashion. The satisfaction of transforming a skein of yarn into a beautifully custom-fit garment is unparalleled. Whether you dream of a chunky cable-knit for winter warmth or a delicate lace-knit for summer evenings, knitting a cardigan is a rewarding journey.
This detailed guide will take you through the conceptual steps of knitting a cardigan, providing a roadmap for beginners and intermediate knitters alike. While it’s not a specific pattern (as those are highly detailed and numerous!), it will equip you with the knowledge to understand and confidently approach any cardigan knitting project.
Why Knit a Cardigan?
Choosing to knit a cardigan offers a host of benefits that go beyond simply acquiring a new item of clothing:
- Ultimate Layering Piece: Cardigans are incredibly adaptable, providing just the right amount of warmth for any season and instantly elevating a wide range of outfits.
- Custom Fit & Style: You have complete control over the length, sleeve style, overall ease, and unique design details, allowing you to create a garment that perfectly suits your body and aesthetic.
- Skill Development: Knitting a cardigan is a significant step in your crafting journey. It consolidates basic knitting skills while introducing you to essential garment construction techniques like shaping necklines, armholes, and sleeves.
- Sustainable Fashion: By creating a durable, cherished, and long-lasting piece with your own hands, you contribute to a more sustainable wardrobe, reducing reliance on fast fashion.
- Therapeutic Hobby: The rhythmic motion of knitting is often described as meditative and calming, offering a wonderful way to de-stress and unwind.
Understanding the Cardigan Aesthetic: Yarn & Stitch Choices
The success of your knitted cardigan, particularly its drape, warmth, and overall feel, is heavily influenced by your yarn and chosen stitch patterns.
Yarn Selection: Key to Drape, Warmth, and Feel
Choose yarn that complements the desired feel and function of your cardigan.
- Weight:
- DK (Double Knitting, Category 3) or Worsted (Category 4): These are the most versatile weights for cardigans. They offer a good balance of warmth and drape, work up at a reasonable pace, and are suitable for a wide range of stitch patterns.
- Bulky (Category 5) or Super Bulky (Category 6): Opt for these for quick projects, extra warmth, and a bold, chunky statement piece.
- Fingering (Category 1) or Sport (Category 2): Ideal for lightweight, delicate, or intricately laced cardigans, perfect for warmer weather or a fine, elegant look.
- Fiber:
- Wool (Merino, Alpaca, Shetland, Lambswool): Excellent for warmth, breathability, and natural elasticity. Wool yarns have fantastic stitch definition and a lovely drape. Look for “superwash” varieties if you prefer machine washability.
- Cotton/Linen Blends: Great for warmer climates or for individuals with wool sensitivities. They are breathable, offer crisp stitch definition, but tend to have less elasticity than wool.
- Acrylic/Blends: Affordable, widely available in many colors, and often machine washable, making them a good choice for beginners or practical everyday wear. High-quality acrylics can be surprisingly soft.
- Silk/Cashmere Blends: For a truly luxurious feel, these blends offer unparalleled softness, warmth without weight, and exquisite drape (though they often come at a higher price point).
- Consider: How the yarn’s inherent qualities (drape, elasticity, softness) will contribute to the finished cardigan. A well-knitted cardigan should flow and move with the body, not feel stiff.
Stitch Patterns: Enhancing Texture & Structure
The stitch pattern defines the fabric of your cardigan, adding texture, elasticity, and visual interest.
- Main Body Stitches:
- Stockinette Stitch (Knit on RS, Purl on WS): A classic, smooth fabric that’s fast to knit but tends to curl at the edges unless bordered with a non-curling stitch like garter or ribbing.
- Garter Stitch (Knit every row): The simplest stitch, creating a textured, reversible fabric that lies flat and has good drape.
- Seed/Moss Stitch: An alternating knit and purl stitch that creates a dense, non-curling, pebbly texture.
- Textured/Lace Patterns: Cables, Aran patterns, basketweave, or various eyelet/lace patterns can add intricate detail and visual depth.
- Ribbing (e.g., 1×1, 2×2): Essential for cuffs, hems, and button bands. Ribbing creates an elastic fabric that pulls in, providing a neat finish and a good fit. Common types include K1, P1 (1×1 rib) or K2, P2 (2×2 rib).
- Avoid: Extremely dense or rigid stitch patterns that would make the cardigan stiff and uncomfortable.
Design Elements
Consider these features when choosing or adapting a pattern to create your ideal cardigan:
- Length: Will it be cropped, hip-length, tunic-length, or a dramatic duster-length?
- Fit: Do you prefer a more fitted silhouette, a relaxed and comfortable fit, or an oversized, slouchy look?
- Neckline: Popular choices include a classic V-neck, a rounded crew neck, an elegant shawl collar, or a simple open front.
- Sleeve Style: Straight, tapered, bell, puffed, or integrated sleeve types like raglan or set-in sleeves.
- Closure: Buttons (the most common), a zipper, ties, or designed to be worn open.
- Pockets (Optional): Patch pockets or integrated pockets can add both functionality and style.

Planning Your Cardigan Project
Meticulous planning is the bedrock of a successful knitted garment.
- Size Selection:
- Crucial: Take accurate body measurements: Full Bust/Chest, Waist, Hips, Shoulder-to-Shoulder width, Arm Circumference (at widest point), Desired Garment Length (from the top of the shoulder to where you want the hem to fall), and Desired Sleeve Length (from shoulder or underarm to wrist).
- Compare to Pattern’s Finished Measurements: Pay very close attention to the “ease” specified in the pattern. Cardigans typically have “positive ease” (meaning the finished garment will be slightly larger than your body measurement) to allow for comfortable layering and movement.
- Pattern Selection (ESSENTIAL!):
- Highly Recommended: Always start with a clear, well-written knitting pattern specifically designed for a cardigan.
- Look for:
- Clear sizing charts and schematics with finished garment dimensions for all sizes.
- Precise stitch counts for each row/round.
- Detailed shaping instructions for necklines, armholes, sleeves, and shoulders.
- CRITICALLY, comprehensive gauge information and clear instructions on how to achieve it.
- Clear photos and diagrams to guide you through the process.
- Common Construction Methods:
- Bottom-Up (Seamed): The back panel, two front panels, and sleeves are knitted separately from the bottom edge upwards, then carefully seamed together. This method often results in a more structured fit.
- Top-Down (Seamless): You start at the neckline/yoke and knit downwards. This method results in minimal seaming and allows for trying the garment on as you go, making length adjustments easier. Raglan or circular yokes are common in this style.
- Flat (Seamed) vs. In the Round (Seamless): The body of a cardigan can be knitted flat in pieces or seamlessly in the round up to the armholes before splitting for the front and back. Sleeves can also be knitted flat (and seamed) or in the round (often on DPNs or a small circular needle).
- Gauge Swatch (NON-NEGOTIABLE!):
- This is the single most critical step in garment knitting! It determines whether your finished cardigan will match the pattern’s intended size and drape.
- Knit a large swatch (at least 6×6 inches / 15×15 cm) using your chosen yarn and needles in the main stitch pattern of the cardigan.
- Wash and block your swatch exactly as you intend to wash and block the finished cardigan. This is crucial because yarn can change (stretch, bloom, or slightly shrink) after laundering, which directly affects the final fit and drape.
- Measure your stitches and rows per inch/cm accurately. If your gauge doesn’t match the pattern’s, adjust your needle size (go up for fewer stitches per inch, down for more stitches per inch) until it matches. A small discrepancy in gauge will lead to a significant sizing error in your final garment.
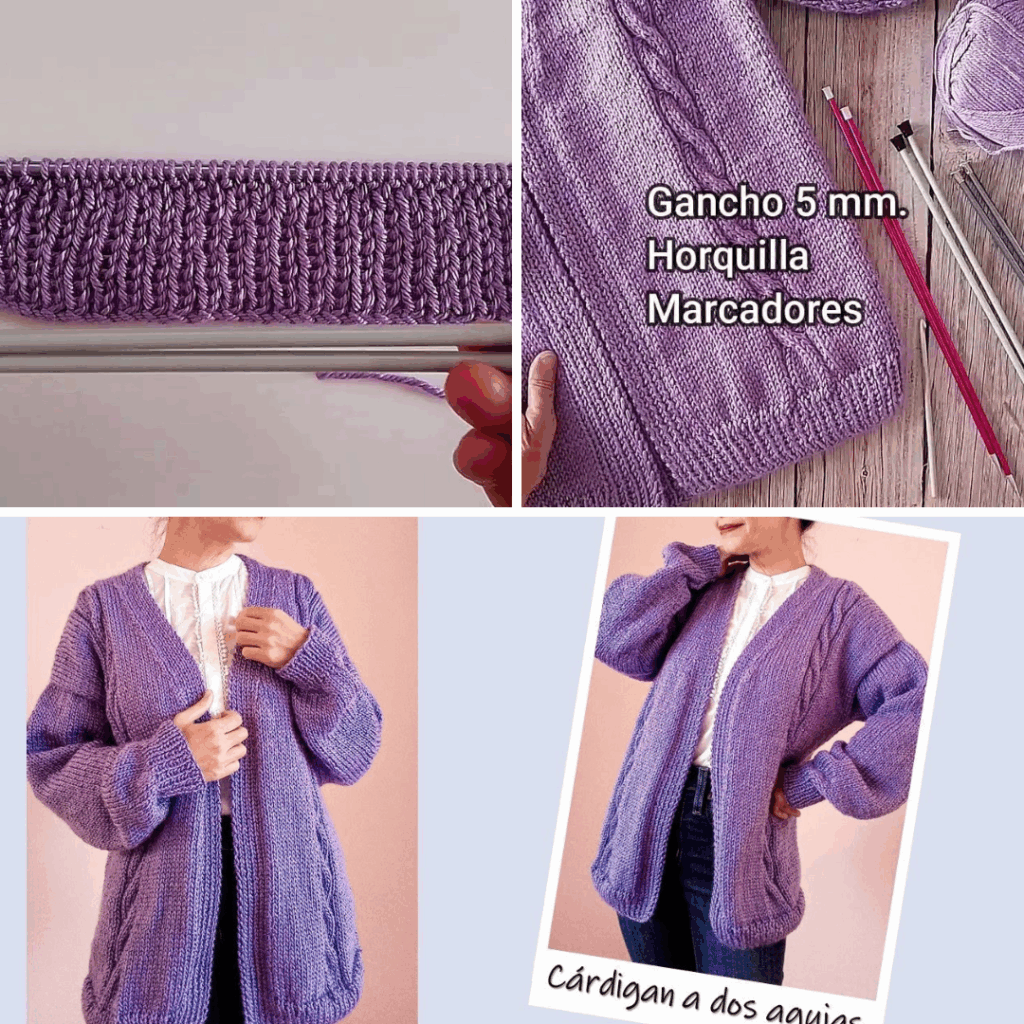
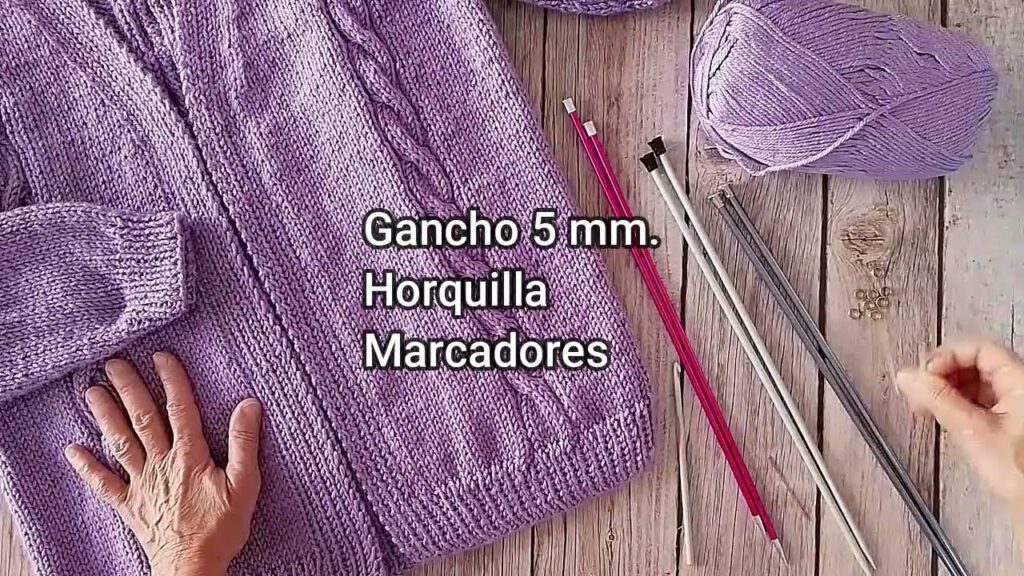
Materials You’ll Need
- Yarn: (As detailed in the “Aesthetic” section). The quantity will vary significantly based on your chosen size, the cardigan’s length, and the yarn weight (expect anywhere from 5-20 skeins).
- Knitting Needles: The size recommended by your pattern, adjusted based on your gauge swatch. Circular needles are often preferred even for flat knitting, as they can hold a large number of stitches comfortably. You may need Double-Pointed Needles (DPNs) or a small-circumference circular needle if knitting sleeves in the round.
- Notions:
- Stitch Markers: Essential for marking pattern repeats, increase/decrease points, raglan lines, and buttonhole placement.
- Tapestry Needle: For neatly weaving in all yarn ends and for seaming your panels.
- Scissors.
- Measuring Tape: Absolutely crucial for checking gauge and garment dimensions as you progress.
- Stitch Holders or Waste Yarn: To temporarily hold sleeve stitches (if working top-down) or other unworked portions of the garment.
- Buttons/Zippers/Fasteners (if applicable): Quantity and size as per your pattern’s design.
- Blocking Mats & T-pins (Highly Recommended): For professional shaping and setting of your finished cardigan.
Key Knitting Techniques for a Cardigan
Beyond your fundamental knitting stitches, you’ll focus on shaping and finishing:
- Basic Stitches: Cast On (the method for starting your knitting), Knit (K), Purl (P), and Bind Off (the method for finishing your work).
- Working Flat (Rows) vs. In the Round (Rounds): Understanding when to work back and forth in rows (for flat pieces) and when to work continuously in rounds (for seamless tubes).
- Increasing Stitches:
- M1L/M1R (Make One Left/Right): Creates a neat increase that leans left or right.
- KFB (Knit Front and Back): Creates a small bar at the base of the new stitch.
- YO (Yarn Over): Creates a decorative hole, often used in lace patterns or as a simple increase.
- Decreasing Stitches:
- K2tog (Knit Two Together): Decreases one stitch, leaning to the right.
- SSK (Slip, Slip, Knit): Decreases one stitch, leaning to the left (often preferred as a mirrored decrease to K2tog).
- P2tog (Purl Two Together): Decreases one stitch in purl.
- Ribbing: K1P1 (1×1 rib) or K2P2 (2×2 rib) are essential for hems, cuffs, and button bands, providing elasticity and a neat edge.
- Buttonholes: Your pattern will specify a method, commonly a one-row (yarn over, knit two together) or a two-row buttonhole (binding off stitches on one row, casting on stitches on the next).
- Picking Up Stitches: A crucial technique for adding neckbands, button bands, or finishing sleeve openings after the main body pieces are complete.
- Seaming (if using panels): The Mattress Stitch is highly recommended for creating neat, almost invisible vertical seams. The Kitchener Stitch can be used for seamless joins, particularly for shoulder seams in some patterns.
Step-by-Step Construction Flows (Conceptual Guides)
Here are conceptual guides for the two most common methods for knitting a cardigan:
A. Bottom-Up, Seamed Cardigan
This traditional method involves knitting separate flat pieces and then sewing them together.
- Preparation: Read your pattern thoroughly, make your gauge swatch (and wash/block it!), and gather all your materials.
- Knit the Back Panel:
- Begin by casting on the specified number of stitches for the lower back hem. Work a few rows/rounds of ribbing.
- Transition to your main stitch pattern and knit upwards until the panel reaches the desired length before the armholes begin.
- Shape Armholes: Follow your pattern’s instructions to bind off or decrease stitches at the beginning and end of rows to create the armhole shaping.
- Continue working straight (or as per pattern for subtle shoulder shaping) until the panel reaches the desired shoulder height. Shape the back neckline (usually a bind-off in the center), then shape the shoulders (bind off or decrease for slope). Bind off any remaining stitches.
- Knit the Front Panels (Two):
- Cast on the specified number of stitches for one of the lower front hems. Work ribbing identical to the back.
- Work upwards in your main stitch pattern until the panel reaches the same length as the back panel before the armholes.
- Shape Armholes: Shape the armholes identically to the back panel.
- Neckline Shaping: Begin shaping the front neckline (e.g., V-neck, rounded neck) by decreasing stitches symmetrically at the front opening edge. This shaping will run concurrently with armhole shaping for a portion.
- Continue working until the panel reaches the desired shoulder height, shaping the shoulder to match the back. Bind off any remaining stitches. Repeat for the second front panel.
- Knit the Sleeves (Two):
- Cast on stitches for the cuff. Work ribbing.
- Transition to your main stitch pattern and knit upwards, making increases evenly along the sides of the sleeve to achieve the desired width.
- Shape Sleeve Cap (Optional): If your pattern calls for set-in sleeves, there will be specific instructions for shaping the curved top of the sleeve (the sleeve cap) to fit into the armhole.
- Work until the desired sleeve length. Bind off.
- Seaming:
- Lay all finished panels flat and block them if the pattern recommends blocking before seaming.
- Shoulder Seams: Join the front and back panels together at the shoulders, typically using a Mattress Stitch for an invisible vertical seam or Kitchener Stitch for a seamless top.
- Side Seams: Join the front and back panels along the sides from the hem up to the armholes using the Mattress Stitch.
- Sleeve Seams: Join each sleeve lengthwise.
- Set in Sleeves: Carefully attach the finished sleeves into the armholes of the body of the cardigan, distributing the fabric evenly.
- Add Finishing Bands:
- Button Bands/Front Band: Pick up stitches evenly along the entire front opening and neckline. Knit the button band (incorporating buttonholes on one side at regular intervals).
- Neckband (if separate): If your cardigan has a separate neckband, pick up stitches around the back neckline and knit the band.
- Attach Buttons: Securely sew on your chosen buttons, aligning them with the buttonholes.
- Final Blocking: Gently wash/wet and block the entire finished cardigan to shape and set all stitches and seams.

B. Top-Down, Seamless Cardigan (Raglan or Yoke Construction)
This method creates a single, continuous piece, minimizing seaming and allowing for easy try-on.
- Preparation: Read your pattern thoroughly, make your gauge swatch (and wash/block it!), and gather all your materials.
- Knit the Yoke (Neckline Start):
- Begin by casting on stitches for the neckline, often working flat (back and forth in rows) to create the open front of the cardigan.
- Place stitch markers at the “raglan points” (dividing the front, back, and two sleeve sections) or at even intervals for a circular yoke.
- Work the yoke rows, making increases at the raglan points (or evenly around for a circular yoke) according to your pattern. This shapes the shoulders and upper chest.
- Buttonholes: Incorporate buttonholes into the front band as you work the yoke rows, following your pattern’s specified intervals.
- Continue until the yoke reaches the desired depth to fit comfortably around the widest part of your chest and upper arm.
- Separate Body & Sleeves:
- Carefully place the stitches designated for the sleeves onto stitch holders or waste yarn.
- “Cast on” a few stitches under each arm (these are the underarm stitches) to add ease and provide a comfortable fit.
- Join the front, back, and newly cast-on underarm stitches to form the main body of the cardigan.
- Knit the Body:
- Continue working flat (for the cardigan’s open front) or in the round (if your pattern instructs you to temporarily join the fronts) until the garment reaches the desired length from the underarm to the hem.
- Add the bottom ribbing or border according to your pattern.
- Knit the Sleeves (Two):
- Join your yarn at the center of the underarm of one set of held sleeve stitches.
- Work the sleeve in the round (using DPNs or a small circular needle, or flat and seam later), following your pattern’s instructions for length and any tapering (decreasing stitches) towards the cuff.
- Add the cuff ribbing.
- Repeat for the second sleeve.
- Finishing:
- Complete any remaining details like a neckband if it wasn’t fully integrated into the yoke, or finish the front bands.
- Attach Buttons: Securely sew on your chosen buttons, aligning them with the buttonholes.
- Final Blocking: Gently wash/wet and block the entire finished cardigan to shape and set all stitches.
Tips for Success
- Read the Pattern Meticulously: Do not skim! Take the time to understand every instruction, abbreviation, and diagram before you begin.
- Don’t Skip the Gauge Swatch! (This cannot be emphasized enough for a well-fitting garment).
- Use Stitch Markers Religiously! They are invaluable for marking the beginning of rounds, increase/decrease points, raglan lines, and buttonhole placements.
- Count Your Stitches! Make it a habit to regularly verify your stitch counts at the end of each row or round, especially where shaping occurs. Catching errors early saves immense frustration later.
- Use Lifelines: For complex stitch patterns or long sections, thread a lifeline (a contrasting piece of smooth yarn) through your stitches every few inches. If you make a major mistake, you can unravel back to the lifeline without losing all your work.
- Try It On (if seamless): If working a top-down cardigan, try it on yourself (or the intended wearer) periodically to check the fit and length as you go.
- Choose Yarn Carefully: The yarn truly makes the cardigan. Prioritize drape, warmth, and how it feels against the skin. Swatch to see how it behaves.
- Practice Techniques: If your pattern uses specific increases/decreases, buttonhole methods, or seaming techniques you’re unfamiliar with, practice them on a small swatch before incorporating them into your main project.
- Blocking is Your Best Friend: It transforms knitted fabric. Blocking evens out stitches, enhances drape, opens up lace patterns, and sets the final shape, making your cardigan look professional and polished.

Caring for Your Knitted Cardigan
Proper care will ensure your handmade knitted cardigan remains beautiful and lasts for years to come:
- Follow Yarn Label Care Instructions Strictly: This is your primary guide for appropriate washing and drying methods for your specific yarn. Different fibers have different needs.
- Gentle Washing: Most knitted garments, especially those made from wool, require hand washing in cool water with a mild wool wash. If your yarn is machine washable, use a gentle or delicate cycle with a garment bag to protect it.
- Reshape and Lay Flat to Dry: Gently squeeze out excess water (never wring or twist the garment!). Reshape the cardigan back to its original dimensions (referencing your pattern’s schematic and your blocking measurements if needed) and lay it flat on a clean towel or a mesh drying rack to air dry completely.
- Never Hang Wet: The weight of a wet knitted garment will cause it to stretch and distort significantly if hung to dry.
Conclusion
Knitting a cardigan is a deeply satisfying and rewarding project. It allows you to create a custom-fit, stylish, and incredibly versatile garment that not only enhances your wardrobe but also stands as a testament to your skill and patience. By understanding these conceptual steps, choosing the right materials, and embracing the meticulous nature of the craft, you’ll be well-equipped to stitch a beautiful cardigan that you’ll cherish for many seasons to come. Happy knitting! Sources
Video Tutorial ;