by
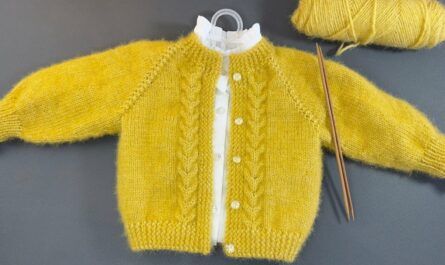
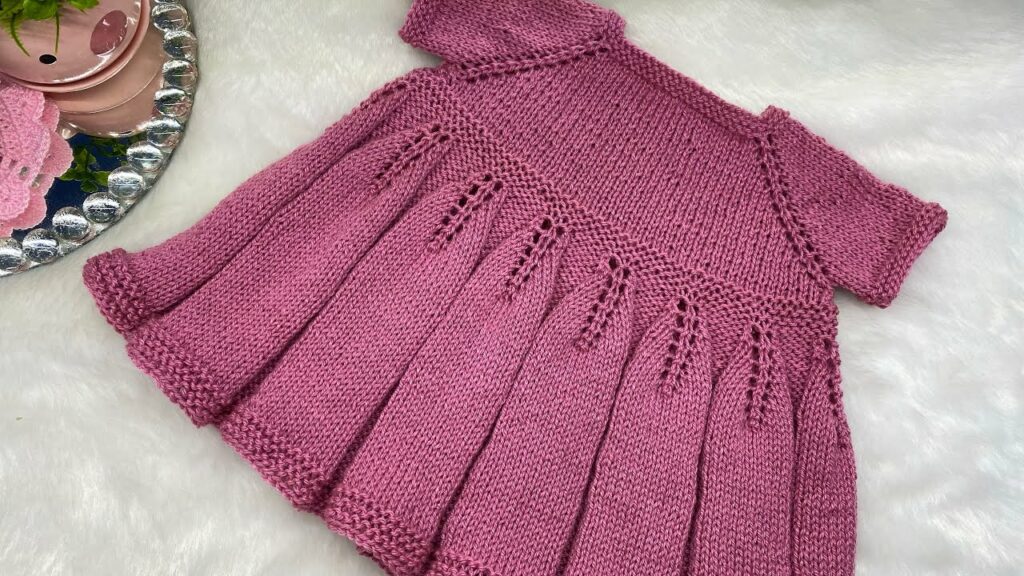
by There’s an undeniable allure to knitted garments, especially those destined for the tiniest members of our families. The meticulous craftsmanship, the soft embrace of the yarn, and the promise of warmth and comfort make them truly cherished pieces. While many intricate patterns might seem reserved for circular knitting, the exquisite beauty of a Herringbone dress, knitted entirely on two needles, proves that classic techniques can yield stunning, textured results.
This detailed article will delve into the art of creating a beautiful baby dress featuring the unique Herringbone stitch, all while working flat on two needles. We’ll explore the stitch’s distinct characteristics, its implications for a dress, and the satisfaction of crafting a truly unique and textured garment for your little one.
The Herringbone Stitch: A Closer Look
The Herringbone stitch is a marvel of knitting. It creates a dense, interlocked fabric that strikingly resembles woven tweed or the classic herringbone pattern found in textiles.
- Visual Appeal: Characterized by its distinctive diagonal “V” shapes that interlock, giving it a rich, textural depth. The “🌸🌾✨” emojis perfectly capture its organic, refined beauty.
- How it’s Formed: Unlike standard knit and purl stitches, Herringbone often involves knitting or purling into the next stitch on the needle and then slipping the previous stitch off, creating that dense, interwoven look. There are several variations, but they all share this principle of working stitches in an unusual order.
- Properties:
- Dense & Thick: Creates a very warm fabric.
- Low Stretch: Less elastic than standard knit fabrics, which is a crucial consideration for garment fit and drape.
- Yarn Eater: Due to its density, it consumes more yarn than simpler stitches.
The “Two-Needle” Advantage for Dress Knitting
Opting for two-needle (flat) construction for a dress, especially with a unique stitch like Herringbone, offers several benefits:
- Accessibility: Perfect for knitters comfortable with flat knitting who may not own or prefer to work with circular needles.
- Controlled Shaping: Working in panels allows for precise shaping (waist, armholes, neckline) with visible increases and decreases at the edges.
- Portability: Flat pieces are often easier to manage and transport than a full garment on long circulars.
- Seaming as an Art: While it involves seaming, mastering the Mattress Stitch can create virtually invisible joins, resulting in a beautifully tailored finish.
Designing Your Herringbone Baby Dress 🌸🌾✨
The Herringbone stitch’s unique properties require thoughtful design choices for a comfortable and beautiful baby dress:
- Yarn Choice (CRITICAL!):
- Softness is Paramount: For a baby’s delicate skin, absolutely prioritize softness. Even though Herringbone is dense, the yarn itself must be gentle.
- Superwash Merino Wool: Excellent for warmth, softness, and machine washability.
- Soft Cotton or Cotton Blends: Breathable and durable, ideal for warmer climates.
- High-Quality Baby Acrylics: Affordable and easy-care, but choose a very soft variety.
- Drape: This is the biggest consideration for Herringbone. Because the stitch is less elastic, select a yarn that inherently has good drape, or knit at a slightly looser gauge than usual to allow the fabric to flow rather than stand stiffly.
- Weight: DK (Double Knitting, Category 3) is often ideal, providing good stitch definition without excessive bulk. Sport (Category 2) can also work.
- Softness is Paramount: For a baby’s delicate skin, absolutely prioritize softness. Even though Herringbone is dense, the yarn itself must be gentle.
- Dress Silhouette:
- A-Line: A gentle A-line flare from the chest down is generally the most forgiving and comfortable silhouette for a Herringbone baby dress, allowing for movement and drape despite the stitch’s density.
- Ease: Ensure the pattern incorporates sufficient positive ease (room to grow and move) for a baby.
- Neckline & Closures:
- Easy Entry: Because Herringbone has minimal stretch, a wider neck opening is essential. Consider a shoulder placket with buttons, a buttoned back, or a simple boat neck that’s wide enough for a baby’s head.
- Crotch Snaps (for bodysuit-style dresses): If extending into a romper-like dress, snaps at the crotch are a practical necessity for diaper changes.
- Aesthetic (🌸🌾✨):
- Colors: The stitch shines in solid colors or subtle marls. Earthy tones, gentle pastels, or rich jewel tones can all highlight its texture beautifully. The emojis suggest natural, serene hues.
- Embellishments: Keep them minimal. The Herringbone stitch is a star on its own. Simple ribbing, a delicate button, or a small crocheted flower appliqué (🌺) can complement without overwhelming.
Materials: Gathering Your Kit
- Yarn: Your chosen fiber, weight, and color (ensure sufficient quantity, remembering Herringbone is a yarn eater!).
- Straight Knitting Needles: The size recommended by your pattern to achieve gauge. You might size up slightly from your usual for a softer drape.
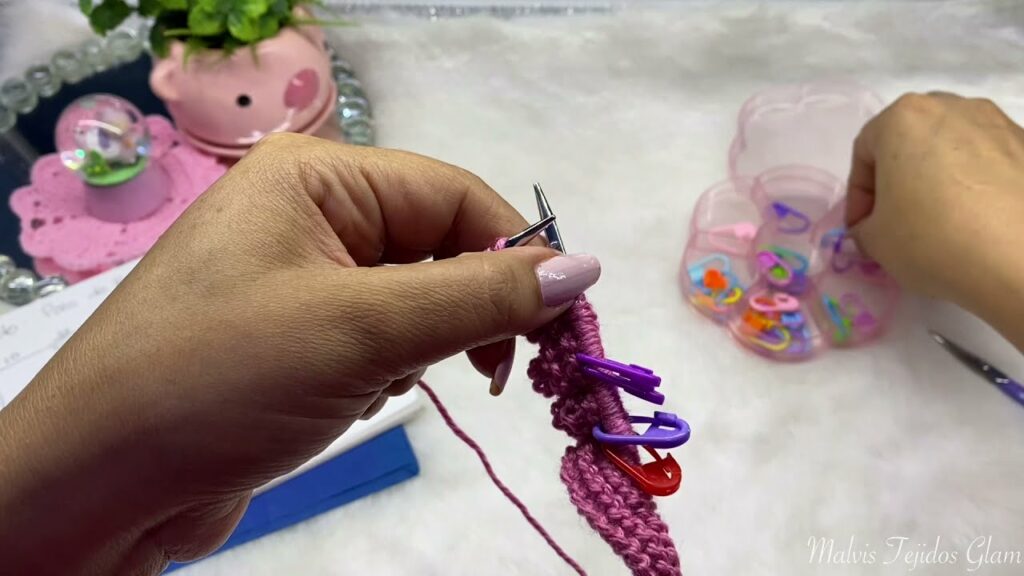
- Stitch Holders or Waste Yarn: For holding live stitches (e.g., shoulder stitches).
- Tapestry Needle: Essential for seaming and weaving in ends.
- Scissors.
- Measuring Tape: Crucial for checking gauge and garment dimensions.
- Buttons/Snaps: As per your design/pattern for closures. Choose flat, securely sewn, baby-safe options.
- Blocking Mats & T-pins: Absolutely essential for shaping and finishing a Herringbone garment.
Key Knitting Techniques
Beyond basic knit and purl, you’ll need:
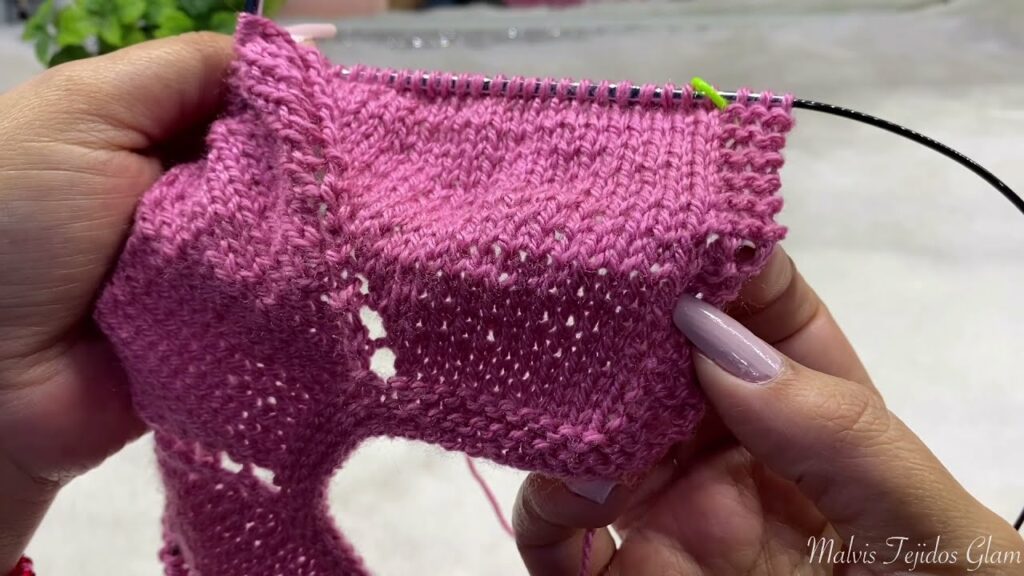
- The Herringbone Stitch: Learn your chosen variation thoroughly (e.g., knitting into the back loop of the second stitch, then dropping the first, or slipping stitches). Practice on a swatch until you’re comfortable with its rhythm.
- Cast On & Bind Off.
- Increasing Stitches: For shaping the body. M1L/M1R (Make One Left/Right) are good choices for subtle increases.
- Decreasing Stitches: For armholes, necklines, and shoulder shaping (K2tog, SSK).
- Ribbing (K1P1, K2P2): For hems, cuffs, and neckbands to provide a neat edge and some flexibility.
- Buttonholes: Creating small openings for buttons (often a yarn over followed by a decrease).
- Picking Up Stitches: For neckbands or armbands along raw edges.
- Seaming (The Unsung Hero for Two Needles):
- Mattress Stitch: This is your best friend. It creates an almost invisible vertical seam, making your flat-knitted panels look seamlessly joined.
- Horizontal Seaming: For shoulders, a basic seam or even grafting (Kitchener stitch) can be used.
- Blocking: The most important finishing step for Herringbone.
Planning Your Project: Precision is Key
- Sizing: Consult your pattern’s size chart. Measure the baby (chest circumference, shoulder-to-hem length, arm length) if possible.
- Gauge Swatch (ABSOLUTELY CRITICAL!):
- Knit a substantial swatch (at least 6×6 inches / 15×15 cm) using your chosen yarn and needles in the Herringbone stitch.
- Crucial Step: Wash and block your swatch exactly as you plan to wash and block the finished dress. Herringbone can change significantly, often softening and gaining drape, after laundering and blocking.
- Measure accurately. Adjust needle size until your gauge matches the pattern’s, or until you achieve the desired fabric density and drape.
- Yarn Quantity: Double-check your pattern’s yardage, and perhaps purchase an extra skein due to the stitch’s yarn-hungry nature.
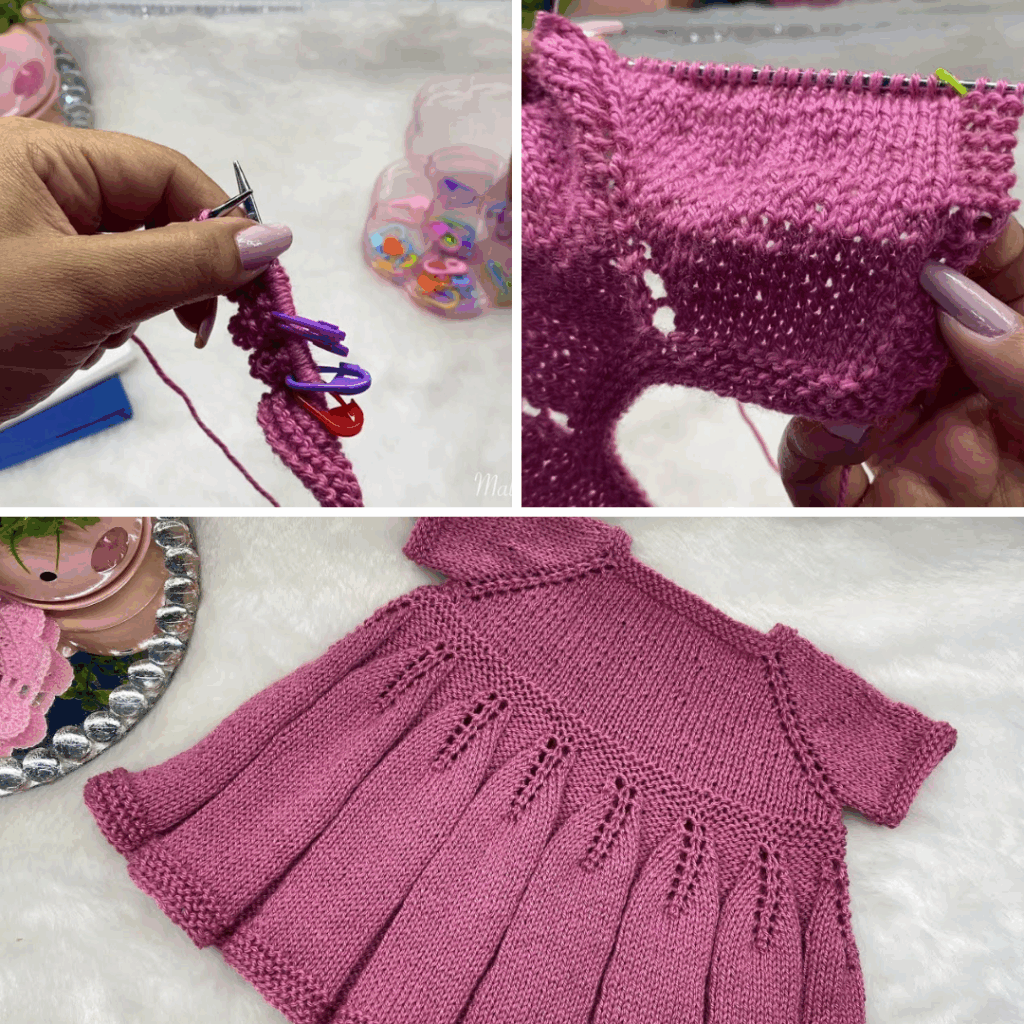
Construction Journey: Bringing the Dress to Life (Conceptual Guide for Two Needles)
A Herringbone dress knitted on two needles typically involves creating separate front and back panels, plus optional sleeves, and then seaming them together.
Part 1: Front Panel
- Cast On: Cast on the required number of stitches for the bottom hem.
- Hem: Work a few rows of ribbing or a simple garter stitch for a neat edge.
- Body (Herringbone): Work in the Herringbone stitch pattern. If creating an A-line, you’ll strategically place increases along the side edges every few inches to gradually widen the panel.
- Armhole Shaping: Once the body reaches armhole depth, bind off or decrease stitches at the beginning and end of rows to create the armhole curves.
- Neckline & Shoulder Shaping: As you near the top, bind off or decrease stitches to form the neckline. Simultaneously, shape the shoulders (often with decreases or leaving live stitches on a holder).
- Bind Off: Bind off remaining shoulder stitches, or place them on a holder.
Part 2: Back Panel
- Repeat Steps 1-4 from Front Panel: The back panel’s shaping for the body and armholes will largely mirror the front.
- Back Neckline & Shoulder Shaping: The back neckline is typically shallower than the front. Shape the back neck and shoulders, potentially incorporating a button placket opening.
- Bind Off: Bind off remaining shoulder stitches, or place on a holder.
Part 3: Sleeves (Optional)
- Cast On: Cast on stitches for the cuff.
- Work in Rows (Herringbone): Work in the Herringbone stitch, increasing stitches evenly along the length of the sleeve to create fullness.
- Sleeve Cap Shaping: As you approach the top, decrease stitches to form the rounded sleeve cap.
- Bind Off.
Part 4: Assembly & Finishing
- Seaming (The Star!):
- Shoulder Seams: Join the front and back shoulder seams using the Mattress Stitch for an almost invisible join.
- Side Seams: Join the front and back side seams from the armhole down to the hem.
- Sleeve Seams (if applicable): Seam the long edges of the sleeves.
- Attaching Sleeves: Sew the prepared sleeve into the armhole opening using a Mattress Stitch or similar technique.
- Neckband & Armbands:
- Pick Up Stitches: Along the raw edges of the neckline and armholes, pick up stitches.
- Knit Ribbing: Work in ribbing (K1P1, K2P2) for a few rows for a neat, stretchy band.
- Bind Off: Bind off loosely.
- Button Bands/Plackets: If your design includes a button placket (e.g., at the back neck), pick up stitches along the opening and knit the bands, creating buttonholes as indicated.
- Weave in All Ends: Meticulously weave in every single yarn tail. For baby items, double-knot initial slip knots and ensure all ends are completely secured to prevent unraveling and discomfort.
- Blocking (ABSOLUTELY ESSENTIAL!):
- Gently wet the finished dress (or steam it).
- Carefully lay it out flat on blocking mats, shaping it to the correct measurements. Use T-pins to hold it in place.
- Allow to dry completely. Blocking is crucial for the Herringbone stitch; it will relax the dense fabric, open up its texture, even out stitches, and set the final shape and drape of your dress.
- Attach Closures: Sew on buttons or apply snaps securely.
Tips for Success
- Practice the Herringbone Stitch: It takes a little getting used to, but it’s worth it for the stunning result. Watch video tutorials if needed.
- Swatch, Swatch, Swatch!: Especially with Herringbone, your swatch will tell you how the stitch behaves after washing and blocking, guiding your needle size and ensuring proper drape.
- Master Mattress Stitch: A neat seam elevates the entire garment, making it look professional.
- Ease of Dressing: Always prioritize easy on/off for baby garments, particularly with less stretchy stitches.
- Patience: Herringbone is a slower stitch. Enjoy the process and the beautiful texture that emerges.
Caring for Your Heirloom Dress
Proper care will ensure your beautiful Herringbone dress remains soft and cherished:
- Follow Yarn Label Instructions: Always refer to your specific yarn’s care guidelines.
- Machine Wash (if superwash): If your yarn is superwash, machine wash on a gentle cycle with cool water. Place in a mesh laundry bag.
- Hand Wash (Recommended): For all other yarns, hand wash gently in cool water with a mild, baby-friendly detergent.
- Reshape and Lay Flat to Dry: Never wring, twist, or hang a wet knitted garment. Gently squeeze out excess water, reshape the dress to its original dimensions (pinning firmly if needed), and lay it flat on a clean towel or a mesh drying rack to air dry completely.
Conclusion
The Herringbone knitted baby dress, created entirely on two needles, is a testament to the enduring beauty of texture and thoughtful craftsmanship. It’s a project that challenges and rewards, resulting in a garment of unparalleled elegance and warmth. The unique interlocked stitches, combined with the gentle softness of baby-friendly yarn, create a truly cherished piece – a wearable heirloom that wraps a little one in love and the beautiful story of handmade art. Happy knitting!
Video Tutorial ;