 by
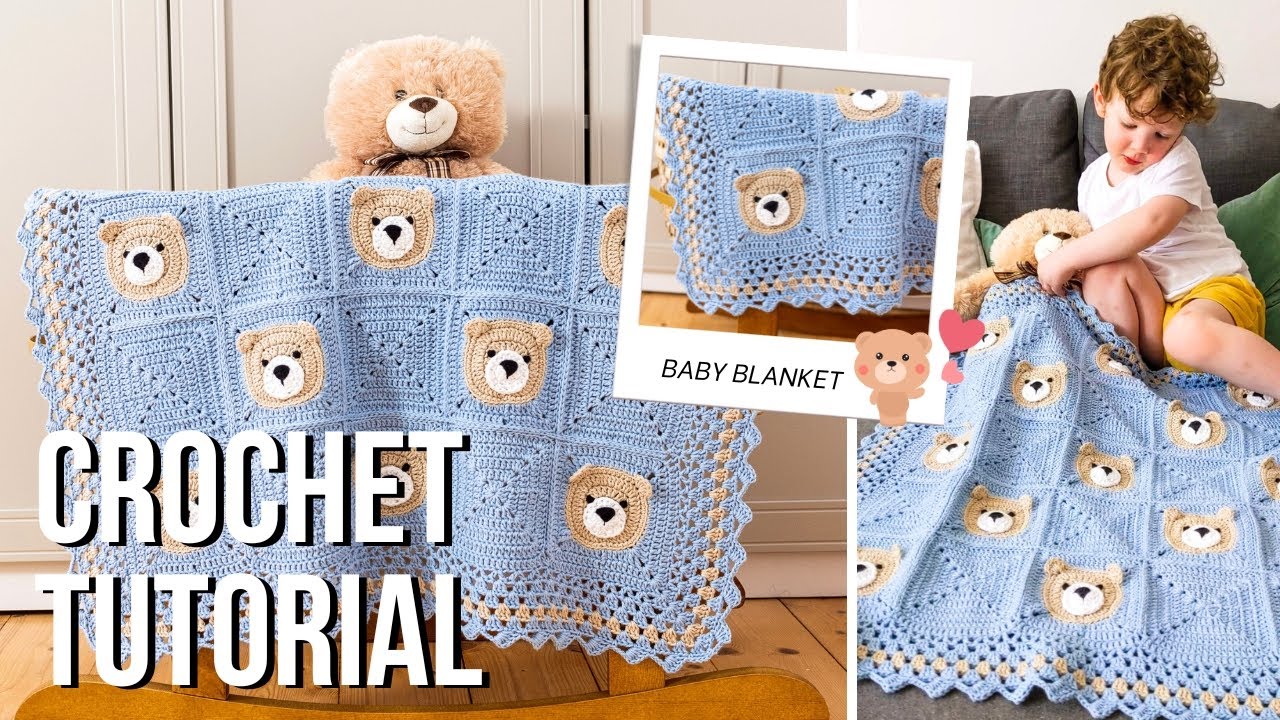
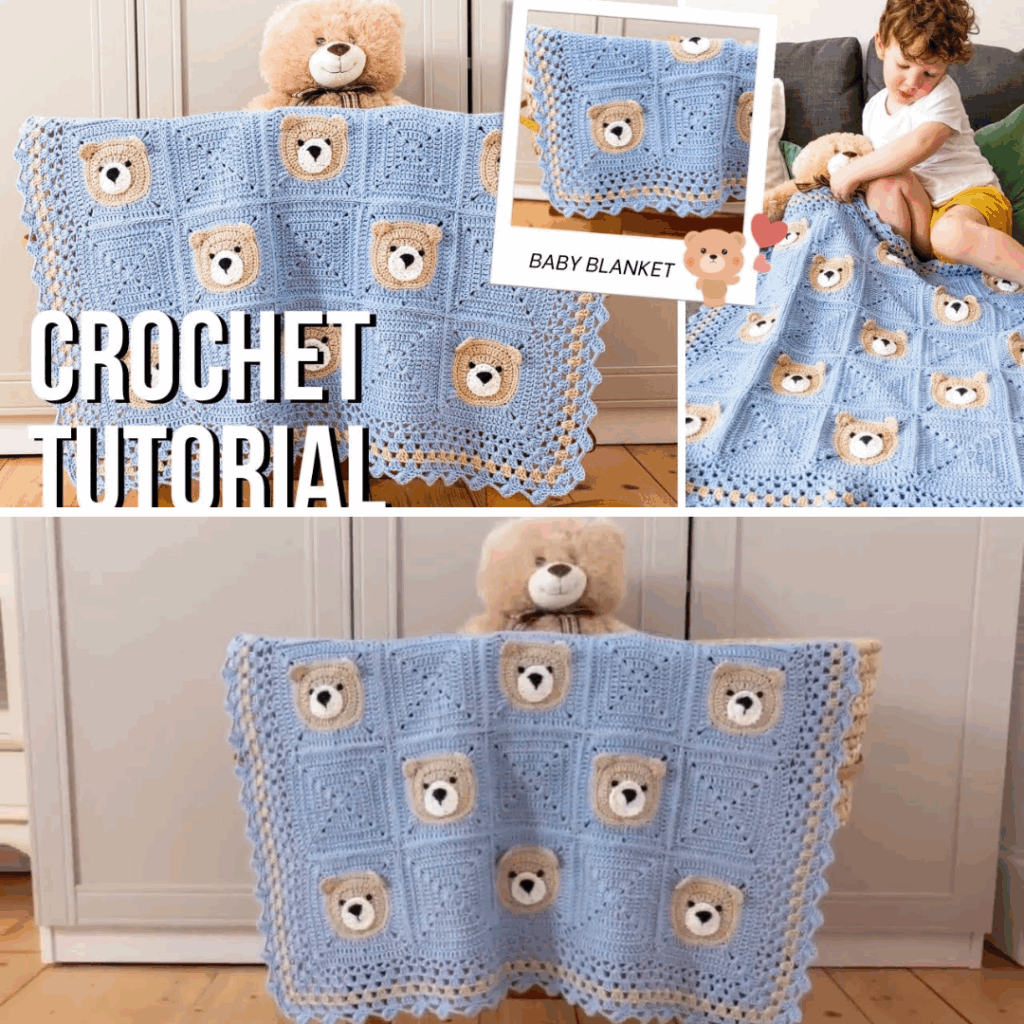
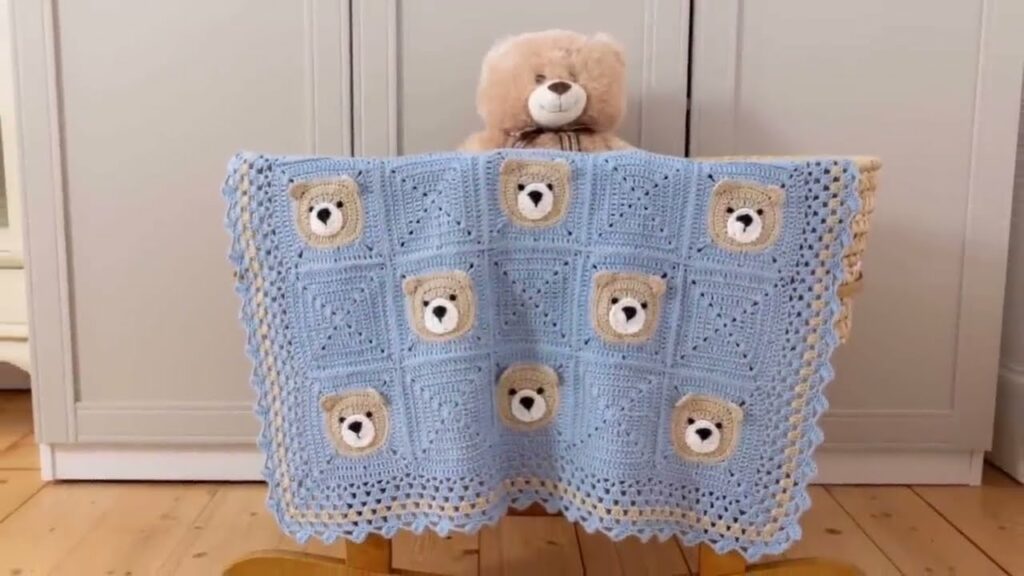
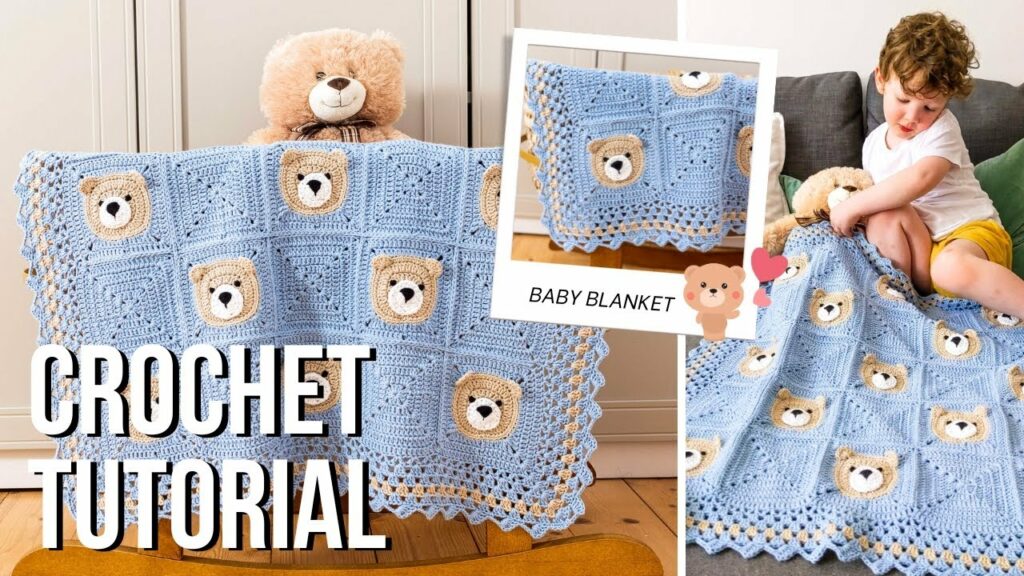
by Looking for the perfect handmade baby gift that’s cozy, whimsical, and irresistibly cute? This Bear Crochet Baby Blanket combines softness, warmth, and adorable charm — all in one easy-to-follow project! With a sweet bear face, optional ears, and gentle textures, this baby blanket is ideal for newborns, baby showers, or nursery decor.
Whether you’re a beginner or a seasoned crocheter, this guide will walk you through how to create a super cute bear-themed baby blanket — complete with fun personal touches.
💖 Why You’ll Love This Bear Blanket
✔️ Beginner-friendly pattern
✔️ Adorable bear face makes it unique
✔️ Customizable for boys, girls, or neutral gifts
✔️ Machine-washable yarn means practical for parents
✔️ Great for nursery themes, photography props, or heirloom gifts
🧵 Materials You’ll Need
| Item | Details |
|---|---|
| Yarn | Worsted weight (Category 4) yarn – approx. 800–1000 yards |
| Yarn for details | Contrasting colors (black, white, brown, pink) for facial features |
| Hook | Size H/8 (5.0 mm) or size needed for gauge |
| Yarn needle | For sewing pieces and weaving ends |
| Scissors | For trimming yarn |
| Safety eyes | Optional (instead of crocheting eyes) – must be baby-safe |
| Stitch markers | Optional but helpful |
💡 Yarn suggestions: Use soft acrylic or cotton-acrylic blends that are machine washable. Bernat Baby, Caron Simply Soft, or Lion Brand Baby Soft are great options.
📏 Finished Size
- Approx. 30 x 30 inches (can be adjusted easily)
- Ideal for crib, stroller, or tummy time blanket
🧶 Stitches & Abbreviations (US Terms)
- ch – chain
- sl st – slip stitch
- sc – single crochet
- hdc – half double crochet
- dc – double crochet
- inc – increase (2 stitches in same stitch)
- dec – decrease (crochet two stitches together)
- st – stitch(es)
🧸 Part 1: Make the Blanket Base
We’ll use a simple stitch pattern (like the granny stitch, moss stitch, or double crochet) to create a soft, flat base. Here’s an easy option using double crochet:
✅ Foundation Row
- Ch 91 (or any odd number to reach your desired width)
✅ Row 1
- Dc in 4th ch from hook and each across. Turn.
✅ Rows 2–50 (or to desired length)
- Ch 2, dc in each stitch across. Turn.
🧼 Optional: Add a simple border in a contrasting color using sc or shell stitch for a polished look.
Video Tutorial Part 1:
🐻 Part 2: Crochet the Bear Face Appliqué
This is what gives your blanket its signature charm! Let’s create a cute bear face to sew onto the center or corner of the blanket.
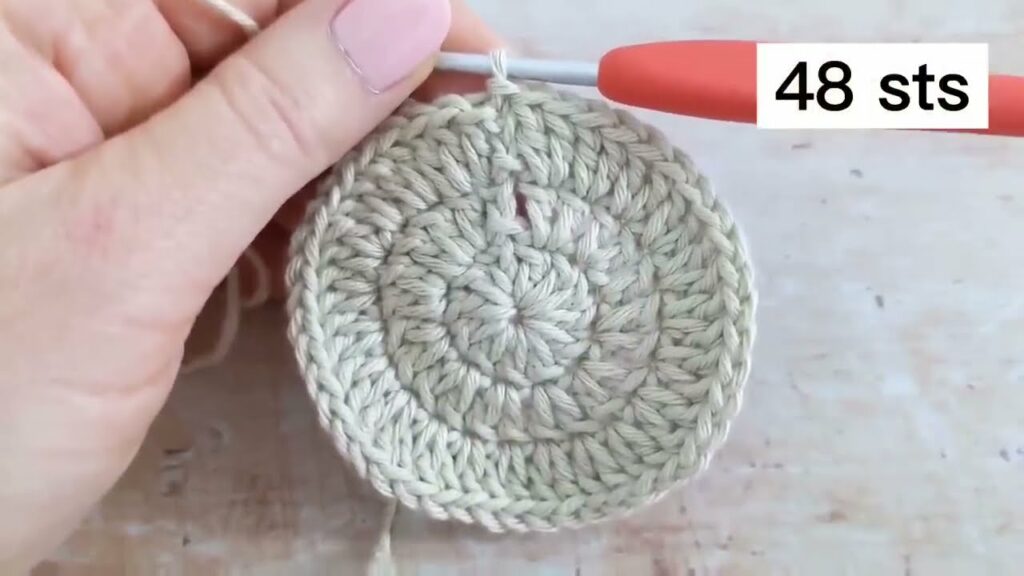
🟤 Bear Head (Make 1)
With brown yarn:
- Magic ring, ch 2, 12 dc in ring. Join. (12)
- Ch 2, 2 dc in each st around. Join. (24)
- Ch 2, (1 dc, 2 dc in next) repeat around. Join. (36)
- Ch 2, (2 dc, 2 dc in next) repeat. Join. (48)
- Fasten off, leave long tail for sewing.
🐽 Bear Muzzle (Make 1)
With beige or cream yarn:
- Magic ring, ch 1, 6 sc in ring.
- 2 sc in each st around. (12)
- (1 sc, 2 sc in next) around. (18)
- Fasten off, leave long tail.
Optional: Embroider or stitch on a small black oval for the nose.
👂 Bear Ears (Make 2)
With brown yarn:
- Magic ring, ch 1, 6 sc.
- 2 sc in each st. (12)
- (1 sc, 2 sc in next) around. (18)
- Fold in half, flatten, and sew to top of bear head.
👀 Eyes (Choose one method)
Option 1: Crochet Eyes (Make 2)
- Magic ring, 6 sc in black yarn.
- Fasten off, leave tail.
- Sew onto face above muzzle.
Option 2: Safety Eyes
- Attach 2 baby-safe safety eyes before sewing bear face onto the blanket.
🧷 Part 3: Assemble the Bear Face
- Lay out your bear head in the center or corner of the blanket.
- Sew muzzle onto bear head.
- Attach eyes (or sew on if crocheted).
- Stitch ears to top of the head.
- Optional: Add embroidered details like lashes, rosy cheeks (with pink yarn), or a smile.
🪡 Part 4: Attach Bear Face to Blanket
- Pin or use stitch markers to hold the face in place.
- Use a yarn needle and matching yarn to sew the entire bear face securely to the blanket.
- Be sure all pieces are tightly secured (especially for babies under 12 months).
🌈 Optional: Customize Your Bear Blanket
- Color themes: Neutral browns, pastels, or bright primaries
- Animal alternatives: Bunny, panda, cat, fox — just change ears and colors
- Add a border: Shell stitch, crab stitch, or picot edging
- Make it a hooded blanket: Attach a bear-faced hood to one corner!
- Personalize it: Crochet or embroider the baby’s name on the edge
🧺 Care Instructions
- Use only baby-safe, washable yarn
- Machine wash on delicate cycle
- Tumble dry low or lay flat to dry
- Do not iron appliqué pieces
📋 Pattern Recap
- Crochet the blanket base using dc rows (or moss/granny stitch)
- Create bear face appliqué: head, ears, muzzle, eyes
- Sew pieces together and attach securely to blanket
- Add border or personalization as desired
- Weave in ends and block if needed
🎁 Perfect Gift for:
- Baby showers
- Newborn gifts
- First birthdays
- Nursery decor
- Photo props
Pair it with:
- Matching bear hat or booties
- Crochet teddy bear plushie
- Coordinating nursery pillow
🧡 Final Thoughts
This Cute Bear Crochet Baby Blanket is more than just a project — it’s a keepsake full of warmth, love, and character. With chunky textures, soft yarn, and a face that’s sure to melt hearts, it’s a gift that’ll be cherished for years to come.
And the best part? It’s beginner-friendly and easy to customize. Whether you’re making it pink, blue, or neutral — with or without ears — you’ll enjoy every stitch of this adorable project.
Video Tutorial Part2 :