by
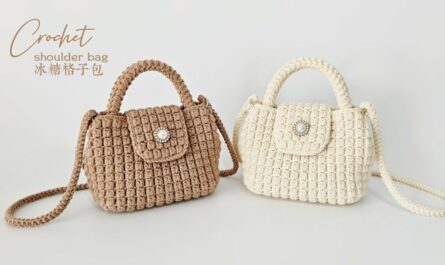
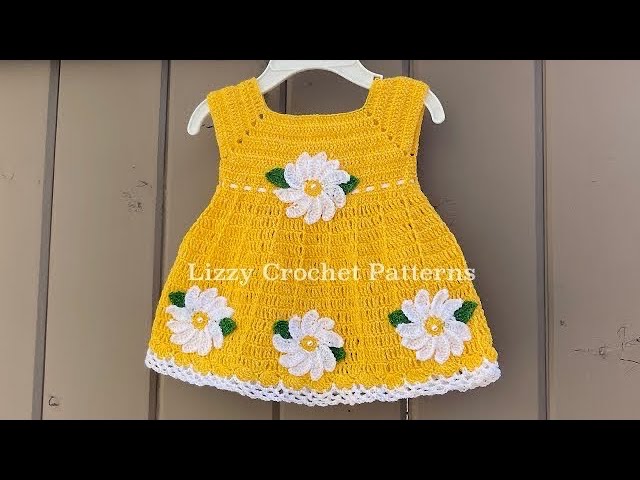
by There’s a unique tenderness in a tiny dress made with love, stitch by delicate stitch. For the littlest loves in our lives, a crocheted baby dress is more than just clothing; it’s a soft hug, a precious keepsake, and an adorable outfit for those fleeting first months. Imagine gentle pastel colors, subtle ruffles, and a comfortable fit – all the hallmarks of a truly “cute” baby dress for ages 0-12 months.
This detailed guide will lead you through the delightful process of crocheting an adorable, comfortable, and customizable baby dress, perfect for milestones, photoshoots, or simply adding everyday sweetness.
Why Crochet a Baby Dress for 0-12 Months?

- Perfect for Milestones: A handmade dress becomes a cherished outfit for first birthdays, family photos, or special outings.
- Personalized & Unique: Unlike store-bought options, your crocheted dress is one-of-a-kind, reflecting your love and creativity. It makes for an unforgettable baby shower gift.
- Comfort & Safety: You control the yarn fiber, ensuring ultimate softness against delicate skin. Plus, no irritating tags or uncomfortable seams (especially with seamless construction).
- Heirloom Quality: A beautiful crocheted dress can be passed down through generations, becoming a treasured family heirloom.
- Skill Building: It’s a fantastic project to practice working in the round, shaping garments, and incorporating delicate stitch patterns.
- Relatively Quick Project: Due to their small size, baby dresses often work up faster than adult garments, offering a satisfying sense of accomplishment.
Key Elements of a “Cute” Baby Dress (0-12 Months):
Achieving that irresistible “cute” factor involves thoughtful design elements:
- The Bodice/Yoke: This is the upper part of the dress. For babies, a top-down, seamless round or raglan yoke is often preferred for comfort and ease of construction.
- The Skirt: Typically gently flared or A-line, allowing for comfortable movement and diaper room.
- Sleeves: Most baby dresses feature sleeveless designs, delicate cap sleeves, or sweet short puff sleeves.
- Neckline: Should be soft, comfortable, and wide enough for easy dressing over a baby’s head (round or boat neck are common).
- Closure: Essential for hassle-free dressing and diaper changes. Buttons down the back are standard, or small buttons on the shoulders.
- “Cute” Details: These are the embellishments that elevate the design: gentle ruffles, delicate lace edges, tiny crochet bows, subtle texture stitches (like puff or bobble stitches), or even simple animal appliques.
Choosing Your Tools & Materials:
The right supplies are paramount, especially when crafting for a baby’s sensitive skin.
- Yarn (MOST IMPORTANT for Baby Items!):
- Fiber:
- 100% Cotton: Highly recommended for its breathability, softness, absorbency, and clear stitch definition. Perfect for warmer climates or babies with sensitive skin.
- Superwash Merino Wool: Luxuriously soft, provides warmth without being bulky, and is conveniently machine washable (check label). Ideal for cooler weather or a more luxurious feel.
- Baby-Specific Acrylic: Many modern acrylic yarns are incredibly soft, durable, hypoallergenic, and very easy to care for (often machine wash and dry). An excellent affordable option.
- Weight: DK (Double Knitting) or Sport Weight yarns are ideal for baby dresses. They create a delicate, lightweight fabric that’s comfortable and not too bulky.
- Color: Opt for classic baby pastels like soft pinks, blues, yellows, mint green, and lavender. Timeless neutrals like white, cream, ivory, or pale grey also make beautiful, versatile dresses. Gentle variegated yarns can add subtle visual interest.
- Quantity: For a 0-12 month baby dress, you’ll typically need between 200-400 yards (approx. 180-360 meters), depending on the chosen size, dress length, sleeve style, and how many ruffles you add.
- Fiber:
- Crochet Hook:
- Consult your chosen yarn label for a suggested hook size (e.g., 3.5mm, 4.0mm).
- Crucial for Baby Wear: The correct hook size for your gauge is more important than the label’s suggestion. You will likely need to adjust your hook size (up or down by half a size) to achieve the exact gauge specified in your chosen pattern for a perfect fit.
- Other Notions:
- Stitch Markers: Essential for marking the beginning of rounds, raglan lines, or increase/decrease points.
- Tapestry Needle: For neatly weaving in all yarn ends.
- Scissors.
- Small, Flat Buttons: 3-5 tiny, flat buttons (approx. 0.4-0.5 inch / 1-1.25 cm diameter) for the back closure. Choose ones that are easy to fasten and lie flat for comfort.
- Thin Ribbon (Optional): For decorative bows or woven sashes.
Understanding Sizing & Gauge (The Non-Negotiable for Baby Clothes!)
For baby garments, precise sizing is crucial for both comfort and appearance. A dress that’s too big will swamp the baby, and one that’s too small will be uncomfortable.
Approximate Baby Dress Sizes (Guidelines for Fit):
| Size | Approx. Chest Circ. | Approx. Finished Dress Length (Shoulder to Hem) |
|---|---|---|
| 0-3 Months | 16-18 inches | 12-14 inches |
| 3-6 Months | 18-20 inches | 14-16 inches |
| 6-9 Months | 19-21 inches | 15-17 inches |
| 9-12 Months | 20-22 inches | 16-18 inches |
Export to Sheets
Disclaimer: These are averages. Always refer to a specific, detailed crochet pattern for precise stitch counts and measurements for your chosen size.
How to Make a Gauge Swatch (Do NOT Skip This Step!):
- Chain: Chain about 20-25 stitches, plus any turning chains (e.g., ch 3 for dc) as per your chosen main stitch.
- Work: Crochet a square of at least 6×6 inches (15×15 cm) in the main stitch pattern you’ll be using for the dress (e.g., double crochet). A larger swatch provides a more accurate measurement.
- Wash & Block: Fasten off your swatch. Crucially, wash and block your swatch exactly as you plan to treat the finished dress. This step relaxes the fibers and reveals the true stitch size and drape after washing, which can change significantly.
- Measure: Once dry, lay the swatch flat. Place a ruler over the center. Count how many stitches fit within 4 inches (10 cm) and how many rows fit within 4 inches (10 cm).
- Adjust:
- If you have more stitches per inch than your pattern (or desired gauge) states (your work is too tight), go up half a hook size and re-swatch.
- If you have fewer stitches per inch than your pattern states (your work is too loose), go down half a hook size and re-swatch.
- Repeat until your gauge precisely matches the pattern’s recommendation.
General Stitch Patterns for a “Cute” Baby Dress:
- Bodice/Yoke:
- Single Crochet (sc): Creates a dense, sturdy fabric, good for structured yokes.
- Half Double Crochet (hdc): Offers a good balance of speed and density.
- Double Crochet (dc): Works up quickly, creates a soft, draped fabric, popular for yokes.
- Skirt:
- Double Crochet (dc): Excellent for creating a flowy, draped skirt quickly.
- V-Stitch: (dc, ch 1, dc in same st/sp) Creates a lovely openwork, lacy effect for a light skirt.
- Puff Stitch/Bobble Stitch: Can be strategically placed for subtle texture and a “cute” element on the yoke or skirt.
- “Cute” Accent Stitches (for ruffles, edgings, cuffs):
- Shell Stitch/Fan Stitch: (e.g., 5 dc in one st, skip 2, sl st) Creates beautiful scalloped or fan-like edges, perfect for ruffles on hems, sleeves, or necklines.
- Picot Stitch: (ch 3, sl st into 1st ch) Creates delicate, tiny points for a dainty edge.
- Simple Lace/Eyelet Rows: (e.g., dc, ch 1, skip 1 st, dc) can be interspersed for a subtle, delicate effect.
Step-by-Step Construction: The Top-Down Baby Dress (0-12 Months)
This outline describes a common construction method for baby dresses. For precise stitch counts, increase/decrease rates for specific sizes, and unique design details, you will need to consult a detailed crochet pattern that matches your desired size and aesthetic.
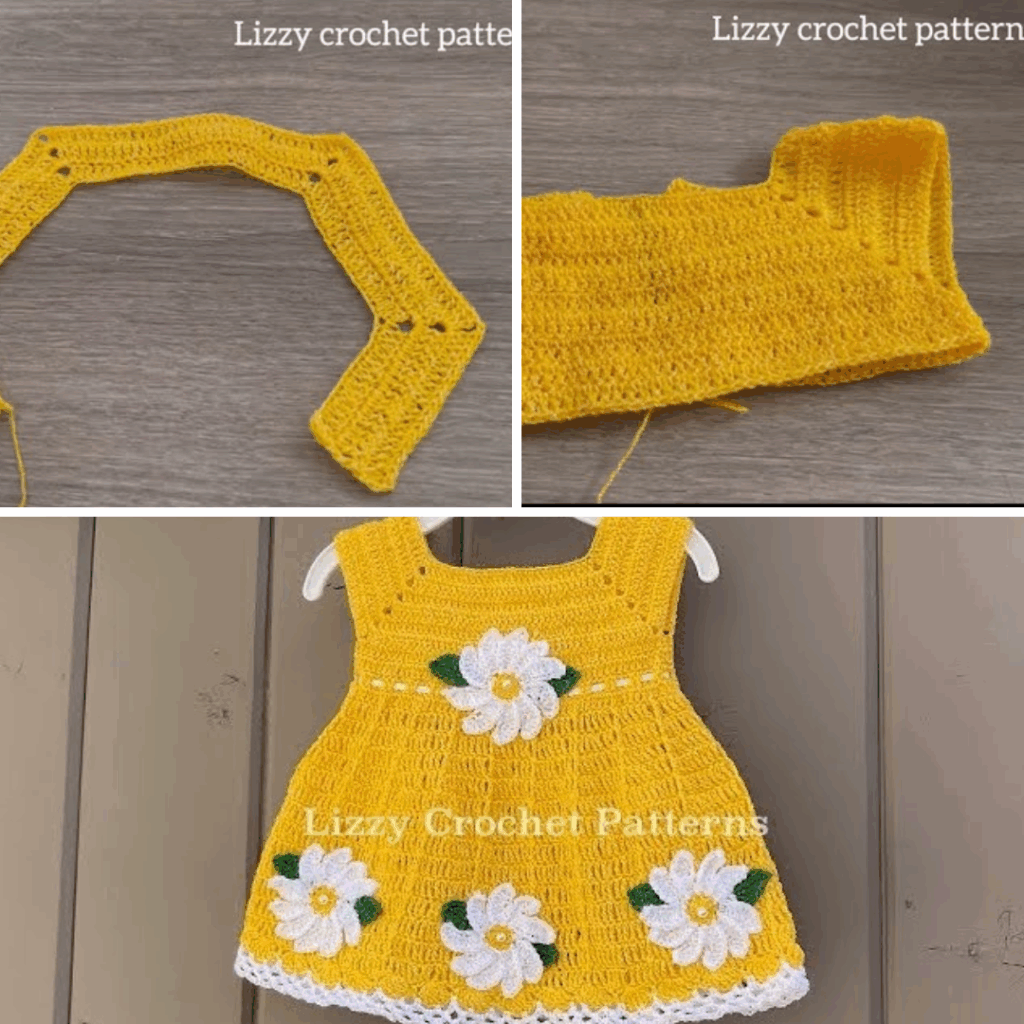
Phase 1: The Yoke (Top-Down & Shaping for Shoulders)
This forms the upper part of the dress, starting at the neckline. Working it flat initially allows for a button-up back opening.
- Step 1.1: Starting the Neckline & Back Opening
- Foundation Chain: Chain the number of stitches specified by your pattern for the neckline circumference.
- Neckband Rows: Ch 2 (or ch 1 for sc, depending on your preferred neckband stitch). Work 2-3 rows in hdc or sc across the chain to create a stable, neat neckband.
- Buttonholes: On one of the back placket edges (usually the wearer’s right side, or as per pattern), create small, evenly spaced buttonholes.
- To make a simple buttonhole: Work to the desired buttonhole position, chain 2, skip the next 2 stitches, then continue working across. On the next row, work into the ch-2 space.
- Step 1.2: Establishing Yoke Shaping (Raglan or Round Yoke)
- Raglan Yoke (Common): Your pattern will divide your total stitches for Back Panel 1, Sleeve 1, Front, Sleeve 2, and Back Panel 2. You will have 4 raglan “corners” where increases will occur.
- First Yoke Row (Worked Flat): Ch 3 (counts as first dc). Work dc stitches for Back Panel 1. At the first raglan corner, work your increase (e.g., [2 dc, ch 2, 2 dc] or [dc, ch 1, dc]). Place a stitch marker in the ch-2 or ch-1 space. Work dc for Sleeve 1, then another increase for Raglan Corner 2, and so on. Continue to the end of the row. Turn.
- Continuing Yoke Rows: In subsequent rows, continue working your main stitch across, and work your specified increase (e.g., [2 dc, ch 2, 2 dc]) into each raglan space from the previous row. Move stitch markers up. Repeat these increase rows until the yoke measures the correct depth from the neckline to the underarm for your chosen size. Continue adding buttonholes on your back placket as specified by the pattern.
- Round Yoke (Alternative): Your pattern will instruct you to increase stitches evenly around in specific rounds to create a flat or slightly curved top that will form the shoulders and upper chest.
- Raglan Yoke (Common): Your pattern will divide your total stitches for Back Panel 1, Sleeve 1, Front, Sleeve 2, and Back Panel 2. You will have 4 raglan “corners” where increases will occur.
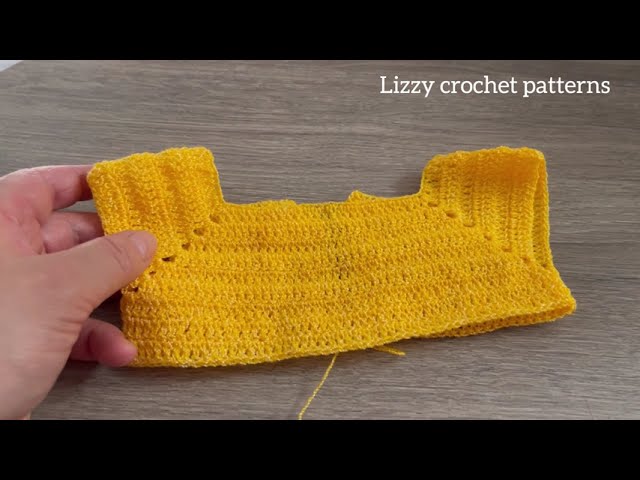
Phase 2: Separating for Bodice & Sleeves
Once the yoke is the correct depth, you’ll separate the main body of the dress from the sleeve sections.
- Separation Row:
- Work stitches for Back Panel 1.
- Work into Raglan Corner 1.
- Skip Sleeve 1: Place all stitches of Sleeve 1 onto a piece of scrap yarn or a stitch holder.
- Underarm Chain: Chain 2-4 stitches (creates extra room at the underarm for comfort).
- Work into Raglan Corner 2.
- Work stitches for the Front Panel.
- Work into Raglan Corner 3.
- Skip Sleeve 2: Place all stitches of Sleeve 2 onto a holder.
- Underarm Chain: Chain 2-4 stitches.
- Work into Raglan Corner 4.
- Work stitches for Back Panel 2. Turn.
- Sleeve Stitches: The stitches on the holders will be used later if you plan to add sleeves.
Phase 3: The Bodice & Skirt Transition
This connects the bodice to the start of the skirt.
- First Body Row: Ch 3 (or ch 1 for sc). Work your main stitch (e.g., dc) in each stitch across, including working into the underarm chains. Continue working flat, extending the back opening for the full length of the bodice if your pattern dictates a back seam.
- Join in the Round (Optional, but common for seamless skirts): If you want a seamless skirt, at the end of this first body row, sl st to join the ends (Front Panel with Back Panels), forming a complete circle. From now on, you will work in continuous rounds, or join with a sl st at the end of each round.
- Bodice Length: Work a few more straight rounds/rows in your main stitch to form the short bodice below the underarms.
- Skirt Start (Initial Flare): In the next round/row, significantly increase stitches to create the initial fullness of the skirt. For example, if using dc, you might work 2 dc in every 2nd or 3rd stitch around, or increase by a set number of stitches evenly across the entire round.
Phase 4: The Skirt
This is where the dress gains its adorable fullness and length.
- Building the Flare:
- Continue working in rounds (or flat) in your chosen skirt stitch (e.g., dc, V-stitch, or Shell stitch).
- Gradual Increases: Continue to gradually increase stitches evenly in subsequent rounds/rows (e.g., increasing by 8-12 stitches every 3-5 rounds/rows) to achieve the desired A-line flare and fullness.
- Lace Skirt: If using lace patterns like V-stitch or Shell stitch, these patterns often naturally increase the circumference as you go, contributing to the flare.
- Length: Continue working until the skirt reaches the desired dress length for your chosen size (refer to the sizing chart).
- “Cute” Hem Edging: Finish the skirt with a pretty and playful edge.
- Shell Stitch Scallop: A classic choice for a sweet, ruffled hem.
- Picot Edging: For a very delicate, dainty finish.
- Simple Ribbon Weave: You can create a row of (dc, ch 1, sk 1 st) near the bottom to weave a thin ribbon through before the final hem.
Phase 5: Sleeves (Optional)
If you want to add sleeves:
- Attach Yarn: Attach yarn to the bottom of one armhole.
- Pick Up Stitches: Pick up stitches evenly around the entire armhole opening. Join to work in the round (or work flat and seam later).
- Working the Sleeve:
- Cap Sleeve: Work just a few rounds of your main stitch.
- Puff Sleeve: Significantly increase stitches in the first 1-2 rounds to create fullness. Then, work a few more rounds, possibly decreasing stitches, or create a simple cuff.
- Cuff/Edging: Finish the sleeve with a pretty cuff or matching edging.
- Simple Cuff: A few rounds of sc or hdc.
- Shell Stitch or Picot Edging: For a sweet, delicate finish.
- Fasten off. Repeat for the second sleeve.
Phase 6: “Cute” Details & Finishing
This is where your dress truly comes to life!
- Ruffles/Lace Edging (Optional): If you desire more ruffles, you can add shell stitch or picot edging around the neckline or armholes.
- Bow Accents (Optional): Crochet a simple small bow (chain a length, work a few rows of sc, tie into a bow shape). Or, use a tiny satin ribbon bow. Securely stitch it to the dress (e.g., at the neckline, waist, or on a strap).
- Back Button Band & Buttonholes: Ensure you have consistently spaced buttonholes on one side of the back opening. Sew on your chosen tiny, flat buttons securely on the corresponding side.
- Weave in All Ends: Use your tapestry needle to meticulously weave in every single yarn tail. This is crucial for a professional, comfortable, and safe finish.
- Blocking (The Magical Transformation!):
- Gently hand wash your finished dress (or machine wash if your yarn allows, using a delicate cycle and a mesh bag) in cool water with a mild, gentle soap suitable for baby items.
- Gently squeeze out excess water (do not wring or twist).
- Lay the dress flat on clean towels or blocking mats. Gently shape it to the correct dimensions for its size, smoothing out any unevenness and opening up any lace or shell patterns. Use rust-proof pins to hold it in place.
- Allow the dress to air dry completely. Blocking is essential for setting the stitches, evening out tension, enhancing drape, and giving your dress a beautifully finished, store-bought quality.
- Optional Lining: For very open lace patterns or if you simply prefer extra modesty and drape, you can sew a simple slip lining from a lightweight cotton or slip fabric. Hand-stitch the lining securely to the inside of your dress at the neckline, armholes, and waist seam.
Tips for “Cute” Dress Success (0-12 Months):
- Yarn Choice is Paramount: Always prioritize softness, breathability, and washability.
- Gauge, Gauge, Gauge! It’s the only way to ensure the dress fits correctly for that precious baby.
- Seamless Construction: When possible, opt for top-down seamless methods to minimize bulky seams that could irritate a baby’s delicate skin.
- Small, Flat Buttons: Choose buttons that are easy to close and lie flat for baby’s comfort.
- Try On (if possible): If you have access to the baby or a similar-sized garment, compare your work as you go.
- Safety First: Avoid any small, detachable embellishments that could pose a choking hazard. Securely attach all bows and details.
Care Instructions for Your Handmade Baby Dress:
- Always follow your yarn label’s care instructions: Some yarns require hand washing, while others are machine washable on a gentle cycle.
- Reshape and Lay Flat to Dry: Gently reshape the dress while wet and lay it flat on a clean towel or drying rack to air dry completely. Do not hang, as this can stretch the fabric and distort the dress’s shape.
VIDEO TUTORIAL :
Creating a crocheted baby dress is a labor of love that results in a truly precious and adorable garment. Each stitch carries your care and affection, making it a unique treasure for the little one who wears it. Happy crocheting! Sources