by
by There’s something undeniably charming about feline-inspired accessories, and a Knitted Cat Ear Headband captures that whimsical spirit with cozy, handmade appeal. More than just a simple headband, this delightful accessory adds a touch of playful personality to any outfit, whether for a costume, a themed event, or simply to express a love for all things feline in everyday wear. The beauty of knitting these ears lies in the customizable texture, warmth, and the unique touch only a handmade item can provide.
This detailed article will explore the creative process of crafting a knitted cat ear headband, covering design considerations, essential knitting techniques, and the immense joy of bringing this adorable accessory to life.
The Irresistible Charm of the Knitted Cat Ear Headband

- Whimsical & Playful: Instantly transforms any look with a fun, lighthearted vibe, perfect for all ages from toddlers to adults.
- Versatile Accessory: Ideal for Halloween costumes, cosplay events, themed parties, quirky everyday wear, or even as a fun prop for photoshoots.
- Handmade Uniqueness: Each knitted headband carries the personal touch of the maker, ensuring it’s a one-of-a-kind piece.
- Comfort & Warmth: Unlike rigid plastic headbands, a knitted base is soft, flexible, and can offer a bit of extra warmth over the ears in cooler weather.
- Beginner-Friendly Potential: Many designs for the ears and band are straightforward, making this an accessible project for those new to knitting.
Designing Your Feline Fashion Statement: Key Considerations
Before you cast on, think about these elements to create a cat ear headband that’s exactly right:
- Target Wearer:
- Children: Prioritize soft, non-irritating yarns. Ensure all components are securely attached with no small, detachable parts for safety.
- Adults: Can experiment with more intricate stitches, luxury fibers, or more delicate designs.
- Headband Base:
- Wholly Knitted Band: You knit a long strip (often ribbed for elasticity or garter stitch for texture) and seam it into a circle. This offers complete softness and custom sizing.
- Knitted Cover for a Pre-made Headband: You knit a tube or a flat strip that’s then sewn around a standard plastic or metal headband. This provides more rigid structure and ensures the band stays in place, while still offering the warmth and look of knitting.
- Yarn Choice (The Foundation of Feel & Structure):
- Fiber:
- Acrylic: Durable, washable, available in a vast array of colors (including fun brights), and generally soft. Excellent for kids’ items.
- Wool/Wool Blends: Offer warmth and excellent elasticity for a snug fit. Superwash merino is soft and easy to care for.
- Cotton/Cotton Blends: Breathable and good for warmer climates, but may have less elasticity than wool or acrylic.
- Weight:
- DK (Double Knitting) or Worsted (Category 4): Popular choices, providing a good balance of stitch definition and thickness for structure.
- Chunky (Category 5) or Super Bulky (Category 6): For quick knits and a very plush, cozy look.
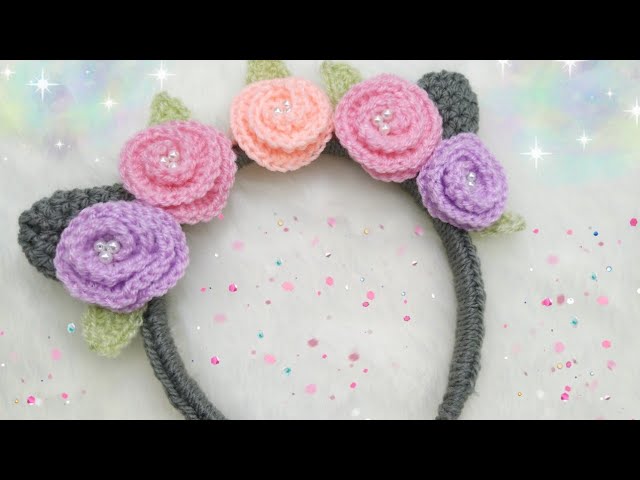
- Colors: Classic cat colors (black, white, grey, brown) or whimsical hues (pink, blue, rainbow). Consider a contrasting color for the inner ear for added realism or fun.
- Fiber:
- Ear Design:
- Shape: Most commonly triangular, often slightly rounded at the base and pointed at the top.
- Size: Proportional to the head and desired effect (subtle vs. prominent).
- Rigidity: Will the ears flop charmingly, or stand stiffly upright? This depends on yarn choice, stitch density, and potential internal support (see “Finishing Touches”).
- Inner Ear: Knit a smaller triangle in a contrasting color and sew it into the main ear for a realistic touch.
- Embellishments (Optional):
- Small knitted or crocheted bows.
- Delicate embroidered whiskers.
- Small felt cutouts.
- Tiny knitted flowers or leaves.
- Fit & Comfort: Ensure the band is snug enough to stay on but not too tight. Pay attention to seam placement if you’re not knitting in the round, so they don’t irritate the scalp.
Materials: Your Yarn Ball & Needle Toolkit
- Yarn: Your chosen fiber, weight, and colors. This is a relatively small project, often requiring less than one skein for the main color and small amounts for contrast.
- Knitting Needles:
- Double-Pointed Needles (DPNs) or Circular Needles (Magic Loop Method): Ideal if knitting the headband or ears seamlessly in the round.
- Straight Needles: If knitting flat panels to be seamed.
- Size will depend on your yarn weight and desired fabric density.
- Stitch Markers: Useful for marking the beginning of rounds or pattern repeats.
- Tapestry Needle: Essential for weaving in ends and seaming the ears to the headband.
- Scissors.
- Measuring Tape: For head circumference.
- Optional:
- Pre-made plastic or metal headband (if covering it).
- Polyester fiberfill (stuffing) for added ear fullness.
- Pipe cleaners or thin floral wire (for ear rigidity, use with caution for children).
Essential Knitting Techniques for a Cat Ear Headband
You’ll utilize a combination of fundamental and shaping techniques:
- Casting On (CO) & Binding Off (BO): To start and finish your work.
- Knit (K) & Purl (P) Stitches: The two fundamental stitches that form all knitted fabric.
- Working Flat vs. In the Round: Depending on the construction method of your chosen pattern.
- Increases (e.g., KFB – knit front and back, M1 – make one): For shaping the crown of the head or the widening base of the ears.
- Decreases (e.g., K2tog – knit two together, SSK – slip, slip, knit): For shaping the top of the ears into a point.
- Seamless Joining (e.g., Kitchener stitch/grafting): If you knit your headband flat and want an invisible seam, or a simple whip stitch for joining.
- Sewing Pieces Together: Securely attaching the knitted ears to the headband.
Planning Your Project: Laying the Foundation for Feline Fun
- Sizing: The most important measurement is the head circumference. If knitting a full band, ensure it has enough elasticity (e.g., through ribbing) to fit snugly without being too tight.
- Gauge Swatch: Although a small project, a gauge swatch is still beneficial, especially for the ears, to ensure they come out the intended size and have good structure.
- Yarn Quantity: This is usually a quick project, often using less than one skein of main color yarn.
- Pattern Selection/Creation: Look for free patterns online (Ravelry is an excellent resource), or if you’re an experienced knitter, you can easily design your own simple patterns for the band and ears.
Construction Journey: Bringing Your Feline Vision to Life (Conceptual Guides)
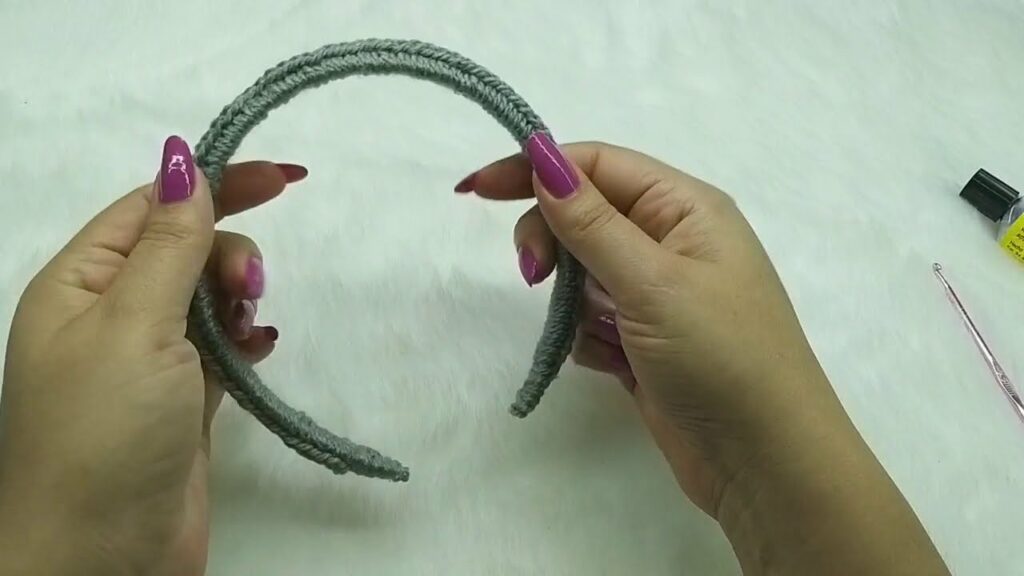
Method 1: Wholly Knitted Headband Base
- Knit the Band: Cast on the desired number of stitches for the width of your band. Work in the round (on DPNs or circular needles) or flat (on straight needles, then seam later) until the band reaches the desired circumference (slightly less than head circumference for a snug fit due to elasticity). Common stitches include 1×1 or 2×2 ribbing, or a simple garter stitch.
- Join Band (if flat): If worked flat, use Kitchener stitch or a neat seam to join the ends of the band into a circle.
Method 2: Knitted Cover for a Pre-made Headband
- Knit the Cover: Knit a long, narrow tube (or a flat strip to be seamed into a tube) that is slightly shorter than your plastic/metal headband and just wide enough to cover it snugly.
- Cover Headband: Slip the knitted tube over the pre-made headband. Stitch the ends closed neatly around the headband’s tips.
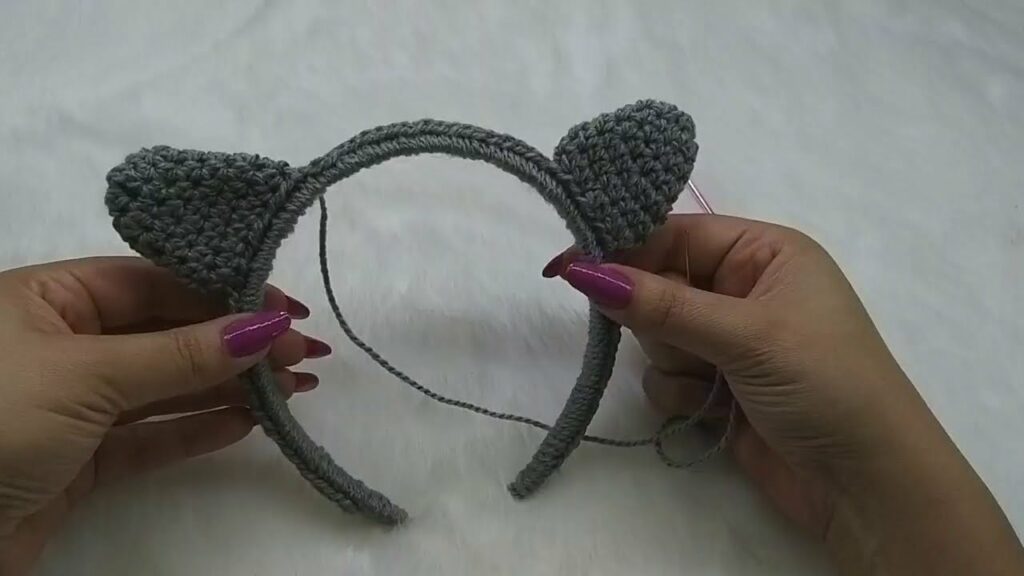
The Ears (for both methods):
- Knit Two Ears: Each ear is typically knitted as a small triangle.
- Flat: Cast on a small number of stitches, then decrease on either side every few rows until a few stitches remain, then bind off. This creates a simple triangle.
- In the Round & Flattened: Cast on a small number of stitches, join into a round, and increase for a few rounds. Then, work decreases to shape the triangle. Once complete, flatten the knitted tube to form the ear shape.
- Inner Ear (Optional): Knit two smaller triangles in a contrasting color.
- Assemble Ears: If using an inner ear, sew it neatly onto the main ear piece. For more rigidity, you can lightly stuff the ears with fiberfill or carefully insert a bent pipe cleaner or wire loop before sewing them completely closed (exercise caution with wire for children).
Assembly:
- Attach Ears: Position the ears evenly on the headband. Using a tapestry needle and matching yarn, securely sew the base of each ear to the knitted band. Take care to ensure they stand upright as desired.
Finishing Touches: The Purr-fect Details
- Weaving in Ends: Meticulously weave in all loose yarn tails for a clean and professional finish, especially on the inside of the headband where they could cause irritation.
- Shaping/Stiffening Ears (if desired): A gentle block might help set the ear shape. If you want more rigidity, consider the stuffing or discreet wire insertion during assembly.
- Adding Embellishments: If you’re adding bows, flowers, or whiskers, sew them on securely now.
Tips for Feline Flair
- Yarn Choice Matters: A yarn with good stitch definition will make your ear shapes crisp. Softer yarns ensure comfort against the skin.
- Gauge is Key: While not a garment, inconsistent gauge can make ears too big/small or floppy/stiff.
- Secure Ears: Make sure the ears are sewn on tightly and can stand up (if that’s your goal). Multiple passes with the tapestry needle often help.
- Comfort First: For children, double-check that there are no scratchy seams or loose ends inside.
- Experiment with Design: Play with different ear sizes, inner ear colors, or stitch patterns for the band to create unique looks.
Caring for Your Knitted Creation
- Follow Yarn Label Instructions: Always refer to your specific yarn’s care guidelines for washing and drying.
- Gentle Hand Wash Recommended: For delicate items or those with internal wire/stuffing, hand washing in cool water with a mild detergent is safest.
- Reshape and Lay Flat to Dry: Never wring or twist. Gently squeeze out excess water, reshape the headband to its original dimensions, and lay it flat on a clean towel or a mesh drying rack to air dry completely.
A knitted cat ear headband is a small project that delivers big charm. It’s a wonderful way to express creativity, celebrate a love for cats, and create a truly adorable and personalized accessory for yourself or a loved one.
Video Tutorial ;