by
by In the ever-evolving world of fashion accessories, sometimes bigger truly is better. Enter the Giant Crochet Bow Headband – a bold, whimsical, and utterly unmissable statement piece that blends the charm of handmade crochet with the playful audacity of oversized design. Far from a subtle accent, this headband is designed to turn heads, inject immediate fun into any outfit, and evoke a sense of joyous, retro-inspired style.
This detailed article will guide you through the exciting process of crafting your own fabulous giant crochet bow headband, exploring the unique considerations for its scale, the techniques for achieving impressive volume, and the sheer delight of wearing such a standout accessory.
The Unmistakable Impact of a Giant Crochet Bow Headband
- Bold Fashion Statement: This isn’t just an accessory; it’s the centerpiece of your look. A giant bow demands attention and radiates confidence and playful style.
- Playful & Whimsical: It instantly adds a touch of quirky charm, perfect for injecting fun into everyday wear, special occasions, parties, or photoshoots.
- Retro Resurgence: Echoing the oversized hair accessories of the 1980s and 90s, the giant crochet bow headband taps into a nostalgic trend while feeling fresh and modern.
- Customization to the Max: With crochet, you have complete control over color, texture, and the exact “giant” proportions, ensuring a truly personalized piece.
- Unique Craftsmanship: A handmade giant crochet bow stands out from mass-produced items, showcasing your skill and creativity.
Designing Your Statement Piece: Key Considerations
Crafting a “giant” accessory requires a bit more thought than a standard one. Here’s what to ponder:
- The Scale of “Giant”: How big do you really want it? From a substantial, eye-catching bow to an almost comically oversized, whimsical statement, define your desired proportions. This will dictate yarn weight and pattern.
- Headband Base (Crucial for Stability):
- Covered Rigid Headband: Highly Recommended for Giant Bows. This involves crocheting a tube or flat strip of fabric to slip over a sturdy plastic or metal headband. The rigid base provides essential support for the weight and size of a giant bow, preventing slipping and ensuring it stands upright.
- Wholly Crocheted Band: While possible for smaller bows, a fully crocheted band might struggle to support a truly giant bow’s weight without slipping or losing shape, especially if made from a soft yarn.
- Yarn Choice (For Volume & Structure):
- Weight: Bulky (Category 5) or Super Bulky (Category 6) yarns are often ideal for achieving substantial volume quickly. Worsted (Category 4) can also work, but you’ll need more stitches and possibly more rounds/rows to get the “giant” effect.
- Fiber:
- Acrylic: Excellent choice for its wide color range, durability, affordability, and ability to hold shape well (especially when densely crocheted).
- Cotton: Provides good stitch definition and structure, though less elastic than acrylic/wool.
- Blends: Can offer a combination of desired properties like softness, structure, and color vibrancy.
- Texture: A smooth yarn will highlight the bow’s shape, while a slightly textured yarn (e.g., chenille for plushness, boucle for a cloud-like effect) can add visual interest.
- Stitch Pattern:
- Dense Stitches: Single Crochet (SC) or Half Double Crochet (HDC) are excellent choices for the bow pieces as they create a firm, dense fabric that helps the bow maintain its shape.
- Less Dense: Double Crochet (DC) can be used, but might require more rows or internal stiffening to prevent floppiness.
- Color & Style:
- Solid Bold Color: Allows the “giant” shape to be the primary focus.
- Pastels: For a softer, whimsical giant bow.
- Variegated or Striped: Can add visual complexity and make the bow even more eye-catching.
- Bow Structure & Rigidity: How will you ensure your giant bow doesn’t flop? (See “Finishing Touches” for more on this).
Materials: Your Toolkit for Grandeur
- Yarn: Your chosen fiber, weight, and color(s). For a truly giant bow, you might need 1-2 skeins of bulky/super bulky yarn.
- Crochet Hook: The size recommended by your pattern for your chosen yarn, to achieve a dense fabric for structure.
- Stitch Markers: Useful for marking rows/rounds or pattern repeats.
- Tapestry Needle (or Blunt Yarn Needle): Essential for weaving in ends and, crucially, for securely assembling and attaching the bow.
- Scissors.
- Measuring Tape: For checking dimensions of the headband cover and bow pieces.
- Crucial for “Giant” Bows:
- Rigid Headband: A standard plastic or metal headband from a craft store or drugstore.
- Stiffener/Stabilizer (Optional but Recommended):
- Thick Craft Wire: Can be crocheted into the edges of the bow loops or inserted later. (Use with caution, ensure no sharp ends, especially if for children).
- Felt or Craft Foam: Can be cut to shape and inserted into the bow loops for structure.
- Heavy Starch/Fabric Stiffener: To stiffen the finished crochet fabric.
- Dense Stuffing (Polyester Fiberfill): To give the bow loops a plush, plump shape.
- Strong Sewing Thread: Matching the yarn color, for extra secure attachment of the bow to the headband.
Essential Crochet Techniques for a Giant Bow Headband
You’ll utilize a combination of fundamental and structural techniques:
- Foundation Chain (ch): To start your work.
- Basic Stitches: Single Crochet (sc), Half Double Crochet (hdc), or Double Crochet (dc) for the main fabric.
- Working Flat (in rows): Most bow pieces are crocheted flat.
- Working in the Round: For the headband cover, if creating a tube.
- Seamless Joining (for headband cover): Techniques like the invisible join or a slip stitch seam for neatness.
- Increases & Decreases (Optional): For subtle shaping of the bow loops if desired (though often a simple rectangle is sufficient, gathered later).
- Assembly & Secure Attachment: This is a critical skill for this project, ensuring the bow is firmly fixed to the headband.
Planning Your Project: Laying the Foundation for a Bold Look
- Measurements:
- Head Circumference: While the headband’s fit is paramount, a giant bow’s presence should also be considered in relation to head size.
- Desired Bow Dimensions: Decide on the approximate width, height, and depth of your finished bow. Sketch it out!
- Gauge Swatch: Essential for a giant bow! Crochet a substantial swatch (at least 4×4 inches / 10×10 cm) in your chosen stitch and yarn. This will help you predict the final size of your bow pieces and how much yarn you’ll need, and assess how stiff or floppy the fabric will be.
- Yarn Quantity: Estimate generously. A “giant” project will use more yarn than you think, especially with bulky weights and if you opt for stuffing.
- Pattern Selection/Adaptation: Look for patterns specifically for giant bows or headbands, or be prepared to scale up a smaller bow pattern significantly.
Construction Journey: Bringing the Bow to Life (Conceptual Guides)
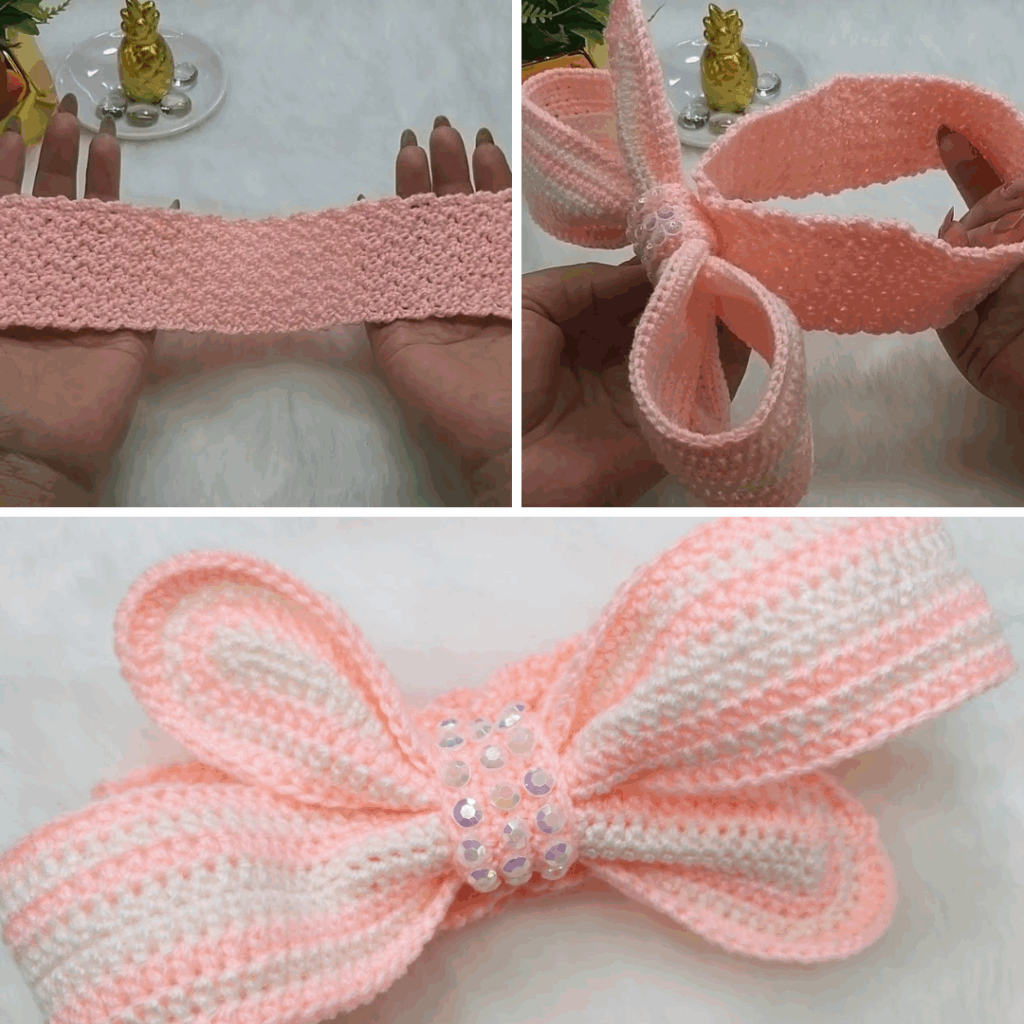
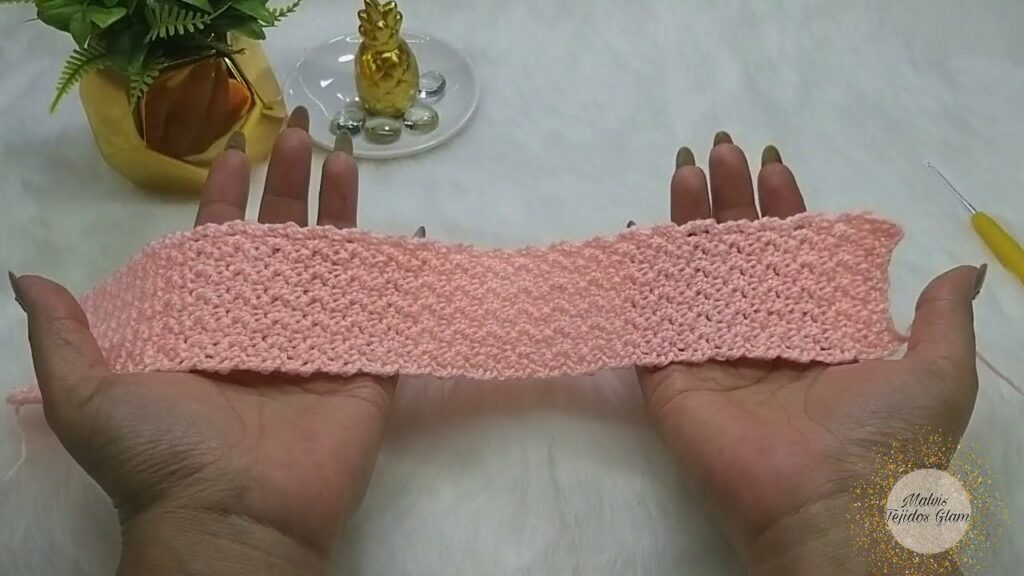
1. The Headband Base (Recommended: Covering a Rigid Band)
- Crochet the Cover: Measure the length and circumference of your plastic/metal headband. Crochet a flat rectangle that is slightly longer than the headband and wide enough to wrap around it snugly (or a seamless tube that can be slipped over).
- Attach Cover: Sew the crocheted piece securely around the rigid headband, ensuring it’s smooth and even.
2. The Bow Pieces
- Main Bow Loops (usually 2 pieces):
- Crochet one or two large rectangles in your chosen stitch. The dimensions will determine the final size of your bow.
- Often, two separate rectangles are made to form the “loops” of the bow, which are then gathered in the middle.
- Center Knot/Band:
- Crochet a small, narrow rectangle that will wrap around the gathered center of the main bow pieces. Its length should be enough to wrap around the gathered loops and overlap slightly.
3. Assembly & Structuring the Bow
- Gathering the Loops: Take your large bow rectangle(s). Using your tapestry needle, gather the center tightly (like cinching a drawstring) to form the classic bow shape. Secure with strong stitches.
- Adding Rigidity (Optional but Recommended for Giant Bows):
- Stuffing: Lightly stuff the bow loops with polyester fiberfill to give them a plump, defined shape.
- Interlining/Stiffener: Cut pieces of felt or craft foam slightly smaller than your bow loops and insert them for more robust stiffness.
- Wire: Carefully insert pre-bent craft wire along the edges of the bow loops (ensure ends are bent inward and secure, especially if for children).
- Wrap the Center: Wrap the smaller “center knot” piece tightly around the gathered middle of the bow. Securely stitch the ends together on the back of the bow.
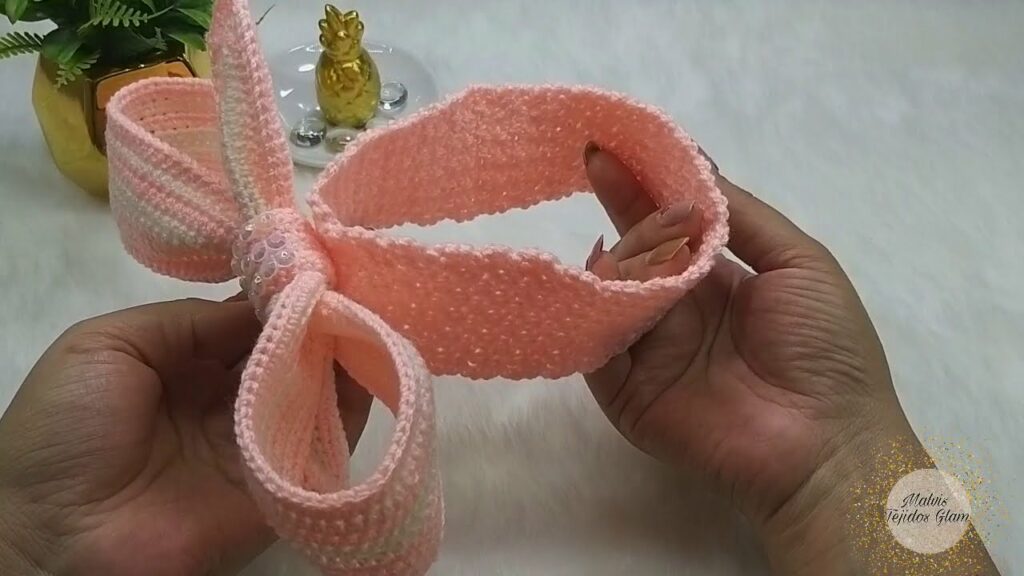
4. Attaching the Bow to the Headband
- Placement: Decide where on the headband you want the bow to sit (centered, off-center).
- Secure Stitching: Using your tapestry needle and strong matching yarn (or strong sewing thread), firmly and repeatedly stitch the finished bow to the crocheted headband cover. Go through multiple layers of both the bow’s center and the headband cover to ensure maximum stability. This step is critical; a giant bow needs robust attachment.
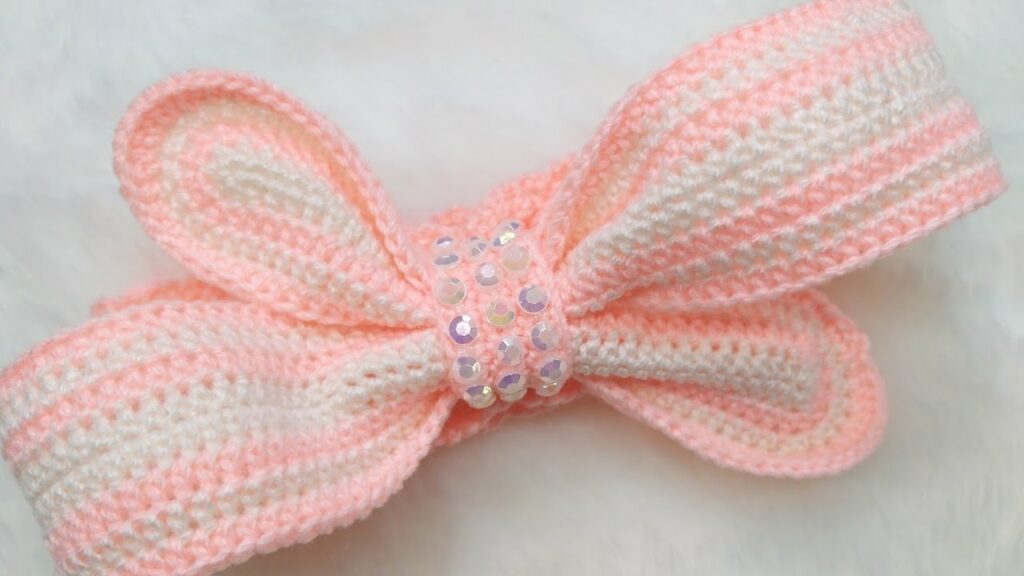
Finishing Touches: The Dramatic Flourish
- Weaving in All Ends: Meticulously weave in every loose yarn tail from both the headband and bow pieces. For a highly visible item, neatness is paramount.
- Shaping the Bow: Gently manipulate and shape the bow loops, ensuring they have the desired volume and stand up as intended. A light spritz of fabric stiffener or hairspray can help maintain shape.
- Reinforcing Bow Structure: If you notice any floppiness, consider adding more stuffing, a hidden stitch to a rigid part of the covered headband, or a small piece of clear fishing line tied discreetly to pull up a loop.
Styling Your Giant Bow Headband
Your giant crochet bow headband is a statement. Let it shine by pairing it with:
- Simple Outfits: A plain t-shirt and jeans, a minimalist dress, or a neutral-colored jumpsuit to let the bow be the star.
- Retro Vibes: Pair with high-waisted jeans, a crop top, or a brightly colored tracksuit for an 80s/90s throwback.
- Party Attire: Elevate a simple party dress or jumpsuit for a fun, festive look.
- Balanced Hair: Consider tying hair back or wearing it down in a way that doesn’t compete with the bow’s volume.
Tips for Giant Bow Success
- Rigid Base is Key: For any truly “giant” bow, a pre-made headband covered in crochet provides the necessary support.
- Structure the Bow: Don’t expect a large piece of crochet fabric to magically stand on its own. Plan for internal support (stuffing, stiffener, wire).
- Yarn Weight for Volume: Don’t be afraid to go for bulky or super bulky yarns; they make a significant difference in achieving impressive size.
- Secure Attachment: This is the most crucial step. Use strong stitches and potentially strong thread to ensure the bow doesn’t sag or fall off.
- Don’t Underestimate Yarn Quantity: “Giant” means more yarn. Buy enough!
- Comfort & Balance: Ensure the finished headband isn’t too heavy or prone to slipping.
Caring for Your Statement Piece
- Follow Yarn Label Instructions: Always refer to your specific yarn’s care guidelines.
- Spot Clean or Gentle Hand Wash: Due to the size and potential for internal stiffeners, spot cleaning is often preferred. If washing, use cool water and a mild detergent. Avoid harsh wringing or twisting.
- Reshape and Air Dry: Gently reshape the bow and headband, and lay it flat on a clean towel or a mesh drying rack to air dry completely. Avoid direct heat.
A giant crochet bow headband is a joyful and audacious project. It’s a testament to the fun and flair that handmade accessories can bring, allowing you to wear your personality on your head with unapologetic style.
Video Tutorial ;