by
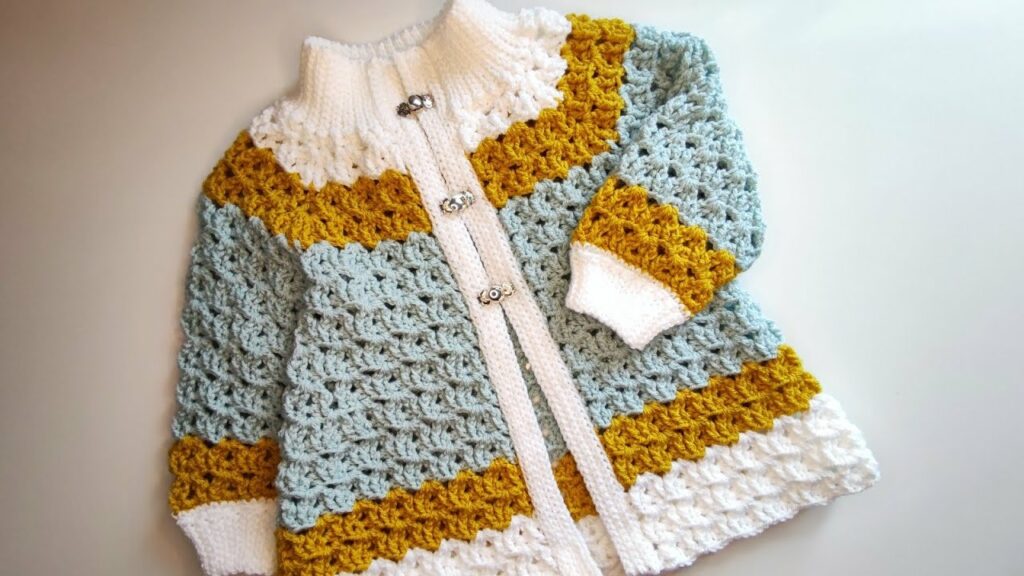
by As the vibrant days of summer gently yield to the crisp air and golden hues of autumn, our wardrobes transition too. The “September” cardicoat is the quintessential garment for this in-between season: combining the comforting warmth of a light coat with the easy drape and versatility of a cardigan. It’s the perfect layering piece for cool mornings, breezy afternoons, and cozy evenings, offering both sophisticated style and practical comfort.
Crocheting your own “September” cardicoat allows for unparalleled customization, ensuring a perfect fit, ideal warmth, and a unique design that perfectly captures the spirit of fall.
What Defines a “September” Cardicoat?
The “September” cardicoat is a hybrid garment, tailored for transitional weather:
- Transitional Warmth: It’s more substantial than a typical spring/summer cardigan but lighter than a heavy winter coat. This makes it ideal for temperatures that fluctuate throughout the day, providing just the right amount of warmth.
- Versatile Layering: Designed to be comfortably worn over lighter tops, blouses, dresses, or even a thin sweater, adding an extra layer of warmth without bulk.
- Relaxed Yet Polished: While offering a comfortable, often slightly oversized fit, a good cardicoat maintains a polished appearance through its drape and structured elements like collars or front bands.
- Autumnal Aesthetic: Often crafted in rich, earthy tones, jewel tones, or classic neutrals that harmonize with the fall landscape. Subtle textures or sophisticated stitch patterns enhance its seasonal appeal.
- “Coat-like” Elements: Distinguishing features often include a longer length (hip to mid-thigh), a more defined collar or lapels, and sometimes functional elements like pockets.
Why Crochet a “September” Cardicoat?
- Perfect for In-Between Weather: It fills a crucial gap in your wardrobe, offering warmth without overheating.
- Stylish Statement Piece: A unique, handmade outer layer instantly elevates any outfit, showcasing your crafting prowess and personal style.
- Custom Comfort: You have complete control over the yarn fiber, weight, and stitch pattern, allowing you to fine-tune the warmth, drape, and feel to your exact preference.
- Skill Advancement: Crocheting a full garment like a cardicoat offers an excellent opportunity to master various techniques, including panel construction, shaping (armholes, necklines, lapels), creating crisp seams, and adding functional details like pockets.
- Heirloom Potential: A beautifully crafted cardicoat is a substantial and cherished piece, destined to be a long-lasting favorite.
- Thoughtful Gift: As a luxurious and practical gift, a handmade cardicoat is a true testament to your affection and skill.
Choosing Your Tools & Materials:
The right supplies are paramount for creating a cardicoat that boasts beautiful drape, appropriate warmth, and lasting durability.
- Yarn: The Essence of Drape and Warmth!
- Fiber:
- Wool Blends (e.g., Merino/Acrylic, Wool/Nylon): Excellent choices for their balanced warmth, good drape, and added durability. Superwash wools are fantastic for easier care.
- Alpaca Blends: Luxuriously soft, incredibly warm for their weight, and possess a magnificent drape. Be aware that pure alpaca often requires hand washing.
- Cotton Blends (e.g., Cotton/Acrylic, Cotton/Wool): For a slightly lighter but still substantial feel, perfect for early September days when the air is cool but not frigid.
- Premium Acrylics: Modern acrylics can be surprisingly soft, durable, and come in a vast array of colors and textures, often at a more accessible price point.
- Avoid: Yarns that are too stiff and lack drape, or those that are excessively bulky unless you specifically desire a very oversized, chunky aesthetic.
- Weight:
- Worsted (Aran / Category 4) or Heavy Worsted: This is often the ideal weight, providing good warmth, a reasonable working pace, and beautiful drape.
- DK (Double Knitting / Category 3): Can be used for a slightly lighter cardicoat, but you might opt for a denser stitch pattern to ensure adequate warmth.
- Bulky (Chunky / Category 5): If you desire a very oversized, chunky, and quick-to-make cardicoat, this weight works well, but be mindful of the resulting fabric’s thickness.
- Color Palette: Embrace the richness of autumn! Classic camel, deep olive green, rust, mustard yellow, charcoal grey, navy blue, cream, and muted heathered tones are always popular. Jewel tones like burgundy or sapphire also work beautifully.
- Quantity: Cardicoats are substantial garments and require a significant amount of yarn. Expect to need 1500-2500+ yards for adult sizes (depending on size, length, and yarn weight). Always consult your chosen pattern’s specific recommendations.
- Fiber:
- Crochet Hook:
- Consult your chosen yarn label for a suggested hook size (e.g., 5.0mm, 5.5mm, 6.0mm, 6.5mm).
- Crucial for Garments: Your actual hook size will be determined by achieving the correct gauge for your pattern. You will almost certainly need to adjust your hook size (up or down by half a size) to ensure the proper fit, comfortable drape, and desired fabric density appropriate for a coat-like garment.
- Other Notions:
- Stitch Markers: Essential for marking increase/decrease points, beginning/end of rows, and specific shaping areas.
- Tapestry Needle: For neatly weaving in all yarn ends and seaming the panels together.
- Scissors.
- Measuring Tape: For frequent measurements during construction, especially critical for garment sizing.
- Buttons or Toggle (Optional): If your design includes a front closure. Choose buttons that complement the style and weight of your yarn.
- Sewing Needle & Matching Thread: To securely attach buttons (if applicable).
Understanding Sizing & Gauge (ABSOLUTELY CRITICAL for Garments!)
Accurate sizing is paramount for a comfortable, well-fitting, and beautifully draping cardicoat.
General Adult Sweater Sizing (Approximate Measurements):
| Size | Approx. Bust/Chest Circ. | Approx. Finished Length (Shoulder to Hem) | Approx. Sleeve Length (Underarm to Cuff) |
|---|---|---|---|
| XS | 30-32 inches | 25-28 inches | 18-19 inches |
| S | 34-36 inches | 26-29 inches | 18-19 inches |
| M | 38-40 inches | 27-30 inches | 19-20 inches |
| L | 42-44 inches | 28-31 inches | 19-20 inches |
| XL | 46-48 inches | 29-32 inches | 20-21 inches |
| 2XL | 50-52 inches | 30-33 inches | 20-21 inches |
Export to Sheets
Disclaimer: These are general averages. Always refer to the specific pattern’s measurements and sizing chart. Most cardicoats are designed with “positive ease” (extra room) for layering; your pattern will specify this.
How to Make a Gauge Swatch (Do NOT Skip This Step!):
- Chain: Chain about 25-30 stitches, plus any turning chains (e.g., ch 3 for dc) as per your chosen main stitch pattern.
- Work: Crochet a square of at least 6×6 inches (15×15 cm) using the specific hook size you plan to use for the body of the cardicoat. A larger swatch provides a more accurate measurement.
- Wash & Block: Fasten off your swatch. Crucially, wash and block your swatch exactly as you plan to treat the finished cardicoat. This step relaxes the fibers and reveals the true stitch size and drape after washing, which can change significantly, especially with natural fibers.
- Measure: Once dry, lay the swatch flat. Place a ruler over the center. Count how many stitches fit within 4 inches (10 cm) and how many rows fit within 4 inches (10 cm).
- Adjust:
- If you have more stitches per inch than your pattern (or desired gauge) states (your work is too tight), go up half a hook size and re-swatch.
- If you have fewer stitches per inch than your pattern states (your work is too loose), go down half a hook size and re-swatch.
- Repeat until your gauge precisely matches.
General Stitch Patterns for a “September” Cardicoat:
- Main Body (for warmth, drape, and texture):
- Half Double Crochet (hdc): Creates a dense, warm fabric with good stitch definition and comfortable drape.
- Double Crochet (dc): Works up quicker, creating a slightly looser fabric with more flow.
- Moss Stitch (Linen Stitch): (
sc, ch 1, sk 1) Produces a dense, textured, and even fabric with excellent drape. - Simple Textured Stitches: Variations like the sedge stitch, grit stitch, or post stitch combinations can add beautiful visual interest and insulation without being overly complex.
- Ribbing (for cuffs, hem, and collar/front bands):
- Front Post/Back Post Double Crochet (fpdc/bpdc): Creates a sturdy, elastic, and professional-looking ribbed edge that maintains its shape well. Ideal for a structured hem and crisp front bands.
- Single Crochet in Back Loop Only (sc blo): A simpler, flexible ribbing option, good for cuffs and less rigid hems.
- Collar/Lapels: Often worked in a tight ribbing (fpdc/bpdc) or a subtle textured stitch to provide structure and a defined look.
Step-by-Step Construction: The “September” Cardicoat (Panel-Based Method)
This construction method involves crocheting individual flat panels (back, two fronts, two sleeves) and then seaming them together. This approach is excellent for creating a structured, coat-like garment with crisp edges and a tailored fit.
Phase 1: The Back Panel
- Starting Chain: Chain the number of stitches specified by your pattern for the lower edge of the back panel.
- Ribbed Hem: Work several rows of your chosen ribbing stitch (e.g., fpdc/bpdc) to create a sturdy, elastic hem.
- Body: Continue working flat in your chosen main stitch pattern until the panel reaches the desired height before the armholes begin.
- Armhole Shaping: On both ends of the row, follow your pattern’s instructions to decrease stitches, creating the curve for the armholes.
- Shoulder/Neck Shaping: Continue working flat, shaping the shoulders and the back neck opening (if any) as per your pattern.
- Fasten off, leaving a long tail for seaming if desired.
Phase 2: Front Panels (Make 2 – Left & Right)
- Starting Chain & Ribbed Hem: Similar to the back panel, chain and work the ribbed hem to match the back.
- Body: Work flat in your main stitch pattern.
- Front Opening/Lapel Shaping: As you work up the body, your pattern will guide you on how to shape the front opening. This often involves gradually decreasing stitches along the front edge (towards the center of the cardicoat) to create a V-neck, or shaping increases/decreases to form lapels.
- Armhole Shaping: Shape the armholes on the outer edge of each front panel to match the armholes on the back panel.
- Shoulder Shaping: Shape the shoulders to match the back panel’s shoulders.
- Fasten off, leaving long tails for seaming.
Phase 3: Sleeves (Make 2)
Each sleeve is typically worked flat and then seamed, or worked in the round.
- Starting Chain & Ribbed Cuff: Chain for the wrist circumference and work several rows of your chosen ribbing stitch for the cuff.
- Body: Continue working in your main stitch pattern.
- If working flat: Work in rows, increasing gradually along both edges to widen the sleeve towards the armhole.
- If working in the round: Join the cuff into a round, then work in continuous rounds, increasing periodically to widen the sleeve.
- Armhole Cap Shaping: Once the sleeve reaches the desired length from the cuff, follow your pattern’s instructions to decrease stitches at the top of the sleeve, creating the curve (cap) that will fit into the armhole.
- Fasten off, leaving a long tail for seaming.
Phase 4: Assembly
This is where your individual panels come together to form the cardicoat. Use your tapestry needle and a strong, invisible seaming method (like the mattress stitch) for a professional finish.
- Shoulder Seams: Align the shoulder edges of the front panels with the shoulder edges of the back panel. Seam them together securely.
- Sleeve Seams (if worked flat): Fold each sleeve in half lengthwise and seam the side edges together from the cuff to the armhole cap.
- Set-in Sleeves: Align the top of each sleeve cap with the armhole opening on the body of the cardicoat. Carefully seam the sleeve caps into the armholes, distributing the stitches evenly.
- Side Seams: Align the side edges of the front panels with the side edges of the back panel. Seam them together from the armhole down to the hem.
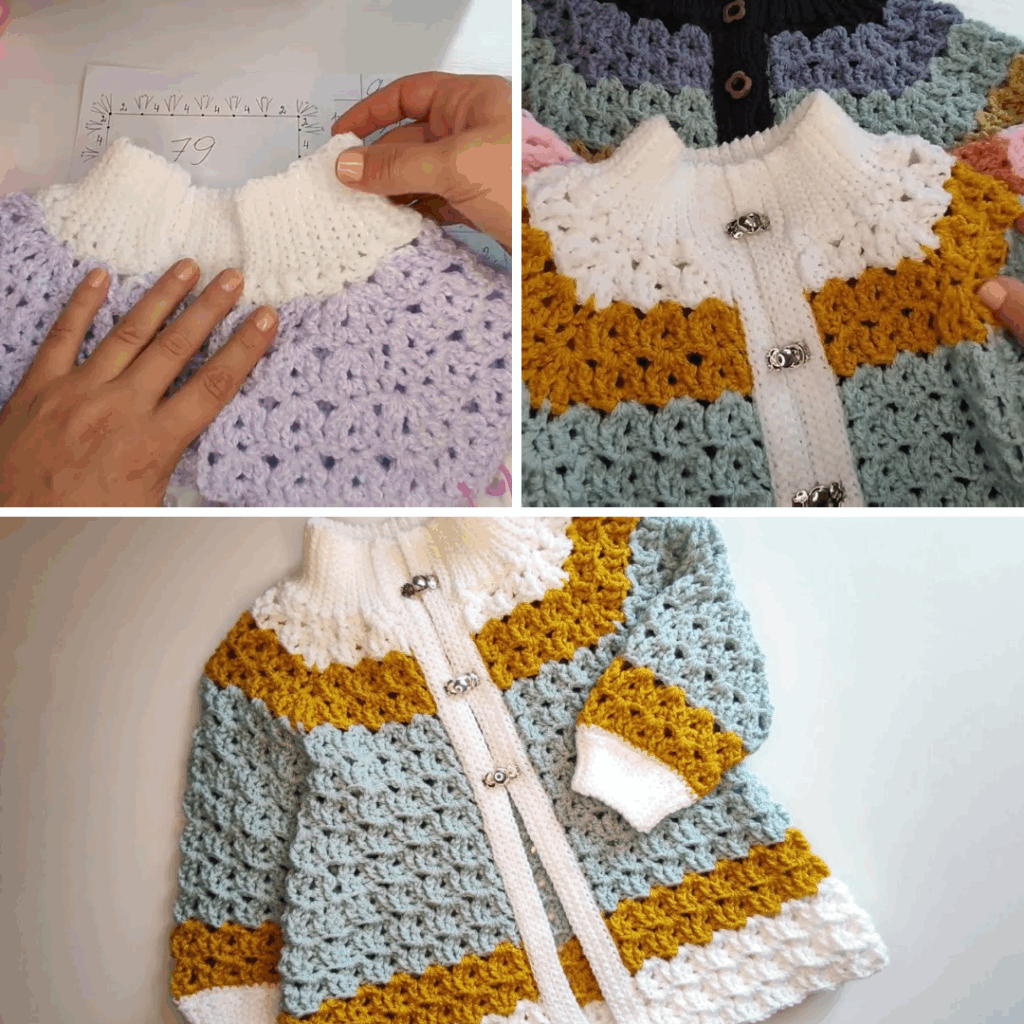
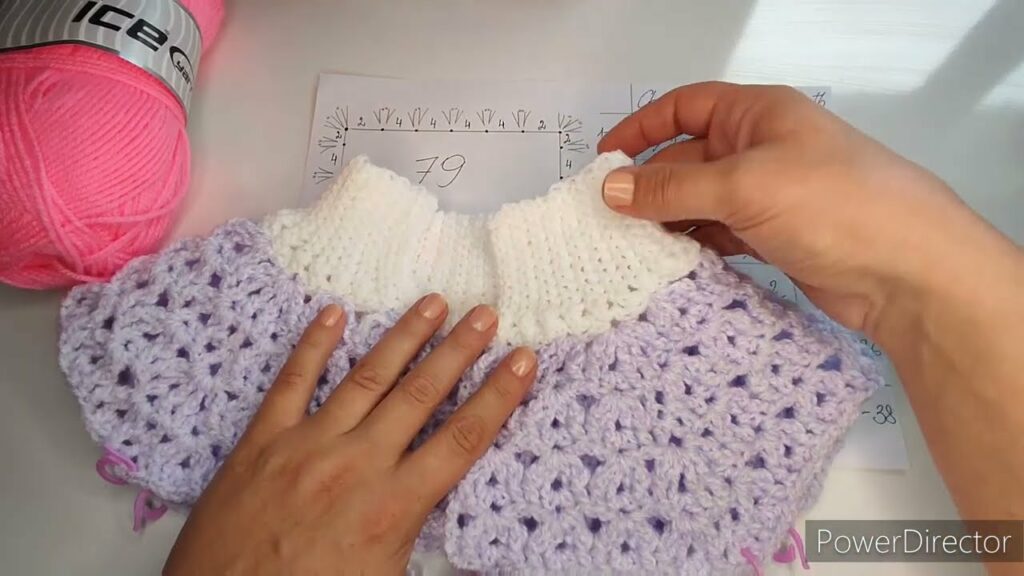
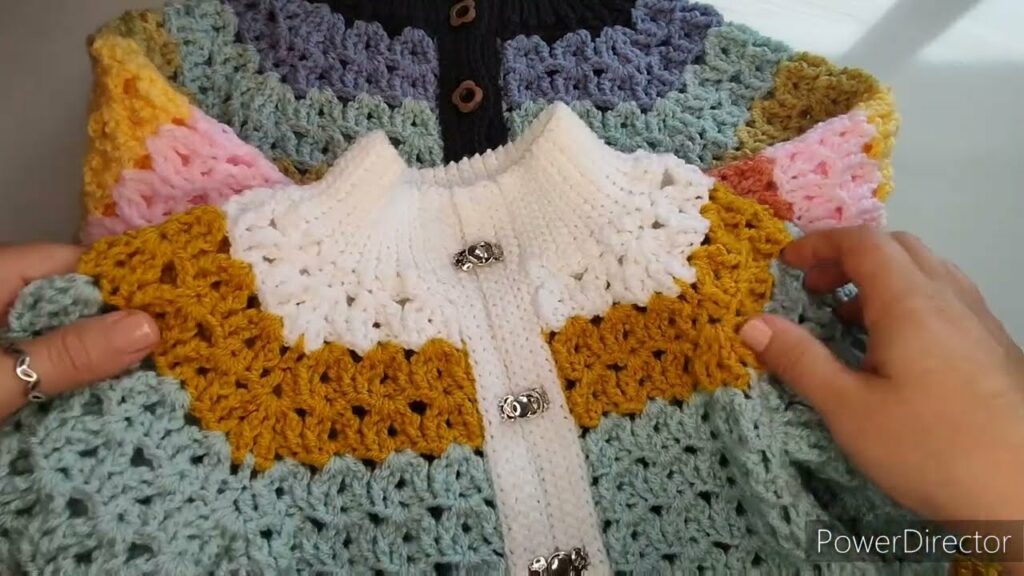
Phase 5: Front Bands & Collar/Lapels
This final structural element brings definition and polish to your cardicoat.
- Front Bands:
- Attach yarn to the bottom corner of one front hem.
- Working along the entire front opening (up one front panel, around the back neck, and down the other front panel), evenly pick up stitches along the raw edge. The number of stitches picked up will determine how flat your band lies.
- Work several rows of your chosen ribbing stitch (e.g., fpdc/bpdc) or a solid stitch to create a neat, sturdy band. If you plan to add a closure, incorporate buttonholes on one side at this stage.
- Collar/Lapels (if separate):
- If your pattern uses a separately crocheted collar or lapel piece, work it according to the pattern’s instructions, shaping it as desired.
- Once complete, carefully align and securely sew the collar/lapel piece onto the neckline and/or front bands of the cardicoat.
Phase 6: Finishing Touches
Video Tutorial part 1 ;
These final steps elevate your handmade garment to a truly professional standard.
- Weave in All Ends: Using your tapestry needle, meticulously weave in every single yarn tail. Secure them firmly by weaving them into existing stitches in different directions to prevent unraveling. This is crucial for a neat and durable finish.
- Add Pockets (Optional): If your design includes pockets, crochet two separate panels for the pockets. Decide on their placement on the front of the cardicoat. Securely sew them onto the cardicoat along three sides, leaving the top edge open.
- Attach Buttons/Toggle (Optional): If your cardicoat has a closure, securely sew your chosen buttons or a toggle onto the front band, aligning them precisely with any buttonholes you created.
- Blocking (ABSOLUTELY CRUCIAL for Garments!):
- Gentle Wash: Fill a basin with cool water and a small amount of mild, wool-friendly detergent. Gently submerge the entire cardicoat and let it soak for 20-30 minutes. Do not agitate or wring.
- Remove Excess Water: Gently squeeze out excess water. Roll the cardicoat in a clean, dry towel and press firmly to absorb as much moisture as possible.
- Shape & Dry: Lay the cardicoat flat on blocking mats. Gently stretch and shape it to the correct finished dimensions (bust width, body length, sleeve length, collar/lapel shape). Smooth out any unevenness and define the edges. Use rust-proof T-pins to hold the shape firmly.
- Air Dry Completely: Allow the cardicoat to air dry completely. Blocking is a transformative step that relaxes the fibers, evens out your stitches, enhances the drape, and gives your cardicoat a beautifully polished, professional appearance.

Tips for “September” Cardicoat Success:
- Yarn Choice for Drape: Select yarns that will hang nicely without being too stiff or too flimsy, ensuring the cardicoat has a beautiful flow.
- Gauge Precision: Essential for a proper fit. Even slight deviations can significantly alter the finished size and drape of a large garment.
- Seaming Quality: For panel construction, neat and strong seams are crucial. Practice your seaming technique to ensure an almost invisible finish.
- Finishing Matters: Well-defined ribbing, crisp front bands, and thorough blocking elevate a handmade garment from good to exceptional.
- Pockets are Practical: Consider adding pockets for functionality and a classic cardicoat look.
- Measure Your Body: Always take your own measurements (or the recipient’s) and compare them to the pattern’s schematic to ensure a truly custom and comfortable fit.
Video Tutorial Part 2 ;
Creating a crocheted “September” cardicoat is a rewarding endeavor that culminates in a truly versatile, stylish, and comfortable garment. Embrace the beauty of the season by crafting a piece that’s perfect for crisp fall days and cool evenings. Happy hooking!