by
by As the days shorten and the air takes on that crisp, invigorating chill, the period of the autumn equinox arrives – a beautiful transition where the warmth of summer gently yields to the embrace of fall. It’s a time for golden sunlight filtering through changing leaves, pumpkin spice, and the delightful dilemma of what to wear when temperatures fluctuate throughout the day. For this nuanced season, the crochet cape emerges as the quintessential garment: a stylish, hands-free “shawl for coolness” that marries the structured elegance of a cape with the light, flowing comfort ideal for autumnal days.
Embracing the Autumn Equinox: Why a Crochet Cape is Ideal
The autumn equinox presents unique layering challenges. Mornings can be brisk, afternoons surprisingly warm, and evenings crisp with a sudden chill. A traditional heavy coat is too much, and a simple scarf might not offer enough coverage. This is where the crochet cape shines:
- Perfect Transitional Layer: It provides just the right amount of warmth to ward off a cool breeze without causing overheating during midday sun.
- Effortless Versatility: Unlike a traditional shawl that can slip, a cape often features a defined neckline and drapes beautifully over the shoulders, staying in place as you move. This “hands-free” comfort allows for freedom of movement while keeping you cozy.
- Chic Styling: A crochet cape instantly elevates an outfit. It can be dressed down over jeans and a sweater for a casual autumn stroll, or elegantly draped over a dress for an evening out, adding a touch of rustic charm and sophistication.
- Easy On/Off: Its open design makes it incredibly easy to throw on when a chill sets in and just as easy to shed when the sun comes out.
Defining the “Cape as a Shawl”: Design Features for Coolness
While we call it a cape, its role as a “shawl for coolness” dictates specific design elements that differentiate it from heavier, more substantial winter capes:
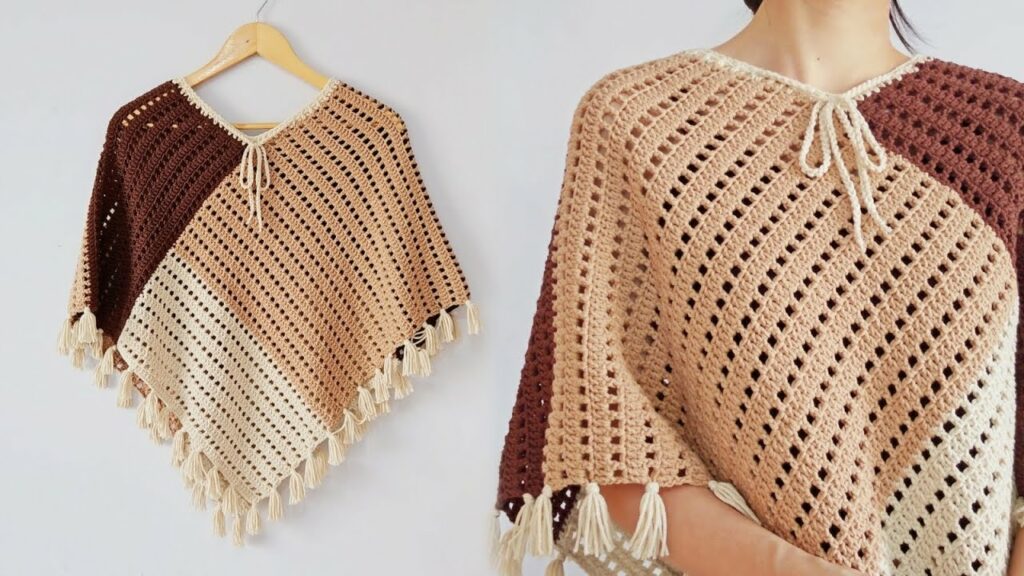
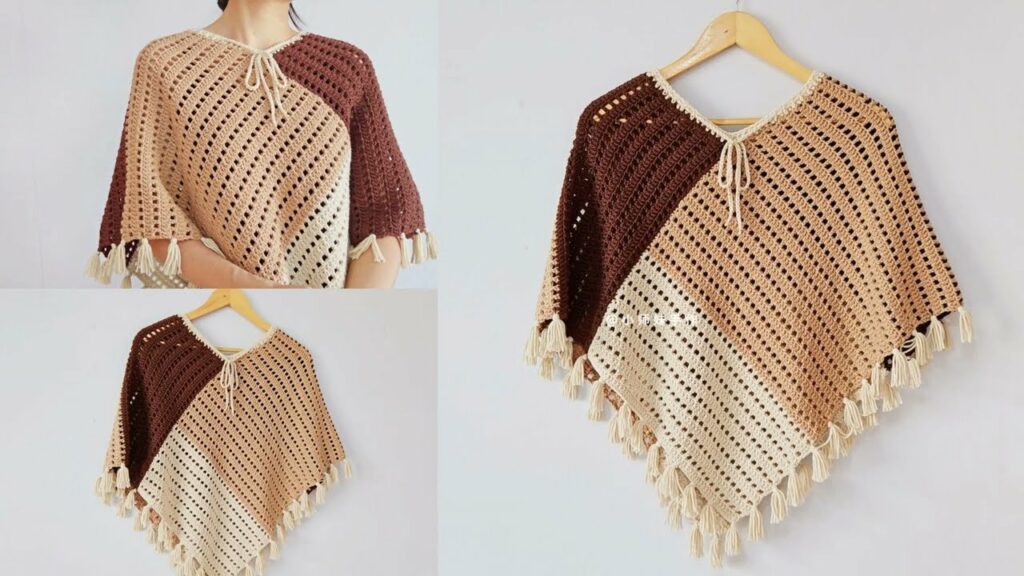
- The Flowing Silhouette: A crochet cape for the autumn equinox typically begins at the neckline and expands outwards in a circular or semi-circular fashion, creating a graceful drape that flows around the body. It covers the shoulders, back, and often part of the arms, offering comforting coverage without restricting movement.
- Openwork or Drapey Stitches: The key is breathability. Instead of dense, closed stitches, patterns often incorporate:
- V-Stitch (dc, ch 1, dc): Creates a lovely, subtle openwork that is both airy and elegant.
- Shell Stitch: Adds beautiful texture and a decorative element, allowing for a gentle flow.
- Double Crochet (dc) or Half Double Crochet (hdc) with a larger hook: Using a hook size slightly larger than typically recommended for the yarn will result in a looser, more pliable fabric with excellent drape, perfect for a “shawl” feel.
- Moss Stitch (Linen Stitch): While dense, its unique construction creates a fabric that is incredibly soft, fluid, and comfortable against the skin, offering warmth without stiffness.
- Yarn Choice for Fluidity: The fiber and weight of the yarn are paramount (discussed below). The aim is a fabric that moves with you, cascades elegantly, and isn’t stiff or weighty.
- Closure Options: Capes can be simply left open, or secured with a single button, a decorative toggle, or a chic pin at the neckline, allowing for flexible styling.
Choosing Your Tools & Materials: Embracing Autumnal Hues
The right materials will not only define the cape’s comfort and drape but also beautifully capture the essence of the autumn equinox.
- Yarn: The Fabric of Fall
- Fiber:
- Merino Wool or Alpaca Blends: Offer incredible softness, natural warmth balanced with breathability, and exceptional drape. Look for “superwash” varieties for easier care.
- Cotton or Cotton/Acrylic Blends: Excellent for a lighter feel, good stitch definition, and breathability, making them perfect for warmer autumn days. They are often very durable and easy to wash.
- Bamboo Blends: Known for their silky softness and beautiful drape, they also offer natural breathability.
- Avoid: Very thick, dense, or stiff fibers like unspun roving or overly rigid blends, which are better suited for heavy winter wear.
- Weight:
- DK (Double Knitting / Category 3) or Worsted (Aran / Category 4): These weights are ideal for creating a comfortable, transitional fabric – substantial enough for coolness but not overly bulky.
- Sport (Category 2): Can be used for a very light, airy version, perhaps for early autumn or warmer climates.
- Color Palette: Draw inspiration from the season’s rich tapestry!
- Earthy Neutrals: Deep browns, charcoal greys, warm beiges, and muted olives.
- Jewel Tones: Emerald green, sapphire blue, ruby red, amethyst purple.
- Autumnal Brights: Burnt orange, rust, mustard yellow, cranberry.
- Variegated Yarns: Often feature stunning color shifts that naturally create a “leaf peeping” effect.
- Quantity: Capes are typically quite yarn-intensive. Expect to need anywhere from 1000 to 2500+ yards, depending on the desired length and fullness.
- Fiber:
- Crochet Hook:
- Consult your chosen yarn label for a suggested hook size.
- For a flowing cape, you might choose a hook size one size larger than recommended by the yarn label. This helps create a looser fabric with more drape, enhancing the “shawl for coolness” effect.
- Other Notions:
- Stitch Markers: Essential for keeping track of increases and the beginning of rounds.
- Tapestry Needle: For neatly weaving in all yarn ends.
- Scissors.
- Measuring Tape: Crucial for checking gauge and overall dimensions as you work.
- Optional Closures: Buttons (wooden, ceramic, or metal to complement the autumnal theme), toggle closures, or a decorative clasp/pin.

Stitch Patterns for Autumnal Drape & Texture:
- Primary Body Stitches (for drape):
- Double Crochet (dc): A versatile stitch that builds fabric quickly and has good flexibility.
- Half Double Crochet (hdc): Offers a slightly denser fabric than dc but maintains good drape.
- V-Stitch (dc, ch 1, dc): Creates a lovely open, lacy effect without being too airy, perfect for transitional weather.
- Shell Stitch: Can be used sparingly for elegant rows or as a continuous pattern for a beautiful, textured flow.
- Moss Stitch (Linen Stitch): (
sc, ch 1, sk 1) Produces a fabric that is surprisingly dense yet incredibly soft and fluid.
- Edging & Accent Stitches:
- Picot Stitch: For a delicate, decorative edge.
- Simple Scalloped Edge: Using small shell stitches along the hem.
- Front Post/Back Post Stitches: Can be used for a defined, ribbed neckline or subtle vertical texture.
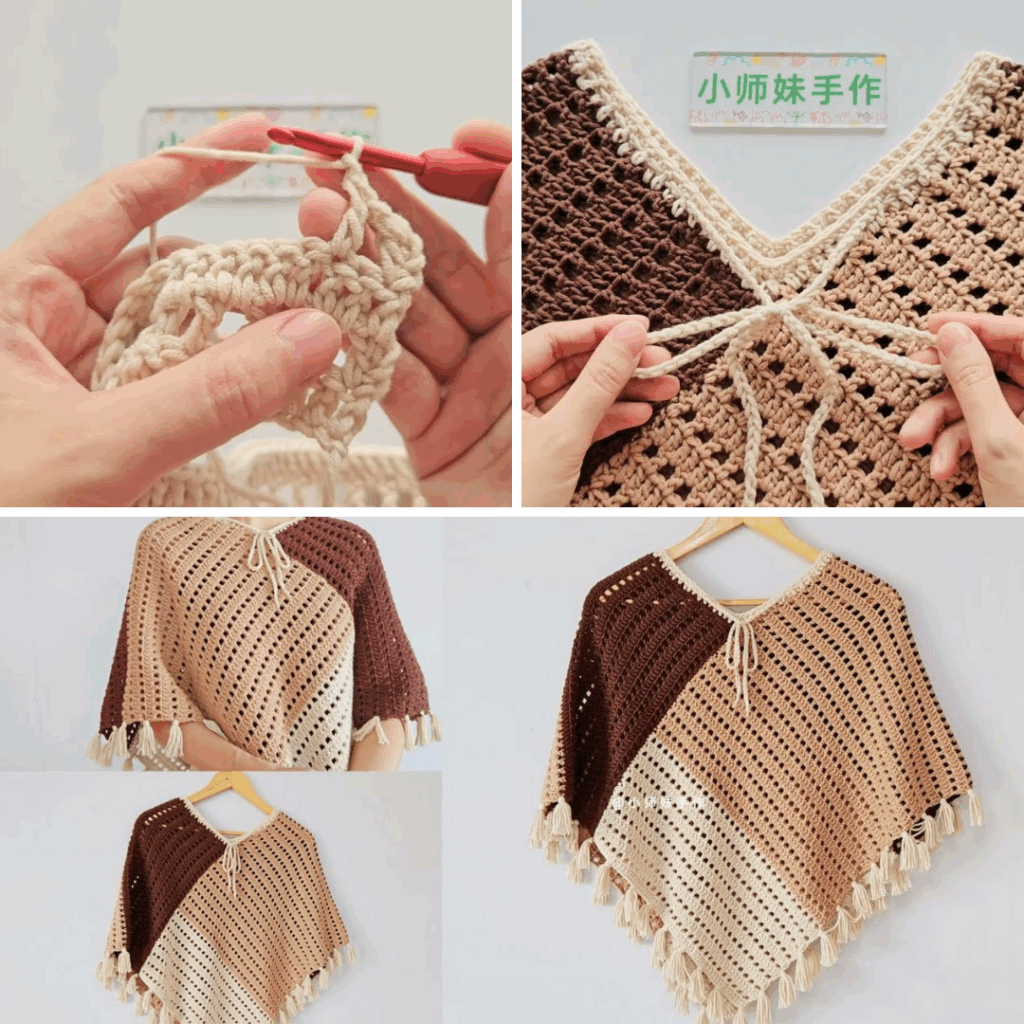
Step-by-Step Construction: The Top-Down Round Yoke Cape
A common and highly satisfying method for crocheting a cape is working from the top down, outwards in rounds, often starting with a round yoke.
Phase 1: The Neckline & Yoke
- Starting at the Neckline: Begin with a foundation chain that forms the circumference of your neck opening, or by chaining a specific number of stitches and joining to form a ring.
- Neckband (Optional but Recommended): Work a few rounds or rows of ribbing (e.g., single crochet in the back loop only, or front post/back post double crochet) to create a neat, elastic collar that sits comfortably.
- Yoke Increases: This is the most crucial part for shaping the cape. You will work in continuous rounds, evenly increasing stitches in each round to create a flat, circular (or slightly oval) yoke that will sit across the shoulders. Your pattern will dictate the specific stitch pattern and the rate of increases. Continue increasing until the yoke reaches the desired width to comfortably drape over your shoulders.
Phase 2: The Body of the Cape
- Transitioning from Yoke: Once the yoke is complete, the body of the cape begins. The work continues in rounds, extending the fabric outwards.
- Continued Increasing: To maintain the cape’s flowing, circular shape and desired fullness, you will continue to increase stitches, but often at a slower rate than in the yoke. This allows the fabric to expand gracefully without becoming ruffled or too bulky.
- Length: Continue working rounds until the cape reaches your desired length (e.g., short, hip-length, or even mid-thigh for more coverage).
Phase 3: Finishing the Edges & Closure
- Bottom Hem: Finish the bottom edge of the cape with a complementary stitch pattern. This could be a few rounds of plain double crochet, a decorative shell border, a contrasting color band, or a simple single crochet edging for a clean finish.
- Front Opening (if applicable): If your cape has a front opening (i.e., not a seamless closed loop), work a neat border along these edges (e.g., a few rows of single crochet or half double crochet). If using buttons, incorporate buttonholes into one of these border rows.
- Closure: Secure buttons, toggles, or a decorative clasp/pin at the neckline or chest level to keep the cape closed if desired.
Phase 4: Finishing Touches
- Weave in All Ends: Meticulously weave in every single yarn tail using your tapestry needle. This is crucial for a clean, professional appearance and to prevent unraveling.
- Blocking (Highly Recommended): Blocking is transformative for a crochet cape. Gently wash the cape according to your yarn’s care instructions. Carefully squeeze out excess water, then lay the cape flat on blocking mats. Gently stretch and shape it to its intended dimensions, smoothing out any unevenness and opening up stitch patterns for maximum drape. Allow it to air dry completely. Blocking makes a significant difference in how the cape hangs and feels.
Tips for the Perfect Autumn Equinox Cape:
- Drape is King: Always prioritize yarns and stitch patterns that create a soft, fluid fabric that flows gracefully, rather than a stiff one.
- Gauge is Crucial: Meeting the pattern’s gauge is vital for ensuring the cape fits correctly around the shoulders and has the intended drape and length.
- Embrace Autumnal Colors: Let the changing leaves and crisp air inspire your color choices. Variegated yarns can be particularly stunning for this effect.
- Consider Subtle Details: A unique button, a small collar, or a textured stitch for the hem can elevate a simple cape.
- Try On as You Go: If possible, try on the cape periodically to assess the fit around the shoulders and the overall length, especially if deviating from a pattern.
Care Instructions for Your Autumnal Companion:
- Follow Yarn Label: Always adhere to the specific care instructions for your chosen yarn. Natural fibers like wool often require hand washing and flat drying, while acrylics may be machine washable.
- Reshape and Lay Flat to Dry: To maintain the cape’s beautiful drape and shape, gently reshape it while wet and lay it flat on a clean towel or drying rack to air dry completely. Avoid hanging, as this can cause stretching.
The crochet cape for the autumn equinox is more than just a garment; it’s a celebration of the season’s beauty and a testament to the warmth and artistry of handmade creations. It’s the perfect companion for crisp morning walks, cozy afternoon reads, and everything in between, embracing you in comfort and style as nature paints its most vibrant hues.
Video Tutorial