 by
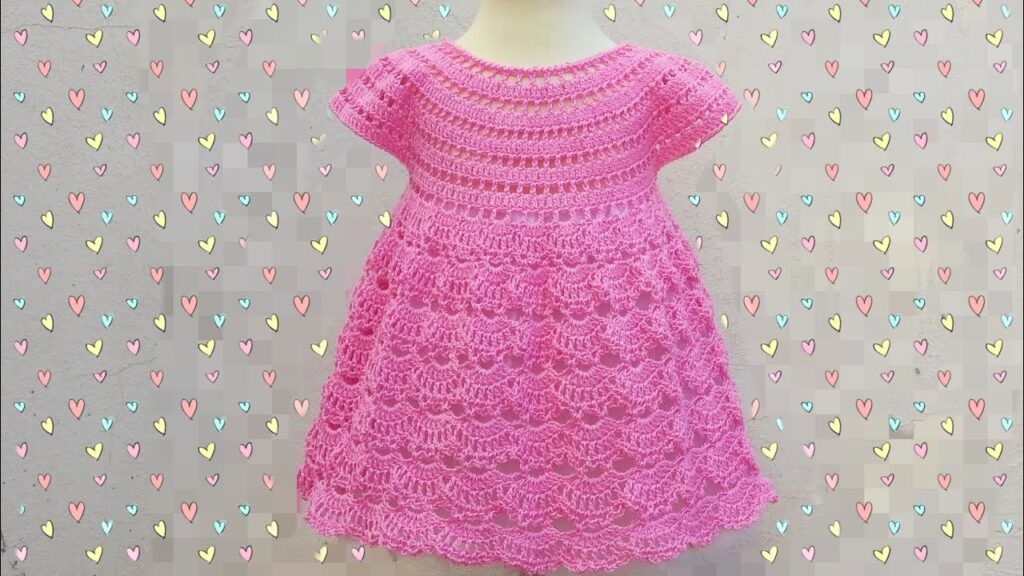
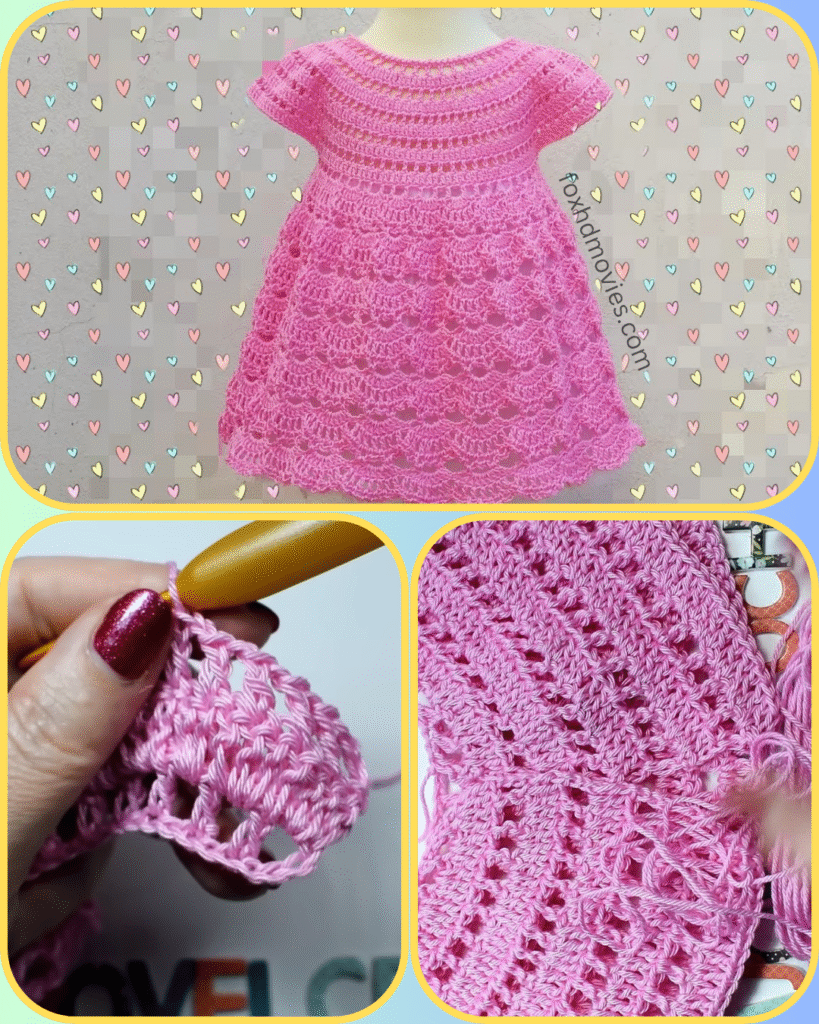
by Hello, lovely crocheters! Get ready to fall in love with this charming “Pink Petal Princess” baby dress. With its beautiful rounded yoke and a skirt full of delicate shell stitches, it’s perfect for any little one. This design is timeless, elegant, and surprisingly fun to make! It’s ideal for special occasions, photoshoots, or just for everyday cuteness.
The dress is worked seamlessly from the top down, making it a rewarding project for those familiar with basic stitches and increasing in the round. Let’s gather our supplies and create something truly enchanting!
Materials You’ll Need:
- Yarn: DK (Light Worsted / 8 ply) weight yarn.
- Main Color (MC): Approx. 150-200g in Pink (as pictured).
- Crochet Hook: 4.0mm (G-6 US) or size needed to obtain gauge.
- Yarn Needle: For weaving in ends.
- Stitch Markers: Very helpful for marking beginnings of rounds or increase points.
- Scissors

Abbreviations Used (US Terms):
- ch: chain
- sl st: slip stitch
- sc: single crochet
- hdc: half double crochet
- dc: double crochet
- sk: skip
- st(s): stitch(es)
- sp: space
- rnd(s): round(s)
- fo: fasten off
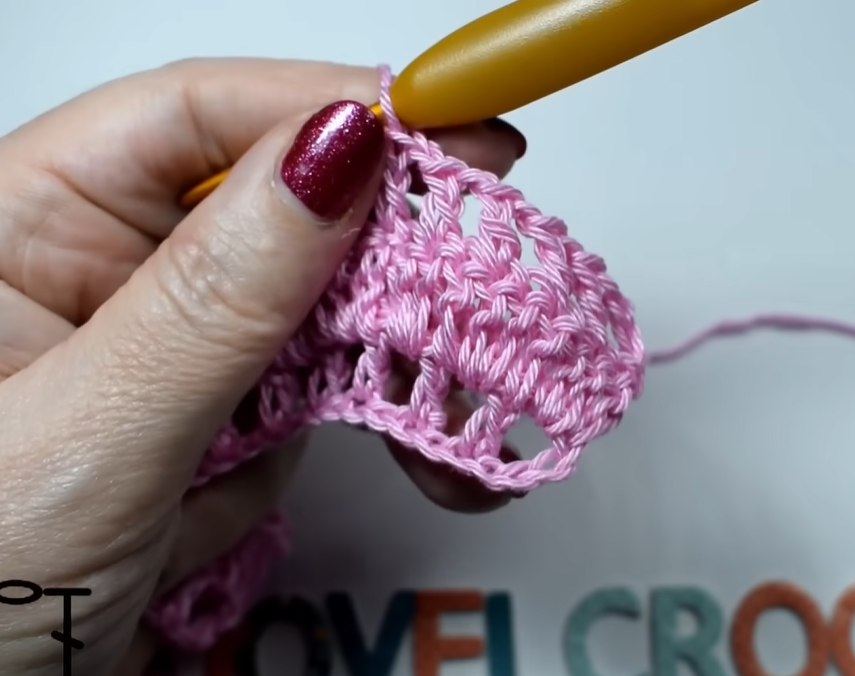
- Shell: (2 dc, ch 1, 2 dc) in same st/space
- Large Shell: (3 dc, ch 1, 3 dc) in same st/space
- Picot: Ch 3, sl st into 3rd ch from hook
Gauge (Crucial!):
16 dc x 8 rows = 4 inches (10 cm) using a 4.0mm hook.
- Make a swatch to check your gauge. If your swatch is smaller, go up a hook size; if it’s larger, go down a hook size.
Pattern Notes:
- This dress is worked seamlessly from the top down, starting at the neckline.
- Chains at the beginning of rounds typically do not count as a stitch unless otherwise specified.
- Join rounds with a sl st to the first stitch of the round (not the beginning chain).
- The yoke is designed to be slightly stretchy to fit over the head without buttons.
- For sizing adjustments, you will modify the initial chain and the number of increase rounds in the yoke.
The Pattern: “Pink Petal Princess” Baby Dress (Newborn – 3 Months)
Part 1: The Yoke (Worked in Rounds)
Start with MC yarn.
- Initial Chain: Ch 72. Join with a sl st to the first ch, being careful not to twist. (72 sts)
- Rnd 1 (Neckline Edging): Ch 1 (does not count as st), sc in each ch around. Join with sl st to first sc. (72 sc)
- Rnd 2: Ch 2 (does not count as st), dc in each st around. Join with sl st. (72 dc)
- Rnd 3 (Increase Round): Ch 2, dc in next 5 sts, 2 dc in next st. Repeat from * 12 times around. Join with sl st. (84 dc)
- Rnd 4: Ch 2, dc in each st around. Join with sl st. (84 dc)
- Rnd 5 (Increase Round): Ch 2, dc in next 6 sts, 2 dc in next st. Repeat from * 12 times around. Join with sl st. (96 dc)
- Rnd 6: Ch 2, dc in each st around. Join with sl st. (96 dc)
- Rnd 7 (Increase Round): Ch 2, dc in next 7 sts, 2 dc in next st. Repeat from * 12 times around. Join with sl st. (108 dc)
- Rnd 8 (Armhole Round – Chain Spaces): Ch 2, dc in next 18 sts (front body). Ch 2, sk next 18 sts (sleeve). Dc in next 36 sts (back body). Ch 2, sk next 18 sts (sleeve). Dc in last 18 sts (front body). Join with sl st to first dc. (72 dc + 4 ch-2 spaces)
- You’ve now created the armholes!
- Rnd 9: Ch 2, dc in each dc and 2 dc in each ch-2 space around. Join with sl st. (72 + 8 = 80 dc)
- Rnd 10 (Last Yoke Round): Ch 2, dc in each st around. Join with sl st. (80 dc)

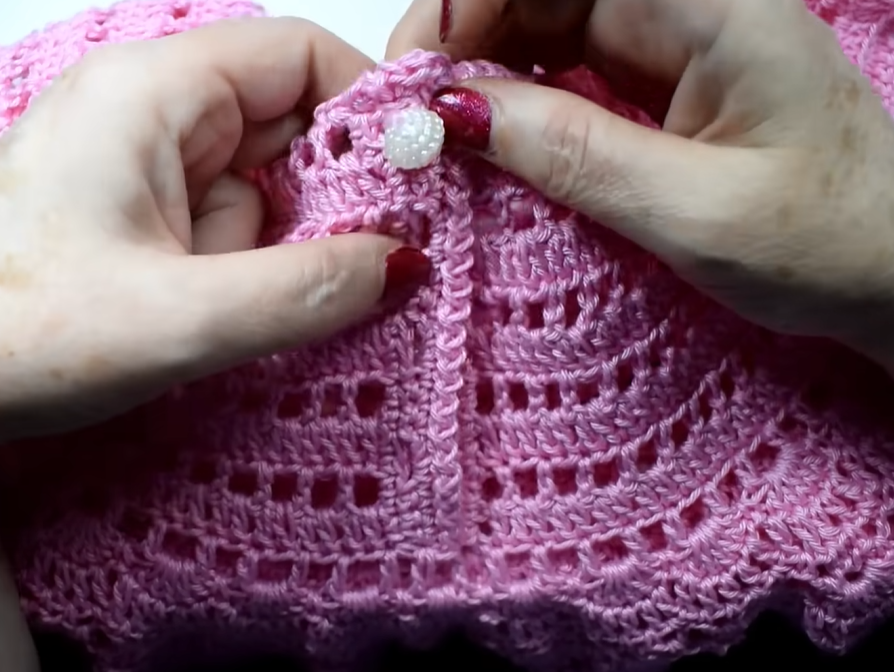
Part 2: The Skirt (Shell Stitch Pattern)
Continue with MC yarn, working directly from the yoke.
- The shell pattern requires a multiple of 8 stitches. 80 stitches is perfect (80 / 8 = 10 repeats).
- Rnd 1 (Foundation for Shells): Ch 3 (counts as first dc), dc in next st. Ch 1, sk 1 st, dc in next 2 sts. Repeat from * around, ending with a dc in the last st if needed to complete the sequence. Join with sl st to 3rd ch of beginning ch 3. (This round creates the base for the shells without a full shell yet).
- Alternatively, and simpler for the image:
- Rnd 1 (Skirt Foundation): Ch 1, sc in first st. Ch 3, sk 3 sts, sc in next st. Repeat from * around. You should end with a ch 3, then join with sl st to first sc. (This creates the large arches for the shells.) You should have 20 sc and 20 ch-3 spaces.
- Rnd 2 (First Shells): Ch 3 (counts as 1 dc). In the first ch-3 space, work (2 dc, ch 1, 3 dc) – this completes your first Large Shell. In the next ch-3 space, work (3 dc, ch 1, 3 dc) – a Large Shell. Repeat from * around in each ch-3 space. Join with sl st to 3rd ch of beginning ch 3. (20 Large Shells)
- Rnd 3: Ch 3 (counts as 1 dc). In the first ch-1 space of the first Large Shell, work (2 dc, ch 1, 3 dc). In the ch-1 space of the next Large Shell, work (3 dc, ch 1, 3 dc). Repeat from * around. Join with sl st to 3rd ch of beginning ch 3. (20 Large Shells)
- Rnd 4 (Increase Round – Optional, for more flare): Ch 3 (counts as 1 dc). In the first ch-1 space of the first Large Shell, work (3 dc, ch 1, 3 dc, ch 1, 3 dc) – this is a double shell increase. In the ch-1 space of the next Large Shell, work (3 dc, ch 1, 3 dc). Continue alternating one double shell with one single large shell around the skirt, ensuring the skirt flares nicely. Adjust spacing as needed. Join with sl st to 3rd ch of beginning ch 3.
- The image shows significant flare, so some increases like this are necessary. You can also increase by working an extra shell in one or two spaces, or by changing to a slightly larger hook for the skirt.
- A simpler increase might be to do (3dc, ch1, 3dc) in a ch-1 space and then (2dc, ch1, 2dc) in the next ch-1 space to vary the size of shells and create subtle increases.
- Rnd 5 – 15 (or until desired length): Ch 3 (counts as 1 dc). In the first ch-1 space of the current large shell, work (3 dc, ch 1, 3 dc). In the ch-1 space of the next Large Shell, work (3 dc, ch 1, 3 dc). Repeat from * around. Join with sl st to 3rd ch of beginning ch 3.
- Continue repeating this round, always working (3 dc, ch 1, 3 dc) into the ch-1 space of the previous round’s shells. This will maintain the pattern and natural flare.
- If you performed an increase round, adjust where you start your shells in the next round to center them in the ch-1 spaces.
- Final Edge (Scalloped Edging):
- Rnd 16 (or final length): Ch 1, sc in the first dc. In the ch-1 space of the next Large Shell, work (sc, hdc, dc, Picot, dc, hdc, sc). Sc in the space between the current large shell and the next large shell. Repeat from * around. Join with sl st to first sc.
- Fo MC. Weave in ends.
Video tutorial
Your “Pink Petal Princess” Dress is Complete!
Congratulations! You’ve just crocheted a truly enchanting baby dress. This is a beautiful project that will be cherished and admired. Don’t forget to snap a picture and share your finished creation! I’d love to see your little “Pink Petal Princess” shine.