 by
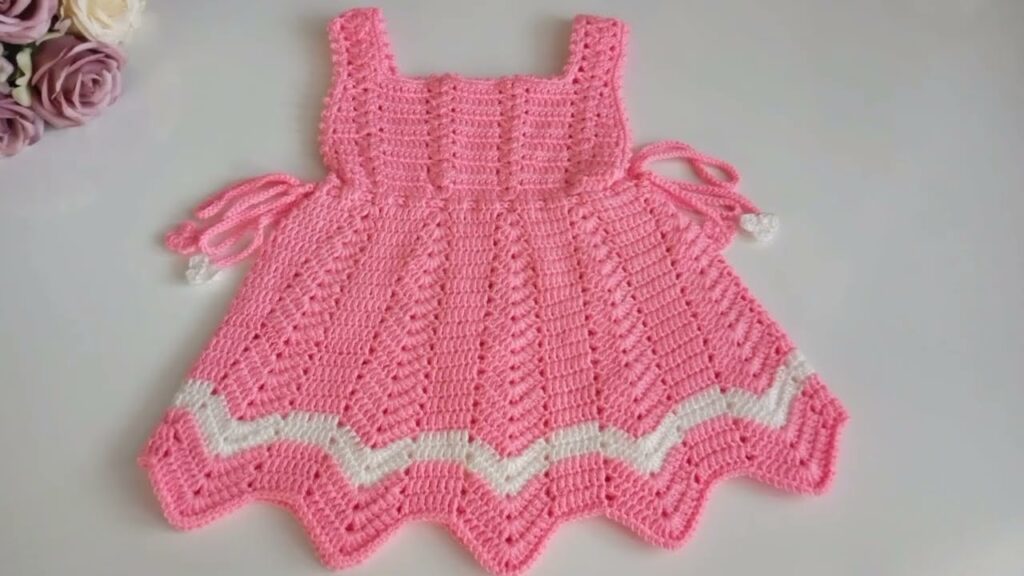
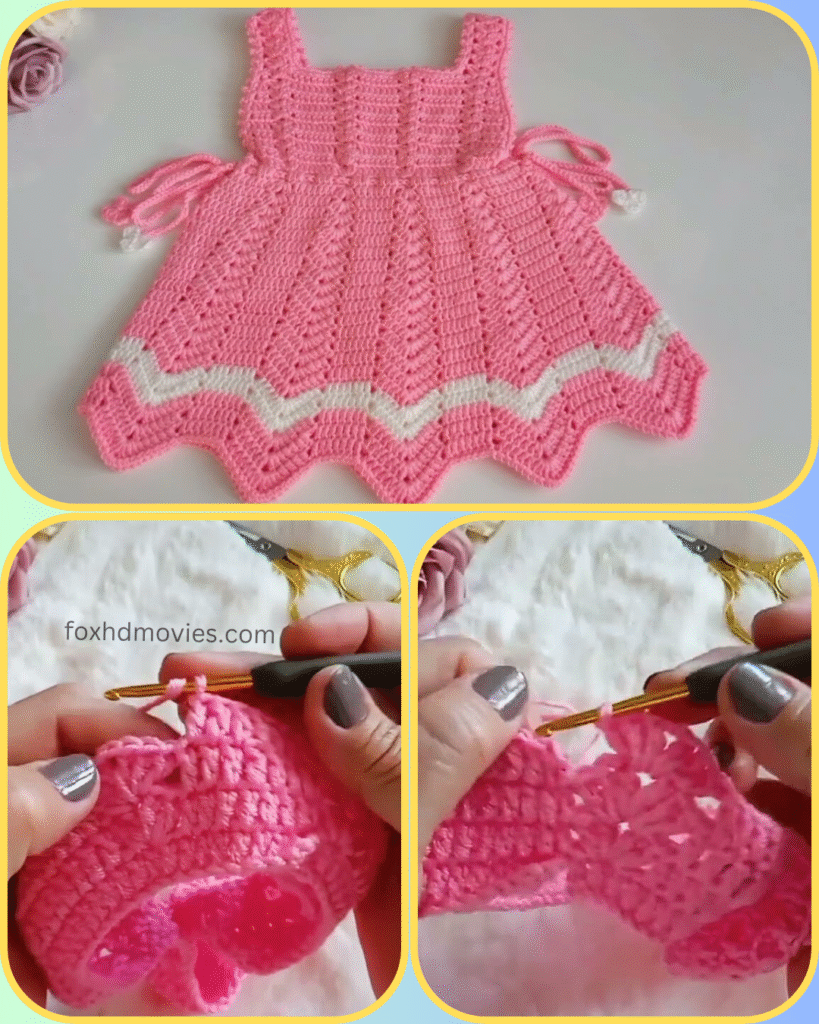
by Ready to crochet something truly special for a little one? This adorable pink baby dress features a charming square neckline, a beautiful textured chevron skirt, and sweet tie details at the waist. It’s a perfect project for an intermediate crocheter looking to create a unique and cherished gift!
This pattern is designed for a baby size (approximately 6-12 months), but I’ll include notes on how to adjust for a larger fit.
Difficulty Level: Intermediate (familiarity with basic crochet stitches and working chevron patterns)
Materials You’ll Need:
- Yarn: DK weight (Category 3) yarn
- Main Color (MC – Pink in the example) – approx. 200-250 yards
- Contrasting Color (CC – White in the example) – approx. 30-50 yards
- Suggestions: A soft, baby-friendly acrylic or a cotton blend for breathability.
- Crochet Hook: 3.5mm (E/4) or size needed to obtain gauge
- Tapestry Needle: For weaving in ends
- Scissors
- Stitch Markers (optional, but helpful for marking repeats or the start of rounds)
Gauge (worked in DC): 5 DC and 3 rows = 1 inch (2.5 cm) Always check your gauge! Adjust hook size if necessary to achieve the correct sizing.
Abbreviations (US Crochet Terms):
- ch: chain
- sl st: slip stitch
- sc: single crochet
- hdc: half double crochet
- dc: double crochet
- inc: increase (2 stitches in the same stitch)
- dc2tog: double crochet 2 together (decrease)
- sk: skip
- sp: space
- st(s): stitch(es)
- rep: repeat
- RS: right side
- WS: wrong side
- MC: Main Color
- CC: Contrasting Color
Special Stitch: Chevron Pattern (for skirt)
The chevron pattern is created by a combination of increases and decreases. For this dress, we’ll use a (3 dc in same st) for peaks and dc2tog, sk 2, dc2tog for valleys.
Chevron Repeat: (3 dc in same st, dc in next 3 sts, dc2tog, sk 2 sts, dc2tog, dc in next 3 sts). You will end a repeat with the 3 dc in same st that starts the next repeat (so the pattern is (peak), dc 3, dec, sk 2, dec, dc 3).
Pattern Instructions
The dress is worked from the top down, starting with the square yoke, then transitioning to the skirt.
Part 1: The Yoke (MC – Pink)
The yoke is worked in rows, from the top down, with increases at the corners to create the square shape.

- Ch 64. (Adjust initial chain for desired neck opening. This chain will form the entire top edge of the yoke).
- Row 1 (RS): Dc in 4th ch from hook (counts as 1st dc) and in next 9 ch (10 dc for back section). (Dc, ch 2, dc) in next ch (corner 1). Dc in next 10 ch (10 dc for shoulder 1). (Dc, ch 2, dc) in next ch (corner 2). Dc in next 18 ch (18 dc for front). (Dc, ch 2, dc) in next ch (corner 3). Dc in next 10 ch (10 dc for shoulder 2). (Dc, ch 2, dc) in next ch (corner 4). Dc in last 10 ch (10 dc for back section). Turn. (Total 58 dc + 4 ch-2 spaces).
- Row 2 (WS): Ch 3 (counts as 1st dc), dc in each dc to first ch-2 sp. (Dc, ch 2, dc) in ch-2 sp. Repeat from * 3 more times for remaining corners. Dc in each remaining dc to end of row. Turn.
- Repeat Row 2 for 3 more rows (or until yoke measures approx. 4-4.5 inches from neck edge). You will have 5 rows total for the yoke. The stitch count between corners will increase by 2 dc each row.
Part 2: Separating Body and Armholes
- Next Row (RS): Ch 3 (counts as 1st dc), dc in each dc until first ch-2 sp. Dc in ch-2 sp. Skip all stitches between this ch-2 sp and the next ch-2 sp (this forms the first armhole). Dc in next ch-2 sp. Dc in each dc until next ch-2 sp. Dc in ch-2 sp. Skip all stitches between this ch-2 sp and the next ch-2 sp (this forms the second armhole). Dc in next ch-2 sp. Dc in each remaining dc to end of row. Sl st to join to top of ch 3.
- You’ve now connected the front and back sections and formed the armholes. The skirt will now be worked in continuous rounds.
Part 3: The Skirt (MC & CC)
The skirt is worked in rounds using the chevron pattern. The stitch count at the end of the joining row should be a multiple of 16 (the repeat for our chevron pattern: 3 dc + 3 dc + dec + sk 2 + dec + 3 dc = 16 sts). Adjust if necessary by adding a few extra stitches evenly distributed in the first round if needed.
- Round 1 (MC – RS): Ch 3 (counts as 1st dc), dc in each st around. Sl st to join to top of ch 3. (Ensure your total stitch count is a multiple of 16).
- Round 2 (MC – Chevron Start): Ch 3 (counts as 1st dc), dc in next st. (3 dc in next st, dc in next 3 sts, dc2tog over next 2 sts, sk next 2 sts, dc2tog over next 2 sts, dc in next 3 sts). Repeat from * around. Sl st to join to top of ch 3. (You’re creating the valley and peak pattern).
- Self-correction: The image shows a very distinct texture within the chevron. It appears to be a
dcrow followed by a row where thedcare worked into the back loop or something similar to give definition. Also, the pattern appears to have(dc, ch1, dc)or a cluster/puff in the valleys. Let’s simplify slightly to capture the look. The image’s chevron seems simpler, a standard ripple.
- Self-correction: The image shows a very distinct texture within the chevron. It appears to be a

Revised Skirt Pattern (Closer to image):
The stitch looks like a dc ripple, where the dc are sometimes worked into the space or top of the previous dc to give a subtle textured look. Let’s go with a standard ripple and then add a subtle texture. The waves are quite defined.
Starting after separating body and armholes:
- Round 1 (MC – RS): Ch 3 (counts as 1st dc), dc in each st around. Sl st to join to top of ch 3. (Ensure your total stitch count is a multiple of 14, as in 7 for one side of the peak/valley, 7 for the other. Example:
dc2tog, dc in 5, 3 dc in next, dc in 5, dc2tog). Let’s aim for a count that allows for easy chevron. If your joined body has ~96 stitches, it’s divisible by 16, which is good for a classic chevron.
Let’s assume the skirt has a base of 96 stitches for 6 repeats of 16 sts.
- Round 2 (MC – Chevron): Ch 3 (counts as 1st dc), dc in next 2 sts, dc2tog over next 2 sts, dc in next 3 sts, (3 dc in next st – peak), dc in next 3 sts, dc2tog over next 2 sts, sk next 2 sts. Repeat from * around. After the last
sk next 2 sts, sl st to join to top of ch 3.- Note: The
sk next 2 stsforms the valley. The3 dc in next stforms the peak.
- Note: The
- Round 3 (MC – Chevron): Ch 3 (counts as 1st dc), dc in each st around, working
dc2togover decreases and3 dcin the center dc of the previous 3-dc peak. Sl st to join. - Repeat Round 3 for the skirt pattern (using MC) until the skirt reaches approximately 6-7 inches from the beginning of the skirt, or desired length.

Adding the White Stripe (CC):
- Next Round (CC): Join CC. Ch 3 (counts as 1st dc), dc in each st around, maintaining the chevron pattern (dc2tog over decreases, 3 dc in peak). Sl st to join.
- Next Round (CC): Ch 3, dc in each st around, maintaining the chevron pattern. Sl st to join.
- Fasten off CC.
Continue Skirt (MC):
- Join MC. Repeat Round 3 of the chevron pattern until the skirt reaches its final desired length.
Bottom Edge (Scallop – MC & CC):
The image shows a pretty scalloped edge formed by the chevron and then outlined with white.
- Last MC Round: Ensure you end with a regular chevron row (like Round 3).
- Next Round (CC – Scallop Outline): Join CC in a
dcin a valley. Ch 1, sc in each of the dc2tog sts. Ch 1, sk next st, (3 dc in next st, ch 1, 3 dc in same st) in the peak st, ch 1, sk next st, sc in each of the dc2tog sts in the valley. Repeat from * around. Sl st to join. - Fasten off.

Part 4: Armhole and Neckline Edging (MC)
- Armhole Edging: Attach MC yarn to the bottom of one armhole. Ch 1, sc evenly around the armhole opening. Sl st to join. Fasten off. Repeat for the second armhole.
- Neckline Edging: Attach MC yarn to one corner of the neckline. Ch 1, sc evenly along the entire neckline edge. Sl st to join. Fasten off.
Part 5: Ties (MC & CC)
- Make 2 Ties: Using MC, Ch a long chain (approx. 40-50 chains). Sl st in 2nd ch from hook and in each ch across. Fasten off.
- Optional White Detail on Ties: Attach CC to one end of each MC chain. Ch 2, then work (dc, ch 1, dc) or a small shell stitch into the end of the MC chain to create a decorative end. Fasten off.
- Attach Ties: Sew or weave the ties into the dress at the waistline, just under the armholes, so they can be tied at the back.
Part 6: Finishing Touches
- Weave in all loose ends with your tapestry needle.
- Block your dress gently to shape and set the stitches.
Video tutorial
Sizing Adjustments:
- For a larger size:
- Yoke: Increase your initial chain for the yoke, ensuring it is a multiple that allows for your 4 sections and corner increases. Work more rows for the yoke before separating armholes.
- Skirt: The skirt is easily adjustable by simply continuing to work more rounds of the chevron pattern until you reach the desired length. If you need a wider skirt, you can increase the number of starting stitches for your skirt base (ensure it remains a multiple of 14 for the chevron).
- Gauge: If you’re using a thicker yarn, adjust your hook size accordingly.
This unique and charming chevron dress is sure to make any baby look adorable! Enjoy the process of creating this lovely handmade piece. Don’t forget to share your finished projects – I love seeing your beautiful work! Happy crocheting!