by
by A tiny mermaid’s dream comes true with a cozy, handmade crochet tail! Perfect for adorable photo shoots, a unique baby shower gift, or simply snuggling up for tummy time, a crocheted mermaid tail for babies is a heartwarming project. This detailed, step-by-step guide will help you create a soft, enchanting cocoon for your little guppy, focusing on techniques ideal for infant sizes.
What is a Crochet Mermaid Tail for Babies?

For babies, a crochet mermaid tail is typically a cocoon-style sleeping bag designed to gently hold their legs and feet, finishing with a decorative fin. It’s meant for supervised use – never for sleeping unsupervised, as it can restrict movement. Think of it as a charming photo prop or a unique blanket for cuddles.
Key Elements of a Baby Mermaid Tail:
- The Opening/Waistband: The top edge where baby slips in, designed for comfort and ease of use.
- The Tail Body: The main tapered section that covers the legs and feet.
- The Fin (or Fluke): The iconic fan-shaped end, adding that magical mermaid flair.
Before You Begin: Gathering Your Oceanic Supplies
Choosing the right materials is crucial for a soft, comfortable, and safe baby item.
- Yarn (Prioritize Softness & Washability):
- Fiber:
- Baby-Specific Acrylic: Excellent choice – incredibly soft, hypoallergenic, durable, and usually machine washable/dryable.
- Superwash Merino Wool: Luxuriously soft, breathable, warm, and conveniently machine washable.
- Cotton or Cotton Blends: Breathable, absorbent, and great for warmer climates. Look for soft, mercerized varieties.
- Weight: DK (Double Knitting) or Worsted Weight (Aran in UK/AU) are ideal. They work up quickly for a baby size and create a nice, cozy fabric.
- Colors: Classic mermaid hues (blues, greens, teals, purples) or softer pastels (aqua, lilac, pale pink). Variegated yarns can create a beautiful shimmering effect.
- Quantity: For a 0-12 month size, you’ll typically need between 250-400 yards (approx. 230-365 meters) of yarn, depending on the exact size and stitch pattern.
- Fiber:
- Crochet Hook:
- Match your yarn weight. A 4.0mm (G) to 5.5mm (I) hook is common for DK/Worsted weight yarn.
- Crucial: Your hook size will be determined by your gauge swatch to ensure proper sizing and fabric density.
- Other Notions:
- Stitch Marker: Essential for marking the beginning of rounds.
- Tapestry Needle: For neatly weaving in ends.
- Scissors.
- Measuring Tape: Indispensable for checking gauge and dimensions.
The Compass of Your Project: Sizing & Gauge (Crucial for Babies!)
Getting the right fit is paramount for a baby item. The mermaid tail should be snug enough to be cozy but loose enough to be comfortable for baby’s legs.
Typical Baby Sizes & Measurements (Finished Garment):
| Size | Approx. Total Length (from waist to fin end) | Approx. Max Circumference (at opening) |
|---|---|---|
| Newborn | 18-20 inches (45-50 cm) | 18-20 inches (45-50 cm) |
| 0-3 Months | 20-22 inches (50-55 cm) | 20-22 inches (50-55 cm) |
| 3-6 Months | 24-26 inches (60-66 cm) | 22-24 inches (55-60 cm) |
| 6-12 Months | 28-32 inches (71-81 cm) | 24-26 inches (60-66 cm) |
Export to Sheets
Disclaimer: These are averages. Always refer to the specific pattern’s size chart if using one, and consider the baby’s actual measurements if known.
How to Make a Gauge Swatch (Do NOT Skip This!):
- Chain: Chain about 20-25 stitches, plus turning chains (e.g., ch 3 for dc) in your chosen main stitch.
- Work: Crochet a square of at least 6×6 inches (15×15 cm) in the main stitch pattern you’ll use for the tail body (e.g., double crochet or shell stitch). A larger swatch gives a more accurate measurement.
- Wash & Block: Fasten off your swatch. Crucially, wash and block your swatch exactly as you plan to treat the finished tail. This relaxes the fibers and shows the true stitch size and drape.
- Measure: Once dry, lay the swatch flat. Place a ruler over the center. Count how many stitches fit within 4 inches (10 cm) and how many rows fit within 4 inches (10 cm).
- Adjust:
- If you have more stitches per inch than your pattern (or desired gauge) states (your work is too tight), go up half a hook size and try again.
- If you have fewer stitches per inch than your pattern states (your work is too loose), go down half a hook size and try again.
- Repeat until your gauge precisely matches.
General Stitch Patterns for Baby Mermaid Tails:

- Body:
- Double Crochet (dc): Works up quickly and creates a soft, draped fabric.
- Half Double Crochet (hdc): Creates a slightly denser, warmer fabric.
- Simple Shell Stitch: (e.g., [5 dc] in one st, skip 2, sl st, repeat) creates a lovely, scaly texture.
- Fin: Typically uses dc or hdc, worked with increases to create the fan shape.
- Opening/Waistband: Simple rounds of hdc or sc, or a basic ribbed band (hdc in back loop only) for a bit of stretch.
Step-by-Step Construction: Crocheting Your Baby Mermaid Tail
We’ll use a top-down approach, starting at the waist/chest opening and working down to the fin. This makes tapering simpler.
Abbreviations Used:
- ch: chain
- sc: single crochet
- hdc: half double crochet
- dc: double crochet
- sl st: slip stitch
- st(s): stitch(es)
- sk: skip
- inc: increase (e.g., 2 dc in one st)
- dec: decrease (e.g., dc2tog)
- […] : repeat instructions in brackets
Phase 1: The Tail Body (Starting from the Top Opening)
- Step 1.1: The Opening/Waistband
- Foundation Chain: Chain a length (e.g., 50-60 chains for 0-3 months) that matches the desired circumference of the tail’s opening (usually around the chest for a baby cocoon). Join with a sl st to the first ch, being careful not to twist.
- Initial Rounds: Ch 2 (counts as hdc or not, as per your pattern). Work 1 hdc (or dc, or your chosen stitch) in each st around. Join with a sl st to the initial ch 2. Repeat for 2-4 rounds to create a comfortable, non-rolling edge.
- Step 1.2: Shaping the Tail Body (Tapering Down)
- Continue working in continuous rounds (or join with sl st at the end of each round) using your chosen main stitch pattern (e.g., hdc, dc, or shell stitch).
- Decreases: To create the tapered shape from the wider opening down to the narrower feet/ankles, you will need to decrease stitches evenly every few rounds.
- Key for Baby Sizes: The frequency and number of decreases will depend on the size you’re making and how quickly you want the tail to narrow.
- For example: For a baby tail, you might decrease 4-6 stitches evenly every 4-6 rounds. Use stitch markers to help evenly space your decreases.
- Example Decrease (hdc2tog): Yarn over, insert hook into next st, yarn over, pull up loop (2 loops on hook). Yarn over, insert hook into next st, yarn over, pull up loop (4 loops on hook). Yarn over, pull through all 4 loops on hook.
- Key for Baby Sizes (Length): Continue working rounds and decreasing until the tail body reaches the desired length from the opening down to where the baby’s feet will end (just before the fin begins). Also, check that the circumference at the current point is suitable for baby’s ankles/feet.
- Step 1.3: Preparing for Fin Attachment
- Work 1-2 straight rounds (no increases or decreases) at the bottom end of the tapered body. This provides a stable base for the fin.
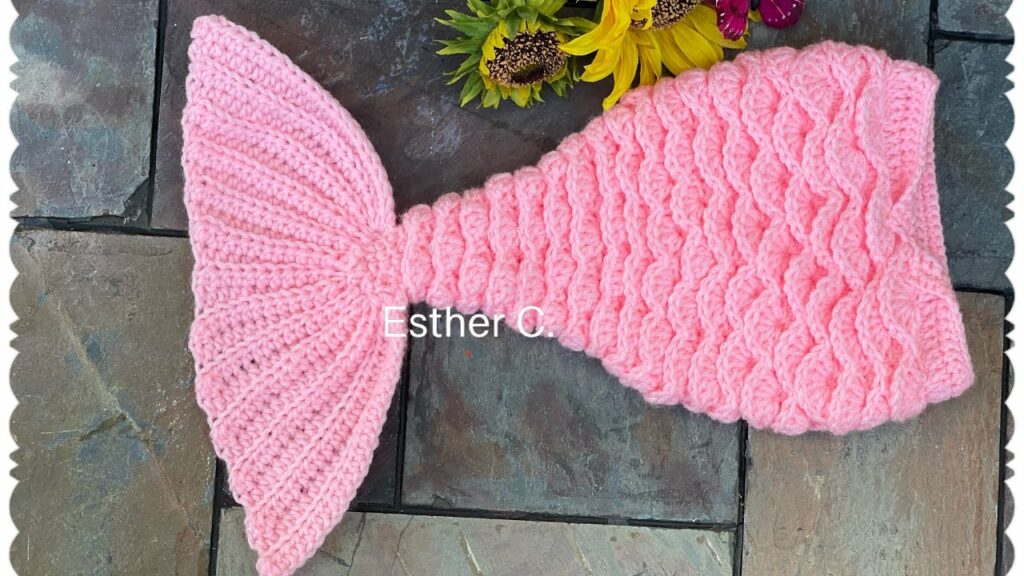
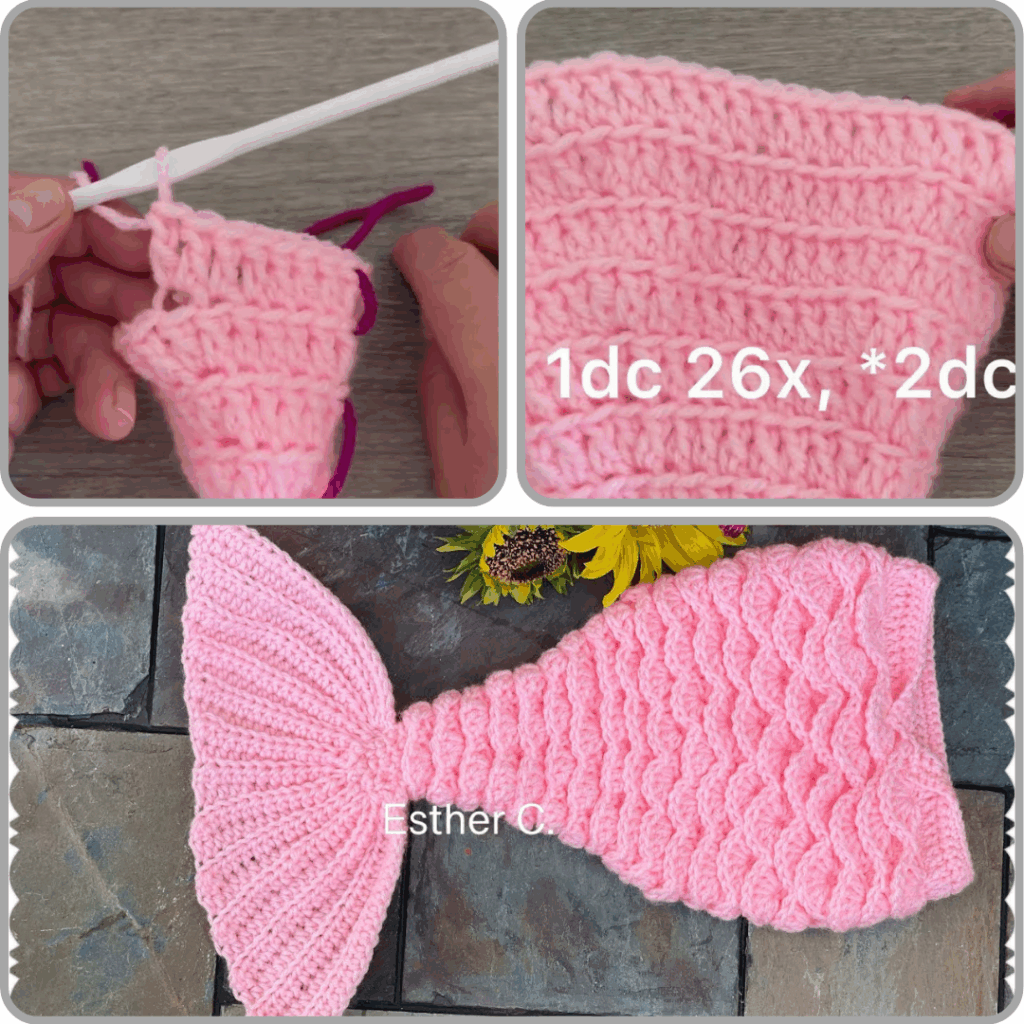
Phase 2: The Fin (Adding the Magical Fluke)
This is the eye-catching part of the mermaid tail! The fin can be worked flat and then sewn on, or worked in rounds and shaped. For babies, working flat and then sewing on is often simpler.
- Step 2.1: Crocheting the Fin (Work Flat)
- Starting Chain: Chain a length (e.g., 20-40 chains for baby) that is about 1.5 times the width of the bottom opening of your tapered tail body.
- Rows & Increases:
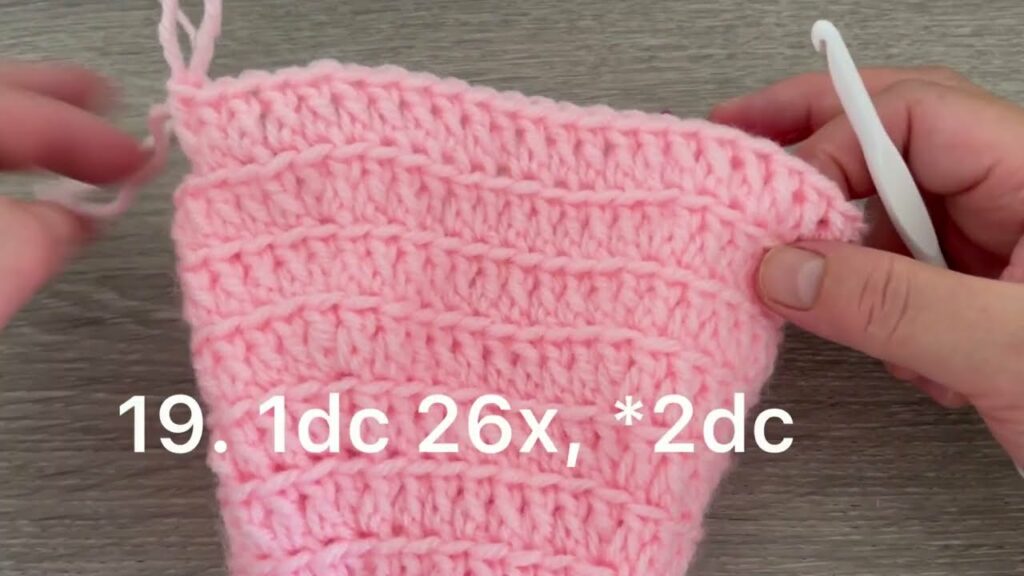
- Row 1: Hdc (or dc) in 2nd ch from hook and in each ch across. Ch 2 (or 3 for dc), turn.
- Increase Rows: Work hdc (or dc) in each stitch across, occasionally adding increases (e.g., 2 hdc/dc in one st) at the beginning and end of rows, or evenly spaced within the row, to gradually create a wider, fan-like shape. The exact frequency of increases will depend on how flared you want the fin.
- Key for Baby Sizes: Continue working rows and increasing until the fin reaches the desired height and width for a baby’s tail (e.g., 6-8 inches / 15-20 cm high and 8-12 inches / 20-30 cm wide at its widest point).
- Finishing Edging (Optional): Work a final row of sc, picot stitches, or small shell stitches around the outer, curved edge of the fin for a polished look. Fasten off, leaving a long tail for sewing.
- Step 2.2: Attaching the Fin to the Tail Body
- Lay the tapered tail body flat. Align the straight top edge of your crocheted fin with the bottom edge of the tail body.
- Using your tapestry needle and the long tail from the fin, securely whip stitch or mattress stitch the fin to the tail body. Ensure the stitches are tight and neat for a secure attachment.
Phase 3: Finishing Touches & Embellishments
This is where your baby mermaid tail comes to life!
- Weave in All Ends: This is paramount for a professional, comfortable, and safe finish. Use your tapestry needle to meticulously weave in all loose yarn tails, hiding them securely within the stitches on the wrong side.
- Blocking (Recommended!):
- Gently wash your finished tail according to your yarn’s care instructions.
- Gently squeeze out excess water (do not wring).
- Lay the tail flat on clean towels or blocking mats. Gently shape it, ensuring the fin is spread nicely and the body is tapered correctly. Use rust-proof pins to hold it in place.
- Allow the tail to air dry completely. Blocking helps to even out your stitches and set the overall shape and drape.
- Optional Gentle Embellishments:
- Crocheted Starfish/Seashells: Create small, flat crocheted motifs (no loose beads!) and securely stitch them onto the tail. Ensure they are completely flat and securely attached.
- Subtle Stitching: You can use contrasting yarn to embroider small “scales” or swirls onto the tail body for added texture.
Safety & Care for Your Baby Mermaid Tail (Crucial!)
Please read these safety warnings carefully, as they are critical for baby items:
- NOT A SLEEPING AID: A crochet mermaid tail is never safe for unsupervised sleep, naps, or overnight use. It poses a suffocation risk and can restrict a baby’s movement. Always supervise the baby when they are in the tail.
- NO LOOSE PARTS: Avoid any small, loose embellishments like beads, sequins, or tiny bells, as they are choking hazards. If adding any sewn-on embellishments, ensure they are absolutely secure and flat.
- NO LONG TIES: Do not add any long drawstrings, ties, or ribbons around the opening, as these can pose a strangulation risk.
- Appropriate Sizing: Ensure the tail is appropriately sized for the baby. It should not be too tight, but also not so loose that the baby can easily slip down inside.
- Washing: Always follow your chosen yarn’s care instructions. For handmade baby items, machine wash on a gentle cycle (in a laundry bag) or hand wash in cool water, then lay flat to dry.
Video Tutorial :
Creating a crochet mermaid tail for a baby is a labor of love that results in a truly enchanting and memorable piece. With careful attention to detail and, most importantly, baby safety, you’ll craft a magical cocoon perfect for adorable moments!