 by
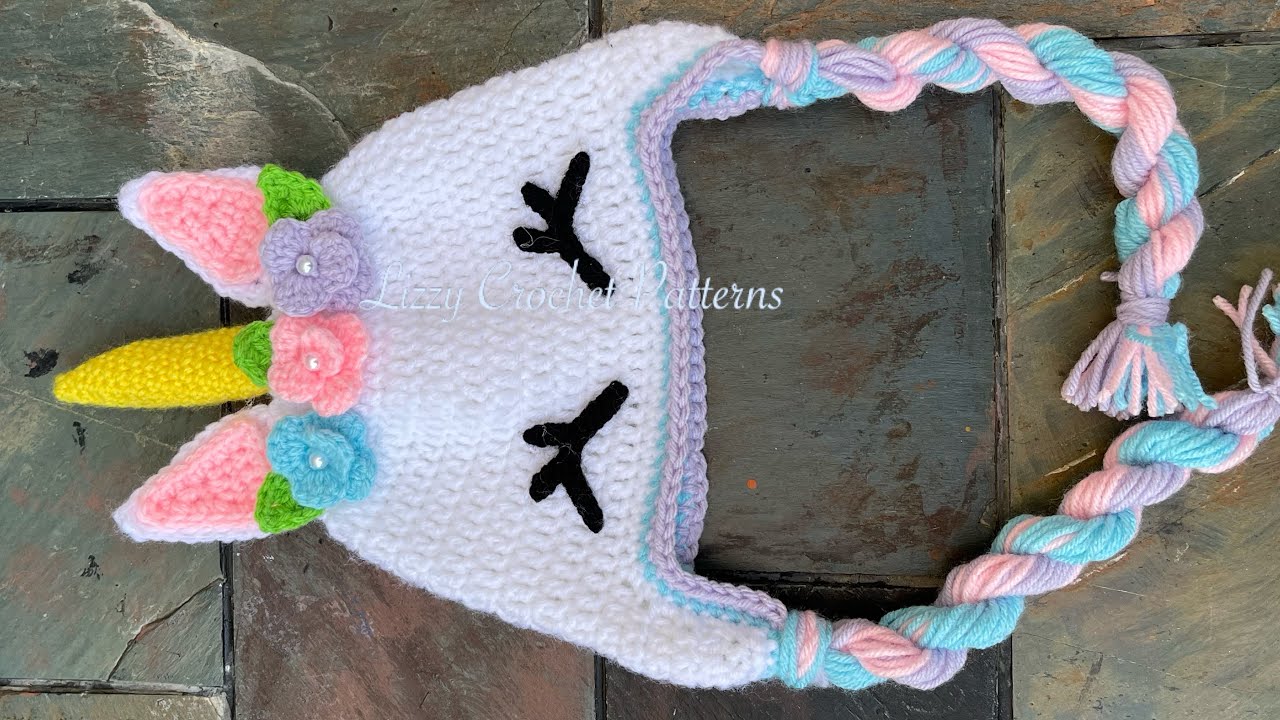
by Imagine the delight on a 5-year-old’s face when they receive their very own unicorn hat, complete with a magical horn and a flowing rainbow mane! This project is not only incredibly charming but can also be surprisingly easy and fast to whip up, even for confident beginners. We’ll break down how to crochet this enchanting accessory step-by-step, focusing on techniques that maximize speed without sacrificing that iconic unicorn magic.
This guide is tailored for a 5-year-old, but the principles can be easily adapted for slightly smaller or larger children by adjusting your initial stitch count and length.
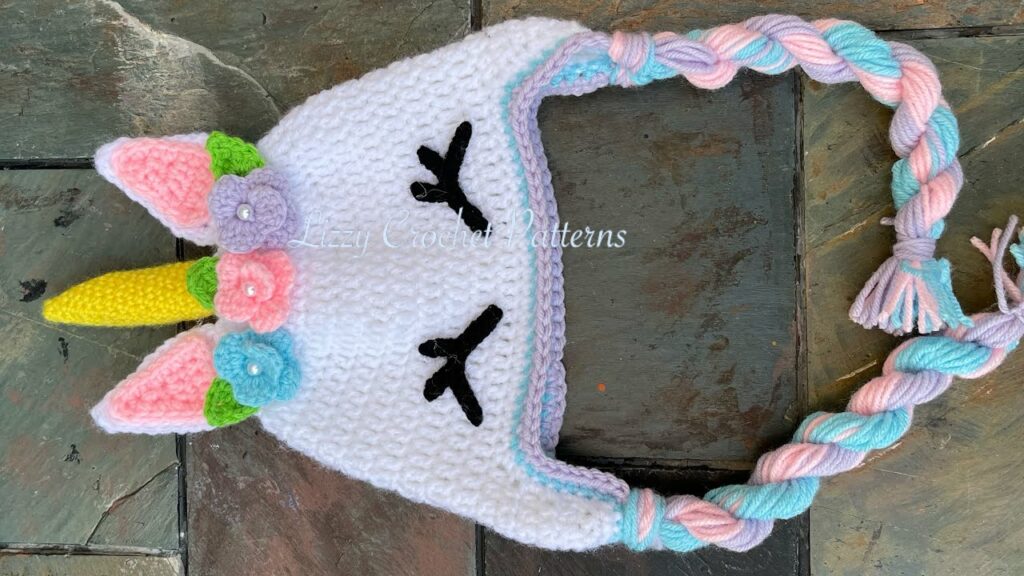
What Makes a Unicorn Hat Magical? The Key Elements
A classic crochet unicorn hat typically consists of four main components:
- The Main Hat Base: A simple beanie in white or a pastel color, forming the unicorn’s head.
- The Unicorn Horn: A sparkling, spiraled cone that stands proudly atop the hat.
- The Ears: Simple, pointed ears that give the hat its animalistic charm.
- The Mane: A vibrant, multi-colored cascade of yarn strands, embodying the unicorn’s playful spirit.
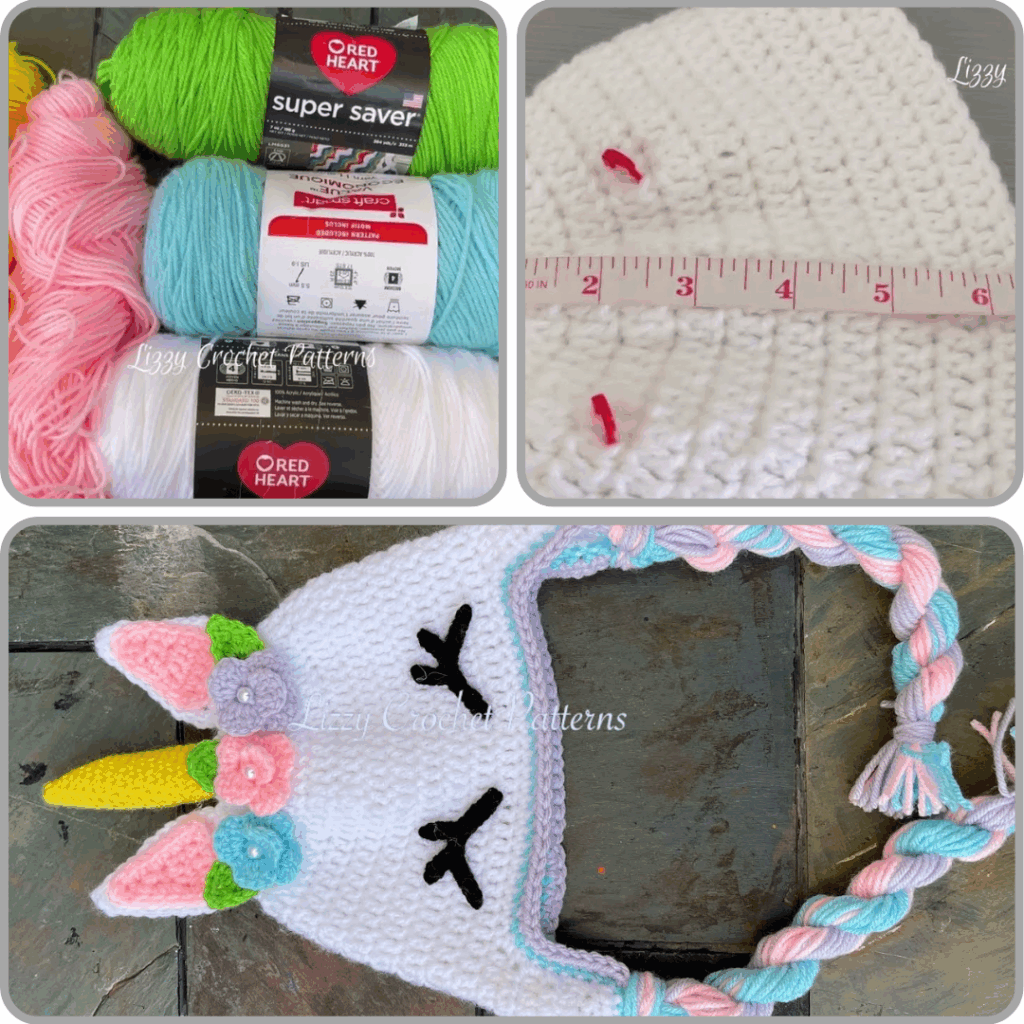
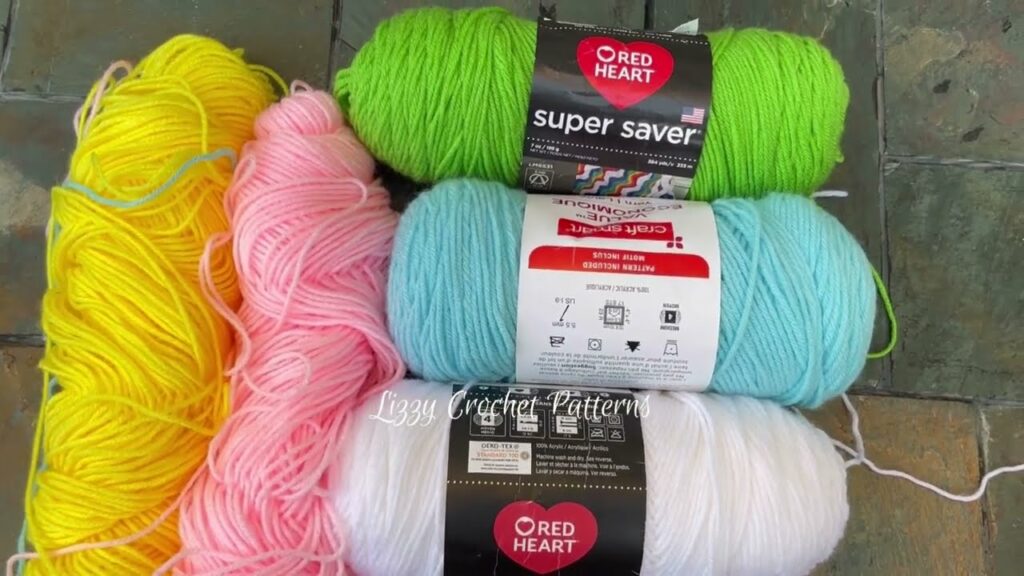
Before You Begin: Gathering Your Magical Supplies
Choosing the right materials is key to a fast and successful project.
- Yarn (Worsted Weight Recommended):
- Main Hat Color: Approximately 100-150 yards (90-130 meters) of white, ivory, or a very light pastel (e.g., blush pink, mint green, sky blue).
- Horn Color: 20-30 yards (18-27 meters) of gold, silver, iridescent white, or a cream color with subtle glitter/sparkle.
- Ear Lining Color: 10-15 yards (9-14 meters) of light pink or a contrasting pastel for the inner ear.
- Mane Colors: Small amounts (5-10 yards / 4-9 meters each) of 3-6 different vibrant colors for a rainbow effect.
- Fiber: Soft acrylic is perfect here – it’s durable, washable, affordable, and comes in a vast array of colors. Worsted weight (Aran in UK/AU) works up quickly and holds its shape well.
- Crochet Hook:
- A 5.0mm (H) or 5.5mm (I) hook is generally good for worsted weight yarn, allowing for a fabric that’s dense enough to be warm but flexible enough to fit comfortably. Your gauge will be the final determinant.
- Other Notions:
- Stitch Marker: Essential for working in continuous rounds.
- Tapestry Needle: For weaving in ends and assembling parts.
- Scissors.
- Fiberfill/Stuffing: A small amount for the horn to help it stand tall.
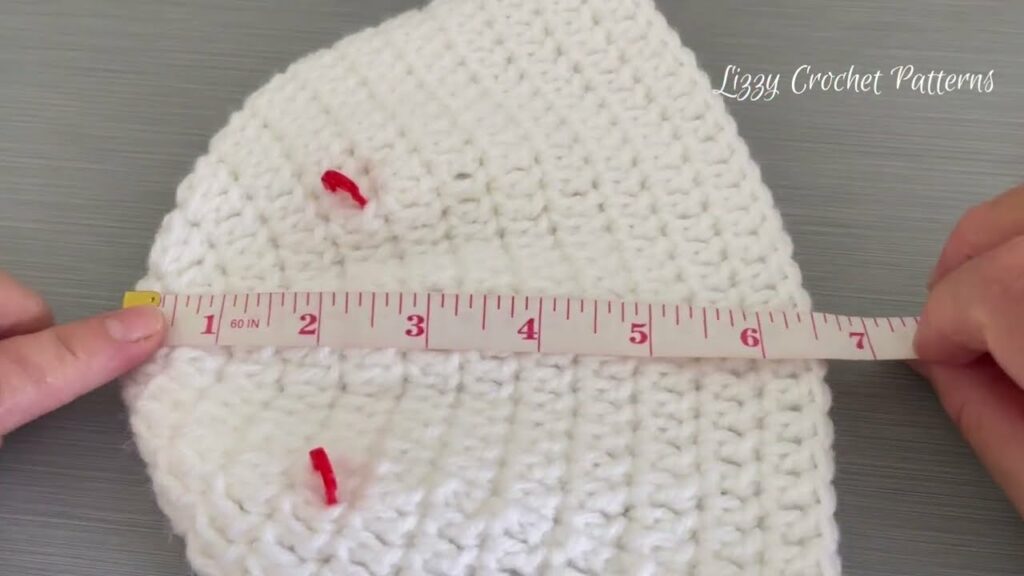
Head Start: Sizing for a 5-Year-Old & Gauge
A 5-year-old’s head circumference typically measures around 19-20.5 inches (48-52 cm). To ensure a good fit, achieving the correct gauge is important, even for a “fast” project.
How to Make a Gauge Swatch (Quick Check):
- Chain: Ch 12.
- Work: Work 10 hdc (half double crochet) into the chain, and work 8 rows of hdc.
- Measure: The swatch should measure approximately 4 inches (10 cm) wide and 4 inches (10 cm) tall.
- If your swatch is larger, go down half a hook size.
- If your swatch is smaller, go up half a hook size.
- Tip: For hats, slight negative ease (your hat is slightly smaller than the head circumference) is usually desired for a snug, but comfortable fit. The yarn will stretch.
Step-by-Step Construction: Crocheting Your Unicorn Hat
We’ll work the main hat in continuous rounds using half double crochet (hdc) for speed and a nice dense fabric.
Abbreviations Used:
- ch: chain
- sc: single crochet
- hdc: half double crochet
- sl st: slip stitch
- inc: increase (e.g., 2 hdc in one st)
- […] : repeat instructions in brackets
- (…) : stitch count at end of round
- MR: Magic Ring (or use ch 2 method)
Phase 1: The Hat Base (Main Beanie – Main Hat Color)
- Approximate Crown Diameter for 5-Year-Old: Aim for a flat circle that measures about 6.5-7 inches (16.5-18 cm) in diameter. This will usually be achieved after 6-7 increase rounds.
- Round 1 (Crown Start): MR, ch 1, 8 hdc into MR. Do NOT join, place stitch marker in first hdc. (8 hdc)
- Alternate start (if MR is tricky): Ch 2, 8 hdc into 2nd ch from hook. Do NOT join, place stitch marker in first hdc.
- Round 2 (Increase): [2 hdc in next st] 8 times. (16 hdc)
- Round 3 (Increase): [2 hdc in next st, 1 hdc in next st] 8 times. (24 hdc)
- Round 4 (Increase): [2 hdc in next st, 1 hdc in next 2 sts] 8 times. (32 hdc)
- Round 5 (Increase): [2 hdc in next st, 1 hdc in next 3 sts] 8 times. (40 hdc)
- Round 6 (Increase): [2 hdc in next st, 1 hdc in next 4 sts] 8 times. (48 hdc)
- Round 7 (Increase): [2 hdc in next st, 1 hdc in next 5 sts] 8 times. (56 hdc)
- Check diameter here: Your flat circle should be close to 6.5-7 inches. If it’s too small, add one more increase round (e.g., [2 hdc in next st, 1 hdc in next 6 sts] 8 times = 64 hdc). If it’s too big, remove an increase round.
- Rounds 8 – 18 (Straight Sides): Hdc in each st around. (56 hdc for 11 rounds)
- Continue working straight rounds until the hat measures approximately 6.5-7 inches (16.5-18 cm) from the top of the crown to the bottom edge. This should fit over the ears.
- Finishing: Sl st into the next st to finish the round. Fasten off, leaving a long tail for sewing.
Phase 2: The Horn (Sparkly & Sturdy – Horn Color)
- We’ll work this in continuous rounds using single crochet (sc) for a tight fabric, and work in the back loop only (BLO) for a ribbed/spiral effect.
- Round 1 (Start): MR, ch 1, 6 sc into MR. Place stitch marker. (6 sc)
- Round 2: Sc in each st around. (6 sc)
- Round 3 (Increase): [2 sc in BLO, 1 sc in BLO] 3 times. (9 sc)
- Round 4: Sc in BLO in each st around. (9 sc)
- Round 5 (Increase): [2 sc in BLO, 1 sc in BLO in next 2 sts] 3 times. (12 sc)
- Rounds 6-7: Sc in BLO in each st around. (12 sc for 2 rounds)
- Round 8 (Increase): [2 sc in BLO, 1 sc in BLO in next 3 sts] 3 times. (15 sc)
- Rounds 9-10: Sc in BLO in each st around. (15 sc for 2 rounds)
- Round 11 (Increase): [2 sc in BLO, 1 sc in BLO in next 4 sts] 3 times. (18 sc)
- Rounds 12-13: Sc in BLO in each st around. (18 sc for 2 rounds)
- Stuffing: Lightly stuff the horn with fiberfill. Don’t overstuff; keep it pointy.
- Finishing: Sl st into the next st. Fasten off, leaving a very long tail for sewing.
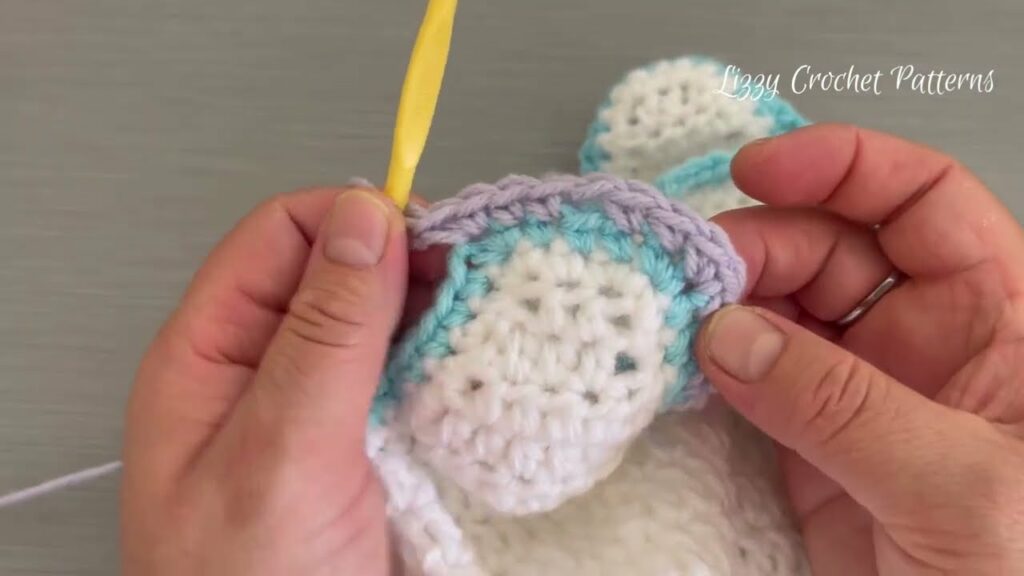
Phase 3: The Ears (Simple & Pointed – Main Hat Color & Ear Lining Color)
- Make 2. We’ll work these flat in rows using single crochet (sc).
- Start (Outer Ear – Main Hat Color): Ch 7.
- Row 1: Sc in 2nd ch from hook and in each ch across. Ch 1, turn. (6 sc)
- Row 2: Sc in each st across. Ch 1, turn. (6 sc)
- Row 3 (Decrease): Sc2tog, sc in next 2 sts, sc2tog. Ch 1, turn. (4 sc)
- Row 4: Sc in each st across. Ch 1, turn. (4 sc)
- Row 5 (Decrease): Sc2tog twice. Ch 1, turn. (2 sc)
- Row 6: Sc in each st across. Ch 1, turn. (2 sc)
- Row 7 (Decrease): Sc2tog. Ch 1. (1 sc) Fasten off, leaving a long tail.
- Inner Ear (Ear Lining Color – Make 2):
- Ch 5.
- Row 1: Sc in 2nd ch from hook and in each ch across. Ch 1, turn. (4 sc)
- Row 2: Sc in each st across. Ch 1, turn. (4 sc)
- Row 3 (Decrease): Sc2tog twice. Ch 1, turn. (2 sc)
- Row 4: Sc in each st across. Ch 1, turn. (2 sc)
- Fasten off, leaving a long tail.
Phase 4: The Mane (Rainbow Magic – All Mane Colors)
- Cut Yarn Strands: For each mane color, cut multiple strands of yarn approximately 12-14 inches (30-35 cm) long. The more strands you use, the fuller the mane will be. (Start with 5-10 strands per color, then add more if desired).
- Prepare Hat for Mane: Lay the hat flat. The mane will go in a line from just behind the horn down the back seam, roughly to the base of the hat. You can use a stitch marker to mark the line.
- Attach Mane:
- Take 2-3 strands of yarn of the same color. Fold them in half.
- Insert your crochet hook into a stitch on the “mane line” from the outside to the inside.
- Hook the folded loop of yarn and pull it partway through the stitch.
- Now, pull the ends of the yarn strands through the loop you just created.
- Pull tightly to secure the “lark’s head knot.”
- Repeat this process, alternating colors or grouping colors together, along your designated mane line. Keep them close together for a fuller look.
Assembly: Bringing Your Unicorn to Life!
- Attach Horn: Position the stuffed horn securely at the very top center of the hat. Using the long tail and your tapestry needle, stitch it firmly in place, going through the hat fabric multiple times.
- Attach Inner Ears: Lay the inner ear piece (smaller, ear lining color) onto the outer ear piece (larger, main hat color). Use the inner ear’s tail to stitch it in place centrally on the outer ear.
- Attach Ears: Fold the bottom edge of each assembled ear slightly to create a small “tuck” or pleat. This helps the ear stand up. Position the ears on either side of the horn, slightly forward (above the temples of where the wearer’s head would be). Using the long tail, securely stitch the ears to the hat, going through both layers of the hat fabric for stability.
- Trim Mane: Once all mane strands are attached, you can gently trim them to an even length or style them for a flowing effect.
Finishing Touches & Tips for Easy/Fast Success
- Weave in All Ends: Use your tapestry needle to meticulously weave in all remaining yarn tails on the inside of the hat for a neat and comfortable finish.
- Simple is Fast: Stick to basic stitches like hdc and sc. They work up quickly.
- Worsted Weight Yarn: This yarn weight ensures your hat grows quickly.
- Continuous Rounds: Working in continuous rounds (rather than joining and chaining up) saves time and creates a smoother fabric. Just remember to use your stitch marker!
- Minimal Embellishments: For speed, avoid complex embroidered eyes or intricate appliqués. The horn, ears, and mane are enough to define the unicorn.
Video Tutorial :
With these steps, you’ll soon have a magical unicorn hat ready to bring joy to its little wearer. This project proves that handmade doesn’t have to mean slow – it can be easy, fast, and utterly enchanting! Sources