by
by Imagine lounging by the pool or strolling along the beach in a bikini that perfectly fits your unique shape and reflects your personal style – a bikini you made yourself! Crocheting a bikini is a rewarding project that offers endless customization, allowing you to create a truly one-of-a-kind swimwear piece. However, it’s also a project that demands careful attention to detail, especially regarding yarn choice, fit, and lining, to ensure it’s functional as swimwear.
This detailed guide will walk you through the essential considerations and step-by-step components of crocheting a bikini, adaptable for all sizes, from petite to plus-size.
Before You Start: Critical Considerations for Crochet Swimwear
Crochet bikinis are distinct from traditional swimwear and require specific attention to detail.

- Yarn Choice: The Most Important Decision!
- Material is Key: You must use 100% cotton or a cotton blend (e.g., cotton/bamboo, cotton/linen).
- Why NOT Acrylic or Wool? Acrylic stretches significantly when wet and will sag, losing all shape. Wool will absorb too much water, become incredibly heavy, and take a long time to dry.
- Properties: Choose mercerized cotton for minimal stretch, good stitch definition, and quick drying. Ensure the yarn is colorfast to prevent bleeding when wet.
- Weight: DK (Double Knitting) or Sport weight yarns are commonly recommended for bikinis as they provide good coverage and structure without being too bulky.
- Material is Key: You must use 100% cotton or a cotton blend (e.g., cotton/bamboo, cotton/linen).
- Lining: Non-Negotiable for Modesty & Support
- Crochet fabric, by its nature, has gaps and stretch. A lining is absolutely essential for:
- Modesty: Prevents transparency when wet.
- Support: Provides a smoother shape and helps prevent sagging.
- Durability: Protects the crochet fabric from excessive stretching.
- Lining Material: Use actual swimsuit lining fabric (available at fabric stores), which is thin, stretchy, and quick-drying. Pre-made bra cups can also be inserted for extra shaping and support in the top.
- Crochet fabric, by its nature, has gaps and stretch. A lining is absolutely essential for:
- Fit & Support Expectations:
- Crochet bikinis, even with lining, will not offer the same compression or engineering support as commercially made swimwear. They are generally best suited for lounging, light swimming, or fashion statements, rather than intense water sports or deep-sea diving.
- Achieve better fit by using a tighter gauge than you might for a garment, ensuring stitches are dense and close together.
- Water Performance:
- Your bikini will feel heavier when wet, and it will take longer to dry than synthetic swimwear. Plan accordingly for drying time.
Understanding “All Sizes”: Adapting Your Design
A single pattern can’t fit all sizes, but you can adapt the principles by understanding how to measure and adjust.
- Measure, Measure, Measure: Before you even cast on, take precise body measurements.
- Bra Top:
- Underbust Circumference: Around your rib cage, directly under your bust.
- Cup Size: This is tricky for crochet. Think in terms of coverage: how wide do you want the bottom of the cup, and how tall do you want the cup to be to fully cover? A general guide is to measure the widest part of one breast from side to side (for cup width) and from nipple to base (for cup height/depth).
- Bottoms:
- Waist Circumference: Around your natural waist or where you want the bikini bottom to sit.
- Hip Circumference: Around the fullest part of your hips/derrière.
- Front Rise: From where the waistband will sit, down through your legs, to where the crotch seam will end at the back. (You can measure a well-fitting pair of underwear/bikini bottoms for this).
- Leg Opening Circumference: Around your upper thigh where the leg opening will sit.
- Bra Top:
- Gauge is Non-Negotiable:
- Work a generous gauge swatch (at least 6×6 inches) in the main stitch you’ll use (e.g., single crochet).
- Wash and block it! See how much it stretches when wet and dry. This is critical for swimwear.
- Your gauge will dictate your initial chain length and how many increase/decrease rows you need. A tighter gauge (more stitches per inch) is generally better for opacity and support in swimwear.
- Customization by Adjustment:
- Initial Chain: Determines width (e.g., the bottom edge of a cup or the waist of the bottom).
- Increase/Decrease Rates: How often you increase or decrease stitches will shape the curves of the cups, hips, and leg openings. More frequent increases/decreases for curvier shapes, less for straighter.
- Number of Rows/Rounds: Determines the height/length (e.g., cup height, rise of bottoms, leg length).
Choosing Your Tools & Materials:
- Yarn: 100% Cotton or Cotton Blend (DK or Sport weight), 150-300 yards depending on size and style.
- Crochet Hook: Size to achieve a tight, dense gauge with your chosen yarn (likely smaller than recommended on the yarn label).
- Notions:
- Stitch markers (essential for shaping).
- Tapestry needle (for weaving in ends).
- Scissors.
- Swimsuit Lining Fabric: (Stretch nylon/spandex blend, typically available in white, nude, or black).
- Matching Thread (for sewing lining).
- Sewing Needle (for hand-stitching lining).
- Optional: Pre-made bra cups (removable or sew-in), swimwear elastic (for leg/waist edges), small charm or bead for decoration (securely sewn!).
General Stitch Patterns for Crochet Bikinis:
- Single Crochet (sc): The most common and best choice for density, opacity, and minimal stretch. Highly recommended for the main body.
- Half Double Crochet (hdc): Slightly taller than sc, works up faster, still offers good density.
- Slip Stitch (sl st): Good for creating firm, non-stretching edges or details.
- Crab Stitch (Reverse sc): Creates a very firm, rope-like edge that doesn’t stretch easily. Excellent for finishing edges.
- Chain (ch) & Slip Stitch (sl st) or Sc Rows: For ties and straps.
Step-by-Step Construction: Crocheting Your Bikini (Component-Based)
Most crochet bikinis are made by creating individual pieces and then assembling them.
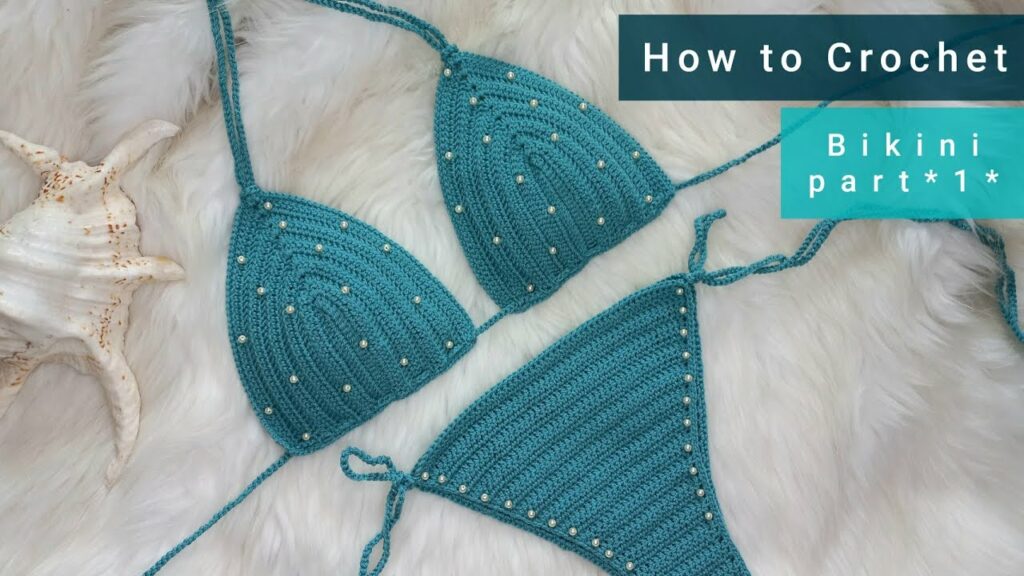
Phase 1: The Bra Top (Cups & Band)
The method for the cups depends on the desired shape.
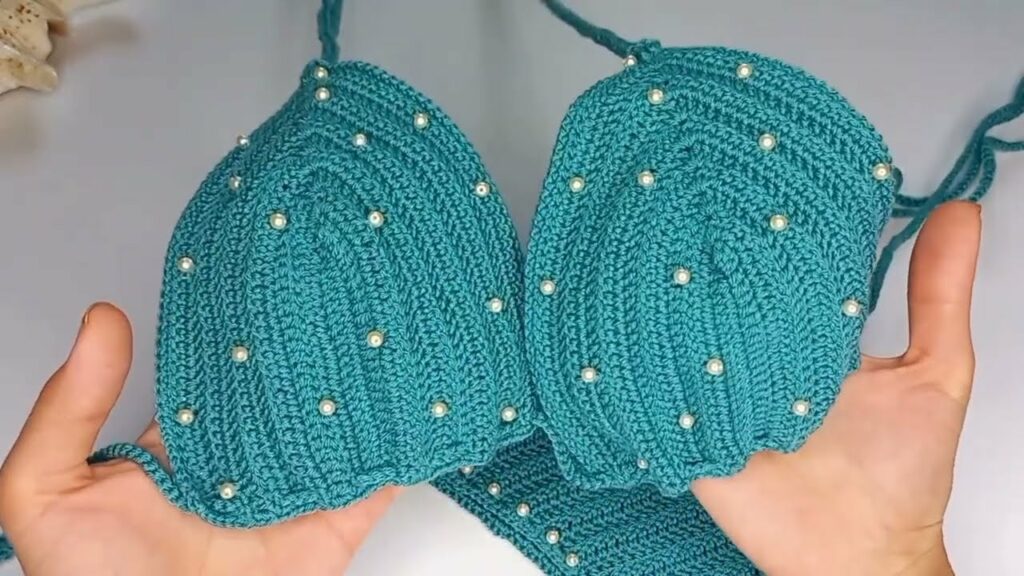
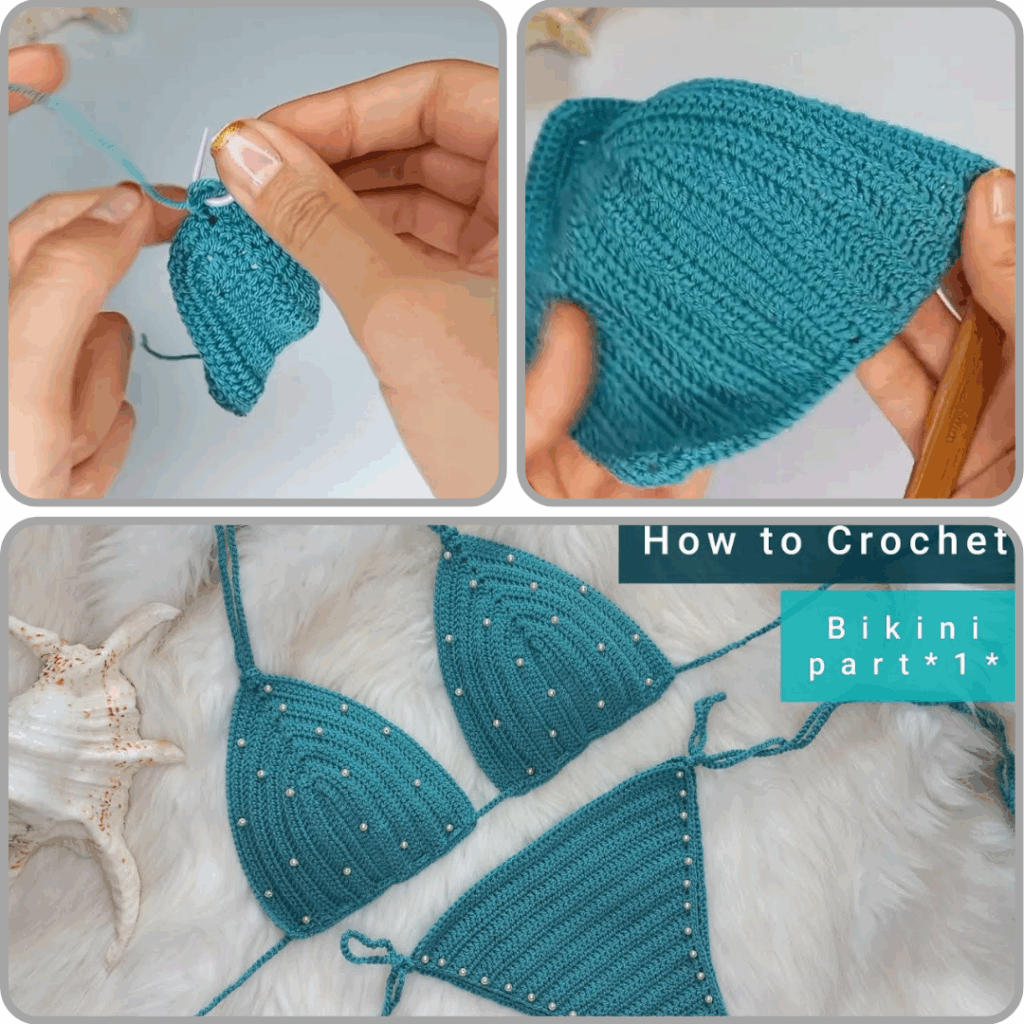
- Option A: Triangle Cups (Most Common & Adaptable)
- Starting: Ch a number of stitches equal to the desired bottom width of one cup. (Example: For a B/C cup, maybe ch 15-20).
- Rows:
- Row 1: Sc (or hdc) in 2nd ch from hook and in each ch across. Turn.
- Increase Rows: Ch 1. Sc (or hdc) in first st. Work until the middle stitch of your row. In the middle stitch, work an increase (e.g., [sc, ch 1, sc] or [sc, ch 2, sc]). Work until the last stitch. In the last stitch, work an increase (e.g., 2 sc or 2 hdc). Turn.
- Repeat these increase rows until the cup reaches the desired height and width for your chosen cup size. (More rows = taller cup; more increases = wider cup).
- Make 2 cups.
- Option B: Half Circle/Full Coverage Cups
- Starting: Work a Magic Ring (MR) or Ch 2, then work 6-8 sc into the ring/2nd ch from hook. PM.
- Rounds: Work in continuous rounds of sc (or hdc), increasing evenly around the curve (e.g., 2 sc in every 2nd or 3rd stitch, adjusted to keep the piece flat and circular).
- Continue until the cup reaches the desired diameter/coverage for your chosen cup size.
- Connecting the Cups
- Lay your two finished cups flat. Determine the desired gap between them.
- You can connect them directly with a few sl st or sc stitches between them.
- Alternatively, you can skip this step and connect them with the underbust band in the next step.
- The Underbust Band
- Option 1 (Ties): Attach yarn to the bottom outer corner of one cup. Sc evenly along the entire bottom edge of both cups. When you reach the desired length (to cover the underbust and then create ties), ch a long chain for the tie (e.g., 40-60 chs). Sl st back down the chain to create a firm tie. Repeat on the other side.
- Option 2 (Back Band with Closure): Attach yarn to the bottom outer corner of one cup. Sc evenly along the entire bottom edge of both cups. Continue working rows of sc (or hdc) for a few inches on either side to create a back band. You can then add a swimsuit clasp or simple ties at the back.
Phase 2: The Bottoms
Bikini bottoms require careful shaping for a good fit.
- Starting:
- Option A (Top-Down, Seamless): Ch a number of stitches equal to your desired waist circumference. Join in the round, being careful not to twist.
- Option B (Flat Panels, Then Seam): Ch a number of stitches equal to your desired front width.
- Shaping the Front Panel (Working Flat or In Round)
- For Seamless (Option A): Work in rounds. Decrease stitches (K2tog or P2tog, or sc2tog/hdc2tog) evenly on either side of the center front and center back, and also at the side seams, to shape the leg opening and the rise of the bottom. You’ll decrease until you reach the desired crotch width.
- For Flat Panels (Option B): Work rows, decreasing at the beginning and end of rows (sc2tog/hdc2tog at beginning, and invisible decrease at end of row) to create the curve of the leg opening and taper towards the crotch.
- Shaping the Back Panel (Usually Wider for Coverage)
- The back panel is similar to the front but generally starts wider and may have fewer decreases to allow for more coverage.
- It also usually starts narrower at the crotch and increases to fit the derriere.
- Connecting Front & Back (If worked flat)
- If you worked flat panels, you will now seam the crotch front to back using a tapestry needle.
- Leg Openings
- If working seamless: After dividing for the crotch, you’ll pick up stitches around each leg opening. Work a few rounds of sc or crab stitch for a neat, non-stretching edge.
- If working flat: After seaming, pick up stitches around the leg openings. Work a few rounds of sc or crab stitch.
- Waistband Edging
- Work 1-2 rounds of sc or crab stitch around the entire waist opening for a firm, neat finish.
Phase 3: Straps & Ties
These can be simple or decorative.
- Neck Straps: Attach yarn to the top point of each bra cup. Ch a long chain (e.g., 60-80 chs), then sl st back down the chain to create a firm tie. Or, work a few rows of sc or hdc for a wider strap.
- Back/Side Ties: If your bra top or bottom requires side ties, ch and sl st (or sc rows) to create them.
Phase 4: Assembly & Crucial Finishing
- Weaving in All Ends: Meticulously weave in every single yarn tail using your tapestry needle. Loose ends in swimwear are problematic.
- Blocking (Lightly!):
- Hand wash your bikini in cold water with a gentle soap.
- Gently squeeze out excess water (do not wring).
- Lay flat on a clean towel, shaping it to its final dimensions. Pin lightly if needed.
- Allow to air dry completely. Blocking helps set stitches and evens out the fabric, but avoid aggressive stretching which could affect fit when wet.
- The Lining (MOST IMPORTANT FINISHING STEP):
- Prepare Lining Fabric: Lay your crocheted bikini pieces flat. Place the swimsuit lining fabric over them. Cut the lining fabric slightly smaller (e.g., 0.25-0.5 inch smaller) than the crochet pieces. This slight negative ease helps the lining pull the crochet fabric inwards and prevent sagging.
- Placement: For the top, line each cup individually, or line the entire bra front. For the bottom, line the entire front panel, or the entire bottom for maximum opacity.
- Sewing: Using your matching thread and a sharp sewing needle, hand-stitch the lining to the inside of your crocheted bikini. Use tiny, invisible stitches, catching only the inner loops of the crochet fabric. Stitch around all edges of the lining. This is time-consuming but essential.
- Optional Bra Cups: If using, insert them between the crochet fabric and the lining and stitch securely in place.
- Adding Elastic (Optional for Extra Security):
- For extra firmness around the leg openings and waistband, you can hand-stitch swimwear elastic to the inside edges after the lining is sewn. Stretch the elastic slightly as you sew to gather the edge. This helps prevent gaping.
Tips for Success & Best Practices:
- Swatch, Swatch, Swatch: It’s worth repeating. Your gauge determines everything.
- Tight Tension: Strive for a dense fabric. This is not the project for loose, airy stitches.
- Try On As You Go: This is a custom garment. Try on the pieces as you knit/crochet them (especially the cups and bottom) to ensure the fit is correct before finishing.
- Find a Specific Pattern: While this guide covers principles, finding a well-written, paid crochet bikini pattern (e.g., on Ravelry, Etsy) is highly recommended. These patterns will provide precise stitch counts and shaping for various sizes, making the process much smoother. Use this article as a supplementary guide for understanding materials and construction.
- Start Simple: For your first bikini, choose a basic triangle top and a modest bottom.
Care Instructions for Your Handmade Crochet Bikini:
- Hand Wash Only: Fill a basin with cool water and a small amount of mild soap (like wool wash or baby shampoo). Gently swish your bikini in the water.
- No Wringing: Gently squeeze out excess water. Do not wring or twist, as this can distort the crochet fabric.
- Lay Flat to Dry: Place your bikini on a clean, dry towel and reshape it. Lay it flat to air dry completely. Avoid direct sunlight or high heat, as this can damage the yarn.
- No Machine Wash/Dry: The agitation of a machine washer and the heat of a dryer will cause irreversible damage, stretching, and potential shrinking.
Video Tutorial :
Crocheting a bikini is a journey that culminates in a unique piece of wearable art. With the right materials and a careful approach to fit and construction, you’ll be ready to make a splash in your beautifully handmade, custom-fit crochet bikini!