 by
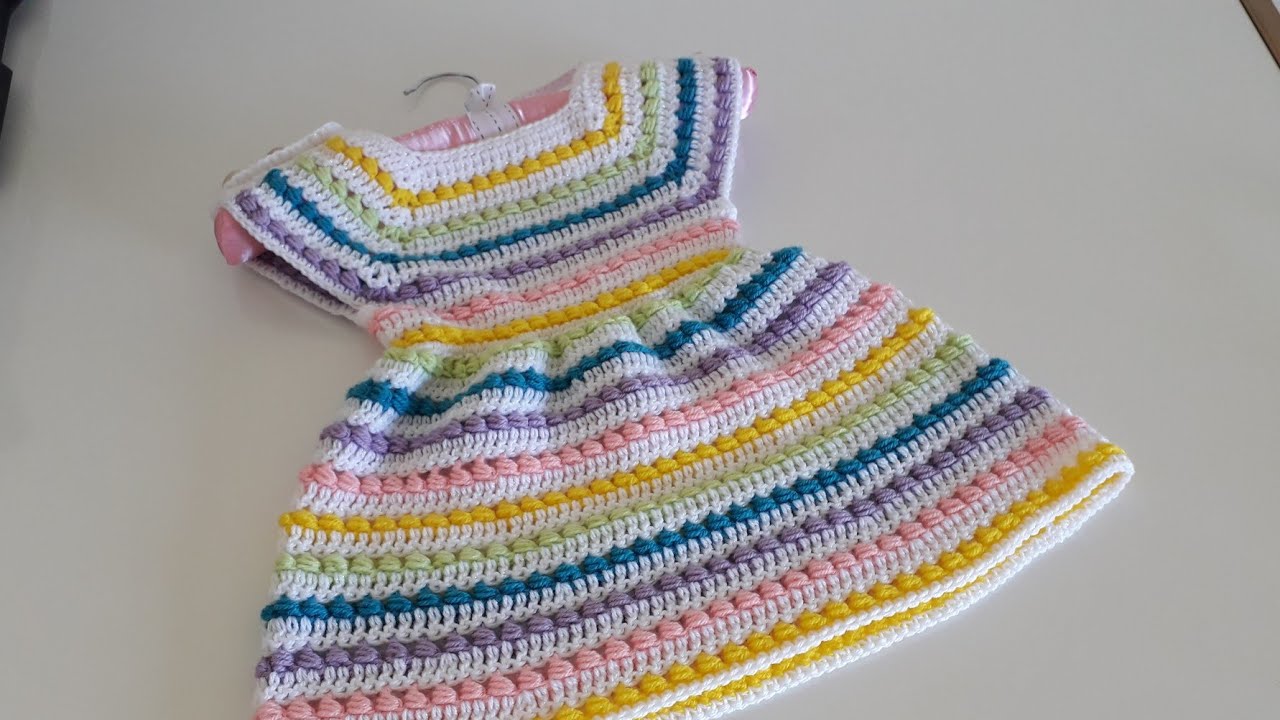
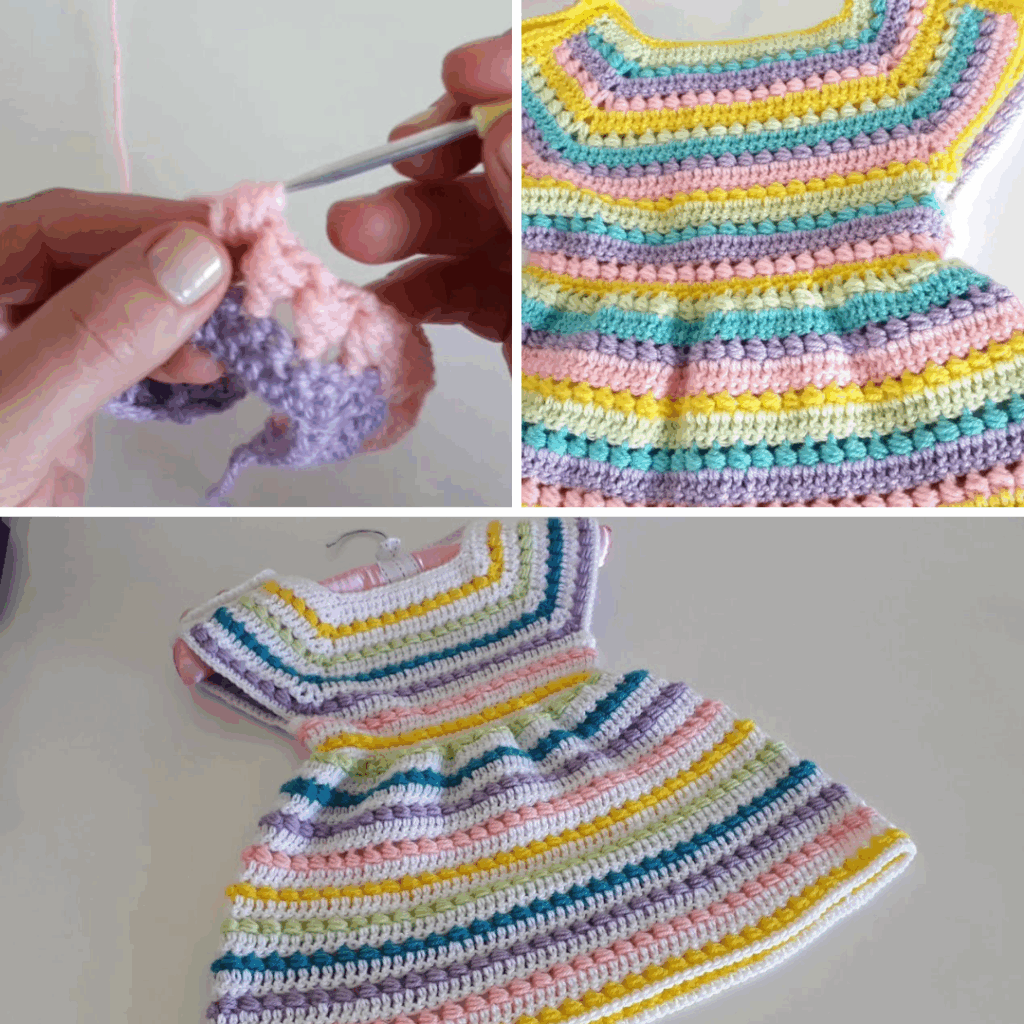
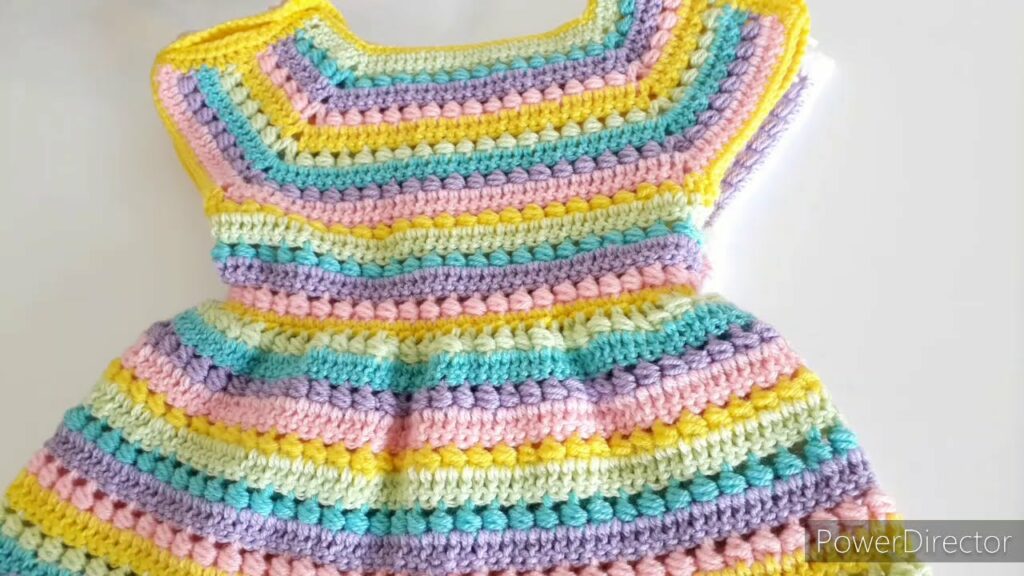
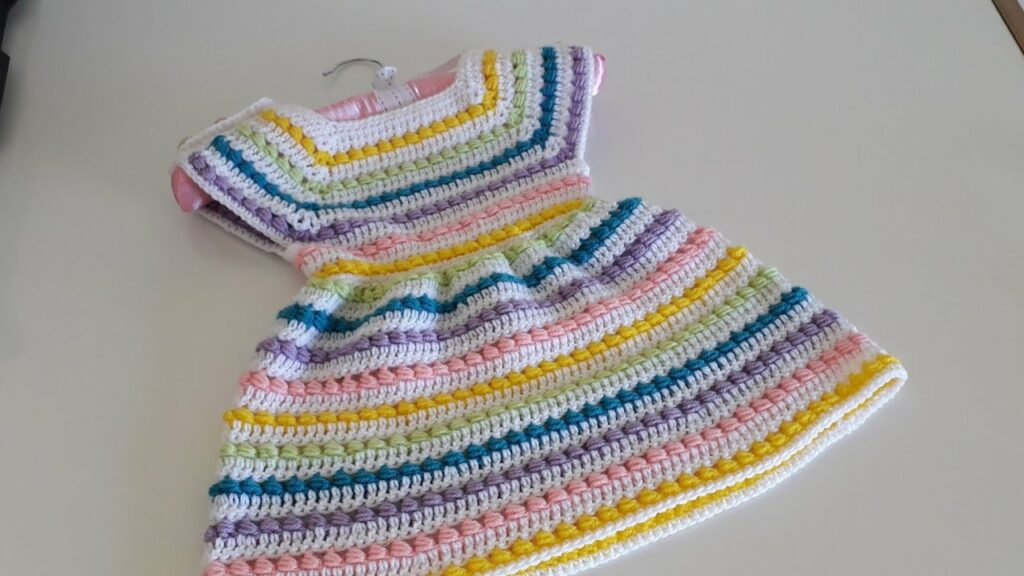
by The “Beaded Rainbow Dress” for a girl is more than just a garment; it’s a celebration of color, sparkle, and imagination. Combining the cheerful vibrancy of a rainbow with the delightful shimmer of integrated beads, this dress becomes a wearable piece of art, perfect for twirling, playing, and making every day feel a little more magical.
While incorporating beads adds an extra layer of charm, it also introduces unique considerations for your crochet work. This detailed guide will illuminate the path to crocheting a beautiful and durable “Beaded Rainbow Dress,” focusing on techniques to seamlessly integrate those dazzling details.
Embracing the “Beaded Rainbow” Aesthetic
The magic of this dress lies in its playful visual impact:
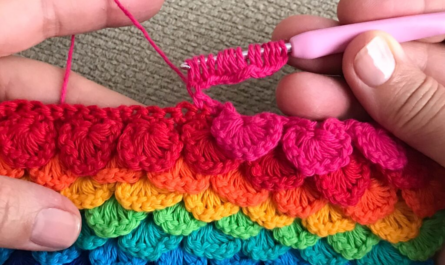
- The Color Palette: Spectrum of Joy
- Classic Rainbow: Follow the ROYGBIV sequence (Red, Orange, Yellow, Green, Blue, Indigo, Violet) for distinct stripes or color blocks.
- Pastel Rainbow: Soften the vibrant hues to create a dreamy, ethereal look.
- Ombre Rainbow: Blend colors gradually from one shade to the next (e.g., light blue transitioning to medium blue, then deep blue, before moving to green).
- Variegated Yarn: Choose a self-striping or variegated yarn that already contains a beautiful rainbow blend for effortless color changes.
- Accent Colors: Use white or cream as a neutral base or separator between rainbow sections to make the colors pop even more.
- Yarn Texture & Weight: Smooth Canvas for Sparkle
- Weight: DK (Double Knitting / Category 3) or Sport (Category 2) are generally ideal. These weights offer good stitch definition to showcase the beads without being too bulky. Thinner yarns like Fingering (Category 1) can be used for a very delicate dress, but require more beads and more intricate work.
- Fiber:
- Cotton: Highly recommended. It’s durable, has excellent stitch definition, minimal stretch (which is good for holding beads securely), and is breathable for comfort.
- Cotton Blends (e.g., Cotton/Acrylic, Cotton/Bamboo): Offer a good balance of properties – softness, drape, and durability.
- High-Quality Acrylic: Look for smooth, anti-pilling acrylics that don’t split easily, as this makes bead integration much smoother.
- Avoid: Slippery yarns (like silk or rayon) as beads might slide, or overly fuzzy yarns (like mohair) where beads might get lost in the halo.
- Beads: The Dazzling Details
- Type:
- Seed Beads (size 6/0 or 8/0): Small, delicate, for subtle shimmer. Require very fine hooks or pre-stringing.
- E-Beads/Pony Beads (size 4mm-6mm): Larger, easier to work with, and provide more visual impact. Great for beginners to bead crochet.
- Material: Glass beads offer beautiful sparkle and weight, but plastic beads are lighter and more child-friendly (less likely to break). Wooden beads add a natural touch.
- Hole Size (CRITICAL!): The hole in the bead must be large enough to thread over your crochet hook. If not, you’ll need a very fine beading needle and strong floss/dental floss to pre-string them onto your yarn.
- Quantity: Estimate generously. Beading uses a surprising number of beads!
- Placement Strategy:
- Random Sparkle: Integrate beads sporadically throughout the fabric for an all-over shimmer.
- Patterned Sections: Create rows or bands of beads (e.g., a beaded stripe in each rainbow color section, or clusters of beads forming motifs like stars or flowers).
- Edging: Use beads to create a sparkling border on the neckline, armholes, or hem (e.g., a beaded picot stitch).
- Type:
- Stitch Patterns: Showcasing the Sparkle
- Choose stitch patterns that allow the beads to lie prominently on the surface without getting hidden.
- Main Fabric: Simple, dense stitches work best: Single Crochet (sc), Half Double Crochet (hdc), or Double Crochet (dc) provide a stable canvas for the beads.
- Textural Accents: You can combine beaded sections with plain textured stitches like Moss Stitch or Basketweave for contrast.
- Lace/Openwork: Can be used in sections between beaded bands, or for the skirt if the bodice is more solid with beads. Ensure beads are very secure in lace.
Why Crochet a “Beaded Rainbow Dress”?
- Unique & Magical: Creates a one-of-a-kind garment that truly stands out.
- Sensory Experience: The texture of the beads adds a delightful tactile element.
- Encourages Imagination: A dress that feels like it belongs in a fairy tale.
- Heirloom Quality: A handmade, personalized dress with special details is sure to become a treasured keepsake.
- Skill Building: A fantastic project to learn or refine bead integration techniques.
Planning Your “Beaded Rainbow Dress” Project
This project requires a bit more meticulous planning than a plain dress.
- Size Selection:
- Refer to standard children’s dress sizes (Newborn up to early pre-teen sizes).
- Measure the child’s chest circumference, desired length from shoulder to hem, and arm length (if sleeves are planned). Use these measurements to select the appropriate size from your chosen pattern.
- Remember that beads add weight, so consider how this might affect drape and overall fit, especially for smaller sizes.
- Pattern Selection (Essential!):
- You must choose a well-written crochet pattern specifically for a girl’s dress.
- Look for patterns that include instructions for bead integration, or are adaptable to it. If using a plain dress pattern, you’ll need to strategically plan where to add beads yourself.
- Key features to look for: Clear sizing, stitch counts, shaping instructions, and gauge information.
- Construction Method:
- Top-Down (Seamless Raglan/Yoke): Often recommended for this type of dress. Working top-down means fewer seams (less bulk for beads) and allows you to try the dress on as you go, which is helpful for bead placement and length.
- Bodice-First, then Skirt: Crochet the bodice, then join yarn at the waist to work the skirt downwards. This allows for distinct bead patterns on the bodice versus the skirt.
- The Gauge Swatch (NON-NEGOTIABLE!):
- Crucial for Fit AND Bead Behavior: Crochet a large swatch (at least 6×6 inches / 15×15 cm) using your chosen yarn, hook, and incorporating your chosen bead integration method.
- Wash and block your swatch exactly as you would the finished dress. Then, measure it meticulously.
- The beads will affect your gauge and the drape of the fabric. Adjust your hook size until your gauge matches the pattern. This prevents sizing issues and ensures the beads lie correctly.
- Your Bead Plan (Most Important Step for This Project!):
- Before you even begin crocheting the dress, decide:
- Where will the beads go? (Entire rows, spaced out, specific sections, edging, motifs?)
- What color beads? (Matching the yarn, contrasting, iridescent, clear?)
- How many beads per row/section? Sketch it out if necessary.
- Which bead integration technique will you use? (See “Key Crochet Techniques” below).
- This plan will guide your bead placement as you crochet.
- Before you even begin crocheting the dress, decide:
Materials You’ll Need
- Yarn: (As detailed in “Aesthetic” section). Quantity will vary (typically 3-8 skeins) depending on size and yarn weight. Account for multiple colors for the rainbow effect.
- Crochet Hook: The size recommended by your pattern, adjusted based on your gauge swatch.
- Beads: (As detailed in “Aesthetic” section). Purchase more than you think you’ll need.
- Crucial Tool: A beading needle and strong beading thread/floss if you plan to pre-string beads onto your yarn, or if your beads’ holes are too small for your crochet hook.
- Notions:
- Stitch Markers: Essential for marking raglan lines, beginning of rounds, and specific bead placement points.
- Tapestry Needle: For neatly weaving in yarn ends.
- Scissors: Sharp and dedicated for yarn.
- Measuring Tape: For checking gauge and garment dimensions.
- Blocking Mats & T-pins: Essential for professional shaping and finishing.
- Optional: Clear nail polish or fabric fray check for securing knots at bead attachments (especially important for child safety).
Key Crochet Techniques for a “Beaded Rainbow Dress”
You’ll combine basic crochet with specialized bead integration:
- Basic Stitches: Chain (ch), Slip Stitch (sl st), Single Crochet (sc), Half Double Crochet (hdc), Double Crochet (dc).
- Increasing & Decreasing: Essential for shaping the bodice, waist, skirt flare, and (if applicable) sleeves.
- Working in Rounds & Rows: Depending on your chosen construction method.
- Seamless Joining: For working in the round.
- Ribbing/Edging: For neat cuffs, neckline, and hem.
- Color Changes: Learn how to change colors neatly at the end or middle of a row/round.
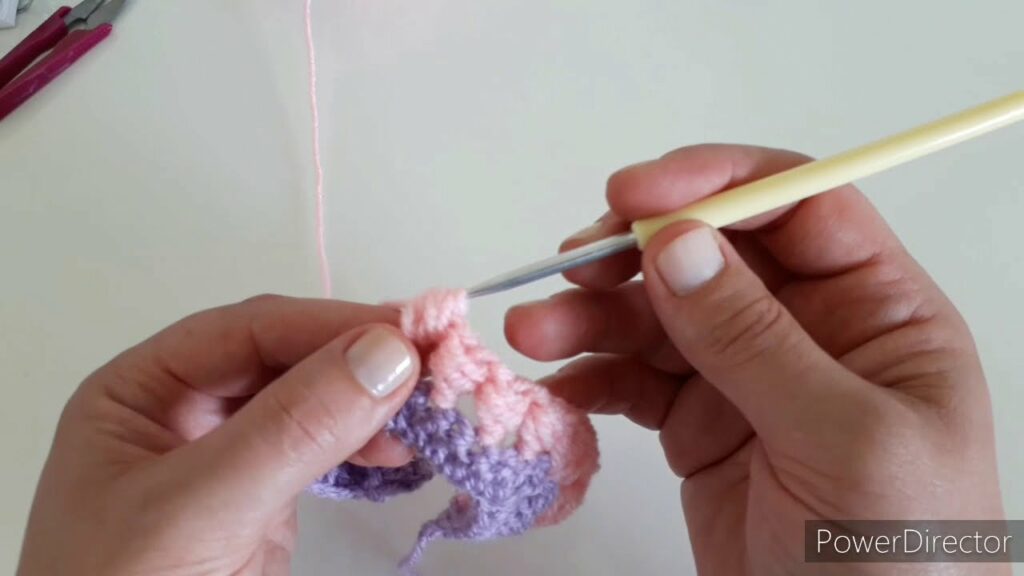
- Bead Integration Techniques (Practice these on a swatch first!):
- 1. Pre-Stringing Method:
- This is often the easiest and most common for projects with many beads. Before you start crocheting, thread all the beads for a section/color onto your yarn using a fine beading needle and strong thread (or if holes are big enough, thread directly).
- As you crochet, slide a bead close to your working loop, then make your stitch. The bead will sit on the front of the stitch.
- 2. Bead-on-Hook Method (Push Bead Method):
- Good for placing individual beads or for larger beads.
- Crochet up to the point where you want a bead.
- Put your crochet hook through the bead (or pick up the bead with your hook).
- Yarn over the hook (with the bead on it).
- Pull the yarn through the bead (and loop on hook) to complete the stitch. The bead will be encased or on the front.
- 3. Crocheting Around a Bead:
- Often used to make a bead sit more prominently on the surface.
- Work a stitch (e.g., DC). Slide a bead onto the post of that stitch using a beading needle or by carefully manipulating the bead.
- 4. Sewing On Beads:
- For embellishments after the fact, or for beads with very small holes.
- Once the crochet is done, use a sewing needle and strong thread (or dental floss) to securely sew beads onto the fabric. Knot securely on the back.
- 1. Pre-Stringing Method:
Step-by-Step Flow (Conceptual Guide – Assuming Top-Down with Bead Integration)
- Preparation:
- Choose your pattern. Make your gauge swatch (with beads!) and adjust your hook.
- Finalize your bead plan: colors, placement, technique.
- Gather all yarn colors, beads, hook, and notions. Pre-string beads if using that method.
- Crochet the Yoke/Bodice:
- Start at the neckline. Work the yoke (upper body/shoulders) as per your pattern, making increases for shaping.
- Integrate beads into rows or sections as planned for the yoke. Ensure beads are secure.
- Divide for Body & Sleeves:
- Once the yoke reaches the correct size, skip stitches for the armholes (or chain for underarms).
- Continue working in the round or rows on the remaining stitches to form the main body.
- Crochet the Skirt:
- Continue working from the waist down, following your pattern for increases to create the desired flare.
- Incorporate your rainbow color changes as planned (stripes, blocks, ombre).
- Integrate beads into the skirt section according to your bead plan. Pay attention to how beads sit on the fabric as it drapes.
- Crochet the Sleeves (if applicable):
- Join yarn at each armhole opening. Work sleeves in the round, tapering as needed.
- Add rainbow colors and beads to the sleeves if desired.
- Add Edging (Neckline, Armholes, Hem):
- Work a neat border around the neckline, armholes, and the bottom hem of the dress.
- Consider a simple beaded picot stitch or a contrasting color edge for a final sparkling touch.
- Finishing Touches:
- Weave in all yarn ends meticulously using your tapestry needle. This is crucial for durability and neatness.
- Double-check all bead attachments. If any feel loose (especially critical for younger children), secure them with a tiny knot on the back and a dab of clear nail polish or fabric glue.
- Blocking:
- Gently wet or steam the finished dress.
- Carefully reshape it to the pattern’s dimensions, paying special attention to how the beads lie. Pin it flat on blocking mats.
- Allow it to dry completely. Blocking helps even out stitches, enhances drape, and sets the final shape.
Tips for Success
- Test Bead Compatibility: Before buying all your beads, get a small quantity of your chosen beads and yarn. See if the beads fit over your hook (or if they can be easily pre-strung) and how they look with your chosen stitch.
- Secure Beads Tightly: Ensure the yarn wraps firmly around or through the bead in your stitch. Loose beads can snag or fall off.
- Consider Bead Weight: Too many heavy glass beads on a very lightweight yarn can cause the fabric to sag. Balance bead quantity with yarn weight.
- Child Safety: For very young children, ensure beads are extremely securely attached. Consider larger, less “swallowable” plastic beads or even crocheting fabric “beads” for ultimate safety.
- Consistent Tension: Maintain even tension throughout for a uniform fabric and consistent bead placement.
- Use Stitch Markers! They are invaluable for marking color changes, bead pattern repeats, and garment shaping.
- Be Patient with Beads: Integrating beads can slow down your pace. Take your time, enjoy the process, and admire the sparkle as it builds!
- Weave in Ends Securely: Loose ends can unravel, especially with handling and washing.
Caring for Your “Beaded Rainbow Dress”
Proper care will preserve the beauty and integrity of your special dress:
- Follow Yarn Label Instructions: Always defer to the specific care instructions on your yarn skein.
- Hand Wash Recommended: Even if your yarn is machine washable, hand washing is generally recommended for beaded garments to protect the beads and prevent snags. Use cool water and a mild detergent.
- Gentle Handling: Do not wring or twist the dress. Gently squeeze out excess water.
- Reshape and Lay Flat to Dry: Reshape the dress back to its original dimensions and lay it flat on a clean towel or a mesh drying rack to air dry completely.
- Avoid Hanging: Never hang a wet crocheted garment, especially one with beads, as the weight can cause stretching and distortion.
VIDEO TUTORIAL ;
Crocheting a “Beaded Rainbow Dress” for a girl is a journey into color, texture, and light. It’s a project that demands a bit of extra planning and care, but the result is a truly unique, sparkling garment that will bring endless joy and a touch of magic to any little girl’s world.