by
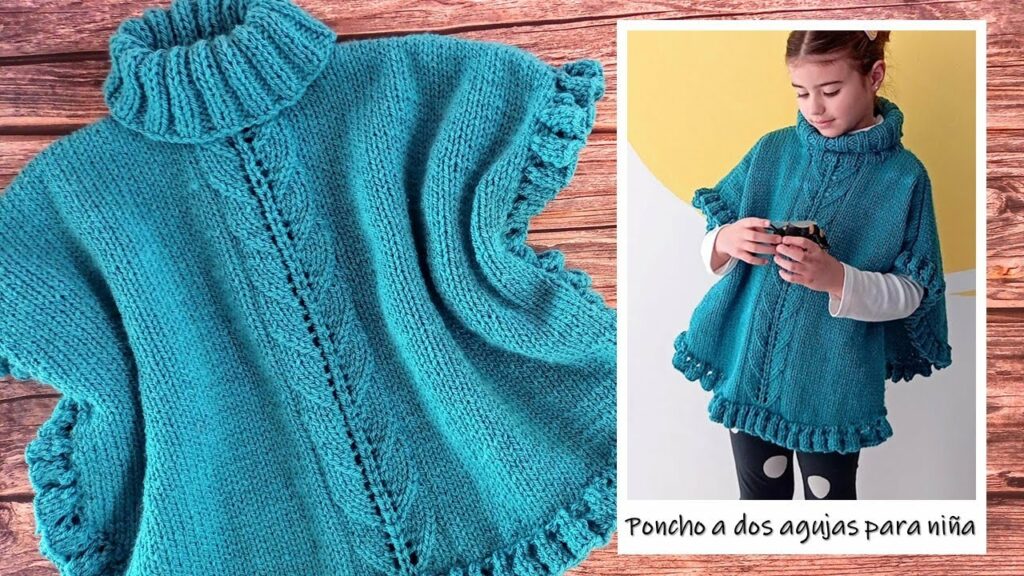
by Knitting a poncho for a girl is a wonderfully rewarding project, offering both a fun crafting experience and a practical, stylish garment. Ponchos are incredibly versatile for kids – they provide warmth without restricting movement, make for easy layering, and often feature simple shapes that are great for knitters of all levels, including adventurous beginners.
This detailed, step-by-step guide will walk you through the process of creating a cozy and chic knitted poncho for a girl.
Why Knit a Poncho for a Girl?

- Versatile Layering: Perfect for transitional seasons like spring and autumn, offering an extra layer of warmth over long or short sleeves.
- Easy to Wear: No sleeves to fuss with, making it quick and easy to put on and take off even a wiggling child. Ideal for active play.
- Comfort & Warmth: Provides cozy warmth around the core and shoulders without feeling bulky or restrictive.
- Quick Project: Often involves simpler shaping than a sweater or cardigan, making it a relatively fast knit.
- Beginner-Friendly: Many poncho patterns utilize basic stitches and straightforward increases, making them an excellent first garment project.
- Customizable & Unique: Endless possibilities for color combinations, stitch patterns, and embellishments like pompoms or tassels.
Planning Your Girl’s Poncho Project
A well-planned project ensures a smooth knitting experience and a perfectly fitting garment.
- Size Selection:
- Most patterns will provide age-based sizing (e.g., toddler, 2-4T, 4-6 years, 6-8 years, etc.).
- Crucially, measure the child:
- Head Circumference: To ensure the neckline fits comfortably over her head.
- Shoulder Width: The poncho should drape well over the shoulders without falling off easily.
- Desired Length: Measure from the top of the shoulder down to where you want the hem to fall (e.g., hip-length, mid-thigh).
- Tip: Ponchos are generally forgiving in terms of fit, offering more room for growth than fitted garments.
- Pattern Selection (Highly Recommended!):
- While this guide provides general steps, a well-written knitting pattern is invaluable, especially for beginners. Look for patterns specifically labeled “simple,” “easy,” or “beginner-friendly” ponchos for children.
- What to Look For in a Pattern:
- Clear sizing charts and schematics.
- Precise stitch counts for each row/round and each size.
- Detailed instructions for increases/decreases.
- CRUCIALLY, accurate gauge information.
- Common Poncho Constructions:
- Worked in the Round (Top-Down): This is very popular for ponchos as it creates a seamless garment. You start at the neckline and work downwards in a large circle, increasing stitches evenly as you go.
- Worked Flat & Seamed: You knit two rectangular (or slightly flared) panels (front and back) and then seam them together at the shoulders and partially down the sides, leaving armholes. This is often the simplest for absolute beginners.
- Gauge Swatch (NON-NEGOTIABLE!):
- This step is critical for achieving the correct size. Knit a swatch (at least 4×4 inches / 10×10 cm) using your chosen yarn and needles in the main stitch pattern of the poncho.
- Wash and block your swatch just as you would the finished poncho. This accounts for any changes in yarn behavior (e.g., stretching, blooming).
- Measure your stitches and rows per inch/cm accurately. If your gauge doesn’t match the pattern’s, adjust your needle size (go up for fewer stitches per inch, down for more) until it does. Skipping this step is the primary reason garments don’t fit.
Materials You’ll Need
- Yarn:
- Weight: DK (Category 3), Worsted (Category 4), or Chunky (Category 5) are all excellent choices. Heavier weights will make your poncho knit up faster and be warmer.
- Fiber:
- Acrylic: An economical and widely available choice, perfect for kids’ garments due to its durability, softness (especially baby acrylics), and machine washability.
- Superwash Merino Wool: Incredibly soft, warm, breathable, and often machine washable. A more luxurious option.
- Cotton/Cotton Blends: Good for lighter, transitional weather ponchos; breathable, but less elastic and can be heavier when wet.
- Color: Choose bright, cheerful colors, soft pastels, or even variegated yarns for easy color changes. Stripes or color blocks are simple ways to add visual interest.
- Quantity: Varies significantly by size and yarn weight (typically 2-6 skeins).
- Knitting Needles:
- Circular Needles: Highly recommended, especially for working in the round. Even for flat panels, they comfortably hold a large number of stitches. Choose a length appropriate for the finished circumference of the poncho.
- Straight Needles: Only if you are definitely working flat panels.
- Size: The size recommended by your pattern, adjusted based on your gauge swatch.
- Notions:
- Stitch Markers: Essential for marking the beginning of the round, increase points, or pattern repeats.
- Tapestry Needle: For weaving in yarn ends neatly and seaming (if applicable).
- Scissors.
- Measuring Tape.
- Stitch Holders or Waste Yarn: For holding stitches if you’re working a separate collar or temporarily setting aside stitches.
- Pompom Maker/Tassel Maker (Optional): For adding fun embellishments to the finished poncho.
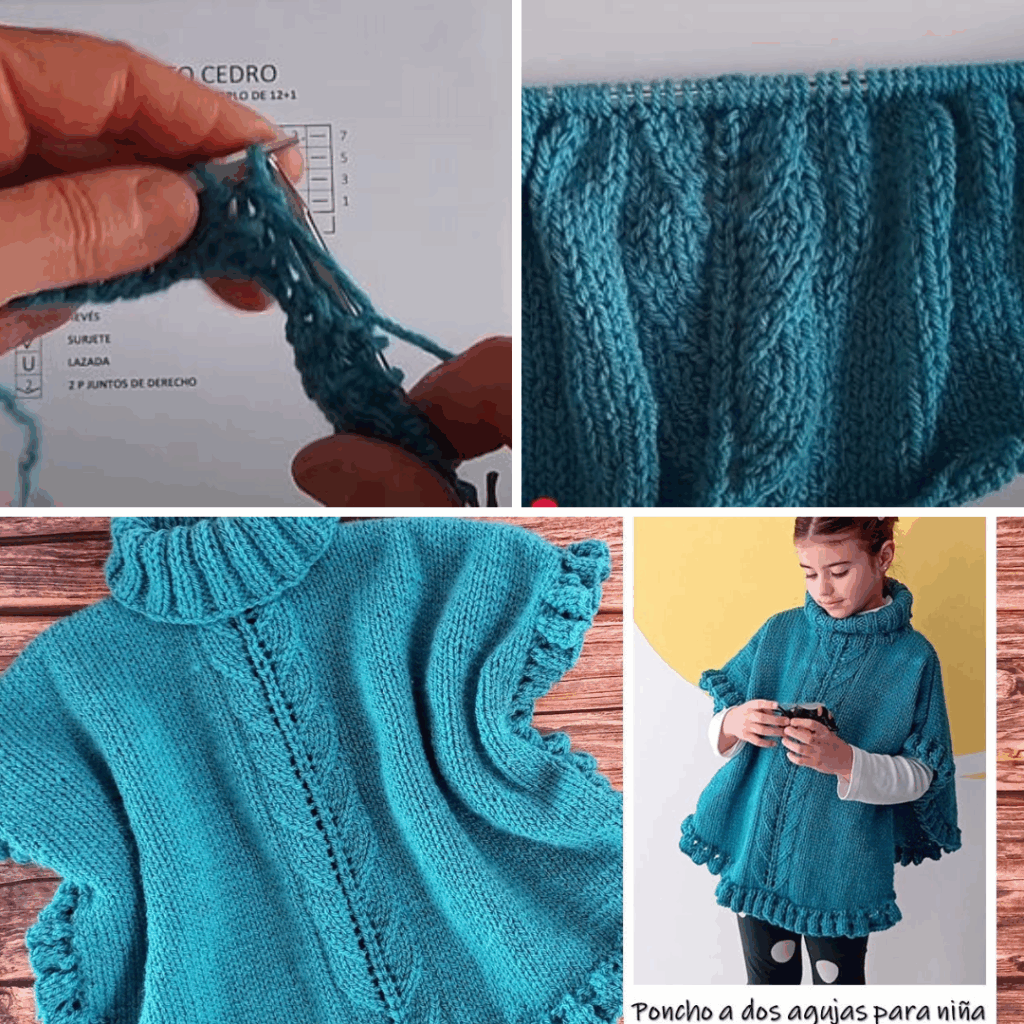
Key Knitting Techniques for a Simple Poncho
You’ll utilize fundamental knitting stitches and basic shaping methods:
- Casting On: The first step to putting stitches on your needle. The Long-Tail Cast-On is a popular choice as it creates a stretchy and neat edge.
- Knit Stitch (K): The most basic knitting stitch.
- Purl Stitch (P): The counterpart to the knit stitch, creating different textures.
- Working in the Round (if applicable): Joining your cast-on stitches to form a continuous tube, knitting without turning your work.
- Working Flat (if applicable): Knitting back and forth in rows, turning your work at the end of each row.
- Increasing Stitches: Essential for shaping the poncho’s expanding body.
- Knit Front and Back (KFB): A simple and common increase that creates a small bar.
- Make One Left (M1L) / Make One Right (M1R): Creates a neater, almost invisible increase.
- Yarn Over (YO): Creates a small hole, often used for decorative or lacy increases.
- Decreasing Stitches (less common for simple top-down ponchos, but used for neck shaping or if working bottom-up):
- Knit Two Together (K2tog): A simple decrease that leans to the right.
- Slip, Slip, Knit (SSK): A simple decrease that leans to the left.
- Ribbing: Used for stretchy and neat edges, typically for the neckline and hem.
- Knit 1, Purl 1 (K1P1) Rib: The most common and elastic rib pattern.
- Binding Off: The final step to taking stitches off your needle, creating a finished edge. Do it loosely for a non-restricting hem/neckline.
- Seaming (if working flat panels): The Mattress Stitch creates neat, almost invisible vertical seams.
- Picking Up Stitches (for neckline/collar): If you’re adding a separate collar or trim after knitting the main body, you’ll pick up stitches along the edge.
Step-by-Step Flow (Conceptual Guide – Top-Down, Worked in the Round)
This is a popular and often seamless method for ponchos.
- Preparation:
- Thoroughly read your chosen pattern.
- Make your gauge swatch! Adjust your needle size if needed.
- Gather all your yarn, knitting needles, stitch markers, and other notions.
- Cast On & Join in the Round:
- Using your circular needles, cast on the specified number of stitches for the neckline. Use a stretchy cast-on (like the Long-Tail Cast-On).
- Place a stitch marker to denote the beginning of the round.
- Carefully join the stitches in the round, ensuring your cast-on row is not twisted.
- Knit the Neckline/Collar:
- Work in your chosen rib pattern (e.g., K1P1 Rib) for the desired height of the neckline or collar. This creates a neat, stretchy opening that fits comfortably over the head.
- Set Up for Increases (Yoke/Body):
- After the collar, you’ll begin the main body of the poncho. Your pattern will instruct you on how to set up your stitches for increases.
- For a simple poncho, increases are often placed evenly around the circumference to create a gradual flare. A common method is to place stitch markers at 4 (or 2) strategic points around the circle and increase on either side of these markers in every round or every other round.
- Knit the Body of the Poncho:
- Work in your chosen main stitch pattern (e.g., Garter Stitch, Stockinette Stitch, Moss Stitch).
- Continue knitting in the round, incorporating the increases as per your pattern to expand the poncho outwards.
- Work until the poncho reaches your desired length (or the length specified in the pattern for your chosen size).
- Knit the Hem:
- Once the main body is complete, switch to a ribbing pattern (e.g., K1P1 Rib) for a few rounds to create a neat, stable hem. This helps prevent the bottom edge from curling.
- Bind Off:
- Bind off all stitches loosely, ensuring the bind-off edge maintains the elasticity of the ribbing.
- Finishing Touches:
- Weave in all yarn ends meticulously using your tapestry needle. For children’s garments, ensure all ends are securely woven in to prevent unraveling or hazards.
- Add Embellishments (Optional): Attach playful pompoms to the corners or bottom edge, or create some charming tassels for a bohemian look.
- Blocking:
- Gently wash or wet your poncho according to your yarn’s care instructions.
- Lay it flat on blocking mats, gently shaping it to the correct dimensions (as per your pattern’s schematic). Pin it if necessary to hold its shape.
- Allow it to dry completely. Blocking evens out your stitches, enhances the drape of the fabric, and sets the final shape beautifully.
Step-by-Step Flow (Conceptual Guide – Worked Flat & Seamed)
This is a very straightforward method for beginners.
- Preparation: Choose pattern, make gauge swatch, gather materials.
- Knit Front Panel:
- Cast on the specified number of stitches for the width of the front panel of the poncho.
- Work in your chosen stitch pattern (e.g., Garter Stitch for a simple texture, or Stockinette for a smooth fabric).
- As you knit, your pattern will likely instruct you to increase stitches evenly along both sides of the panel to create the poncho’s flare.
- Knit until the panel reaches the desired length from the shoulder to the hem.
- Bind off all stitches.
- Knit Back Panel:
- Repeat Step 2 exactly to create an identical back panel.
- Seam Panels:
- Lay the front and back panels flat, with wrong sides together.
- Shoulder Seams: Carefully seam the top edges of the panels together, starting from the outside shoulders and working inwards. Leave a central opening large enough for the neckline. The length of this seam will depend on the desired neck opening size.
- Side Seams: Seam the sides of the panels together, starting from the bottom hem and working upwards for a few inches/centimeters. Leave large openings near the top for the armholes.
- Use the Mattress Stitch for neat, invisible vertical seams.
- Knit Neckline/Collar (Optional):
- Using circular needles, pick up stitches evenly around the entire neck opening.
- Work in a rib pattern (e.g., K1P1 Rib) for the desired height of the collar.
- Bind off all stitches loosely.
- Finishing Touches:
- Weave in all yarn ends securely.
- Add embellishments (pompoms/tassels).
- Blocking:
- Wet/wash the poncho according to yarn care instructions.
- Lay it flat, gently shaping it to the correct dimensions, and allow it to dry completely.
Tips for Success
- Read the Pattern Thoroughly: Understand the entire construction, stitch abbreviations, and shaping instructions before you start.
- Don’t Skip the Gauge Swatch! (We can’t say it enough – it’s crucial!).
- Use Stitch Markers! They are your best friend for marking increases, beginning of rounds, and pattern repeats.
- Count Your Stitches! Regularly verify your stitch counts at the end of each row or round to catch errors early.
- Choose Child-Friendly Yarn: Prioritize softness and ease of care (machine washability).
- Keep Track of Rounds/Rows: Use a row counter or a tick sheet to avoid getting lost.
- Be Patient: Knitting a garment takes time. Enjoy the process and the satisfaction of seeing your creation come to life.
- Blocking is Your Friend: It truly transforms the finished look of your poncho, making stitches more even and improving drape.
Caring for Your Knitted Poncho
Proper care will ensure your handmade poncho stays beautiful and cozy for a long time:
- Follow Yarn Label Care Instructions Strictly: This is your primary guide.
- Gentle Washing: Machine wash on a gentle/delicate cycle with cool water (if suitable for your yarn) or hand wash gently with a mild detergent.
- Reshape and Lay Flat to Dry: Gently squeeze out excess water (never wring or twist!). Reshape the poncho back to its original dimensions and lay it flat on a clean towel or a mesh drying rack to air dry completely.
- Never Hang Wet: The weight of a wet knitted garment will cause it to stretch and distort if hung.
Video Tutorial ;
Knitting a poncho for a girl is a deeply rewarding endeavor. With each stitch, you’re creating not just a garment, but a warm, versatile, and unique expression of love that will be cherished. Embrace the process, and enjoy crafting this charming addition to a little one’s wardrobe!