by
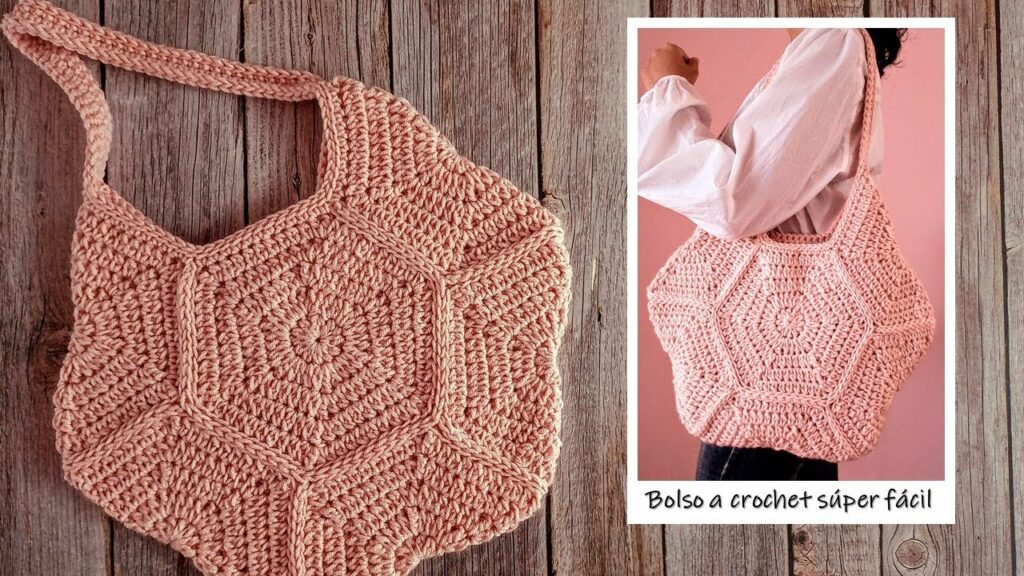
by There’s a special charm that comes with carrying a handmade bag – it’s a statement piece, a conversation starter, and a testament to your creative spirit. If you’ve been dreaming of crocheting your own unique accessory, but feel daunted by complex patterns, then a hexagon crochet bag is your perfect starting point.
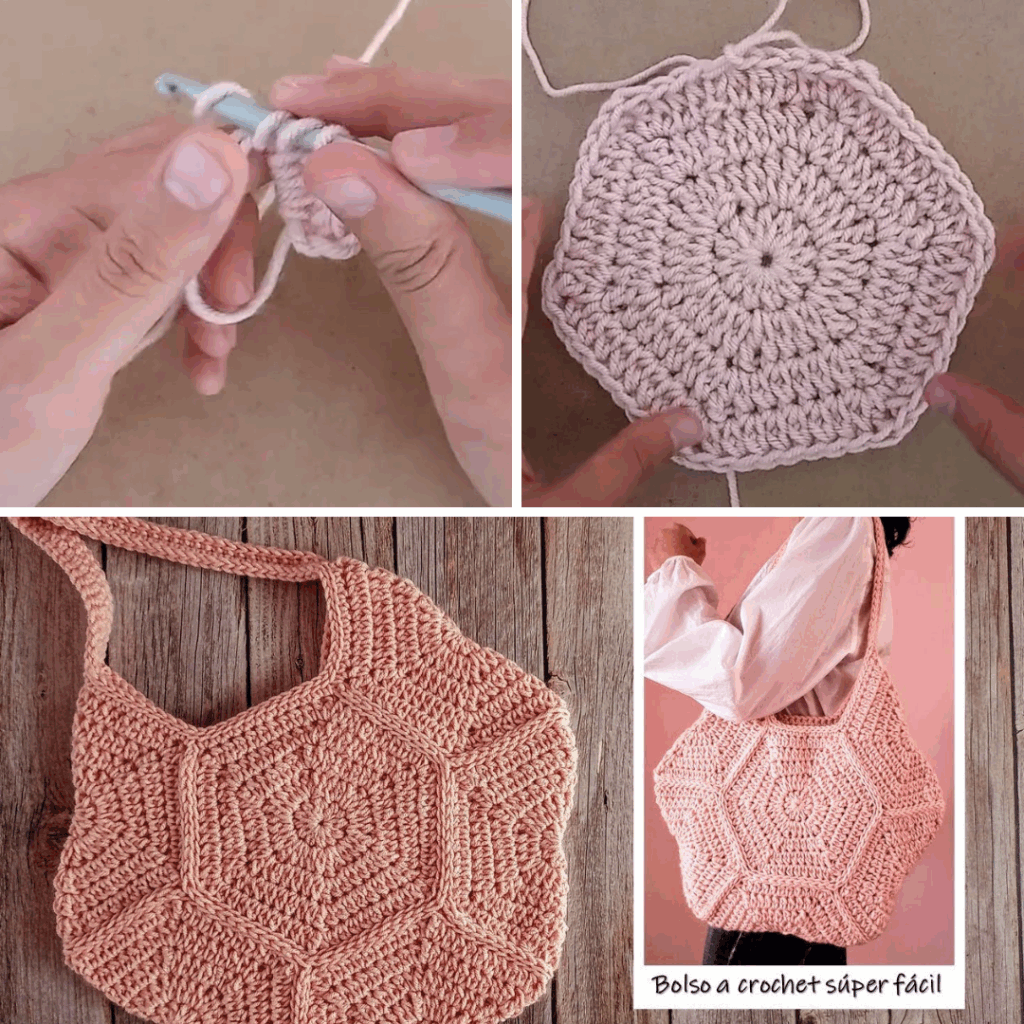
This guide focuses on making a “SUPER EASY” hexagon bag, breaking down the process into simple, step-by-step instructions. You’ll discover how a collection of charming, geometric motifs can be effortlessly assembled into a stylish and functional bag, perfect for beginners and seasoned crocheters alike.
Why Crochet a Super Easy Hexagon Bag?

This project isn’t just cute; it’s smart for a variety of reasons:
- Beginner-Friendly Project: Working with individual hexagons is far less intimidating than tackling a large, continuous piece. You get to practice basic stitches and working in the round repeatedly, building confidence with each finished motif.
- Portable & Quick: Each hexagon is a small, manageable project you can tuck into your bag and work on anywhere. This makes it perfect for on-the-go crocheting and offers quick wins, keeping you motivated.
- Visually Appealing: Hexagons offer a unique, tessellating pattern that stands out. You can create striking geometric designs or subtle, harmonious blends with your color choices.
- Customizable & Versatile: The modular nature means endless possibilities! Experiment with color combinations, yarn weights (for different bag sizes), and personalize it with your choice of strap, lining, or embellishments.
- Practical & Functional: A handmade bag is always useful for carrying essentials, whether for a quick trip to the market, a casual outing, or just as a unique everyday accessory.
- Skill Building: You’ll master working in the round, increasing stitches to create shape, and learning how to join motifs – all fundamental skills for more advanced crochet projects.
- Great Gift Idea: A handmade hexagon bag is a thoughtful, unique, and truly personalized gift that will be cherished.
Understanding the “Super Easy” Hexagon Bag Aesthetic
The beauty of a “super easy” hexagon bag lies in its simplicity. We’ll focus on straightforward construction and choose materials that enhance its structure and visual appeal.
Simplicity in Design
The core concept involves crocheting individual hexagon motifs and then joining them together to form the bag’s structure. This modular approach simplifies the shaping process significantly.
Yarn Selection: Balance of Durability, Structure & Color
The right yarn will ensure your bag is both beautiful and functional, holding its shape well.
- Weight:
- Worsted (Category 4) or Aran (Category 4/5): These are ideal choices for a sturdy bag. They provide good structure and work up quickly, resulting in a decent-sized finished product.
- DK (Double Knitting, Category 3): Can be used for a smaller, more delicate bag, but might require a tighter stitch or a lining for better structure.
- Fiber:
- Cotton or Cotton Blends: An excellent choice for bags. Cotton is sturdy, offers clear stitch definition, holds its shape well, is breathable, and easily washable.
- Acrylic (Good Quality): Durable, widely available in a huge range of colors, affordable, and washable. While lighter than cotton, good quality acrylic can still create a functional bag, though you might need to use a slightly smaller hook for a tighter fabric.
- Blends (e.g., Cotton/Acrylic, Wool/Acrylic): These combine the best properties of different fibers, offering benefits like durability, softness, and enhanced structure.
- Avoid: Very delicate, slippery, or overly stretchy yarns unless you plan to add a sturdy fabric lining to compensate for lack of structure.
- Color: This is where the fun begins! You can use a single solid color for all your hexagons, create a gradient effect, or mix and match contrasting colors for each motif for a truly vibrant design.
Stitch Patterns: Focus on Definition & Ease
For a “super easy” hexagon bag, we’ll stick to basic stitches that clearly define the hexagon shape.
- Recommended Stitches: Chain (ch), Slip Stitch (sl st), Double Crochet (dc). Half Double Crochet (hdc) can also be used for creating solid, denser hexagons.
- Classic Granny Hexagon: This is the absolute easiest and most common way to crochet a hexagon, making it perfect for beginners. It involves working groups of double crochets separated by chain spaces, creating a charming, open-work fabric.
- Solid Hexagon: For a denser bag, you can make a solid hexagon using double crochet (DC) or half double crochet (HDC), increasing at the corners to maintain the shape.
- Avoid: Complex stitches that obscure the geometric hexagon shape or create excessive gaps that contents might fall through, unless you plan to line the bag.

Design Elements
- Number of Hexagons: This will directly dictate the size and shape of your bag. A common layout for a small, structured bag uses 13 hexagons.
- Strap: You can crochet a simple strap yourself, or attach a pre-made woven, leather, or chain strap for a different look.
- Lining (Optional but Recommended): Adding a fabric lining is highly recommended for any crocheted bag. It adds structure, prevents the bag from stretching out, protects your belongings, and ensures small items don’t slip through any gaps in the crochet work.
Planning Your Super Easy Hexagon Bag Project
A little planning goes a long way to ensure your bag comes together smoothly.
- Bag Size & Number of Hexagons:
- For a highly recommended beginner-friendly, structured bag, consider using a 13-hexagon layout:
- 1 Hexagon for the flat base.
- 6 Hexagons for the side walls, which will be joined around the base.
- 6 Hexagons for the top/upper body, which will be joined above the side walls.
- This layout creates a neat, bucket-style or structured tote bag.
- For a highly recommended beginner-friendly, structured bag, consider using a 13-hexagon layout:
- Color Scheme: Decide if you’ll use a single color, multiple solid colors, or a variegated yarn. If using multiple colors, plan out which colors will go into each hexagon and which color you’ll use for joining.
- Strap Style: Decide if you’ll crochet your own strap (and factor in yarn for it), or purchase a pre-made strap. If purchasing, consider any D-rings or other hardware you might need for attachment.
- Lining? Decide now if you’ll add a fabric lining. This is easier to do after the crocheting is complete but before the strap is permanently attached.
Materials You’ll Need
- Yarn: (As detailed in the “Aesthetic” section). The quantity will depend on your desired bag size and yarn weight, but typically 2-4 skeins for a medium-sized bag using worsted weight.
- Crochet Hook(s): The size recommended by your yarn label, or the size that gives you the desired fabric density.
- Notions:
- Stitch Markers: Useful for marking the beginning of rounds when crocheting the hexagons.
- Tapestry Needle: Essential for neatly weaving in all yarn ends and for joining your hexagons.
- Scissors.
- Measuring Tape: For ensuring consistent hexagon size.
- Bag Strap: (Crochet your own, or purchase a leather/fabric strap, D-rings if needed).
- Fabric for Lining (Optional): Choose a sturdy fabric like cotton canvas or broadcloth.
- Sewing Needle & Matching Thread (for lining/strap attachment, if applicable).
Key Crochet Techniques for a Super Easy Hexagon Bag
You’ll mostly be using basic stitches and a simple joining method.
- Basic Stitches: Chain (ch), Slip Stitch (sl st), Double Crochet (dc).
- Working in the Round: Crucial for creating the hexagon motifs.
- Increasing: Understanding how to increase stitches at specific points to form the six sides of the hexagon.
- Magic Ring (Recommended for a tight center): Creates a neat, adjustable loop to start your hexagon without a hole. Alternatively, a chain 3 or 4 ring.
- Joining Motifs: For a “super easy” bag, we’ll focus on simple, secure joining methods:
- Slip Stitch Join: Creates a neat, almost flat seam.
- Single Crochet Join: Creates a slightly more pronounced but very sturdy seam.
- Weaving in Ends: Crucial for a professional and durable finish, especially with multiple motifs.
Step-by-Step Construction (Conceptual Guide)
This guide walks you through making the hexagons and then joining them. For exact stitch counts and specific instructions for a “Granny Hexagon,” a quick search for “easy granny hexagon pattern” will provide numerous free resources.
Part 1: Crocheting the Hexagons (Repeat for desired number of hexagons)
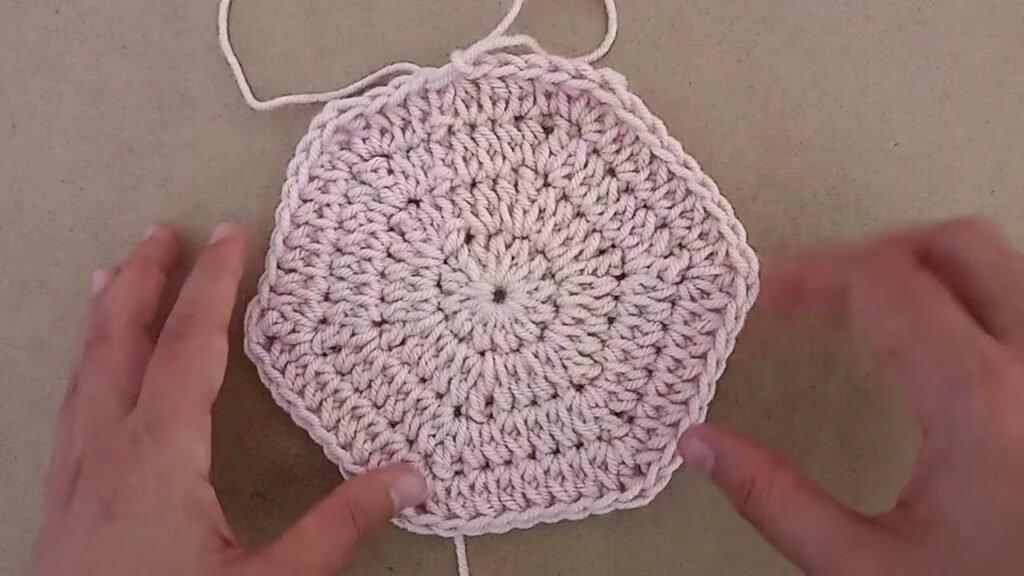
You will need to crochet the total number of hexagons required for your bag (e.g., 13 hexagons for our example bag).
- Start the Center of the Hexagon:
- Magic Ring Method (Highly Recommended): Make a magic ring. Chain 3 (counts as your first Double Crochet). Work 1 Double Crochet into the ring.
(Chain 2, work 2 Double Crochet into the ring)5 times. Chain 2. Join with a Slip Stitch to the top of your starting Chain 3. Gently pull the yarn tail of the magic ring to close the center hole tightly. (You now have 6 groups of 2 DC, separated by 6 chain-2 spaces, forming your 6 corners). - Chain Ring Method (Alternative): Chain 4. Join with a Slip Stitch to the first chain to form a ring. Chain 3 (counts as 1st DC). Work 1 Double Crochet into the ring.
(Chain 2, work 2 Double Crochet into the ring)5 times. Chain 2. Join with a Slip Stitch to the top of your starting Chain 3. (This creates the same result as the magic ring but with a small central hole).
- Magic Ring Method (Highly Recommended): Make a magic ring. Chain 3 (counts as your first Double Crochet). Work 1 Double Crochet into the ring.
- Round 2 (for Granny Hexagon Style):
- Slip Stitch into the first chain-2 space (this moves your hook to the first corner).
- Chain 3 (counts as 1st DC). Work 2 Double Crochet into the same chain-2 space. (This is the first “cluster” and the start of your first corner for this round).
(Chain 1, skip the next 2 DC, work 3 Double Crochet into the next chain-2 space)5 times. (This creates a side space and 5 full corner clusters).- Chain 1, work 3 Double Crochet into the same initial chain-2 space where you started Round 2. (This completes the first corner cluster for this round).
- Join with a Slip Stitch to the top of your starting Chain 3.
- You now have 6 defined corners (each with 3 DC, ch 1, 3 DC) and 6 side spaces (each with ch 1).
- Round 3 and Beyond:
- To continue growing your hexagon, you will always work your “corner” stitches into the chain-1 space of each corner from the previous round (e.g., for Granny Hexagon, 3 DC, ch 1, 3 DC into each corner ch-1 space).
- For the “sides” (the spaces between the corners), you will work your regular cluster stitches (e.g., 3 DC for Granny Hexagon) into the chain-1 spaces along the sides.
- Continue adding rounds until your hexagons reach the desired size.
- Crucial Step: Weave in all individual hexagon ends as you go! It’s much easier to do this after each motif is finished than at the very end.
Part 2: Joining the Hexagons (Simple Slip Stitch or SC Join)
This is where your individual hexagons transform into a bag!
- Layout Your Hexagons:
- Arrange all your finished hexagons according to your bag design. For the 13-hexagon bag layout:
- Lay out 1 hexagon to be the flat base of the bag.
- Surround it with 6 hexagons, which will form the side walls.
- Place another 6 hexagons above those, which will form the upper body/opening of the bag.
- Arrange all your finished hexagons according to your bag design. For the 13-hexagon bag layout:
- Choose Your Joining Method (for simplicity, we’ll describe a working-right-side-out join):
- Slip Stitch Join: Creates a neat, flat, and subtle seam line.
- Place two hexagons side-by-side, right sides facing up and edges perfectly aligned.
- Insert your hook through both corresponding stitches (or chain spaces) of the two hexagons. Yarn over and pull through all loops on your hook (this completes a slip stitch).
- Repeat across the entire edge you are joining.
- Single Crochet Join: Creates a slightly more pronounced, but very sturdy and often decorative seam.
- Similar to the slip stitch join, but instead of a slip stitch, you work a single crochet through both corresponding stitches/chain spaces.
- Slip Stitch Join: Creates a neat, flat, and subtle seam line.
- Step-by-Step Joining:
- Join the Base to Side Hexagons:
- Take your base hexagon.
- Take one of the hexagons intended for a side wall. Align one edge of the side hexagon to one edge of the base hexagon.
- Join them using your chosen method (Slip Stitch or Single Crochet Join) along that entire edge.
- Repeat this process for all 6 side hexagons around the perimeter of the base hexagon. You will now have a flat base with 6 side walls standing upright.
- Join Side Hexagons to Each Other:
- Now, join the vertical edges of the side hexagons to each other. You’ll join 6 seams here, connecting each side hexagon to its neighbor. This will form the main cylindrical or prismatic body of the bag.
- Join Upper Hexagons to Side Hexagons:
- Take your remaining 6 hexagons (these will form the upper part of the bag and the opening).
- Align one edge of an upper hexagon to the top edge of a side hexagon. Join them using your chosen method.
- Continue joining all 6 upper hexagons around the top, and then join their vertical edges to each other, just like you did with the side hexagons.
- Note: For this “super easy” bag, we assume you’re aiming for a fairly enclosed structure with an opening at the very top. If you wanted a flap, you would modify the joining of the top hexagons or leave certain edges unjoined.
- Join the Base to Side Hexagons:
Part 3: Finishing the Bag
- Top Edging:
- Once all hexagons are joined, work 1-2 rounds of single crochet (SC) evenly around the entire top opening of the bag. This creates a neat, sturdy, and reinforced edge.
- You can incorporate a drawstring here if desired: After the SC rounds, you can crochet a long chain (e.g., 200-300 chains) and weave it through the stitches of your final SC round.
- Attach the Strap:
- Crocheted Strap: Chain the desired length (e.g., 2-3 feet for a shoulder bag). Work rows of single crochet or half double crochet until the desired width (e.g., 1-2 inches). Securely attach the ends of the strap to the top corners of the bag using single crochet or slip stitches.
- Purchased Strap: If you have a pre-made leather, fabric, or chain strap, follow its instructions for attachment. You might need D-rings sewn onto the bag first, or simply sew the strap directly onto the top edge of the bag.
- Weave in All Remaining Ends: Take your tapestry needle and meticulously weave in any remaining loose yarn ends. This is crucial for a professional-looking and durable bag.
- Add Lining (Optional but Highly Recommended):
- While optional, a fabric lining significantly improves a crocheted bag’s durability, structure, and prevents contents from stretching the bag or slipping through gaps.
- Measure the finished crochet bag (its circumference and height).
- Cut a sturdy fabric (like cotton broadcloth or canvas) slightly larger than your measurements (allowing for seam allowances).
- Sew the fabric into a bag shape.
- Insert the fabric lining into your crochet bag, fold the top edge of the fabric under, and hand-stitch or machine-stitch it securely to the top crochet edging.
Tips for Success
- Don’t Skip the Gauge Swatch: While not for fit, a gauge swatch ensures all your hexagons are a consistent size, which is critical for easy joining.
- Count Your Stitches! Especially at the end of each round for the hexagons. A consistent stitch count ensures perfect hexagon shape.
- Weave in Ends As You Go! This cannot be stressed enough. Weaving in dozens of ends at the very end is tedious. Do it after each hexagon is complete.
- Block Your Hexagons (Optional but Recommended): Lightly wetting and pinning your finished hexagons to shape before joining them will make the joining process much easier and result in a neater final bag.
- Choose Your Join Method Wisely: For “super easy,” the Slip Stitch or Single Crochet join is fast and effective.
- Work Loosely on Joins: If your joining stitches are too tight, they can cause the bag to pucker. Maintain an even tension.
- Match Corresponding Stitches: Ensure you are inserting your hook into the correct, corresponding stitches or chain spaces on both hexagons to achieve a neat, aligned seam.
- Patience with Joining: Joining many motifs can be repetitive, but the reward of seeing your bag take shape is worth it!
Caring for Your Hexagon Bag
Proper care will ensure your handmade hexagon bag remains beautiful and functional:
- Follow Yarn Label Instructions: Always refer to your yarn’s specific care instructions for washing and drying.
- Gentle Wash: Most crocheted bags made with cotton or acrylic can be hand washed or machine washed on a gentle/delicate cycle with cold water.
- Reshape & Lay Flat to Dry: Gently squeeze out excess water (never wring or twist the bag!). Reshape the bag to its original form and lay it flat on a clean towel or a mesh drying rack to air dry completely.
- Never Hang Wet: The weight of a wet crocheted bag will cause it to stretch and distort significantly if hung to dry.
Conclusion
Creating a “SUPER EASY” hexagon crochet bag is a wonderfully accessible and satisfying project. It transforms simple geometric shapes into a unique and eye-catching accessory. By following these step-by-step conceptual guidelines, you’ll be able to confidently crochet individual hexagons and assemble them into a charming, personalized bag that’s not just a carry-all, but a testament to your growing crochet skills. Get ready to buzz with excitement over your new handmade creation!
Video Tutorial ;