by
by The bucket hat has cemented its status as a timeless accessory, effortlessly blending casual cool with practical sun protection. Once a niche item, it’s now a ubiquitous fashion statement, seen on runways, city streets, and sunny beaches. For crocheters, this trend is a golden opportunity: the crochet bucket hat is not only a fun and relatively quick project, but also a fantastic way to customize your style and hone your skills.
This detailed guide will walk you through everything you need to know about crocheting a bucket hat, from choosing the right materials to mastering the essential techniques that ensure a structured, stylish, and successful outcome.
Why Crochet Your Own Bucket Hat?
Beyond simply following a trend, crocheting a bucket hat offers a myriad of benefits:
- Customization King: No more settling for limited store options! You choose the color, yarn fiber, stitch pattern, and embellishments to create a hat that is uniquely you. Stripes, color blocking, solid minimalist, textured — the possibilities are endless.
- Skill Builder: This project is an excellent way to practice fundamental crochet techniques like working in the round, increasing stitches evenly, maintaining consistent tension, and understanding how stitch density impacts fabric structure.
- Satisfyingly Quick: Compared to garments or large blankets, a bucket hat works up relatively quickly, offering near-instant gratification and a boost of creative confidence.
- Stash Buster: They don’t require a vast amount of yarn, making them perfect for using up those leftover skeins from previous projects.
- Practical & Stylish: Beyond aesthetics, a well-made crochet bucket hat offers genuine sun protection and is a go-to solution for bad hair days or adding a relaxed vibe to any outfit.
- Perfect Gift: A handmade bucket hat is a thoughtful and personal gift for friends and family.
Understanding the Anatomy of a Bucket Hat
A crochet bucket hat consists of three primary sections, each with its own purpose and construction method:
- The Crown (Top): This is the flat, round part that sits on the very top of your head. It’s typically crocheted in continuous rounds, increasing stitches evenly to maintain a flat circle.
- The Sides/Body: Once the crown reaches the desired diameter, you stop increasing and work even (without increases) in the round. This section forms the height of the hat and should fit snugly around your head.
- The Brim: The brim extends outwards from the base of the sides. It’s created by resuming increases in the round, causing the fabric to flare outwards to provide shade.
Choosing Your Materials: The Foundation of Success
The right materials are crucial for a bucket hat that looks great and holds its shape.
Yarn Selection: Structure and Breathability are Key!
- Yarn Weight:
- Worsted Weight (Category 4): This is the most common and versatile choice. It works up quickly and creates a good balance of structure and comfort.
- DK (Double Knitting, Category 3): Can be used for a lighter, more pliable hat. You’ll need to use a smaller hook to achieve adequate density.
- Bulky (Category 5): For a very quick, chunky, and noticeably textured hat.
- Fiber: The fiber choice dictates the hat’s drape, breathability, and how well it holds its shape.
- Cotton or Cotton Blends: Highly recommended for most bucket hats, especially for warmer weather. Cotton is breathable, durable, holds stitch definition beautifully, and has minimal stretch, allowing the hat to maintain its shape.
- Acrylic: A good, affordable alternative. Choose a denser, firmer acrylic for better shape retention. It’s durable and comes in a vast array of colors. Less breathable than cotton.
- Raffia or Paper Yarn: For a very structured, rigid, and beachy hat. These require a specific crocheting technique and can be less forgiving.
- Wool or Wool Blends: Better suited for cooler weather bucket hats, as they offer warmth. May have more drape than cotton, so choose a blend with good memory.
- Color: Solid colors offer a classic, minimalist look. Variegated yarns create a unique, often tie-dye-like effect. Stripes or color blocking allow for creative expression.
- Yardage: A typical adult bucket hat will require approximately 100-200 yards (90-180 meters) of worsted weight yarn, but always check your specific pattern for exact requirements.
Crochet Hook: The Density Secret
The hook size is critical. For a bucket hat, you generally want a firm, dense fabric that can stand on its own and hold its shape, especially the brim. This often means using a crochet hook that is one or even two sizes smaller than what the yarn label typically recommends for garments. Your gauge swatch (see below!) will be your ultimate guide.
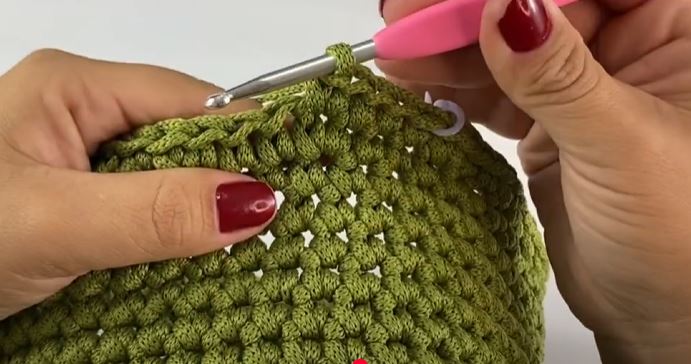
Key Crochet Techniques for a Successful Bucket Hat
- Basic Stitches: Chain (ch), Slip Stitch (sl st), Single Crochet (sc), Half Double Crochet (hdc), Double Crochet (dc). Most bucket hats are primarily worked in SC or HDC for their density.
- Working in the Round:
- Magic Ring (Magic Circle/Adjustable Ring): The best way to start the crown for a tight, hole-free center.
- Joining Rounds vs. Continuous Spiral: Many patterns use continuous spirals (no slip stitch to join, no chain to start new round) for a seamless look. Others join with a slip stitch at the end of each round and chain up, which creates a visible seam but can be easier to track rounds.
- Increasing Stitches: Essential for creating the flat crown and the flaring brim. Increases must be distributed evenly around the circle to prevent warping.
- Consistent Tension: This is paramount for shaping. Uneven tension will lead to a lopsided crown or a wavy brim.
- Blocking: While optional for some projects, blocking is highly recommended for bucket hats, especially the brim, to set the shape, even out stitches, and ensure it lays flat.
Planning Your Bucket Hat Project
A little preparation goes a long way to ensure your hat fits perfectly and looks great.
- Sizing:
- The most crucial measurement is head circumference. Measure around the widest part of your head, just above your eyebrows.
- Standard adult head circumference is typically 21-23 inches (53-58 cm). Children’s sizes will be smaller.
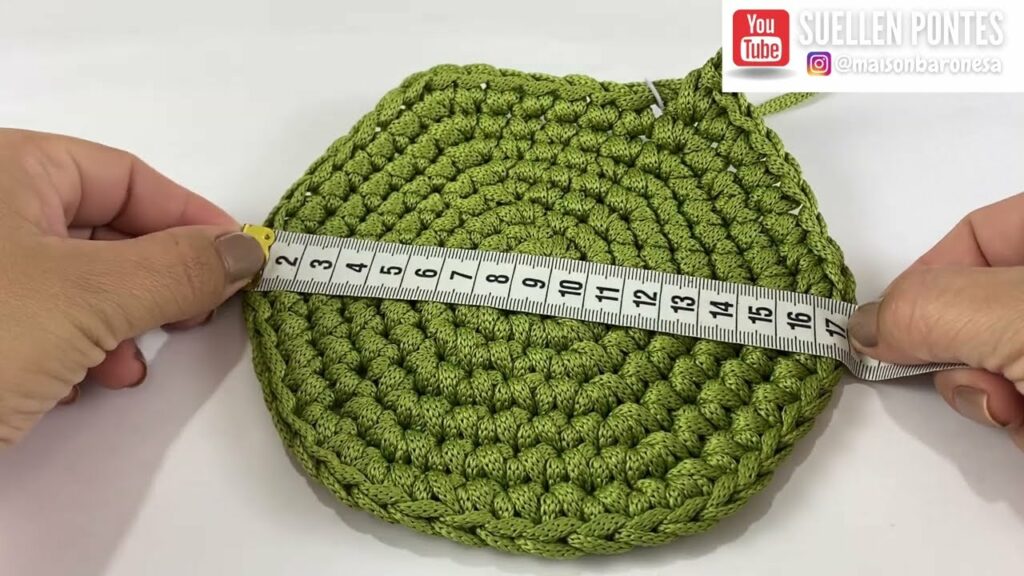
- The diameter of your flat crown should be approximately (Head Circumference / π) – (1/2 to 1 inch for negative ease). For example, for a 22-inch circumference, $\sim$7 inches diameter, so your crown would be $\sim$6-6.5 inches. This creates a slight “negative ease” so the hat fits snugly.
- Gauge Swatch (ABSOLUTELY CRITICAL!):
- This is the most important step for achieving a hat that fits.
- Crochet a substantial swatch (at least 4×4 inches / 10×10 cm) using your chosen yarn and hook in the main stitch pattern you’ll use for the crown (usually SC or HDC).
- Crucial Step: Wash and block your swatch exactly as you plan to wash and block your finished hat. Yarn can change after laundering.
- Measure your stitches and rounds per inch/cm accurately. If your gauge doesn’t match your pattern’s, adjust your hook size. (Go up a hook size if you have too many stitches per inch, down if you have too few.)
- Yarn Quantity: Once your gauge is determined, reconfirm the yarn requirements based on your chosen size.
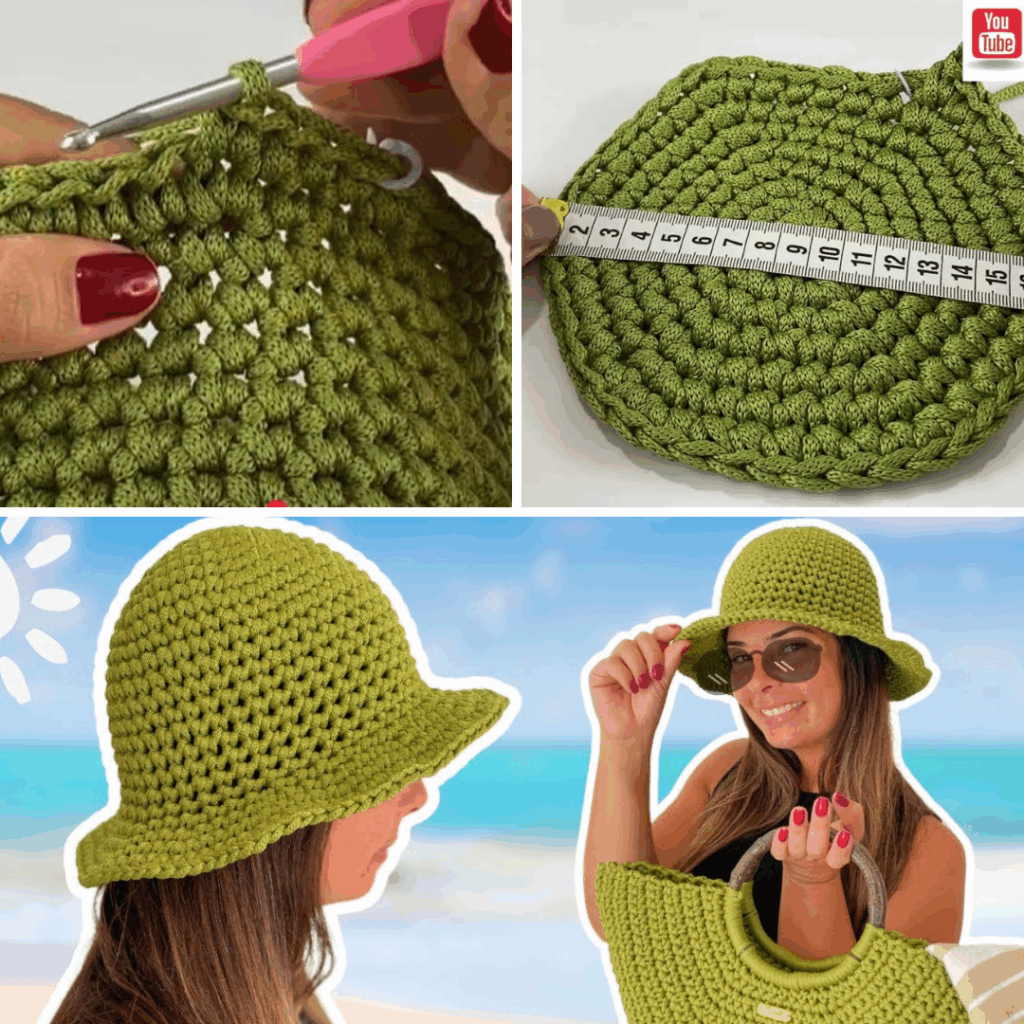
Step-by-Step Construction (Conceptual Guide)
While specific patterns will provide exact stitch counts, the general process for crocheting a bucket hat is as follows:
Part 1: The Crown (The Flat Circle)
- Start (Magic Ring): Create a magic ring.
- Round 1: Work a small number of single crochet (SC) or half double crochet (HDC) stitches into the magic ring (e.g., 6 SC or 8 HDC). If working in a spiral, place a stitch marker in the first stitch.
- Increasing Rounds: In each subsequent round, you will increase the stitch count evenly to ensure the circle lays flat.
- Common Increase Pattern (SC):
- Rnd 2: 2 SC in each stitch around.
- Rnd 3: (1 SC, 2 SC in next stitch) around.
- Rnd 4: (1 SC in next 2 stitches, 2 SC in next stitch) around.
- Continue this pattern, adding one more stitch between increases each round.
- Common Increase Pattern (HDC):
- Rnd 2: 2 HDC in each stitch around.
- Rnd 3: (1 HDC, 2 HDC in next stitch) around.
- Continue similarly to SC.
- Common Increase Pattern (SC):
- Target Diameter: Continue increasing rounds until your flat circle reaches the desired crown diameter for your head (e.g., 6-6.5 inches for an adult).
Part 2: The Sides/Body (The Hat Height)
- Stop Increasing: Once the crown reaches the correct diameter, you will stop all increases.
- Work Even: Work one SC (or HDC) in each stitch around for subsequent rounds. The fabric will now turn downwards, forming the sides of the hat.
- Optional Sharp Edge: For a very defined corner where the crown meets the sides, some patterns will instruct you to work the first round of the body in the back loop only (BLO) of each stitch.
- Target Height: Continue working even rounds until the hat reaches the desired height, typically covering the top of your forehead and ears. Try it on as you go!
Part 3: The Brim (The Flare)
- Resume Increases: To make the brim flare outwards, you will start increasing stitches again in the round.
- Common Brim Increase: Start by working (2 SC in first stitch, 1 SC in next 1-2 stitches) around, or place 2-3 increases very evenly per section/wedge of the brim. The key is to distribute them evenly to avoid a wavy or puckered brim.
- Flaring Out: Continue increasing rounds until the brim reaches your desired width. A wider brim provides more shade and a more dramatic look.
- Stiffness: For a very stiff brim, ensure your tension is tight, use a firm yarn (like cotton or raffia), or consider working a round or two in BLO/FLO for added structure. Some patterns even suggest inserting wire into the brim for extreme stiffness.
- Finishing Edge: Once the brim is the desired width, finish with a neat edge, often a final round of slip stitches or single crochets, or a reverse single crochet (crab stitch) for a unique border.
- Fasten Off: Cut yarn, leaving a tail, and pull through the last loop to secure.
Part 4: Finishing Touches
- Weave in Ends: Using your tapestry needle, meticulously weave in all yarn tails securely. Loose ends can unravel your beautiful work.
- Blocking: This is arguably the most important finishing step for a bucket hat.
- Gently wet the hat (or steam it).
- Place it over a form (a bowl, a head-sized balloon, or even your own head wrapped in plastic wrap) to help it hold its shape.
- Carefully shape the brim to lie flat or have a desired curve. Pin it in place if using blocking mats.
- Allow to dry completely. Blocking will set the stitches, even out any tension inconsistencies, and ensure your hat holds its perfect shape.
Tips for Bucket Hat Success
- Don’t Skip the Gauge Swatch: Seriously, measure your gauge! It’s the difference between a hat that fits and one that doesn’t.
- Maintain Consistent Tension: This is the golden rule for all shaping in crochet, especially for the smooth curves of a hat.
- Use Stitch Markers: Mark the beginning of each round, especially if working in a continuous spiral, to avoid losing your place.
- Weave in Ends as You Go: If you’re changing colors, weave in those tails immediately. It saves a tedious job at the end.
- Try It On As You Go: Periodically try on your hat (especially after completing the crown and building the body) to check the fit and height.
- Block Your Hat: It truly makes a professional difference, especially for the brim.
Customization & Styling Your Bucket Hat
The beauty of a crochet bucket hat is its endless potential for personalization:
- Stitch Variety: Use different stitches for the crown, body, and brim for subtle texture changes.
- Color Play: Create bold stripes, subtle ombrés, or color-blocked sections.
- Embellishments: Sew on embroidered patches, add enamel pins, crochet small appliques (like flowers or leaves), or add playful pom-poms.
- Fringe: A long, shaggy fringe around the brim can add a distinct boho or rustic vibe.
- Chin Tie: Add a crocheted chain tie or a ribbon if you want to secure your hat on windy days.
- Styling: A classic bucket hat pairs perfectly with casual wear – jeans, t-shirts, shorts, or a simple sundress. It’s fantastic for festivals, beach days, or just adding a laid-back, street-style edge to your everyday look.
Caring for Your Crochet Bucket Hat
Proper care will ensure your hat lasts for years:
- Follow Yarn Label Instructions: Always defer to your specific yarn’s care guidelines.
- Hand Wash Recommended: Even if your yarn is machine washable, hand-washing a shaped item like a hat helps preserve its form. Use cool water and a mild detergent.
- Reshape and Lay Flat to Dry: Never wring or hang a wet crocheted hat, as this will stretch and distort its shape. Gently squeeze out excess water, reshape it, and lay it flat on a clean towel or a mesh drying rack to air dry completely. You can also place it over a form (like a bowl) to help it maintain its shape as it dries.
Conclusion
Crocheting a bucket hat is a deeply satisfying project that yields a trendy, customizable, and practical accessory. By understanding its fundamental construction, paying attention to yarn choice and gauge, and embracing the power of blocking, you can confidently create a professional-looking hat that you’ll be proud to wear (and perhaps even gift!). So pick up your hook, choose your perfect yarn, and embark on your bucket hat adventure – your head will thank you! Sources
Video Tutorial ;