by
by There’s something uniquely refreshing and fun about a watermelon – its vibrant colors, crisp freshness, and undeniable association with sunny days and summertime joy. Translating this beloved fruit into a crocheted watermelon dress creates a garment that’s not just adorable but also brimming with playful personality. Whether for a tiny tot’s first summer or a whimsical adult’s wardrobe, a handmade watermelon dress is a true celebration of the season, crafted stitch by colorful stitch.
This detailed article will explore all the delicious details of crocheting a watermelon dress, from capturing those iconic colors to perfecting the fit and adding those essential “seed” accents.
The Irresistible Appeal of a Crochet Watermelon Dress
- Summertime Essential: Its bright, cheerful colors make it an instant hit for picnics, beach trips, backyard BBQs, and any warm-weather festivity.
- Vibrant & Playful: The distinct color blocking of green, white, and red/pink is instantly recognizable and incredibly eye-catching, bringing a smile to anyone’s face.
- Unique & Handmade: A crocheted watermelon dress is a one-of-a-kind creation, showcasing your crafting skills and personal style in a fun way.
- Versatile Design: While often associated with children’s wear, the concept can be adapted for stylish adult sundresses or even sophisticated casual wear.
Designing Your Juicy Garment: Key Considerations
Bringing a watermelon to life in yarn involves thoughtful planning of colors, motifs, and overall style.
- Target Wearer:
- Baby/Toddler: Focus on ease of dressing (wide necklines, back closures), comfort (soft yarns, minimal bulky seams), and safety (securely attached embellishments, no choking hazards).
- Child: Similar comfort and durability considerations, perhaps a bit more room for active play.
- Adult: Prioritize drape, flattering silhouette, and personal style.
- Color Palette (The Watermelon Core!): This is the heart of your design.
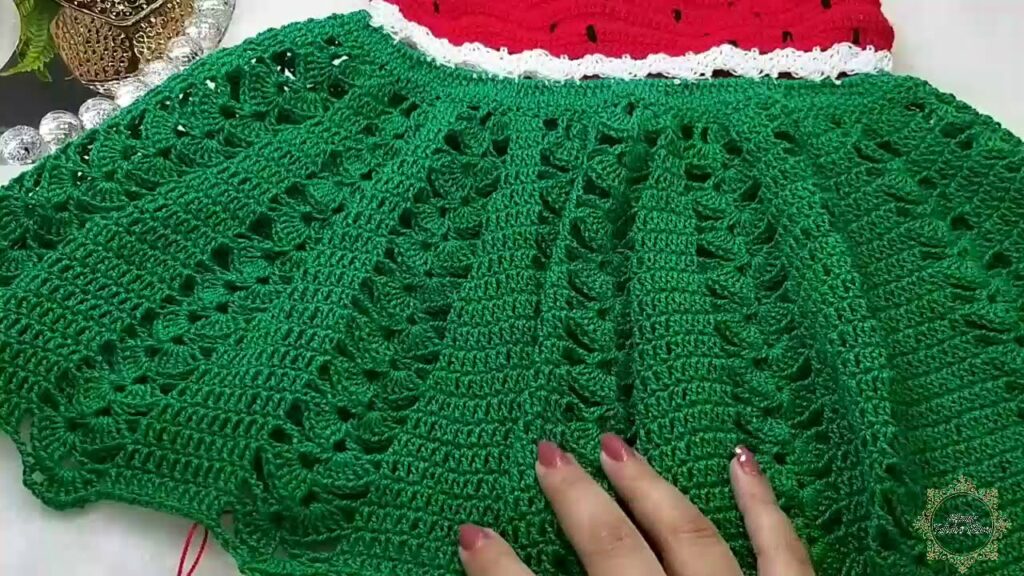
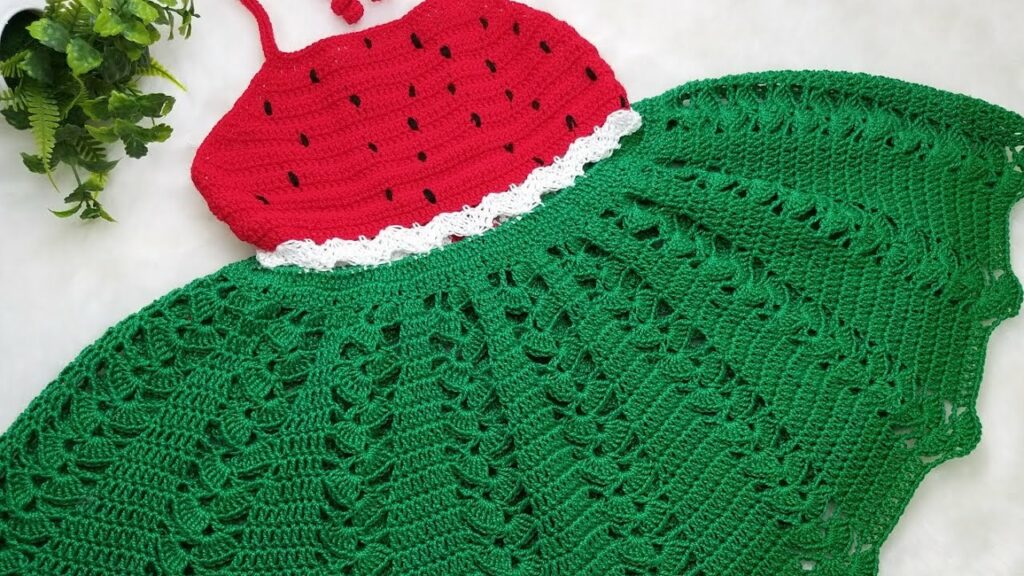
- Outer Rind: Deep, rich green (forest green, emerald) for the outermost band. You can also add a thinner stripe of lighter green (lime, mint) directly next to it to mimic the rind’s natural variations.
- White Rind: A crisp, narrow band of white or off-white. This crucial stripe provides the perfect separation between the rind and the flesh.
- Flesh: Bright, juicy red or vibrant pink. This will be the largest section of the dress.
- Seeds: Small accents of black.
- Watermelon Motif Integration: How will you make your dress look like a watermelon slice?
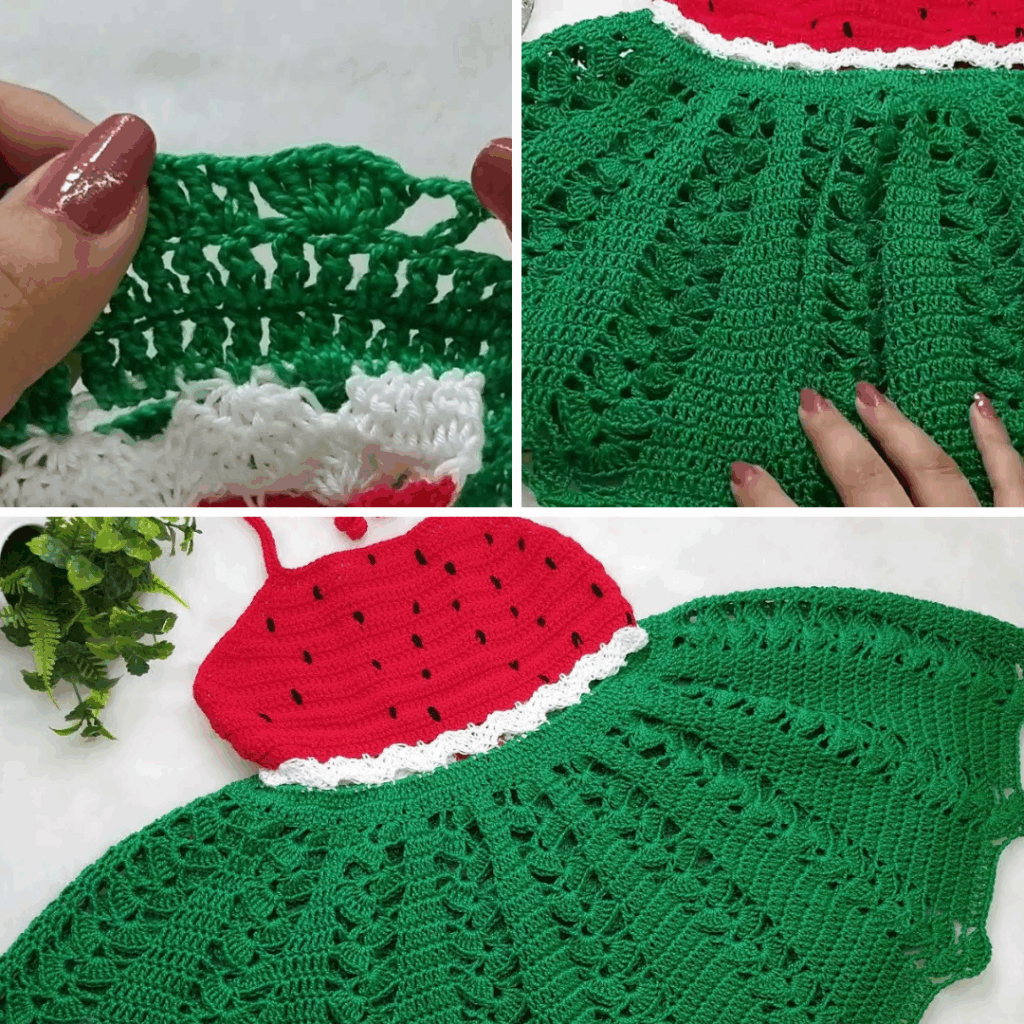
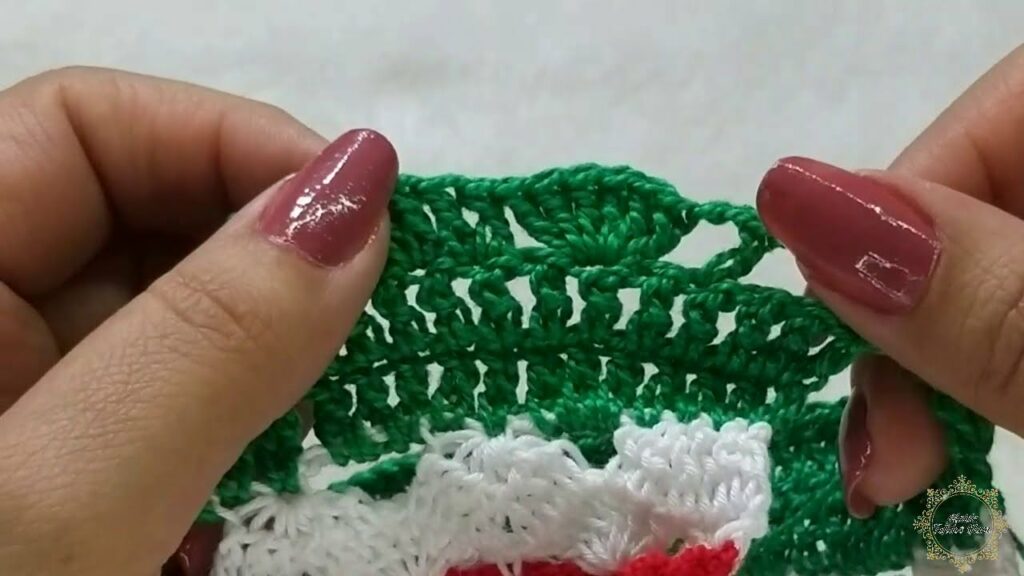
- Horizontal Color Blocking (Most Common & Effective): This is the most straightforward and visually impactful method. The dress is crocheted in distinct horizontal bands of green, white, and red/pink.
- Striping for Rind: For a more realistic rind, alternate rows or sections of dark green and a lighter green.
- Seed Details:
- Embroidered Stitches: After the dress is completed, use black embroidery floss or a thin black yarn to embroider small “V” stitches or French knots to represent seeds. This is the safest method for babies and toddlers.
- Small Black Beads: Use with extreme caution for children under 3, and generally avoid for babies. If used for older children or adults, ensure beads are securely sewn with strong thread.
- Crocheted Bobbles/French Knots: Small, raised crocheted stitches in black yarn can create a textured seed effect.
- Appliqués: A single large crocheted watermelon slice (with all colors and embroidered seeds) could be appliquéd onto a plain white or green dress as a focal point.
- Dress Style:
- Sleeveless Sundress: Perfect for hot weather, often with simple shoulder straps or a halter neck.
- Strappy Dress: Thin or wider straps, offering a classic summer look.
- Short-Sleeved: Adds a bit more coverage while maintaining a warm-weather feel.
- Silhouette: A-line (flaring gently from the chest/waist), shift (straighter cut), or a full, gathered skirt (for a more playful look, especially for children).
- Yarn Choice:
- Fiber: For summer wear, prioritize breathability and comfort.
- Cotton or Organic Cotton: Excellent for its breathability, absorbency, and softness.
- Bamboo Blends: Known for their silky drape and cool feel against the skin.
- Lightweight Acrylics: Modern acrylics can be soft and durable, offering a wide color range.
- Weight: Sport (Category 2) or DK (Double Knitting, Category 3) are common choices, offering a good balance of drape and working speed. Fingering (Category 1) can create a very fine, elegant dress but will take longer.
- Fiber: For summer wear, prioritize breathability and comfort.
- Construction Method:
- Top-Down (Seamless): Work from the neckline down. This is popular for minimizing seams and allowing easy length adjustment. You’d typically start with the green (rind) at the top, transition to white, then the red/pink for the body of the dress.
- Bottom-Up (Seamless Body): Work from the hem up. You’d start with the red/pink, transition to white, then green for the bodice.
- Panels & Seams: Crocheting front and back panels flat, then seaming them. This can be easier for managing color changes if you’re not comfortable carrying yarn in the round.
Materials: Your Summer Crochet Toolkit
- Yarn: In your chosen watermelon colors (dark green, light green, white/cream, red/pink, black for seeds). Ensure you have enough for each section.
- Crochet Hooks: The size(s) recommended by your pattern to achieve gauge.
- Stitch Markers: Essential for marking rounds, stitch counts, and shaping points.
- Tapestry Needle (or Blunt Yarn Needle): Crucial for weaving in ends neatly (especially important with many color changes!). Also for embroidering seeds.
- Scissors.
- Measuring Tape: Crucial for gauge swatching and checking garment dimensions.
- Blocking Mats & T-pins: Highly recommended for shaping and setting the final dress, particularly to even out color transitions.
- Embroidery Floss (Black): For stitching seeds.
- Buttons/Zippers (Optional): If your dress design includes closures.
Essential Crochet Techniques for a Watermelon Dress
Beyond basic stitches, you’ll need to master colorwork techniques:
- Foundation Chains/Foundation Single Crochet (FSC): For starting edges that are elastic and neat.
- Basic Stitches: Chain (ch), Slip Stitch (sl st), Single Crochet (sc), Half Double Crochet (hdc), Double Crochet (dc). These will form the main fabric.
- Working in Rounds vs. Rows: Depending on your construction method.
- Increasing/Decreasing Stitches: For shaping the body (bust, waist, hips) and armholes/necklines.
- Ribbing/Edging: For neatening necklines, armholes, and hems.
- Clean Color Changes (Crucial!):
- Invisible Join (for Rounds): How to join rounds seamlessly.
- Last Pull-Through: The key to a clean color change: complete the last pull-through of the final stitch in the old color with the new color.
- Carrying Yarn (Tapestry): If working short stripes or small details, you might carry the unused color loosely behind your work. For large blocks, it’s often better to drop and pick up yarn.
- Embellishment Techniques: How to embroider stitches for seeds, or securely attach bobbles.
- Blocking: Essential for opening up stitches, evening out tension (especially crucial where colors meet), enhancing drape, and achieving the correct final size and shape.
Planning Your Project: Laying the Foundation
- Sizing & Measurements:
- Take accurate body measurements (bust, waist, hips, shoulder to hem, etc.) for the intended wearer.
- Determine the desired “ease” (extra room) for comfort and style.
- Gauge Swatch (The Golden Rule!):
- Crochet a substantial swatch (at least 6×6 inches / 15×15 cm) using your chosen yarn and hook in the main stitch pattern.
- Crucial Tip: If using multiple colors, make sure your swatch includes a color change or two, as this can affect your tension and gauge.
- Wash and block your swatch exactly as you plan to wash and block the finished dress. Measure accurately to ensure your finished dress will be the correct size.
- Yarn Calculation: Based on your gauge and chosen size, calculate the necessary yardage for each color. It’s wise to buy an extra skein of the main (red/pink) color.
Construction Journey: Bringing Your Watermelon to Life (Conceptual Guides)
The most popular approach for a watermelon dress is horizontal color blocking:
- Start with Green (Rind):
- If top-down, you’d begin with the neckline/yoke in green, working outwards. You might include a stripe of lighter green here.
- If bottom-up, you’d start with the hem (red/pink) and work upwards, so the green section would be at the top of the dress/bodice.
- If panels, you’d crochet the bottom section of your front and back panels in green.
- Transition to White/Cream (Rind Edge):
- Work a distinct, narrow band of white or cream. This is typically just a few rows/rounds. Ensure your color changes are very clean here.
- Work the Red/Pink (Flesh):
- This will be the largest section of the dress. Continue working in red or pink, shaping the body as needed (e.g., increasing for the skirt flare, or decreasing for a fitted waist).
- Add Sleeves/Straps: Crochet sleeves or straps in the appropriate color (often green or red/pink, depending on where they attach).
- Add Seed Details: Once the main dress is crocheted and before blocking, use black embroidery floss or thin yarn to stitch small “V” shapes, straight lines, or French knots randomly across the red/pink “flesh” section to represent seeds. Position them realistically, not too uniform.
Finishing Touches: The Sweet Finale
- Weave in All Ends: This is paramount, especially with multiple color changes. Secure every yarn tail neatly to prevent unraveling and a messy appearance. For a clean look, weave yarn tails into stitches of the same color.
- Edgings: Neatly finish all raw edges (neckline, armholes, hem) with a round or two of single crochet (sc) or a simple, coordinating edging stitch.
- Blocking (The Transformation!):
- Gently wet your finished dress (or steam it).
- Carefully lay it out flat on blocking mats, shaping it to the correct dimensions. Pin firmly with T-pins, paying extra attention to flat seams and crisp color transitions.
- Allow to dry completely. Blocking evens out stitches, enhances drape, and sets the final shape, making your watermelon dress look polished and professional.
- Add Closures: If your design includes buttons or zippers, install them securely.
Tips for Watermelon Dress Success
- Practice Color Changes: If new to colorwork, practice on a small swatch until your tension is even and your color changes are clean and almost invisible.
- Manage Yarn Intelligently: For horizontal stripes, you might be able to carry the unused yarn up the side of your work if the color changes frequently. For larger blocks, cutting and joining new yarn for each section (and weaving ends as you go) might be neater.
- Safety First for Seeds: For babies and toddlers, always opt for embroidered seeds or crocheted bobbles/French knots over small beads, which are a choking hazard.
- Embrace the Fun: This is a playful project! Don’t stress too much about perfection; the charm is in its handmade nature.
Caring for Your Juicy Creation
- Follow Yarn Label Instructions: Always refer to your specific yarn’s care guidelines for washing and drying.
- Gentle Wash: For most handmade crochet dresses, gentle hand washing in cool water with a mild detergent is recommended. If your yarn is superwash, machine wash on a gentle cycle in a mesh laundry bag.
- Reshape and Lay Flat to Dry: Never wring, twist, or hang a wet crocheted dress, as this will cause it to stretch and distort. Gently squeeze out excess water, reshape the dress to its original dimensions, and lay it flat on a clean towel or a mesh drying rack to air dry completely.
A crocheted watermelon dress is a wonderfully vibrant and unique garment, perfect for bringing a slice of summer joy to any wardrobe. Get ready to crochet your own sweet, stylish masterpiece! Sources
Video Tutorial ;