 by
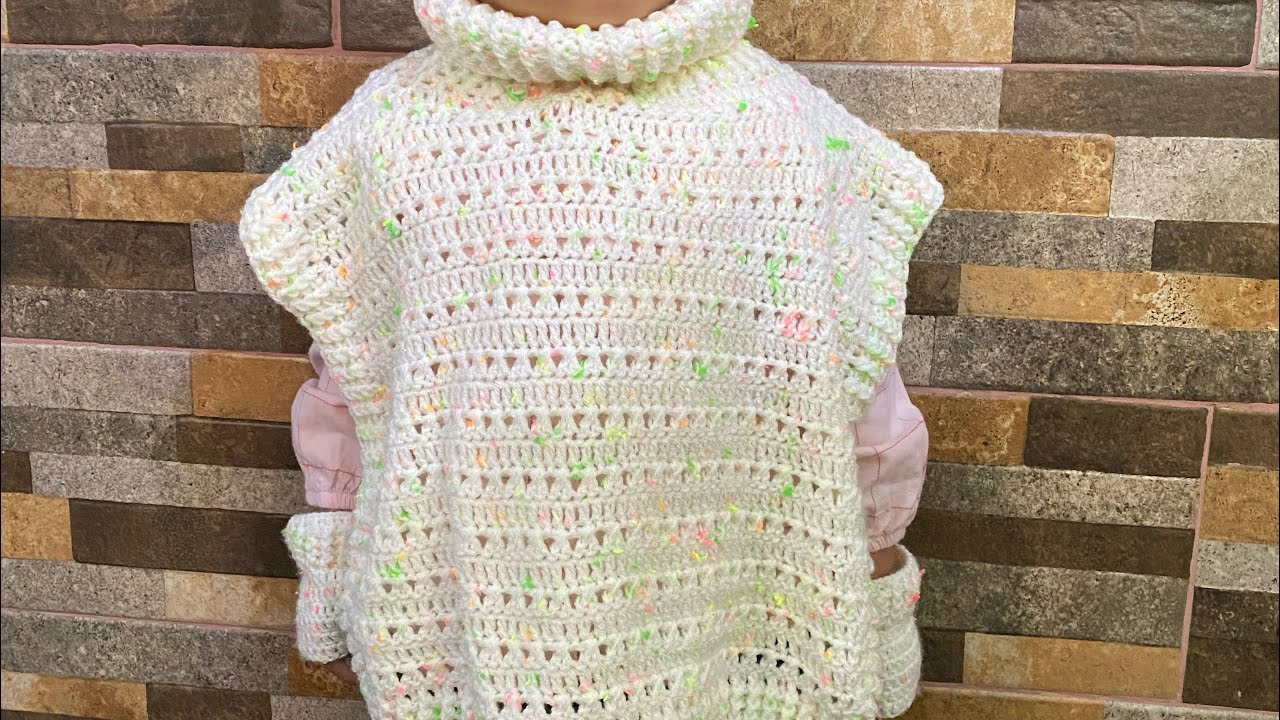
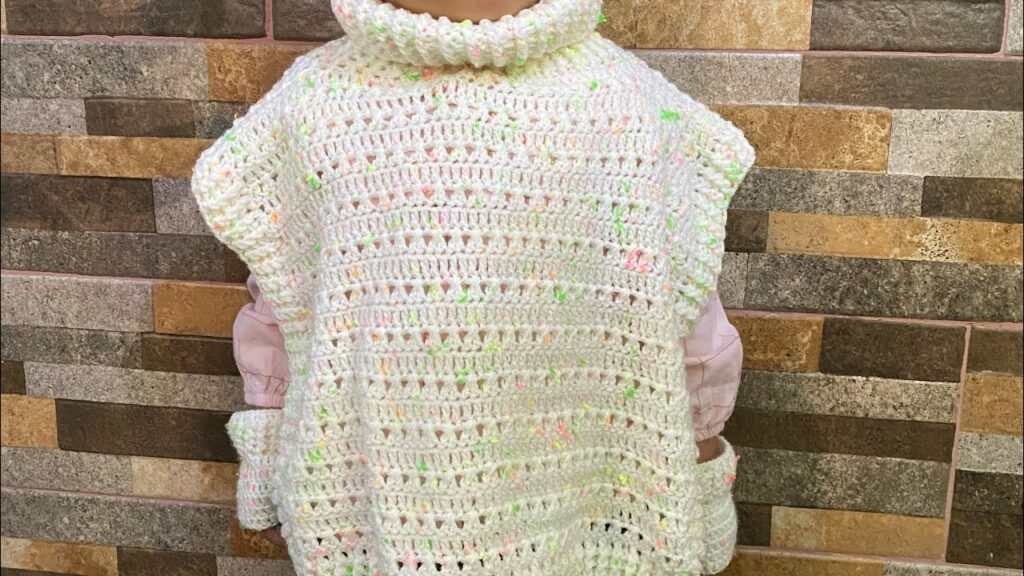
by The high-neck vest or poncho is a statement piece that blends cozy comfort with sophisticated style. This versatile garment offers warmth without bulk, making it an ideal layering option for transitional seasons or adding a touch of elegance to any outfit. The defining high neck not only provides extra warmth but also creates a chic, modern silhouette that elevates simple stitches into something truly special. Whether you prefer the structured lines of a vest or the flowing drape of a poncho, the high-neck feature transforms it into a fashionable and functional staple.
This detailed article will explore the allure of crocheting a high-neck vest or poncho, delving into design choices, essential techniques, and tips to help you create a piece that’s both beautiful and practical.
Why Choose a High-Neck Vest or Poncho?

- Sophisticated Style: The high neck instantly adds a touch of modern elegance and a refined finish, making the garment look more polished than a traditional neckline.
- Layering Versatility: It’s the perfect transitional piece. Wear it over a long-sleeved tee, a crisp button-down, or a fitted dress. It provides warmth without restricting arm movement.
- Comfort and Warmth: The high neck offers extra coziness around the neck and chest, acting like a built-in scarf without the fuss.
- Flattering Silhouette: Depending on the design, a vest can be tailored to highlight your figure, while a poncho offers a flowing, forgiving drape that suits many body types.
- Creative Canvas: The larger surface area of a vest or poncho provides ample space to showcase intricate stitch patterns, bold textures, or striking colorwork.
Designing Your High-Neck Masterpiece: Key Considerations
When planning your high-neck vest or poncho, consider these elements to ensure your finished piece matches your vision:
1. Style: Vest vs. Poncho
- Vest:
- Structure: Typically more fitted to the body, with defined armholes. Can be open-front, buttoned, or pulled over.
- Versatility: Excellent for layering over collared shirts or adding a sleek line under a jacket.
- Construction: Often involves crocheting front and back panels, or a seamless top-down design with armhole divisions.
- Poncho:
- Drape: Characterized by its flowing, open design, often without defined armholes (though some have slits).
- Ease of Wear: Simply slips over the head.
- Construction: Often worked in a large circle, square, or rectangle from the neck opening outwards, or from a central point.
- Effortless Chic: Creates an bohemian, relaxed, or dramatic silhouette.
2. The High Neck
This is the defining feature and can be styled in several ways:
- Turtle Neck: A full, tall neck that can be folded down for extra warmth. Usually worked in ribbing or a dense stitch for elasticity.
- Mock Neck: Shorter than a true turtleneck, offering coverage without too much bulk.
- Cowl Neck: A looser, wider neck that drapes around the collarbone, creating soft folds. Achieved with generous increases or looser stitches in the neck area.
- Ribbed Neck: Often worked in a back loop only (BLO) or front post/back post (FP/BP) stitch to create stretch and definition, ensuring a snug but comfortable fit.
3. Yarn Choice (Drape and Warmth)
The yarn directly influences the garment’s feel and look.
- For Warmth & Structure:
- Wool/Merino Wool: Excellent for warmth, elasticity, and stitch definition. Ideal for cozy, structured vests or substantial ponchos. Superwash merino offers easy care.
- Acrylic/Acrylic Blends: Versatile, affordable, wide color range, and often machine washable. Many modern acrylics are soft and drape well.
- For Drape & Breathability:
- Cotton/Cotton Blends: Great breathability and stitch definition. Perfect for lighter, airy versions.
- Alpaca/Alpaca Blends: Incredibly soft, warm, and offer a luxurious drape, though can be pricier.
- Weight: Worsted (Category 4), Aran, or Chunky (Category 5) are popular for their balance of warmth and working speed. For a lighter piece, DK (Double Knitting, Category 3) can work beautifully.
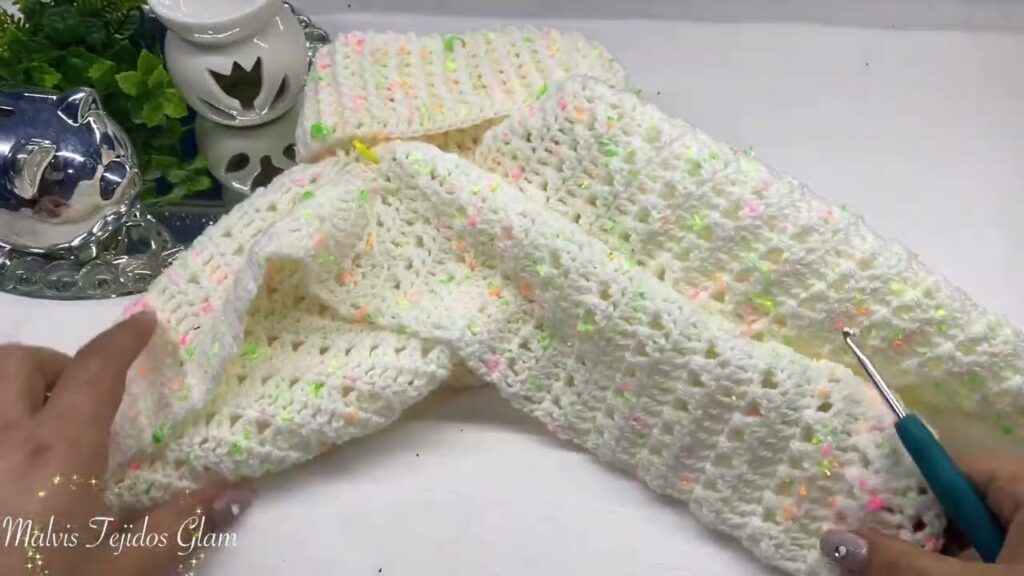
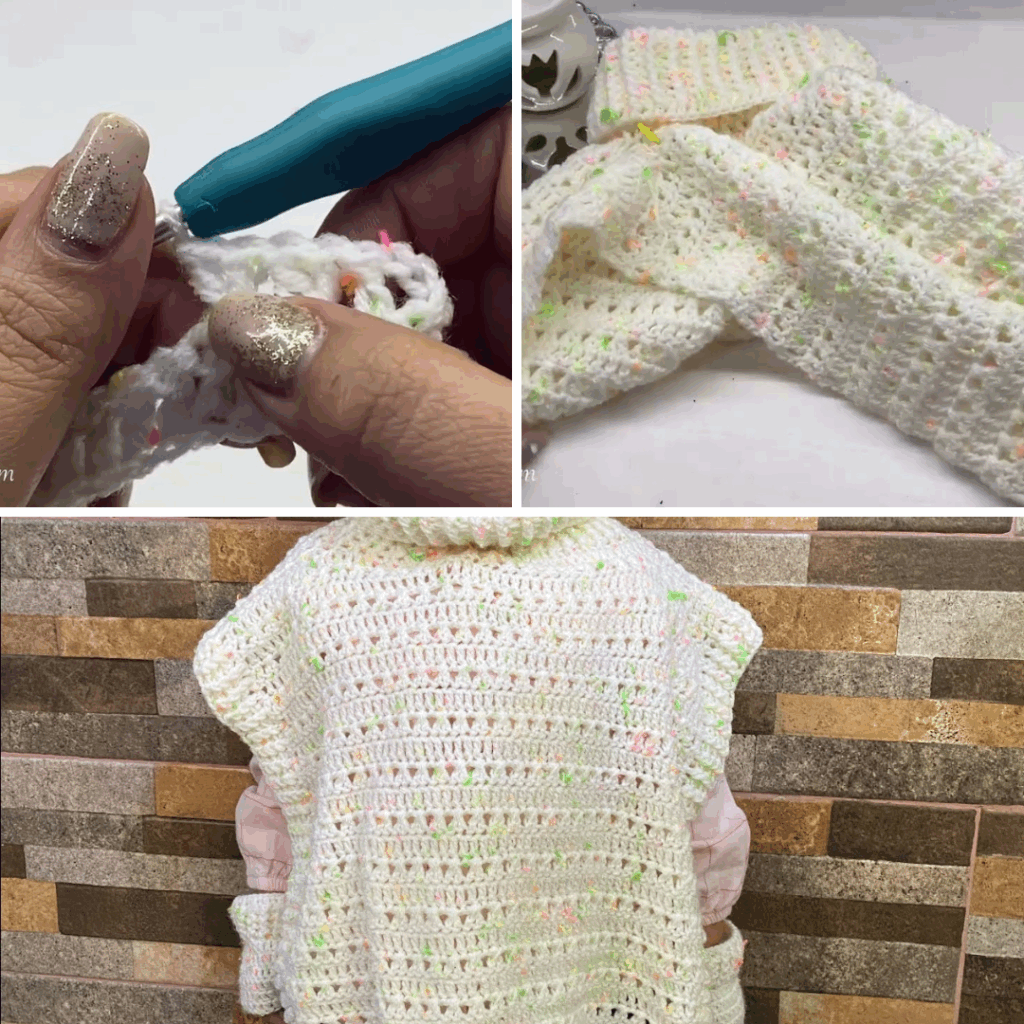
4. Stitch Pattern
The high-neck design can beautifully frame a wide variety of stitch patterns:
- Textured Stitches: Bobbles, puffs, cables (using post stitches), or basketweave patterns for a rich, tactile fabric that stands out.
- Simple Repeats: Basic stitches like half double crochet (hdc) or double crochet (dc) worked in simple repeats (e.g., alternating rows, or working BLO) can create elegant textures quickly.
- Lace Stitches: For a more open, airy design, use shells, V-stitches, or open mesh patterns. This creates a visually stunning piece, especially if layered over a contrasting color.
- Ribbing: Crucial for the high neck itself, as well as for hems and armhole edgings for a polished, elastic finish.
5. Construction Method
- Top-Down (Seamless): Very common for both vests and ponchos. You start at the neck and work outwards, dividing for the body and armholes (for vests) or continuing to expand (for ponchos). This allows for easy try-on and length adjustments.
- Bottom-Up (Seamed or Seamless): For vests, you might work front and back panels from the hem up, shaping armholes and neck, then seaming. Ponchos might start with a large rectangle or square.
- Modular (for Ponchos): Some ponchos can be made from a series of squares or rectangles joined together, similar to a “granny square” approach.
Materials You’ll Need
- Yarn: Your chosen color(s), fiber, and weight. Consult your pattern for recommended yardage.
- Crochet Hook: The size(s) recommended by your pattern to achieve the correct gauge and fabric density. You might use a slightly smaller hook for the neck ribbing for a firmer fit.
- Stitch Markers: Invaluable for marking the beginning of rounds, increase points, and shaping details.
- Tapestry Needle (Yarn Needle): Essential for weaving in ends and seaming panels (if applicable).
- Scissors.
- Measuring Tape: Crucial for taking body measurements and checking your gauge as you go.
- Buttons/Closures (Optional): If your design includes them.
Essential Crochet Techniques for a High-Neck Vest/Poncho
You’ll utilize a range of fundamental and intermediate crochet skills:
- Foundation Chain & Slip Knot: The starting point for most projects.
- Basic Stitches: Chain (ch), Slip Stitch (sl st), Single Crochet (sc), Half Double Crochet (hdc), Double Crochet (dc).
- Working in Rows & Rounds: Depending on your chosen construction method.
- Increasing & Decreasing: Essential for shaping the body, armholes, shoulders, and particularly for the neck opening and collar.
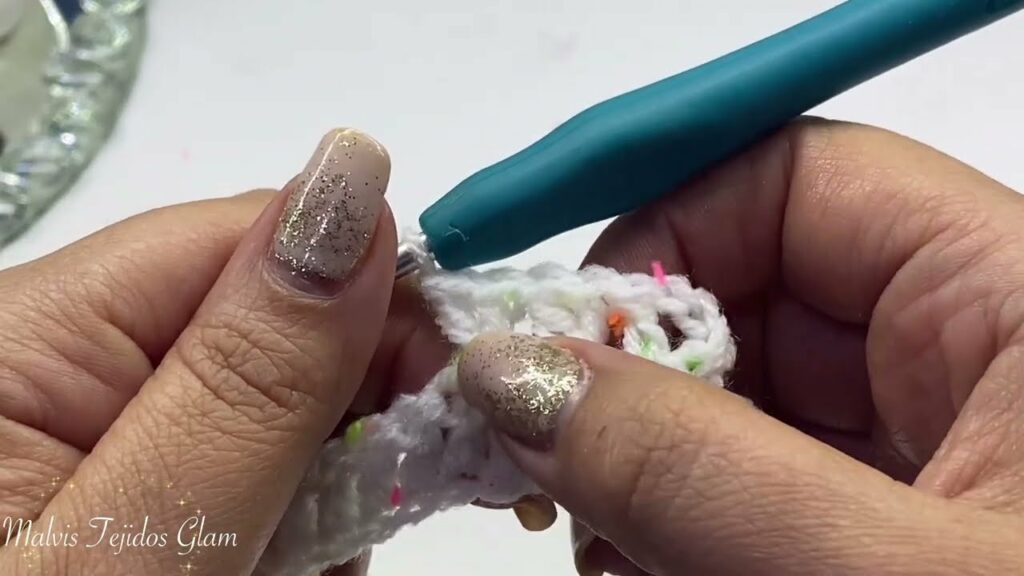
- Working Ribbing: Mastering techniques like working in back loops only (BLO) or front post/back post (FP/BP) stitches for elastic, defined edges on the high neck, hem, and cuffs.
- Seaming (if applicable): How to neatly join crocheted pieces together.
- Weaving in Ends: Meticulously hiding all yarn tails for a polished and durable finish.
- Blocking: Absolutely crucial for any garment. It evens out stitches, enhances drape, opens up lace patterns, and sets the final shape and dimensions of your vest or poncho.
Planning Your High-Neck Project: Laying the Foundation
- Sizing & Measurements:
- Take accurate body measurements: full bust, shoulder width, desired overall length, and neck circumference (for the high neck).
- Choose a pattern size that corresponds to your bust measurement, keeping in mind the desired “ease” (amount of extra room). A poncho will have much more ease than a vest.
- Gauge Swatch (Non-Negotiable!):
- This is the most critical step for any garment. Crochet a substantial swatch (at least 4×4 inches / 10×10 cm) in your chosen yarn and hook, using the main body stitch pattern of your garment. If the high neck uses a different stitch (like ribbing), swatch that separately as well.
- Wash and block your swatch exactly as you plan to wash and block the finished garment.
- Measure your stitches and rows per inch/cm accurately. Adjust your hook size if your gauge doesn’t match the pattern’s recommendation.
- Yarn Quantity: Consult your chosen pattern’s yardage requirements for your specific size. It’s always wise to purchase an extra skein just in case.
- Pattern Selection: Choose a well-written pattern specifically for a high-neck crocheted vest or poncho. Look for clear instructions, sizing options, stitch diagrams, and positive reviews.
Construction Journey: Bringing the Garment to Life (Conceptual Guide)
The steps will vary based on your chosen pattern and style. Let’s outline a common top-down approach for both:
For a High-Neck Vest (Top-Down):
- Start the High Neck:
- Begin by crocheting a foundation chain (or working a small panel of ribbing) that forms the desired circumference of the neck. Join into a circle.
- Work upwards in rounds (or rows, then seam) using your chosen ribbing or dense stitch until the neck reaches the desired height.
- Form the Yoke/Shoulders:
- Transition from the high neck to the main stitch pattern.
- Evenly distribute increases in subsequent rounds/rows to create a circular or shaped yoke that will form the shoulders and upper chest. Continue until the yoke reaches the desired depth (typically around the armpit level).
- Divide for Body & Armholes:
- At the end of the yoke, the pattern will instruct you to skip stitches (or chain stitches) to create openings for the armholes.
- Join the remaining stitches to form the front and back of the body, continuing to work in rounds (or rows).
- Crochet the Body:
- Continue working in your main stitch pattern until the vest reaches your desired length.
- Finish the bottom hem with ribbing or a neat border.
- Finish Armholes:
- Attach yarn to each armhole opening.
- Work a few rounds of ribbing or a simple border to create a neat, finished edge.
For a High-Neck Poncho (Top-Down):
- Start the High Neck: (Same as for the vest) Crochet the high neck band to the desired height and circumference.
- Expand the Body:
- Transition to your main stitch pattern.
- Evenly distribute increases in subsequent rounds to create the wide, flowing shape of the poncho. Increases are often concentrated at 2 or 4 points to create a square or rounded shape.
- Continue working until the poncho reaches your desired length.
- Finish Hem:
- Complete the bottom edge with a border, fringe, or matching ribbing.
Finishing Touches: The Polish of a Pro
- Weave in All Ends: Meticulously hide every yarn tail. For a wearable garment, neatness and security are paramount.
- Add Closures (if applicable): If your design includes buttons, sew them on securely.
- Blocking (The Ultimate Transformation): Gently wet the finished garment, carefully shape it to its intended dimensions on blocking mats, paying special attention to the high neck to ensure it stands or drapes as desired. Pin securely. Allow it to dry completely. Blocking opens up stitch patterns, evens out stitches, and sets the beautiful drape and fit, truly elevating your handmade piece.
A crocheted high-neck vest or poncho is a rewarding project that combines practical warmth with undeniable style. By carefully choosing your yarn, stitch pattern, and construction method, you’ll create a unique and elegant garment that you’ll love to wear.
Are you leaning towards a snug turtleneck vest or a more flowing cowl-neck poncho for your next project?
Video Tutorial ;