 by
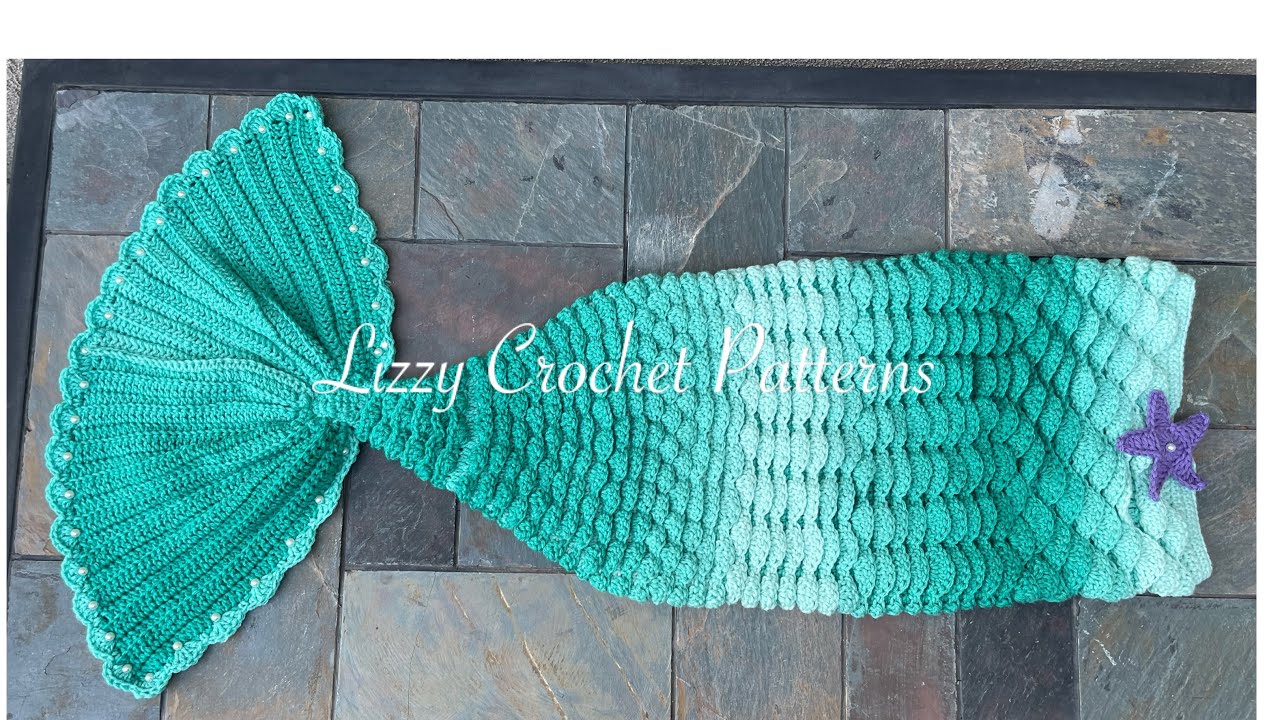
by The allure of the ocean’s depths, the shimmer of scales, and the graceful sweep of a tail – the mermaid fantasy captivates hearts of all ages. What better way to bring that magic to life than by crocheting a beautiful mermaid tail? Whether you dream of a cozy cocoon for a newborn, a playful costume for a child, or a luxurious blanket for an adult, crocheting a mermaid tail is a rewarding project that can be adapted for every size.
This detailed, step-by-step guide will walk you through the fundamental process of crocheting a mermaid tail, focusing on a bottom-up, seamless construction. We’ll emphasize the techniques and principles that allow you to customize your creation for anyone, from the tiniest guppy to a seasoned siren.
What is a Crochet Mermaid Tail? (And Which Type Will We Make?)

A crochet mermaid tail typically falls into a few categories:
- Cocoon/Sleeping Bag Style: This is essentially a seamless, tapered “bag” that covers the legs and feet, ending in a fin. It’s popular for babies and children, allowing them to snuggle inside.
- Blanket Style: For older children and adults, it functions more as a blanket, with an opening at the top (usually at the waist or chest) and a tapered, finned end. It allows the wearer to slip their legs in.
- Wearable Costume: Often less tapered and more open at the top, designed for walking or swimming (though yarn isn’t swim-friendly!).
For this comprehensive guide, we’ll focus on the popular cocoon/blanket style, which is worked from the fin up to the opening, allowing for easy tapering and customization across all sizes.
The Key Elements of a Mermaid Tail:
Every mermaid tail, regardless of size, consists of three main parts:
- The Fin (or Fluke): The iconic fan-shaped end of the tail.
- The Tail Body: The long, tapered section that encases the legs.
- The Waistband/Opening: The top opening where the wearer slips in, often with a stretchy band.
Before You Begin: Gathering Your Oceanic Tools & Materials
The right supplies will make your journey smoother and your tail more stunning.
- Yarn (Colors & Fiber):
- Colors: Think mermaid! Blues, greens, teals, purples, aquamarines. You can use solid colors, variegated yarns, or stripe different shades for a shimmering effect.
- Fiber:
- Acrylic: Affordable, widely available, durable, and comes in a huge range of colors. Choose a soft acrylic for comfort.
- Wool/Wool Blends (Superwash): Warm, breathable, and cozy. Ensure it’s superwash for easy care.
- Cotton/Cotton Blends: Great for warmer climates or if you want less stretch and more definition.
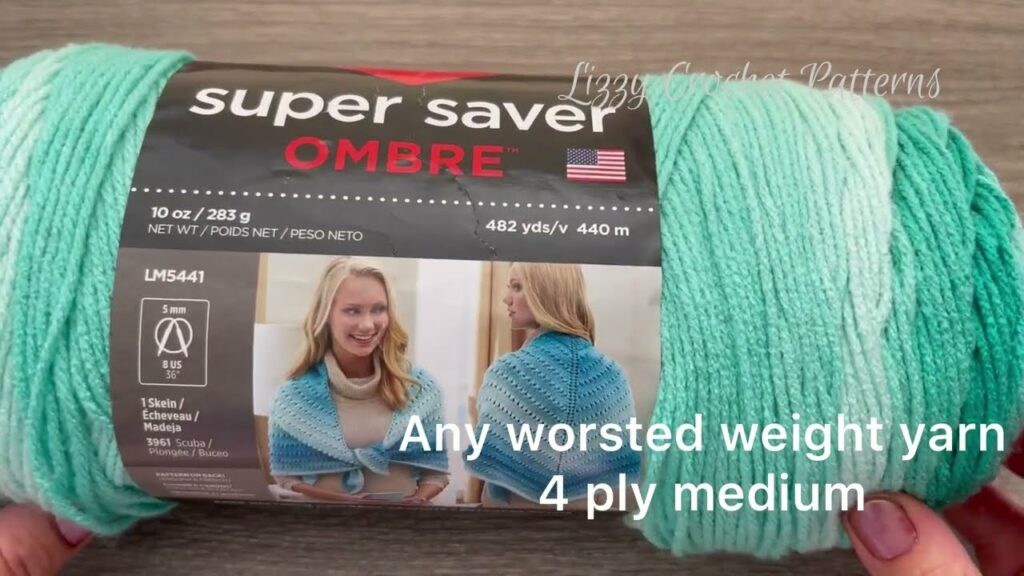
- Weight:
- Bulky (5) or Super Bulky (6): Ideal for larger tails (child to adult) as they work up quickly and create a plush fabric.
- Worsted (4) or Aran (4): Versatile for all sizes, offering a good balance of warmth, drape, and stitch definition. Will take longer for larger sizes.
- Quantity: This varies hugely by size and yarn weight.
- Newborn/Baby: 200-400 yards
- Toddler/Child: 600-1200 yards
- Teen/Adult: 1500-3000+ yards (or more for super bulky yarn)
- Crochet Hook:
- Match your yarn weight. For bulky, think 8.0mm-12.0mm (L-P hooks). For worsted, 5.0mm-6.5mm (H-K hooks).
- Crucial: Your hook size will be determined by your gauge swatch to ensure proper sizing and drape.
- Other Notions:
- Stitch Markers: Essential for marking the beginning of rounds and increase/decrease points.
- Tapestry Needle: For neatly weaving in ends.
- Scissors.
- Measuring Tape: Absolutely vital for checking gauge and dimensions.
The Compass of Your Project: Sizing & Gauge (Crucial for All Sizes!)
This is the most critical part for crocheting a mermaid tail for any size. Getting your gauge right ensures your tail fits the intended wearer.
Understanding Mermaid Tail Sizing:
You’ll need two main measurements:
- Length: From the wearer’s chest/waist (where the opening will be) down to their feet, plus extra length for the fin.
- Circumference: Around the widest part of the hips/thighs, or chest for a very small baby cocoon.
Approximate Finished Measurements (Guideline only):
| Size | Approx. Total Length (incl. fin) | Approx. Max Circumference |
|---|---|---|
| Newborn | 20-22 inches (50-55 cm) | 20-22 inches (50-55 cm) |
| 0-6 Months | 24-28 inches (60-70 cm) | 24-26 inches (60-66 cm) |
| 6-12 Months | 30-34 inches (76-86 cm) | 28-30 inches (71-76 cm) |
| Toddler | 36-40 inches (91-102 cm) | 30-32 inches (76-81 cm) |
| Child | 45-55 inches (114-140 cm) | 34-38 inches (86-97 cm) |
| Teen | 60-65 inches (152-165 cm) | 40-44 inches (102-112 cm) |
| Adult | 68-75+ inches (173-190+ cm) | 45-55+ inches (114-140+ cm) |
Export to Sheets
Disclaimer: These are averages. Always take actual measurements of the wearer if possible.
How to Make a Gauge Swatch (Do NOT Skip This!):
- Chain: Chain about 20-25 stitches, plus turning chains (e.g., ch 3 for dc) in your chosen main stitch.
- Work: Crochet a square of at least 6×6 inches (15×15 cm) in the main stitch pattern you’ll use for the tail body (e.g., shell stitch or double crochet). A larger swatch gives a more accurate measurement.
- Wash & Block: Fasten off your swatch. Crucially, wash and block your swatch exactly as you plan to treat the finished tail. This relaxes the fibers and shows the true stitch size and drape.
- Measure: Once dry, lay the swatch flat. Place a ruler over the center. Count how many stitches fit within 4 inches (10 cm) and how many rows fit within 4 inches (10 cm).
- Adjust:
- If you have more stitches per inch than your desired gauge (your work is too tight), go up half a hook size and try again.
- If you have fewer stitches per inch than your desired gauge (your work is too loose), go down half a hook size and try again.
- Repeat until your gauge precisely matches.
General Stitch Patterns for Mermaid Tails:
- Body (Scales/Texture):
- Shell Stitch: Popular for its “scaly” look and nice drape (e.g., [5 dc] in one st, skip 2, sl st, repeat).
- Crocodile Stitch: Very textural and realistic “scales,” but more complex and yarn-intensive.
- Half Double Crochet (hdc) or Double Crochet (dc): Can be worked in back loops only (BLO) or alternating front/back post stitches for subtle texture. Simpler and faster.
- Fin (Fluke): Usually simple stitches like dc or hdc, worked with increases to create a fan shape.
- Waistband: Ribbing created by alternating front post/back post double crochet (FPDC/BPDC) or by working hdc in back loops only (BLO) for stretch.
Step-by-Step Construction: Crocheting Your Mermaid Tail (Adaptable for All Sizes)
This guide provides the general method. You will need a specific pattern for your chosen size for exact stitch counts, row numbers, and increase/decrease placements.
Abbreviations Used:
- ch: chain
- sc: single crochet
- hdc: half double crochet
- dc: double crochet
- sl st: slip stitch
- st(s): stitch(es)
- sk: skip
- inc: increase (e.g., 2 dc in one st)
- dec: decrease (e.g., dc2tog)
- […] : repeat instructions in brackets
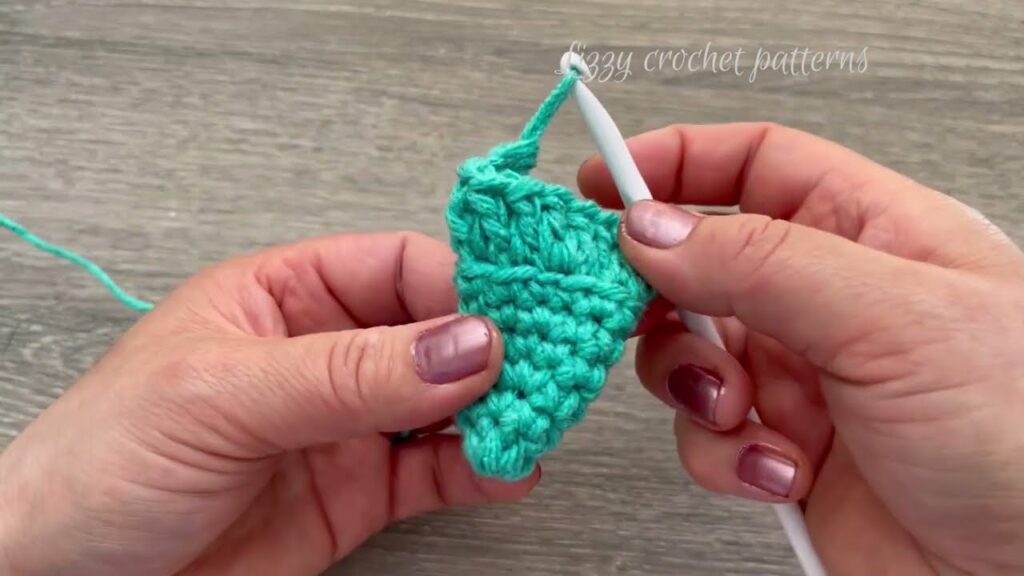
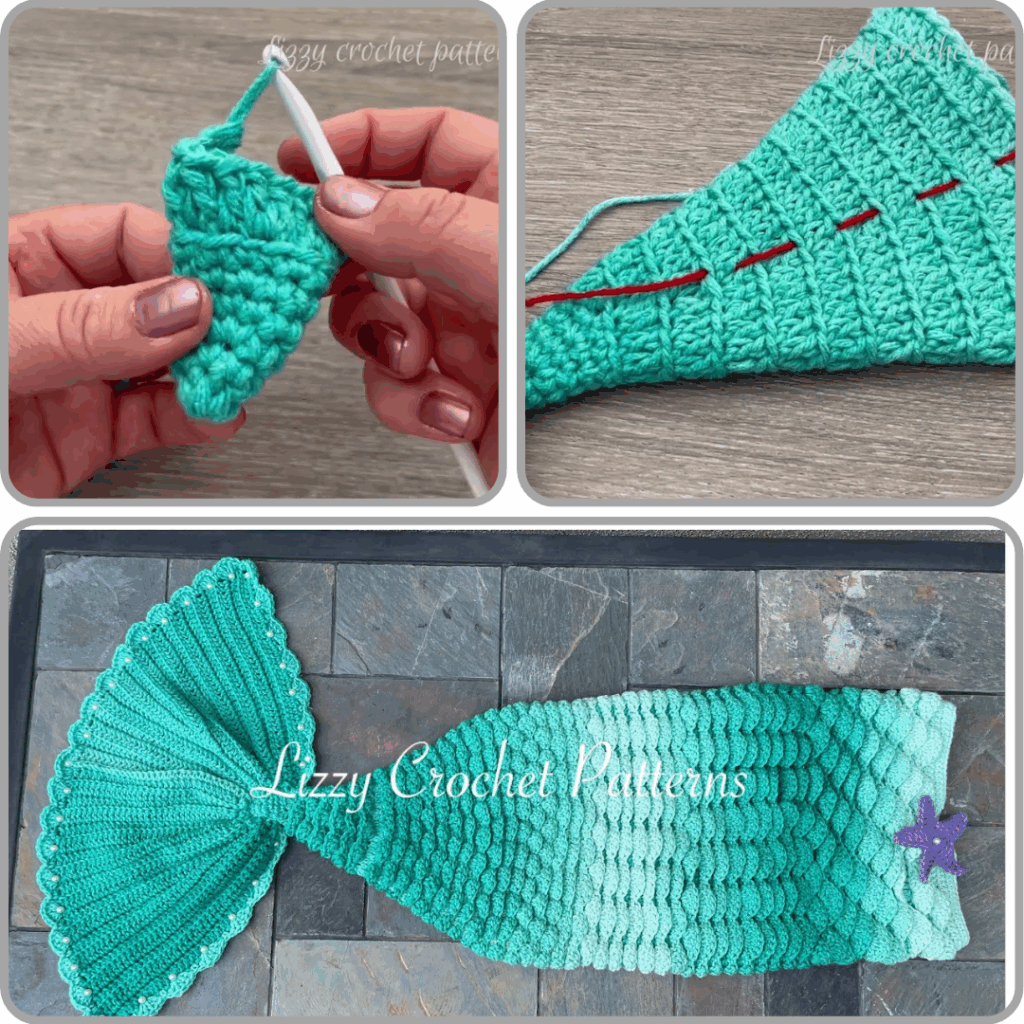
Phase 1: The Fin (The Iconic Fluke)
The fin is typically worked flat in rows and then folded and joined, or worked in rounds with increases to create a fan.

- Starting the Fin:
- Option 1 (Flat, then Folded): Ch a foundation chain (e.g., 20-40 chains for a baby, 60-100+ for adult) that is about 1.5-2 times the desired width of the fin.
- Option 2 (In the Round, for a smoother base): Start with a magic ring or ch 2, and work initial stitches into the ring/chain.
- Shaping the Fin:
- Work in rows (Option 1) or rounds (Option 2) using your chosen fin stitch (e.g., dc).
- Increases: For Option 1, you’ll increase at the beginning and end of rows to create the outward fan shape. For Option 2, you’ll increase evenly around the circle.
- Key for All Sizes: Continue increasing until the fin reaches the desired width and height for your chosen size. You’ll want it to be wide enough to stand out visually, usually 1.5-2 times the width of the tail’s narrowest point.
- Finishing the Fin:
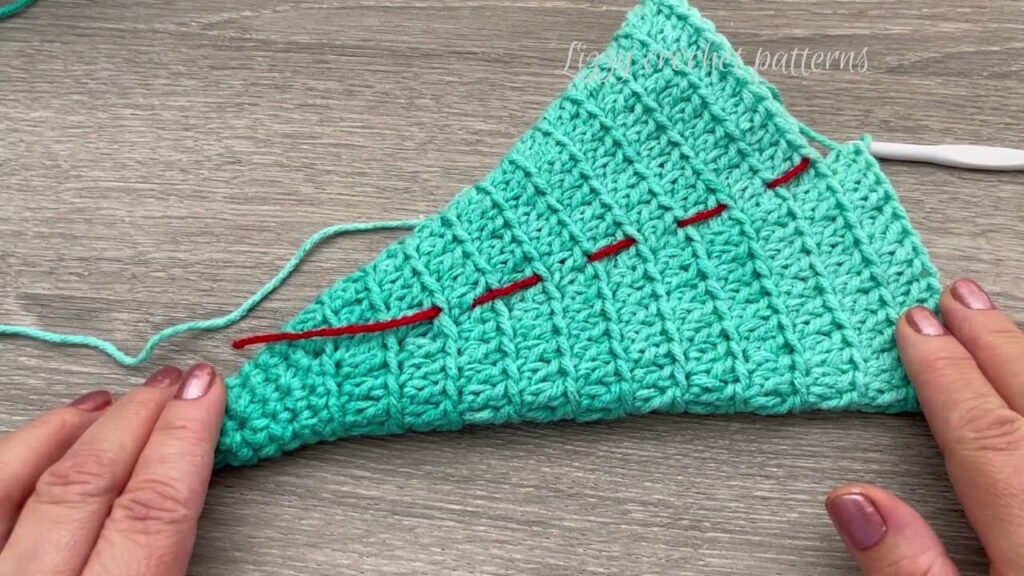
- If working flat (Option 1), fold the fin in half and sl st or sc the edges together to create a seam.
- You can add an edging around the outer curved edge of the fin (e.g., a simple sc border, picot stitches, or small shells) for a polished look.
Phase 2: The Tail Body (The Scales & Taper)
This section forms the main part of the tail, tapering from the widest point down to connect to the fin.
- Joining Fin to Body & Beginning Tail (Working Upwards):
- If your fin was worked flat and seamed: Working along the top straight edge of the seamed fin, join your yarn. Ch 3 (counts as dc). Work dc stitches evenly across this edge. The number of stitches here will be the starting circumference for the narrowest part of your tail body (ankles/feet). Join with a sl st to the initial ch 3 to form a round.
- If your fin was worked in the round: Simply continue working rounds from the top edge of the fin.
- Shaping the Tail Body (Tapering & Length):
- Work in continuous rounds (or join with sl st at the end of each round) using your chosen main stitch pattern (e.g., shell stitch, dc).
- Increases (for Taper): To create the tapered shape from the narrow ankle/foot area up to the wider hip/thigh area, you will need to increase evenly every few rounds.
- Key for All Sizes: The frequency and number of increases will depend on the size you’re making and how quickly you want the taper to widen.
- For example: For a baby, you might increase 4-6 stitches every 3-5 rounds. For an adult, you might increase 8-12 stitches every 5-8 rounds.
- Use stitch markers to help evenly space your increases.
- Key for All Sizes (Length): Continue working rounds and increasing until the tail body reaches the desired circumference for the wearer’s widest point (hips/thighs) and the desired length from the top of the fin to the wearer’s hips/waist. Refer to your size chart.
Phase 3: The Main Body Opening / Waistband
This is the top opening where the wearer slips into the tail.
- Straight Body Section (Optional): Once you’ve reached the maximum desired circumference for the hips/thighs, you can work a few rounds without increases to create a straight section, if desired, before transitioning to the waistband. This is especially useful for adult sizes.
- The Waistband:
- Work 5-10 rounds (depending on desired band width) using a stretchy stitch for the waistband.
- Ribbing Example (FPDC/BPDC): Ch 3. Work 1 FPDC around the first dc from the previous round, 1 BPDC around the next dc. Repeat FPDC, BPDC around. Join with a sl st to the top of the initial ch 3. Repeat for desired number of rows.
- Ribbing Example (BLO hdc): Ch 2. Work hdc in BLO in each hdc around. Join.
- The ribbed band helps the tail stay up comfortably without being too tight.
- Fasten Off.
Phase 4: Finishing Touches & Embellishments
This is where your mermaid tail truly sparkles!
- Weave in Ends: This is crucial for a professional, comfortable finish. Use your tapestry needle to meticulously weave in all loose yarn tails, hiding them securely within the stitches on the wrong side.
- Blocking (Recommended!):
- Blocking helps to even out your stitches, open up any stitch patterns (like shells), and set the shape of your tail.
- Gently wash your finished tail according to your yarn’s care instructions.
- Gently squeeze out excess water (do not wring).
- Lay the tail flat on clean towels or blocking mats. Gently shape it, ensuring the fin is spread nicely and the body is tapered correctly. Use rust-proof pins to hold it in place.
- Allow the tail to air dry completely.
- Optional Embellishments:
- Crocheted Sea Life: Create small crocheted starfish, seashells, or pearls and securely stitch them onto the tail.
- Glitter Yarn: Incorporate a strand of thin glitter yarn when working certain rounds for extra shimmer.
- Ribbon: Weave a ribbon through the waistband for a cinching effect or decorative bow (be mindful of length for safety).
General Tips for Success & Safety (Applicable to All Sizes):
- Read Your Pattern Thoroughly: This guide provides the method. A specific pattern for your chosen size will give you the exact stitch counts, increase/decrease rates, and unique design details. Read it entirely before you start.
- Use Stitch Markers Liberally: They are your best friend for marking the start of rounds, the placement of increases/decreases, and any other important points.
- Count Your Stitches Regularly: Especially on increase/decrease rounds. This prevents mistakes that are harder to fix later.
- Maintain Consistent Tension: This comes with practice, but striving for even tension ensures your fabric has a uniform look and the correct drape.
- Take Breaks: Crocheting can be hard on the hands. Take frequent breaks to rest and stretch.
- Safety First (Especially for Babies & Children):
- No Loose Parts: If adding embellishments, sew them on very securely.
- No Long Ties: Avoid any long drawstrings or ties around the waist or neck, as they can pose a strangulation risk.
- Sleeping Aid Caution: Crochet mermaid tails are NOT recommended as sleep aids for infants or young children due to potential suffocation/entrapment risks. Always supervise children when they are using a mermaid tail.
Video Tutorial :
Creating a custom-sized crochet mermaid tail is a magical journey that culminates in a truly unique and cherished piece. With patience, attention to detail, and a touch of your own oceanic creativity, you’ll bring a little bit of the sea’s enchantment to life! Sources