 by
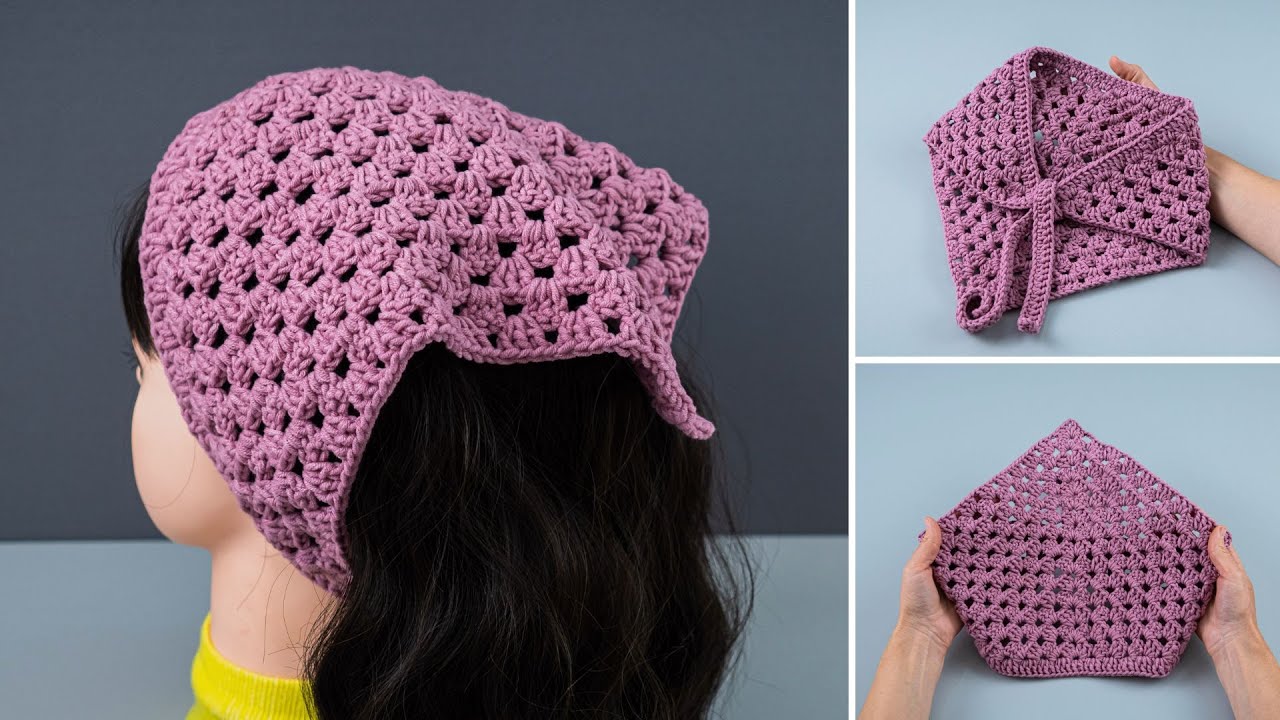
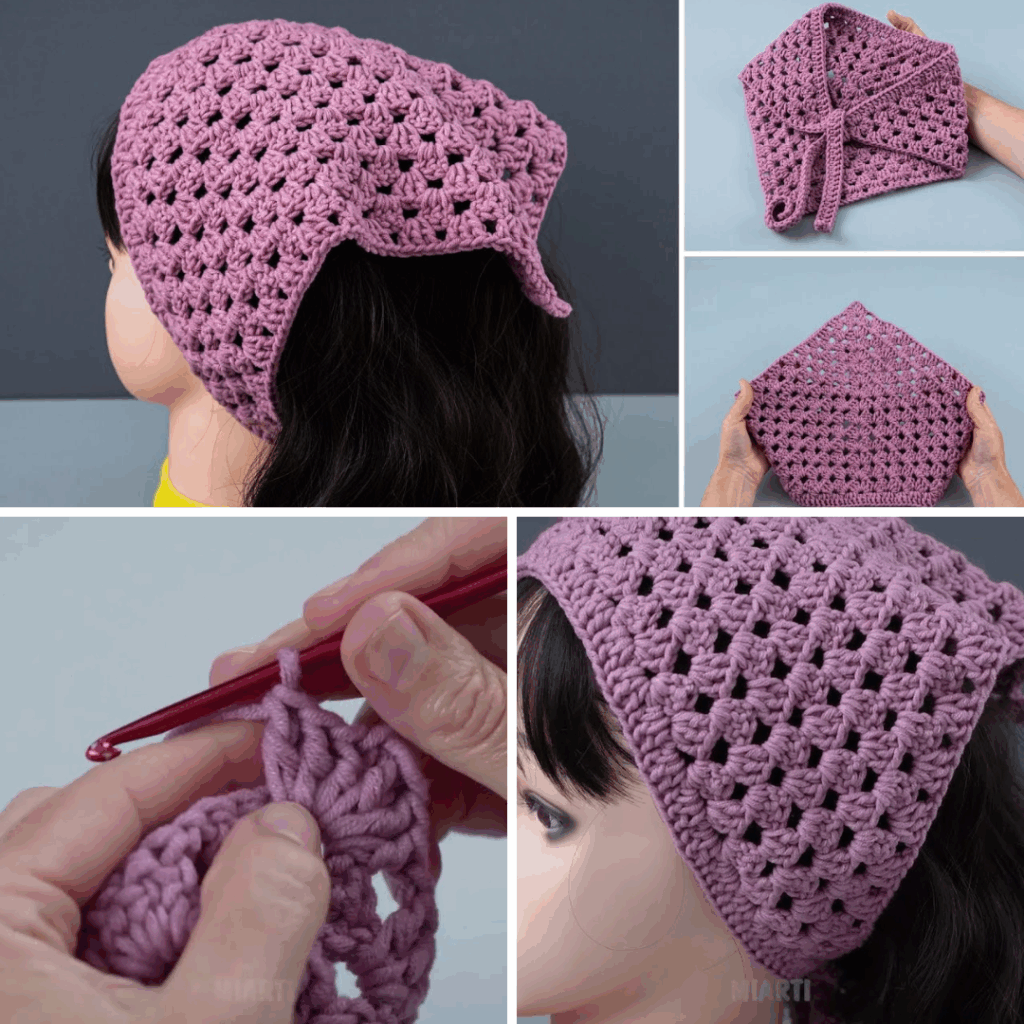
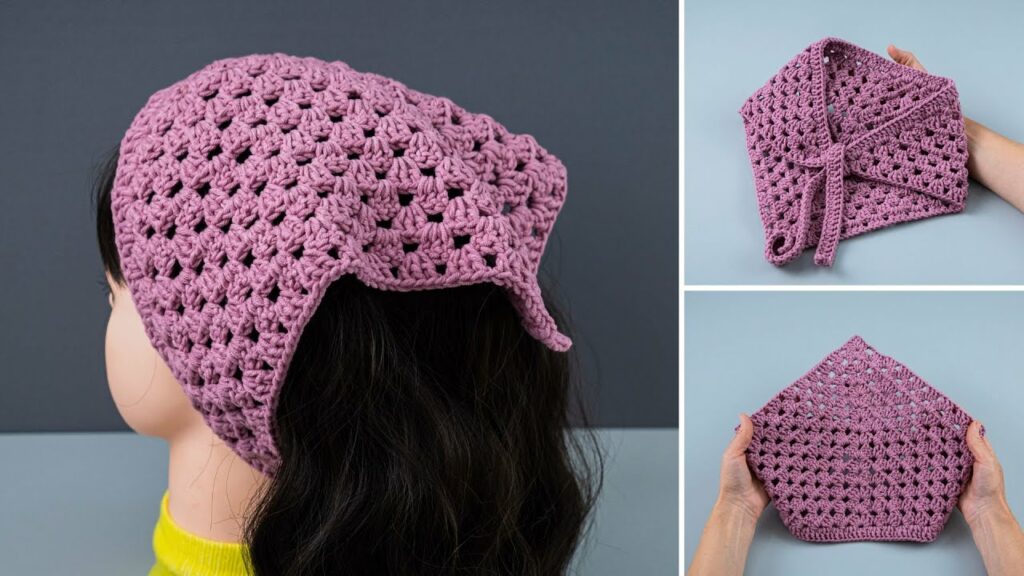
by Crochet granny square triangle bandanas are one of the most popular DIY fashion accessories right now. They’re easy to make, customizable, and add a charming handmade touch to any outfit. Whether you’re heading to a music festival, beach day, or just want to keep your hair back in style, this project is perfect for beginners and experienced crocheters alike.
In this tutorial, you’ll learn how to make a simple granny triangle bandana step by step using classic granny stitch techniques.
🧶 What You’ll Need:
| Item | Details |
|---|---|
| Yarn | DK (light worsted) or worsted weight yarn – ~50–100g |
| Hook | 4.5mm – 5mm crochet hook (H-8 or G-6) |
| Scissors | For cutting yarn |
| Tapestry Needle | For weaving in ends |
| Measuring Tape | Optional – for sizing |
🧵 Cotton yarn is great for breathable summer wear, while acrylic or blends offer softness and stretch.
🧵 Crochet Stitches & Abbreviations (US Terms):
- ch – chain
- sl st – slip stitch
- dc – double crochet
- sp – space
- st(s) – stitch(es)
- ch sp – chain space
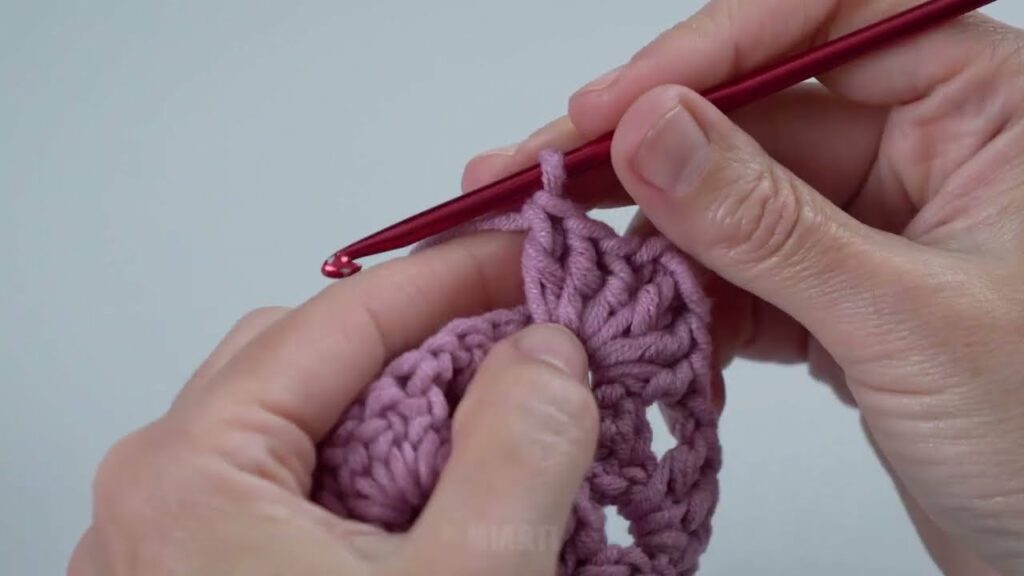
We’ll use the granny stitch, which is typically 3 double crochets grouped together into a space.
📐 Finished Size (Adjustable):
- Width (across forehead): 18–20 inches (can be customized)
- Height (from top to point): 8–10 inches
- Optional: Add long ties on the corners
👒 Pattern Structure:
We’re building a triangle-shaped granny square starting from the point upward. This is a half granny square, increasing each row by 1 granny cluster.
🪡 Step-by-Step Instructions:
🌟 Step 1: Start with a Magic Ring or Chain
- Magic Ring, OR
Chain 4, and sl st to the first chain to form a ring. - Ch 3 (counts as first dc), then work:
- 2 dc into the ring,
- ch 2,
- 3 dc into the ring.
- Turn your work.
🔹 You now have 2 granny clusters with a ch-2 space in the middle. This is the point of your triangle.
🔺 Step 2: Begin Granny Triangle Increases
Repeat this basic row pattern to build the triangle:
Row 2:
- Ch 3 (counts as dc), turn.
- Into the first ch sp (the space between dc groups), work 3 dc.
- Into the center ch-2 space, work: 3 dc, ch 2, 3 dc.
- Into the last space, work 3 dc.
👉 You now have 4 granny clusters.
🔁 Row 3 and Beyond:
- Ch 3, turn.
- Work 3 dc into each space between granny clusters.
- At the center ch-2 space, always work:
3 dc, ch 2, 3 dc. - Continue across with 3 dc in each space.
✅ Your triangle will grow wider and taller with each row. Keep going until it reaches your desired size!

⏱ How Many Rows?
- For a standard adult-sized bandana: 10–14 rows
- For kids: 7–9 rows
- Try on as you go, or measure your forehead to back of the head (about 18–22 inches across).
🎀 Optional: Add Ties
After you’ve finished the triangle, you can:
Option 1: Chain Ties
- Attach yarn to one corner.
- Ch 40–60 (depending on how long you want the tie).
- Fasten off and repeat on the other corner.
Option 2: Crochet Ties
- Ch 40–60
- Turn and sl st or sc back down the chain.
- Fasten off and attach to corners.
Option 3: No Ties
- Just tuck and tie the corners behind your head if the triangle is wide enough.
🧼 Finishing Touches
- Fasten off and weave in all ends with your tapestry needle.
- Block your bandana gently for a flat, crisp finish (especially for cotton yarn).
🎨 Customization Ideas:
| Idea | Description |
|---|---|
| 🌈 Color Changes | Change yarn colors every few rows for a striped or rainbow effect |
| 🧵 Picot Edge | Add a decorative picot or scalloped edge |
| 💐 Appliqués | Sew on small flowers or patches |
| ✨ Beads or Charms | Weave in some sparkle along the edges |
🧶 Why You’ll Love This Project:
- Quick to make (1–2 hours)
- No seaming or shaping
- Great stash-busting project
- Lightweight and stylish
- Makes a perfect handmade gift!
💬 Final Thoughts
Crocheting your own granny square triangle bandana is a fantastic way to learn (or practice) granny stitch techniques and create something both fashionable and functional. Whether you rock it boho-style or keep it classic, this project is as fun to wear as it is to make.
So grab your hook and yarn, and start stitching your way to a fabulous headscarf today! 🧶💃
Video Tutorial: