 by
by Introduction: Why You Need a Crochet Tea Set in Your Life
Hello, fellow craft enthusiasts! Liliana here from tallermanualperu, and today, I’m absolutely thrilled to share a project that is not only incredibly beautiful but also wonderfully easy and budget-friendly for even the most beginner of crocheters.
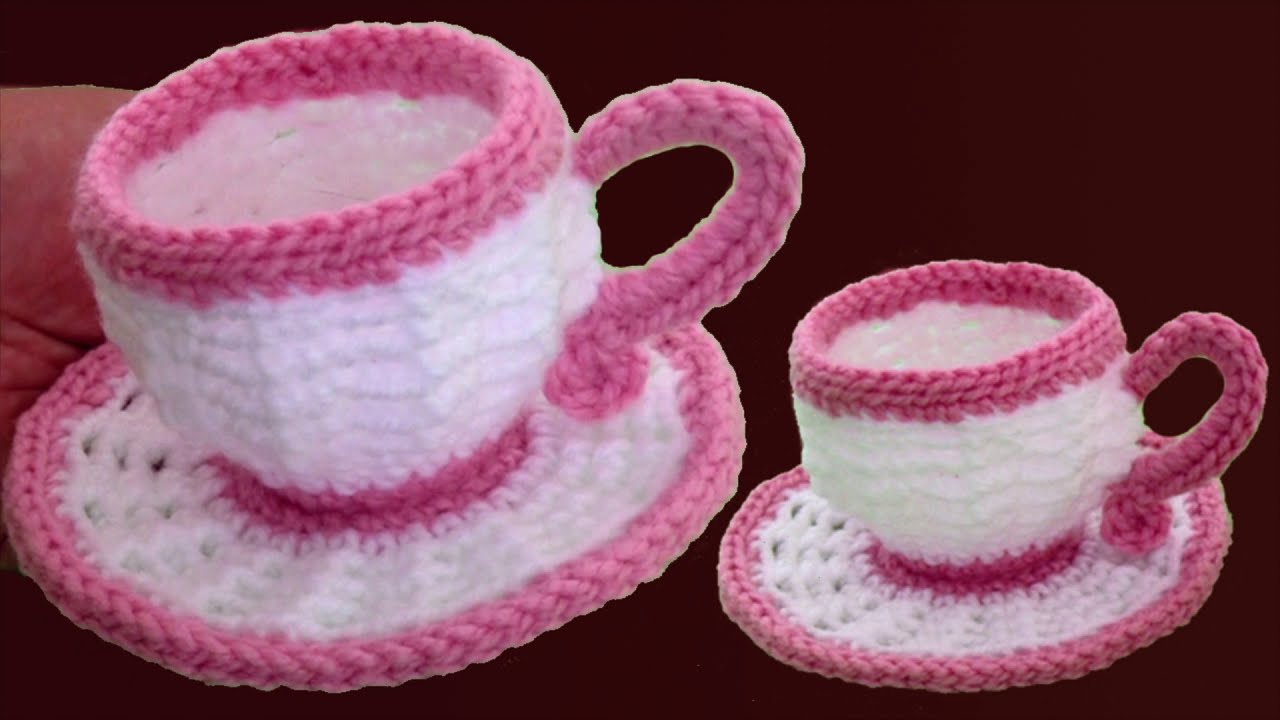
Have you ever looked at a beautiful centerpiece and wished you could create something just as elegant with your own hands? Now you can! We are going to craft a charming, super-firm, and endlessly customizable Crochet Tea and Coffee Cup Set (Tazas de Té y Café Tejidas), complete with a lovely saucer. This delightful creation is the perfect accent for any room, a unique addition to your holiday decor, or a heartfelt handmade gift, especially as a special tribute for occasions like Mother’s Day!

The best part? This project is designed to help you bust your yarn stash! We use very little material, making it ideal for those beautiful scraps and leftover threads you’ve been saving. So, grab your hook, choose your colors, and let’s turn simple yarn into a gorgeous, lasting treasure!
Section 1: Gathering Your Supplies (Materiales)
Before we begin this relaxing journey, let’s make sure you have everything you need. The beauty of this project lies in its flexibility—you can use almost any yarn you have!
| Material | Description/Recommendation |
| Yarn/Thread | Small quantities of worsted weight (gruesa) or lighter thread (delgadito). We’ll be using two or more colors for a lovely contrasting effect (e.g., Pink/Rose for the body and White for the trim). |
| Crochet Hook | Crucial: Select a hook that is slightly smaller than what is recommended for your yarn. For example, if using thick yarn, a 3mm hook works well to ensure the final piece is stiff and holds its shape without needing to be starched! |
| Scissors | For cutting the yarn. |
| Yarn Needle | For weaving in ends for a clean finish. |
💡 Pro-Tip on Size: The size of your finished cup will depend entirely on the thickness of your yarn and hook. Our example creates a small, decorative cup with a diameter of about 5-6 cm at the top and a saucer base of 8-9 cm. You can adjust your materials to go bigger or smaller!

Section 2: The Core Pattern – Building the Cup and Saucer
The entire set is primarily worked using only Single Crochet (Puntos Bajos) and Chains (Cadenitas), making it truly accessible for beginners! We will work in a specific sequence of rounds to create the shape, height, and final texture.
Part A: The Cup Base and First Lift
- Initial Circle: Begin with a Magic Ring or a series of chains closed into a circle.
- Base Layer: Work your starting stitches (e.g., 12 half double crochet or single crochet) into the circle and close with a slip stitch.
- Increasing for Diameter: In the next round, increase in every stitch to widen the base (1 single crochet, then 2 single crochet in the next, repeating). This ensures a flat, solid foundation.
- Creating the Side Wall (The Key to Shape!): The next round is where the cup begins to rise. Instead of working through both loops, work a round of single crochet only in the back loop (la hebra de atrás). Do not increase on this round. This back-loop-only technique creates a crisp edge and forces the yarn to turn upwards, forming the body of the cup.
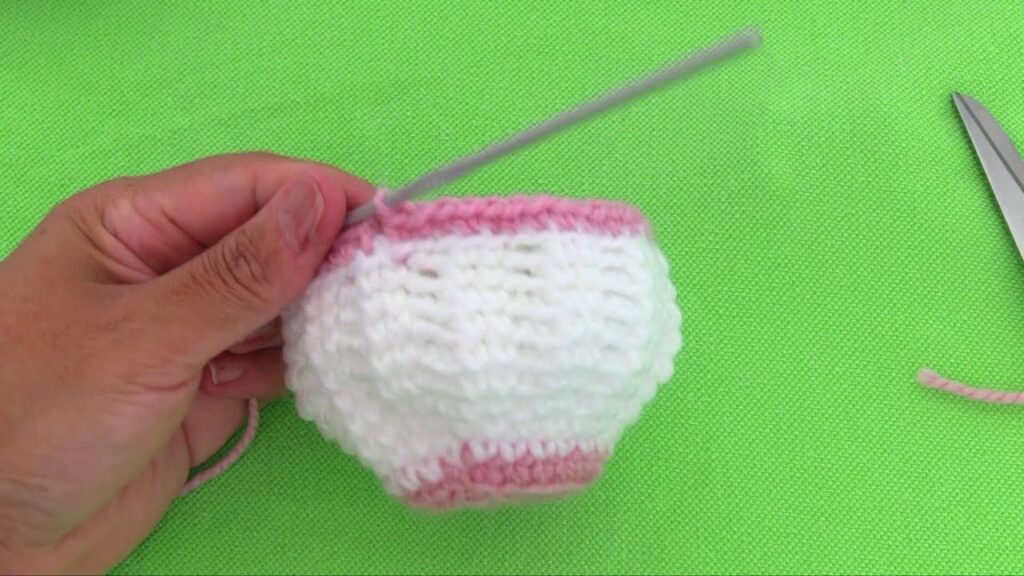
Part B: Building the Cup Body in a Spiral
- Change to your contrast color (e.g., White)
- First Color-Change Round: Work a round of single crochet, again with no increases, to establish the new color and base height.
- The “Lace” Rounds (Creating Texture): We now work in a continuous spiral—do not slip stitch to join at the end of the rounds until instructed. This keeps the seam invisible.
- Round 1 (Chain-1): Work a sequence of 2 Single Crochet followed by 1 Chain. This creates the first layer of subtle texture and a slightly open look.
- Round 2 (Chain-2): Work 2 Single Crochet over the 2 SC from the previous round, but now separate them with 2 Chains (skipping the single chain space).
- Round 3, 4, etc. (Chain-3): Continue the spiral for the main height of the cup, now using 3 Chains between the 2 Single Crochet groupings. Repeat this length multiple times (e.g., 3 rounds total) to achieve your desired height.
- Closing the Cup Height (Tapering): To slightly close the top and create a neat rim, decrease the chain count back down. Work two more rounds using 2 Chains between the 2 Single Crochet groups.
- Final Seam: Slip stitch to close the spiral when finished, and switch to your border color.

Part C: The Cup Rim and Finish
- Switch to your main color (e.g., Pink/Rose)
- Solid Base Round: Work one round of single crochet around the entire top opening, making sure to work into the chain spaces to keep the top opening even and neat.
- The Consistency Border: This is a vital step for a crisp finish! Work one final round using Slip Stitches (Puntos Deslizados) around the entire rim. This tight stitch makes the edge robust and smooth, giving your cup a professional, non-wavy finish.
Section 3: Crafting the Saucer (Platito)
The saucer is ingeniously attached to the cup base, creating a seamless, one-piece structure!
- Base Attachment: Flip the cup upside down. The initial back-loop-only round (Part A, Step 3) left a row of unworked front loops. Attach your yarn (Main Color) to one of these loops.
- Connecting Round: Work a round of slip stitches around the base using those unworked loops. This gives the saucer a neat starting edge.
- Saucer Base Layer (Increases): Now work rounds of single crochet, increasing strategically to create a large, flat circle. A simple pattern is to alternate between 2 SC in one stitch and 1 SC in the next, repeating the sequence until the base is wide enough.
- Saucer Body:Change to your contrast color (e.g., White).
- Similar to the cup, start working your texture rounds in a spiral.
- Work a sequence of 2 Single Crochet groupings, separated by increasing chain counts (e.g., 1 Chain, then 2 Chains, then 3 Chains). This helps the saucer lie flatter as it widens.
- Close the final Chain-3 round with a slip stitch to prepare for the border.
- Saucer Border:Switch back to your main color (e.g., Pink/Rose).
- Work a final round of single crochet, ensuring a flat edge by distributing your stitches evenly (you’ll need to work 2 single crochets over the chain spaces).
- Finish with the signature Slip Stitch Border around the entire edge. This finalizes the shape and gives the saucer its robust feel.
Section 4: The Finishing Touch – The Handle (El Asa)
The handle is the final detail that brings the entire piece to life!
- Handle Base: Create a tiny ring (Magic Ring) and work a small number of single crochets into it (e.g., 6 SC). Close the ring.
- The Chain: Attach the base ring to the side of the cup (find a good spot, about 3 rounds down from the rim) by slip stitching. Then, chain a length long enough to form the loop (e.g., 12 chains).
- Secure the Loop: Slip stitch the chain to the cup on the opposite side of the ring (4 rounds down).
- Forming the Handle Thickness: Working back along the chains you just made, work a row of single crochet stitches. This reinforces the handle loop and gives it thickness. Slip stitch back into the original ring.
- Final Handle Edge: Finally, work a border of Slip Stitches around the entire handle (the new SC row and the small ring). This gives the handle the same firm, finished edge as the cup and saucer.
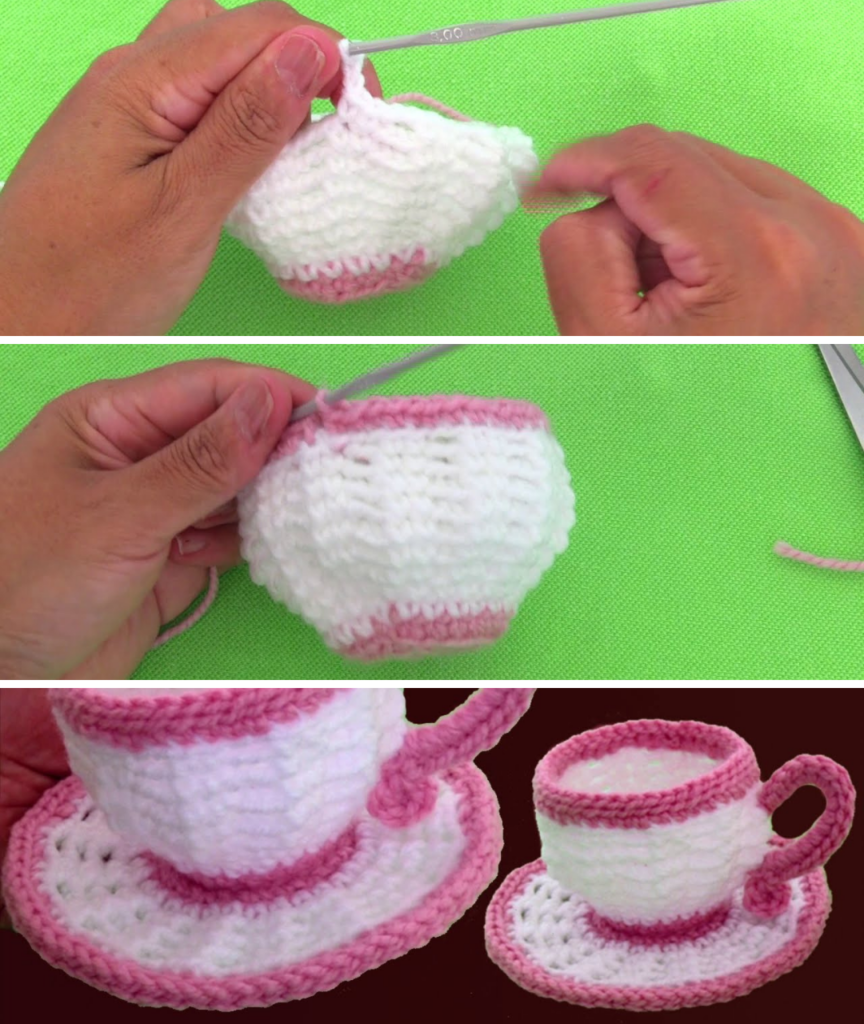
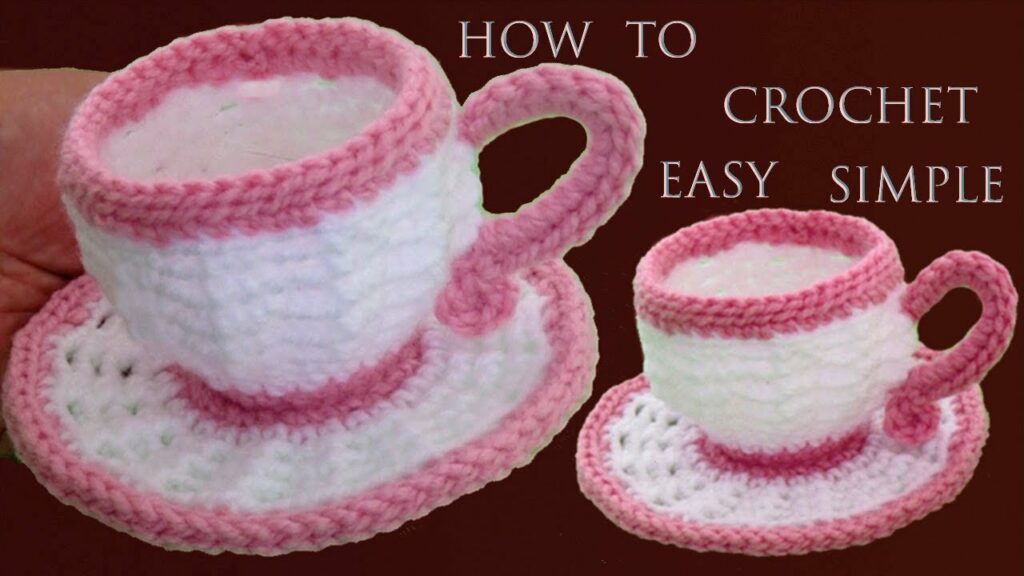
Conclusion: Your Crochet Masterpiece Awaits!
Congratulations! You now have a gorgeous, firm, and professionally finished decorative tea or coffee cup set!
These little creations are not just cute; they are a testament to your skill and creativity. Use them:
- As a stunning centerpiece on your dining table.
- To add a cozy kitchen or shelf accent.
- As a perfect, personalized gift for a loved one.
I truly hope you enjoyed learning this technique. As you can see, by simply using points bajos and cadenitas, we can achieve an incredible result!
Tell me in the comments: Would you like to see a tutorial for a matching Crochet Teapot (Tetera) to complete the entire set? Let me know!
Don’t forget to subscribe to my channel, like this video, and share your finished projects with your friends and family! We have over a thousand tutorials on all sorts of projects—from flowers to bags and everything in between—at tallermanualperu!
Happy Crocheting!
Video tutorial: