 by
by There’s something uniquely precious about a pair of hand-knitted baby booties. They are miniature marvels, often signifying new beginnings and boundless love. Whether you’re knitting for your own little one, a cherished friend, or a charity, these small projects offer immense satisfaction. For babies from newborn up to 16 months, knitted booties provide essential warmth and a touch of bespoke charm, protecting delicate feet as they grow and explore.
This guide will delve into the art of creating baby booties, focusing on practical considerations, various construction methods, and a wealth of design inspiration to help you craft the perfect pair.
Why Knit Baby Booties?

- Essential Warmth: Babies regulate their temperature less efficiently than adults, and feet are often the first to get cold. Booties provide crucial warmth.
- Prevent Scratches: For newborns, soft booties can prevent accidental scratches from tiny toenails.
- Adorable Factor: Let’s be honest – they’re irresistibly cute and make for fantastic photo opportunities!
- Quick Project: Most booties knit up relatively fast, offering quick gratification and making them ideal for last-minute gifts.
- Skill Builder: They’re excellent for practicing small circumference knitting, shaping, and various cast-on/bind-off techniques.
- Yarn Scrap Friendly: Often, you only need a small amount of yarn, perfect for using up remnants from larger projects.
Essential Considerations for Baby Bootie Design (0-16 Months):
- Yarn Choice is Paramount:
- Fiber Content:
- Superwash Merino Wool: The top choice for softness, warmth, and breathability. Crucially, “superwash” means it’s machine washable, which is a must for baby items.
- Cotton: Excellent for warmer climates or babies with sensitive skin. Choose soft, mercerized cotton for durability and drape.
- Alpaca: Incredibly soft and warm, though often requires more delicate handwashing.
- Acrylic: A good hypoallergenic and budget-friendly option. Choose high-quality, soft acrylics specifically labeled for babies to avoid scratchiness or pilling.
- Blends: Many yarns combine these fibers to balance softness, durability, and ease of care.
- Yarn Weight: This dictates your needle size and the fabric’s thickness.
- Fingering/4-ply: Creates delicate, lightweight booties, great for intricate lace or warmer weather.
- Sport/DK (Double Knitting): A very popular choice, offering good stitch definition and a moderately warm fabric that knits up at a good pace.
- Worsted/Aran: Produces warmer, denser booties, suitable for cooler climates or quicker projects.
- Color: Pastels are traditional, but bright, cheerful colors, speckles, or subtle variegations are also wonderful.
- Fiber Content:

- Sizing and Fit (0-16 Months):
- Age Ranges: Bootie patterns are typically sized for:
- Newborn
- 0-3 months
- 3-6 months
- 6-12 months
- 12-16 months (as babies start to stand/cruise, the sole might need more structure)
- Growth Spurt: Babies grow incredibly fast! Always choose a size that offers a little room for growth without being too big that it slips off.
- Foot Measurements: Refer to a reliable baby foot sizing chart (available online or in knitting books) for average foot length and circumference for your target age.
- Age Ranges: Bootie patterns are typically sized for:
- Gauge Swatch (Yes, even for booties!):
- Crucial! Knit a small swatch (e.g., 4×4 inches or 10×10 cm) in your chosen yarn and main stitch pattern.
- Wash and block the swatch as you would the finished booties.
- Measure your stitches and rows per inch. This is the only way to ensure your booties will come out the correct size. Adjust your needle size if your gauge is off.
Common Bootie Construction Methods:
Baby bootie patterns often fall into one of these general construction types:
- Knit Flat and Seamed:
- Method: The bootie is knitted as one or two flat pieces and then seamed together (usually down the back and along the sole).
- Pros: Simpler for absolute beginners who are not comfortable with circular needles or DPNs.
- Cons: Seams can sometimes be bulky or rub on delicate baby skin.
- Knit in the Round (Top-Down or Sole-Up):
- Method: Utilizes circular needles (using Magic Loop for small circumferences or a small circular needle) or Double Pointed Needles (DPNs). This creates a seamless bootie.
- Pros: No uncomfortable seams, smooth finish, often quicker once you master the technique.
- Cons: Requires comfort with DPNs or Magic Loop.
- Top-Down: Start at the cuff, work down the leg, shape the heel, then work the foot, and finally shape the toe.
- Sole-Up: Start with the sole, build up the sides of the foot, then shape the heel and leg. This often results in a very neat sole.
Inspiring Design Elements for Baby Booties:
Even small booties offer a wealth of design possibilities:
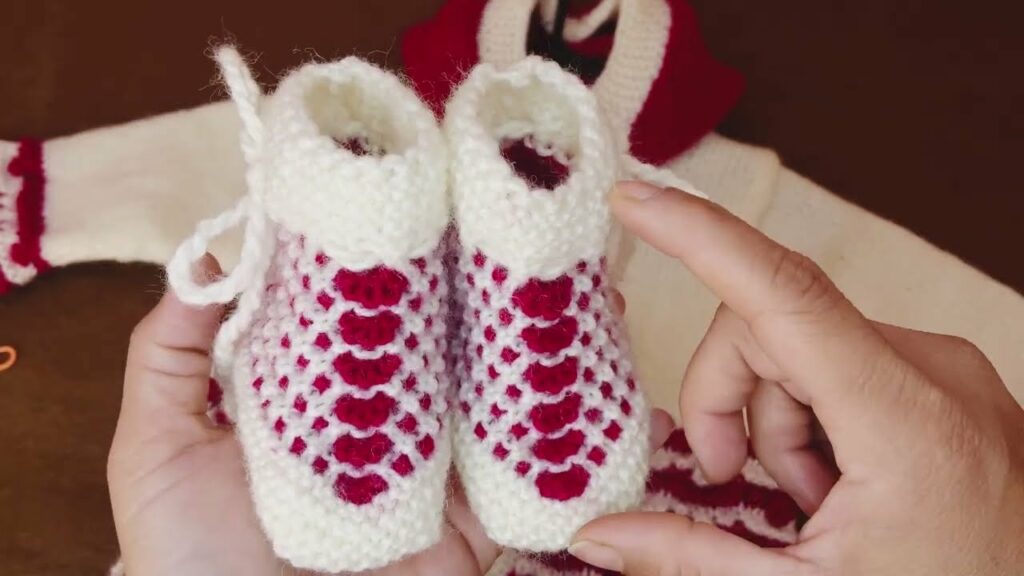
- The Cuff/Ankle:
- Purpose: To keep the bootie on the baby’s foot! And to add visual appeal.
- Stitches:
- Ribbing (1×1, 2×2): Most common and effective due to its stretch and elasticity.
- Garter Stitch: Simple, squishy, and creates a neat edge that doesn’t curl.
- Seed/Moss Stitch: Creates a lovely, subtle texture that lies flat.
- Picot Edges: A sweet, decorative, slightly ruffled edge created with yarn-overs and knit-togethers.
- Height: Can be short (just around the ankle) or longer (extending higher up the leg for more warmth and security).
- Closure: Some booties have ties (I-cord, ribbon) or buttons on the cuff to secure them.
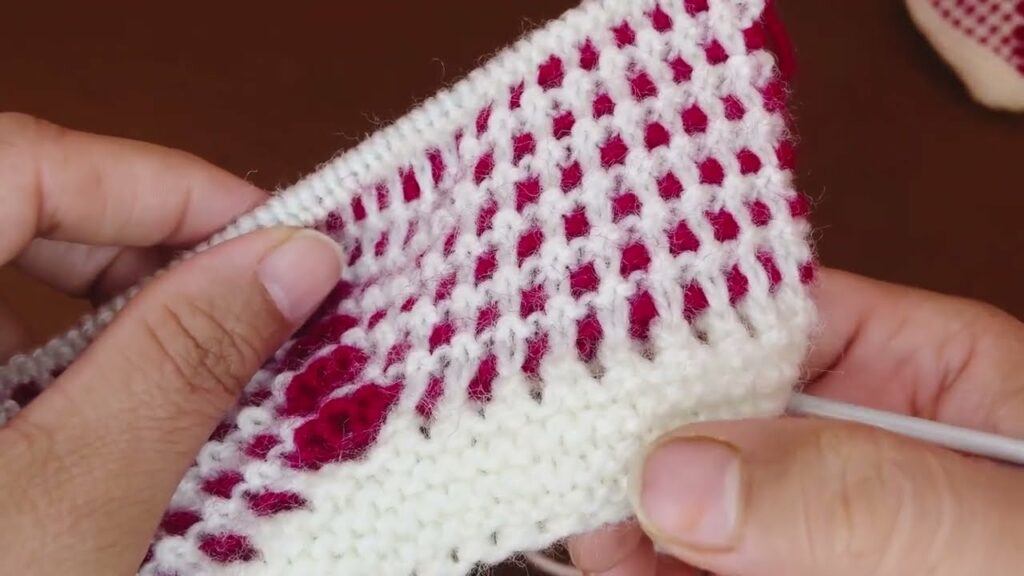
- The Main Body/Foot:
- Purpose: Forms the bulk of the bootie.
- Stitches:
- Stockinette Stitch: Classic, smooth, lets the yarn color shine.
- Garter Stitch: Provides a thick, squishy, reversible fabric.
- Simple Textured Stitches: Basketweave, simple knit/purl repeats, small bobbles (ensure they are very securely formed).
- Easy Lace: Small eyelet patterns for a delicate touch, especially for lighter yarns.
- Stripes: Simple horizontal stripes are easy and effective for adding color.
- Basic Colorwork: Very simple two-color motifs like small dots or blocks on the instep.
- Heel Shaping:
- Purpose: To create the pocket for the heel.
- Methods:
- Heel Flap & Gusset: A robust method where you knit a separate “flap” and then pick up stitches along its sides to form the gusset before decreasing. Common in more traditional sock/bootie patterns.
- Short Row Heel: A quicker, often seamless method where stitches are worked back and forth in partial rows to shape the heel cup.
- Folded Heel: Some very simple patterns achieve a heel by simply folding the fabric and seaming or joining.
- Toe Shaping:
- Purpose: To decrease stitches to close the front of the bootie.
- Methods:
- Wedge Toe: Decreases are worked at four points (corners) of the toe, creating a neat wedge shape.
- Round Toe: Decreases are more gradual, creating a softer, rounder toe.
- Gathered Toe: For very simple booties, stitches are gathered tightly at the end.
- Finishing: The remaining stitches are usually threaded with yarn, pulled tight, and the end woven in. Kitchener stitch (grafting) can be used for a completely seamless toe.
Embellishments and Finishing Touches:
- Ties/Cords: I-cord ties (knitted cords) or ribbon can be threaded through eyelets on the cuff to secure the booties. Always ensure ties are not too long to prevent entanglement risks.
- Buttons: Small, securely sewn buttons can be functional or purely decorative. Ensure they are baby-safe (no sharp edges, large enough not to be choking hazards).
- Ears/Animal Details: Simple knitted ears (bunny, bear) sewn onto the top for themed booties.
- Simple Embroidery: Small stars, hearts, or a tiny initial can be embroidered onto the finished bootie.
- Fold-Over Cuffs: Knit a longer ribbed cuff and fold it down for extra warmth and a classic look.
General Tips for Knitting Successful Baby Booties:
- Read the Pattern Completely: Before casting on, read through the entire pattern to understand its construction and any special techniques.
- Use Stitch Markers: Especially helpful for small projects to mark repeats, decreases, or the start of a round.
- Weave in Ends Meticulously: Loose ends can unravel the bootie or irritate baby’s skin. Weave them in securely.
- Block Your Booties: Gently wash and block your finished booties according to the yarn’s instructions. This evens out stitches, opens up any lace, and sets the final shape and size, making them look much more professional.
- Safety First: Ensure no small parts can detach. Check that ties are not excessively long.
Video Tutorial :
Knitting baby booties is a wonderful way to express your creativity and provide comfort for a little one. With a vast array of patterns available and endless possibilities for customization, you’re sure to find (or design!) the perfect pair to warm those tiny toes. Happy knitting!