 by
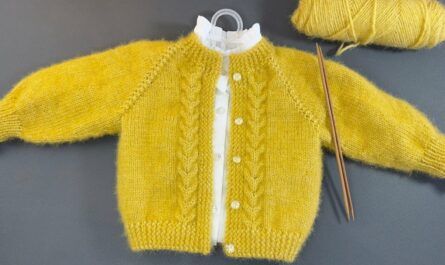
by There’s something uniquely precious about a baby’s first clothing, and a hand-knitted onesie for a newborn is the epitome of thoughtful gifting and cozy comfort. Perfect for sleepy snuggles, playful wiggles, and those endless photo opportunities, a knitted onesie ensures tummy and back stay covered, providing warmth and security. While it might look like a complex undertaking, many patterns are designed to be achievable for adventurous beginners or intermediate knitters, leading to immense satisfaction.
This detailed article will guide you through the wonderful world of knitting a baby onesie for a 0-3 month old, covering essential considerations, popular construction methods, and key design elements to help you create a truly cherished garment.
Why Knit a Baby Onesie for 0-3 Months?

- Ultimate Comfort: Unlike separate tops and bottoms that can ride up, a onesie keeps a baby’s core consistently covered and warm, with no waistbands digging in.
- Practicality: With well-placed snaps or buttons, knitted onesies are incredibly easy to slip on and off for quick diaper changes and dressing, a huge plus for new parents.
- Adorableness Factor: Tiny knitted garments are irresistibly cute, and a onesie highlights a baby’s precious smallness, making for adorable photos.
- Heartfelt Gift: A handmade onesie is a deeply personal and practical gift that will be appreciated and cherished, often becoming an heirloom.
- Skill Building: This project helps knitters combine various garment elements – shaping for a body, sleeves, and leg openings, creating plackets, and adding closures.
- Yarn Efficiency: While seemingly complex, a 0-3 month onesie doesn’t require a vast amount of yarn.
Key Considerations for Design & Yarn (0-3 Month Specifics):
When knitting for the tiniest occupants, every detail counts.
- The Newborn/Infant Factor:
- Delicate Skin: Yarn must be super soft, non-irritating, and breathable. Avoid anything scratchy or overly coarse.
- Temperature Regulation: Newborns struggle to regulate their body temperature, so knitwear is excellent for providing consistent warmth.
- Frequent Diaper Changes: The design must have easy and efficient access to the diaper area, usually via snaps or buttons at the crotch.
- Floppy Limbs: Wide neck openings, full front or back plackets, or shoulder button openings make dressing much easier for newborns.
- Outgrown Quickly: Acknowledge this joyful reality! While a newborn onesie is precious, they’ll outgrow it fast. Cherish its short but sweet wearing time.
- Yarn Choice (Utmost Importance!):

- Fiber:
- Superwash Merino Wool: The gold standard for baby items. It’s incredibly soft, warm, breathable, and (crucially!) machine washable.
- Organic Cotton / Bamboo: Excellent choices for babies with sensitive skin, those living in warmer climates, or if you prefer plant-based fibers. They are soft, breathable, and often machine washable.
- Baby-Specific Acrylics / Blends: Modern, high-quality acrylics can be surprisingly soft, durable, hypoallergenic, and very machine washable. Blends (e.g., merino/nylon for durability, cotton/bamboo for softness and drape) offer combined benefits.
- Weight:
- DK (Double Knitting) or Sport Weight: These are ideal. They provide good stitch definition, work up at a reasonable pace, and offer comfortable warmth without being too bulky.
- Fingering (4-ply): Suitable for lighter, more delicate, and finer gauge onesies, but will take longer to knit.
- Color Palette: Soft pastels (pale blue, pink, mint, lavender, yellow), gentle neutrals (cream, white, light grey, beige, taupe), or muted earthy tones are popular choices. Avoid very dark colors that might hide stitch definition or potentially harsh dyes.
- Safety: The yarn must be machine washable (or at least easy care for parents) and hypoallergenic.
- Sizing (0-3 Months):
- Most patterns specify a finished chest circumference for a 0-3 month size (typically around 16-18 inches / 40-45 cm).
- Positive Ease: Onesies usually incorporate a bit of positive ease (the garment being slightly larger than the body measurement) to allow for comfort, movement, and diaper bulk.
- Gauge Swatch (Absolutely Non-Negotiable!): This is the single most critical step for any knitted garment, especially for small baby items where even slight gauge differences can significantly impact the fit.
- How to do it: Knit a swatch (at least 6×6 inches / 15×15 cm) in the main stitch pattern. Wash and block it exactly as you plan to treat the finished onesie. Measure your stitches and rows per inch/cm precisely.
- Adjust Needles: If your gauge is off, adjust your needle size (up if your knitting is too tight/too many stitches per inch; down if too loose/too few stitches per inch) and knit another swatch until you match the pattern’s gauge.
- Closure:
- Snaps: Very common and highly practical at the crotch for quick diaper access. Can be applied with a plier tool.
- Buttons: Small buttons (e.g., 1/2 inch or larger) along a front or back placket, and/or at the crotch. They must be sewn on very, very securely.
- Plackets: A band of knitting with buttonholes or an area for snaps, usually running down the front, back, or along one shoulder.
Common Construction Methods:
For a knitted onesie, seamless methods are often preferred for their comfort and neat finish.
- Top-Down Seamless (Raglan or Circular Yoke):
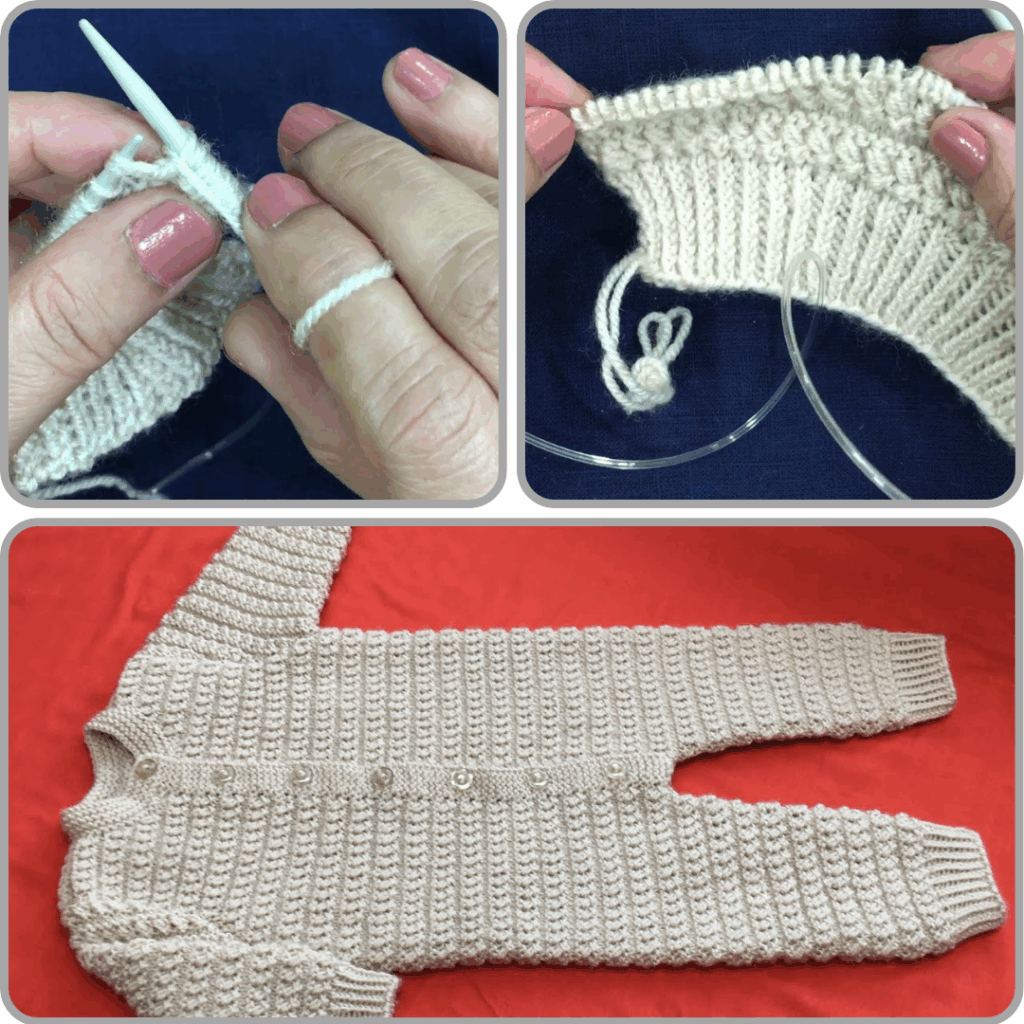
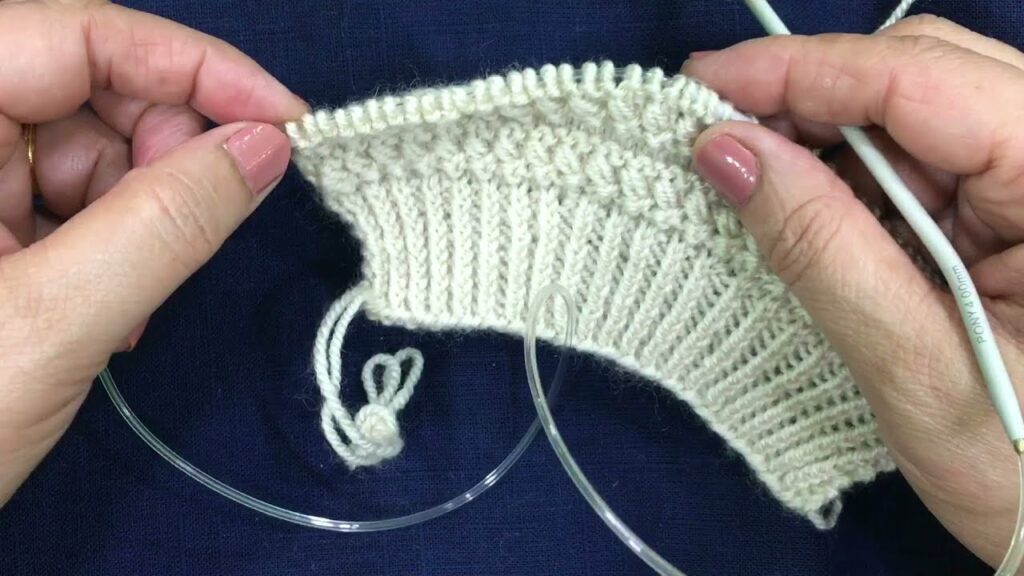
- How it Works: You cast on at the neck and knit downwards. Increases are made along specific “raglan” lines (diagonal lines for raglan) or evenly around (for a circular yoke) to shape the shoulders and upper body. The body is then knit, divided for the legs, and the legs and sleeves are knit individually.
- Pros: No seaming (a huge advantage!), easy to try on for length adjustments, often quicker to finish. Introduces various increase techniques.
- Cons: Requires circular needles and often DPNs (Double Pointed Needles) or the Magic Loop method for the tiny sleeves and legs.
- Highly Recommended: For its neat appearance, seamless comfort, and ease of adjusting lengths.
- Bottom-Up (Seamed or Seamless):
- Seamed: Legs are knit first, then joined, then the body is knit. Sleeves are knit separately, and all pieces are sewn together. More seaming is involved.
- Seamless: Legs are knit in the round, joined, then the body is knit in the round. Sleeves are knit in the round. Requires careful joining of the legs at the crotch.
Basic Elements & Stitch Patterns:
A good pattern will guide you through these fundamental techniques:
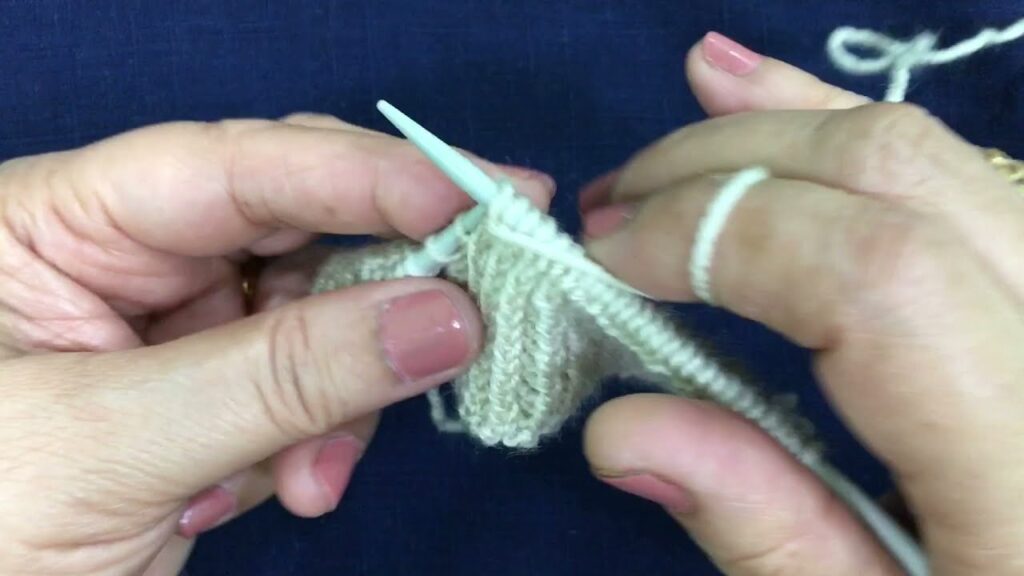
- Cast On: How to begin your stitches (e.g., Long-Tail Cast On for a stretchy edge).
- Knit Stitch (K) & Purl Stitch (P): The two fundamental stitches.
- Ribbing (1×1 or 2×2): Alternating knits and purls for stretch and elasticity at cuffs, leg openings, and neckbands.
- Garter Stitch: Knit every row/round. Very squishy, soft, reversible, and prevents curling. Excellent for comforting textures or durable bands.
- Stockinette Stitch: Knit one row/round, purl the next row/round. Creates a smooth, classic fabric (but curls at edges unless bordered).
- Moss Stitch / Seed Stitch: A textured stitch that lies flat and prevents curling. Good for edgings or yokes.
- Simple Shaping: Increases (KFB, M1L/R) for raglan lines, and simple decreases (K2tog, SSK) for neckline shaping or armholes.
- Buttonholes / Snap Plackets: Learning to create neat horizontal or vertical buttonholes, or a simple band for snap application.
- Bind Off: How to finish your stitches.
- Weaving in Ends: Making your finished work neat and tidy.
- Pattern Structure: A reliable pattern will clearly list materials, gauge, finished measurements, abbreviations, and step-by-step instructions for each section.
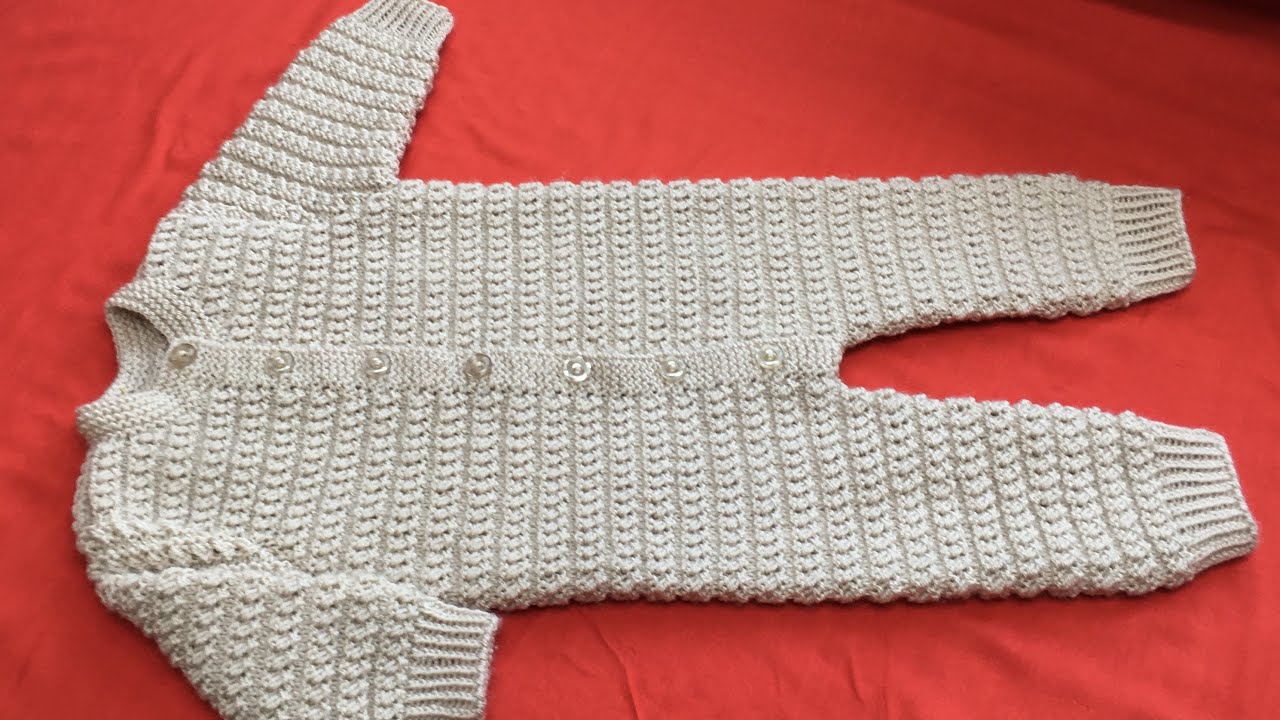
Key Design Elements for 0-3 Month Onesies:
- Full Front or Back Opening: These are the easiest to dress a newborn in.
- Crotch Opening: Essential for quick and easy diaper changes, typically secured with snaps or buttons.
- Neckline: Should be wide enough to slip over the head comfortably, often designed with buttons at the shoulder or a front placket.
- Sleeve Length: Full-length for warmth, or short “romper” style sleeves for warmer climates.
- Leg Length: Full-length for warmth, or short “romper” style legs for warmer weather.
- Hood (Optional): Adds extra warmth and undeniable cuteness, framing the baby’s face.
- Footies (Optional): Integrated feet mean no worrying about socks slipping off, providing continuous warmth.
Step-by-Step (Simplified) Outline of a Top-Down Raglan Onesie:
This is a general guide; your chosen pattern will provide exact stitch counts and specific instructions.
- Cast On: Using smaller needles (for ribbing/bands), cast on the specified number of stitches for the neckline.
- Neckline Ribbing/Band: Work in ribbing or your chosen stitch pattern for the specified height. This section will often incorporate the first buttonhole(s) or snap placket.
- Switch to Main Needles: Change to your larger needles for the main body of the onesie.
- Establish Raglan Markers: On the first round/row of the yoke, divide your stitches for the front placket, front panels, sleeves, and back panel, placing stitch markers at the four raglan “corners.”
- Knit Yoke (Increase Rounds/Rows): Continue knitting in your main stitch pattern. On designated “increase rounds/rows,” work increases around each of your raglan markers. This creates the growing yoke. Continue working buttonholes on your placket at regular intervals. Repeat until the yoke reaches the desired depth.
- Separate for Body & Sleeves: Once the yoke is complete, put the stitches for the two sleeves onto scrap yarn or stitch holders. The remaining stitches will form the front and back of the onesie. You’ll typically cast on a few stitches under each armhole.
- Knit Body: Join the front and back (and any underarm stitches) and continue knitting flat (for a cardigan-style opening) or in the round (for a pullover-style body with crotch opening only) until the body reaches the desired length for the crotch split. Shape the crotch area according to the pattern.
- Divide for Legs: Separate the body stitches into two sections for the legs.
- Knit Each Leg Separately: Work each leg in the round (using DPNs or Magic Loop) or flat (then seam) to the desired length. Finish with ribbing or garter stitch for the cuffs (or integrate footies). Bind off.
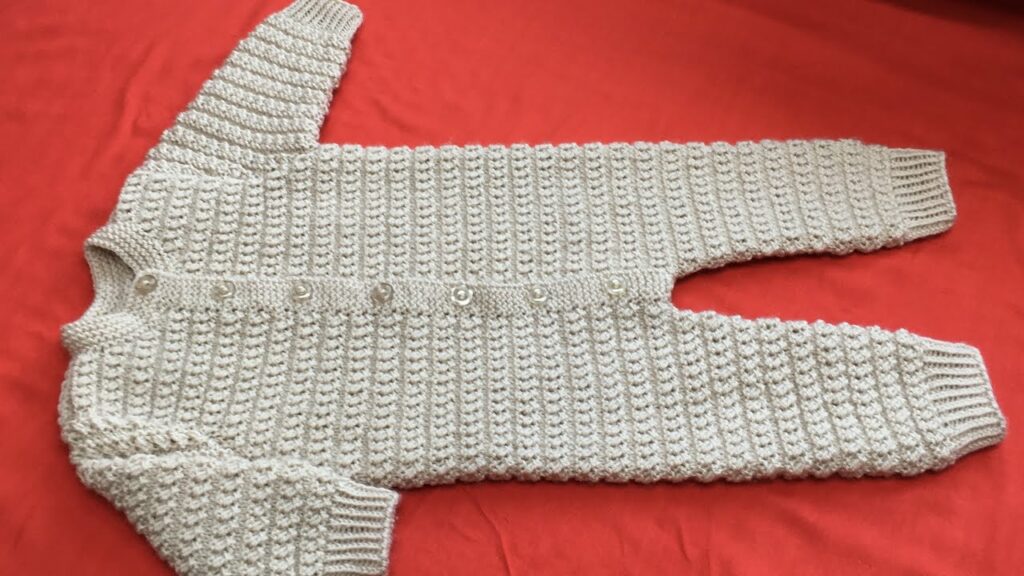
- Knit Sleeves: Return to the held sleeve stitches. Pick up any stitches under the armhole. Knit each sleeve in the round (or flat) to the desired length, finishing with ribbing or garter stitch for the cuffs. Bind off.
- Finishing:
- Weave in Ends: Neatly weave in all loose yarn tails using a tapestry needle.
- Sew on Buttons/Apply Snaps: Securely sew on all buttons, ensuring they are very tightly attached and pose no hazard. If using snaps, follow the tool’s instructions for secure application.
- Block: Gently wash your onesie according to your yarn’s care instructions. Gently squeeze out excess water. Lay it flat on a towel or blocking mats, shaping it to the correct dimensions from the pattern. Let it air dry completely. This step truly transforms the finished garment, evening out stitches and improving drape.
Tips for Beginner/Intermediate Success:
- Read the Entire Pattern First: This is paramount for any complex garment. Understand the flow, identify new techniques, and visualize each step.
- Watch Video Tutorials: For any technique that’s new or unclear (e.g., specific cast-ons, increases, picking up stitches, Magic Loop, joining legs, making buttonholes).
- Use Stitch Markers! They are invaluable for marking raglan lines, stitch pattern repeats, and the beginning of rounds.
- Don’t Fear Mistakes: Everyone makes them! A good stitch fixer or seam ripper is your friend. It’s always better to undo a few rows and correct an error than to be unhappy with the finished project.
- Blocking is Your Secret Weapon: Do not skip this step! It evens out your stitches, relaxes the fabric, opens up lace patterns, and helps your garment achieve its intended size and drape.
- Baby Safety First: Double-check that all buttons and snaps are sewn/applied extremely securely. Avoid any long ties or small, loose embellishments that could pose a choking hazard.
Video Tutorial :
Knitting a baby onesie for a 0-3 month old is a truly heartwarming and rewarding project. You’ll create a garment that is not only practical and adorable but also a tangible expression of your love and skill, sure to be cherished by the little one and their family. Happy knitting!