 by
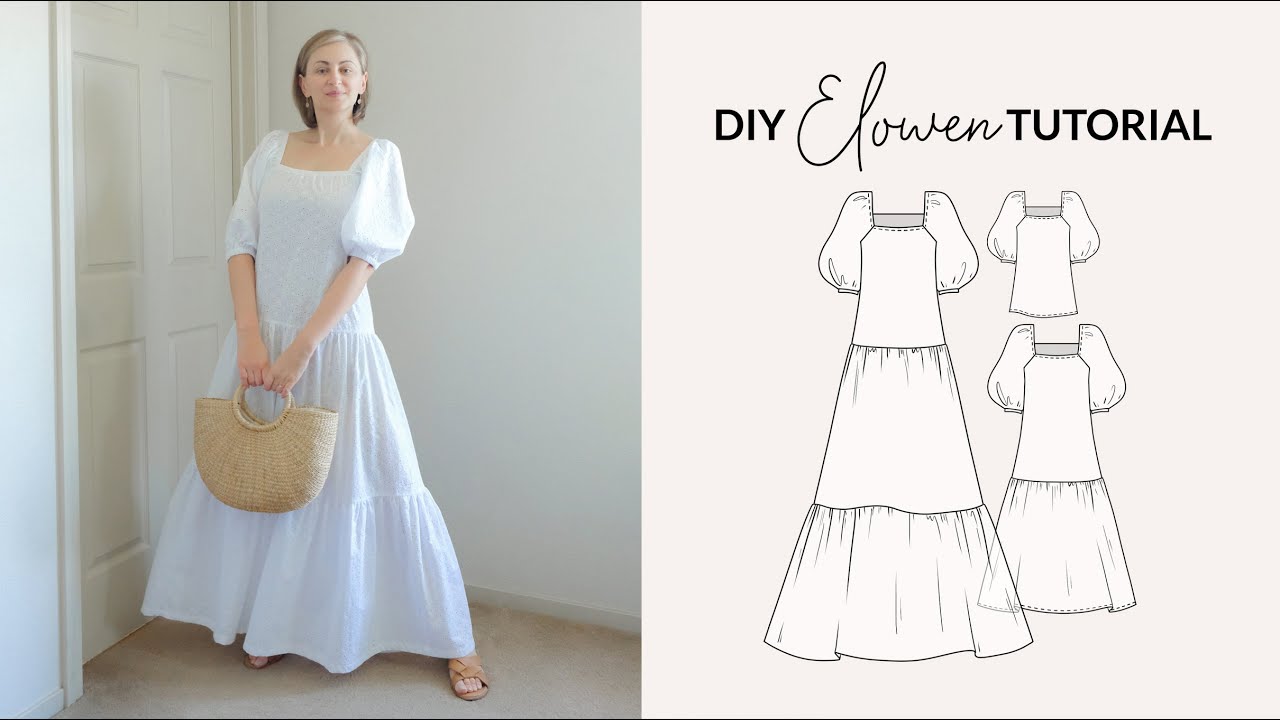
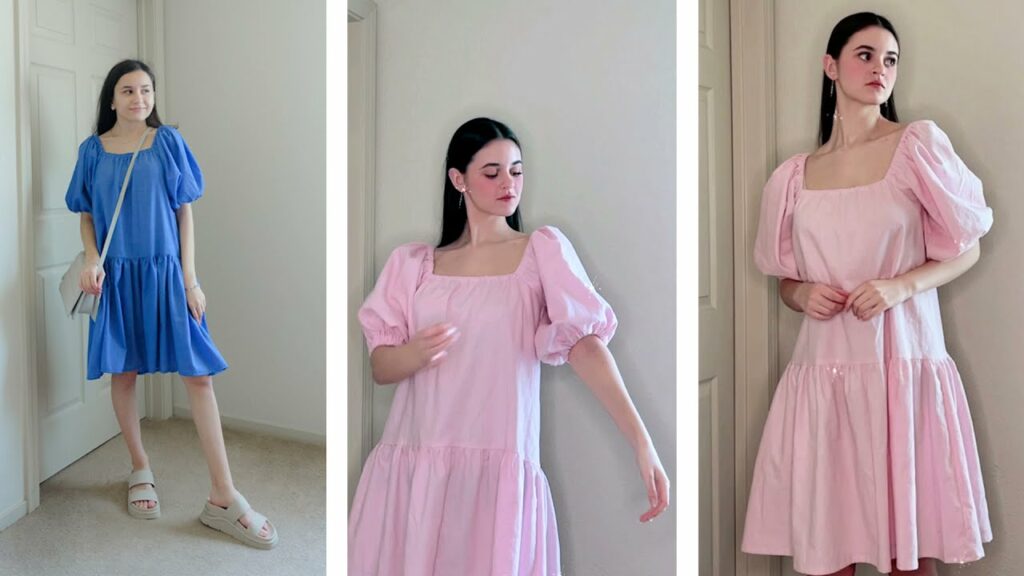
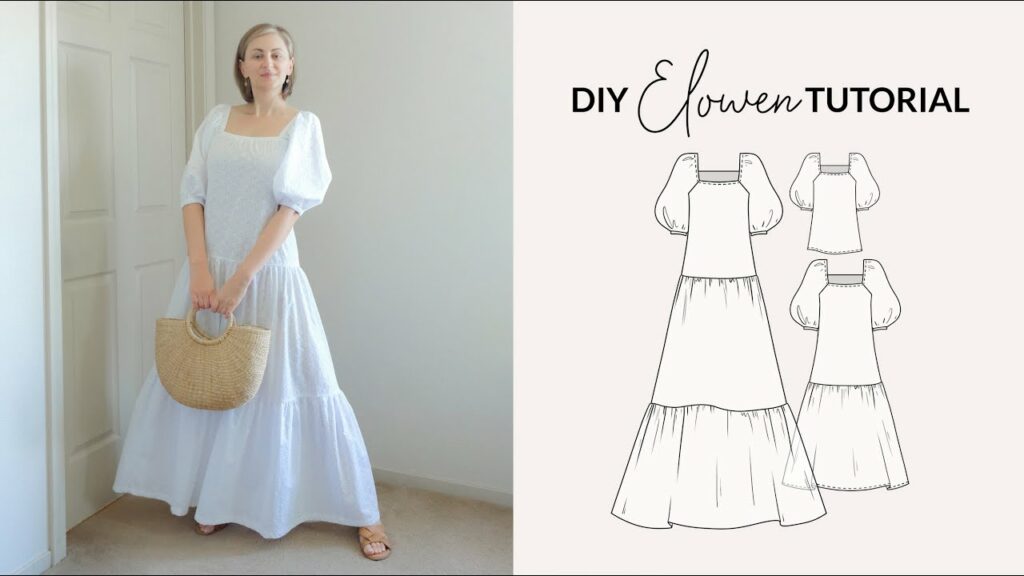
by Imagine a dress that combines whimsical charm with ultimate comfort – that’s the tiered puff sleeve dress. Its flowy tiers offer graceful movement, while the delightful puff sleeves add a touch of romantic flair. Perfect for various occasions, this versatile garment is a true wardrobe gem. The most exciting part? You can create this stunning piece yourself, tailored to your exact measurements and fabric preferences, even if you’re not an advanced patternmaker.
This guide provides a comprehensive tutorial for designing your own basic pattern and sewing a beautiful tiered puff sleeve dress, empowering you to craft a unique and personal fashion statement.
Why Sew Your Own Tiered Puff Sleeve Dress?

- Custom Fit: Achieve a perfect fit around your bodice and armholes, and customize the length and fullness of the tiers to flatter your figure.
- Fabric Freedom: Unleash your creativity by choosing from an endless array of lightweight fabrics, patterns, and colors that reflect your personal style.
- Unique Design: Play with the number of tiers, the height of the puff sleeves, and the neckline to create a dress that truly stands out.
- Skill Enhancement: This project refines essential sewing skills like gathering, attaching sleeves, working with facings, and creating clean finishes.
- Comfort & Versatility: These dresses are incredibly comfortable and can be dressed up with accessories or kept casual for everyday wear.
Materials You’ll Need:
- Fabric: The key to a beautiful drape and puff.
- Recommended: Lightweight wovens with good drape.
- Rayon Challis/Viscose: Excellent drape, soft, luxurious feel.
- Cotton Lawn/Voile: Breathable, crisp, great for summer.
- Linen/Linen Blends: Breathable, natural texture, can be slightly crisp.
- Double Gauze: Super soft, breathable, beautiful texture.
- Lightweight Poplin: Good for a more structured puff and a crisp look.
- Quantity: This will depend heavily on your measurements and desired fullness. As a general guide, you’ll need approximately 3-6 yards (2.7 – 5.5 meters) of 44-45″ (112-114 cm) wide fabric. Wider fabric (e.g., 54-60″ / 137-152 cm) may require less yardage. Detailed calculation below.
- Recommended: Lightweight wovens with good drape.
- Interfacing: Lightweight fusible interfacing for bodice facings and sleeve cuffs (if using a band).
- Elastic: 1/4″ – 1/2″ (0.6 – 1.25 cm) wide elastic for sleeve cuffs (if making an elasticated cuff). You’ll need about 12-18 inches (30-45 cm) per sleeve, depending on arm circumference.
- Matching All-Purpose Thread: Polyester or cotton.
- Sewing Machine: With a universal needle appropriate for your fabric weight.
- Iron and Ironing Board: Essential for crisp seams and a polished finish.
- Measuring Tape, Fabric Scissors, Pins, Tailor’s Chalk/Fabric Marker, Seam Ripper, Safety Pin or Bodkin: Your essential sewing toolkit.
DIY Pattern Design & Fabric Calculation:
The beauty of this dress is that many of its “pattern pieces” are simple rectangles, which you’ll calculate based on your own body measurements.
Step 1: Take Your Key Body Measurements
- High Bust: Measure around your back and over the fullest part of your chest, just above your bust. This is crucial for bodice fit.
- Full Bust: Measure around the fullest part of your bust.
- Waist Circumference: Measure around the narrowest part of your torso.
- Armhole Circumference: Measure loosely around your arm where the armhole seam would sit.
- Desired Full Length: Measure from the top of your shoulder (where a typical T-shirt seam sits) down to where you want the dress hem to fall.
- Sleeve Length: Measure from the top of your shoulder down to where you want the sleeve cuff to sit.
- Finished Sleeve Opening: Measure around your arm where the cuff will sit (e.g., just above the elbow or at the wrist), adding 1-2 inches for comfort/ease.
Step 2: Design Your Bodice Pattern (Simplified Approach)
For an easy DIY bodice, you can start with a well-fitting non-stretch top or T-shirt that has simple shoulder seams and side seams.
- Trace: Lay your chosen top flat. Trace the front and back bodice pieces onto pattern paper (or large paper).
- Refine:
- Neckline: Adjust to your desired shape (round, square, V-neck). Add seam allowance (e.g., 1/2″ or 5/8″).
- Shoulders: Ensure shoulder seam is comfortable.
- Armhole: Keep the armhole shape from your top, but ensure it’s not too tight.
- Length: Extend the bodice straight down from the underarm to approximately your waist or just below (where the top tier will attach). Add a 1/2″ (1.25 cm) seam allowance at the bottom.
- Width: The width should be roughly half your
Full Bustmeasurement plus 2-4 inches for ease, plus seam allowances (e.g., 1/2″ on each side). Cut two front pieces (mirror image) or one on the fold, and one back piece on the fold.
- Facings: Create separate facing pieces for your chosen neckline and armholes (if sleeveless bodice) by tracing 2-3 inches in from the edge of your bodice pattern. Add seam allowances.
Step 3: Calculate Tiered Skirt Dimensions
Let’s assume a 3-tier skirt for a balanced look. Adjust the number of tiers based on your desired fullness and length.
- Determine Skirt Height:
Skirt Height = Desired Full Length - Finished Bodice Height (from shoulder to bottom of bodice). - Tier Height Calculation:
Skirt Height / Number of Tiers.- Example: Total Skirt Height = 30 inches. For 3 tiers, each tier is 10 inches finished height.
- Gathering Ratio: This determines fullness. 1.75x to 2x is common.
- 1.75x: Medium gathers.
- 2x: Full, voluminous gathers.
- Tier 1 (Attaches to Bodice):
- Cutting Height:
(Tier Height) + 1 inch(for 1/2″ top & bottom seam allowances). - Cutting Width:
(Finished Bodice Bottom Circumference) x Gathering Ratio. You’ll cut this into 2-3 panels and join them if needed. - Example: Bodice bottom circumference 40 inches. 40 x 1.75 = 70 inches total width for Tier 1. Cut two 35-inch wide panels if using 45″ wide fabric.
- Number of Pieces: Cut enough rectangles to achieve the total width.
- Cutting Height:
- Tier 2 (Middle Tier):
- Cutting Height:
(Tier Height) + 1 inch(for 1/2″ top & bottom seam allowances). - Cutting Width:
(Tier 1 Total Width) x Gathering Ratio. - Example: 70 inches x 1.75 = 122.5 inches total width for Tier 2.
- Number of Pieces: You’ll likely need 3-4 panels.
- Cutting Height:
- Tier 3 (Bottom Tier – Hem):
- Cutting Height:
(Tier Height) + 1 inch(for top seam allowance) +1-2 inches(for hem allowance). - Cutting Width:
(Tier 2 Total Width) x Gathering Ratio. - Example: 122.5 inches x 1.75 = 214.375 inches total width for Tier 3.
- Number of Pieces: You’ll likely need 4-6 panels.
- Cutting Height:
Step 4: Design Your Puff Sleeve Pattern
- Start with a Basic Sleeve: Use the sleeve from your well-fitting top or draft a simple sleeve pattern based on your armhole circumference and desired sleeve length.
- Slash & Spread:
- Draw several vertical lines from the sleeve hem up to the sleeve cap (but not through the cap seam allowance).
- Cut along these lines, stopping just before the seam allowance at the sleeve cap.
- Spread the pieces apart to create fullness:
- For Sleeve Head Puff: Spread the top edges of the slashes by 1-2 inches each. Tape paper underneath to fill the gaps. This adds volume at the shoulder.
- For Cuff Puff: Spread the bottom edges of the slashes by 1-2 inches each. Tape paper underneath. This adds volume at the cuff.
- Redraw the sleeve cap and cuff lines smoothly.
- Cuff:
- Elastic Casing: If using elastic, add 1 inch to the sleeve bottom length for a casing.
- Cuff Band: If using a band, create a rectangle pattern piece:
(Finished Sleeve Opening + 1 inch for overlap) x (Desired Cuff Height x 2 + 1 inch seam allowance).
Step 5: Total Fabric Calculation
Add up the total Cutting Height for your bodice pieces and all your tiers. Account for the number of widths you’ll need. Always round up when buying fabric!
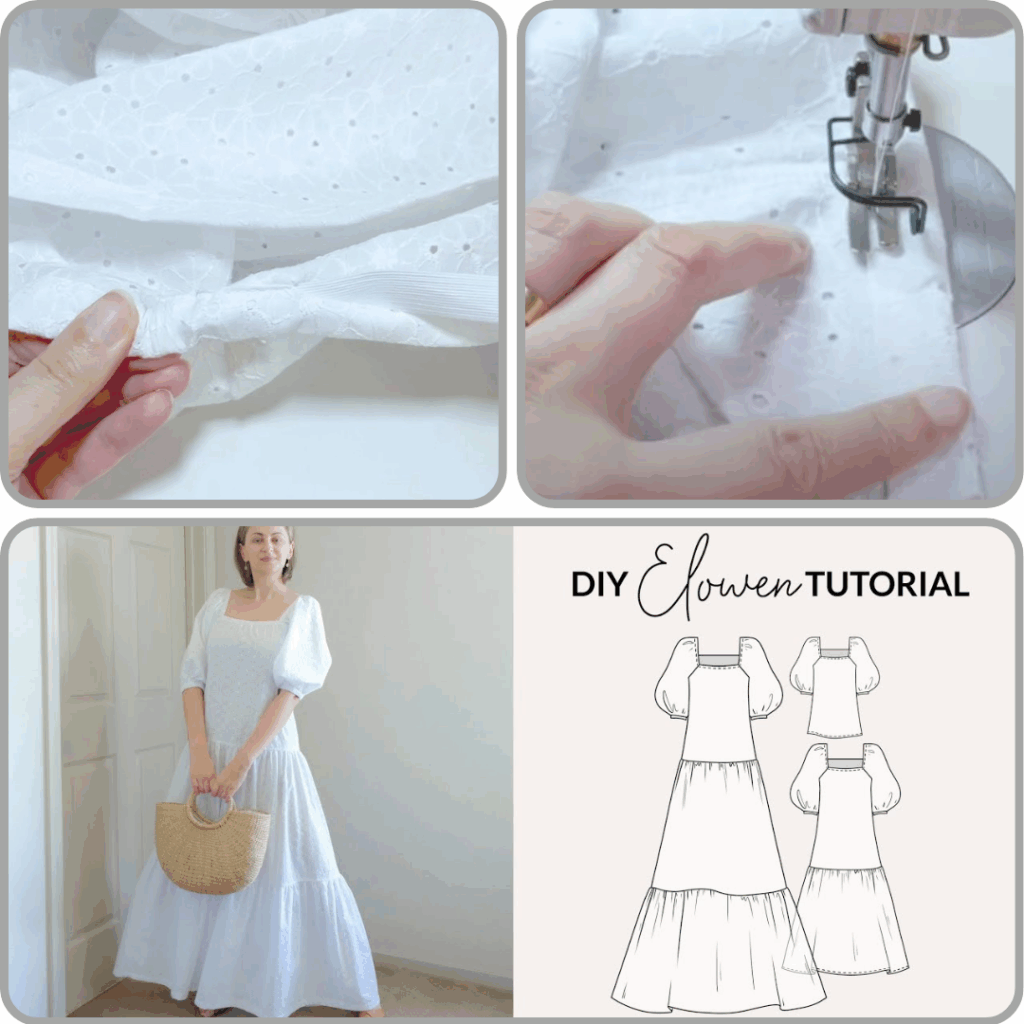
Step-by-Step Sewing Tutorial:
Phase 1: Preparation
- Pre-wash & Press Fabric: This is crucial to prevent shrinkage and ease cutting.
- Cut All Fabric Pieces: Carefully cut your calculated rectangles for tiers, bodice pieces, sleeve pieces, and facings.
- Join Skirt Panels (if necessary): For Tiers 1, 2, and 3, you’ll likely have multiple panels. With right sides together (RST), sew these panels along their short edges using a 1/2″ (1.25 cm) seam allowance. Press seams open and finish edges (zigzag or serge) to prevent fraying. You will now have one long rectangle for each tier.
- Transfer Markings & Apply Interfacing: Transfer all pattern markings. Fuse interfacing to your bodice facing pieces and cuff band pieces.
Phase 2: Bodice Construction
- Sew Shoulder Seams: With RST, sew front bodice pieces to the back bodice piece at the shoulder seams. Press seams open.
- Prepare and Attach Neckline & Armhole Facings (or Bias Binding):
- Sew shoulder seams of your facing pieces. Press seams open.
- Pin the facing (RST) to the neckline and armhole raw edges of the bodice. Stitch.
- Trim seam allowances, clip curves, and grade seams to reduce bulk.
- Understitch: Stitch from the right side of the facing, through the facing and the seam allowance close to the seam line. This helps the facing roll neatly to the inside.
- Press the facing neatly to the inside. Lightly tack facings to shoulder seams to keep them in place.
- Sew Bodice Side Seams: With RST, sew the front and back bodice pieces together at the side seams. Press seams open.
Phase 3: Puff Sleeve Construction
- Sew Sleeve Underarm Seams: With RST, fold each sleeve piece in half lengthwise. Sew the underarm seam. Press seams open.
- Run Gathering Stitches (Sleeve Head): Set your machine to a long stitch length (e.g., 4.0-5.0). Stitch two rows of gathering stitches along the top curved edge of each sleeve cap (within the seam allowance). Do NOT backstitch. Leave long thread tails.
- Prepare Cuff (Elastic Casing or Cuff Band):
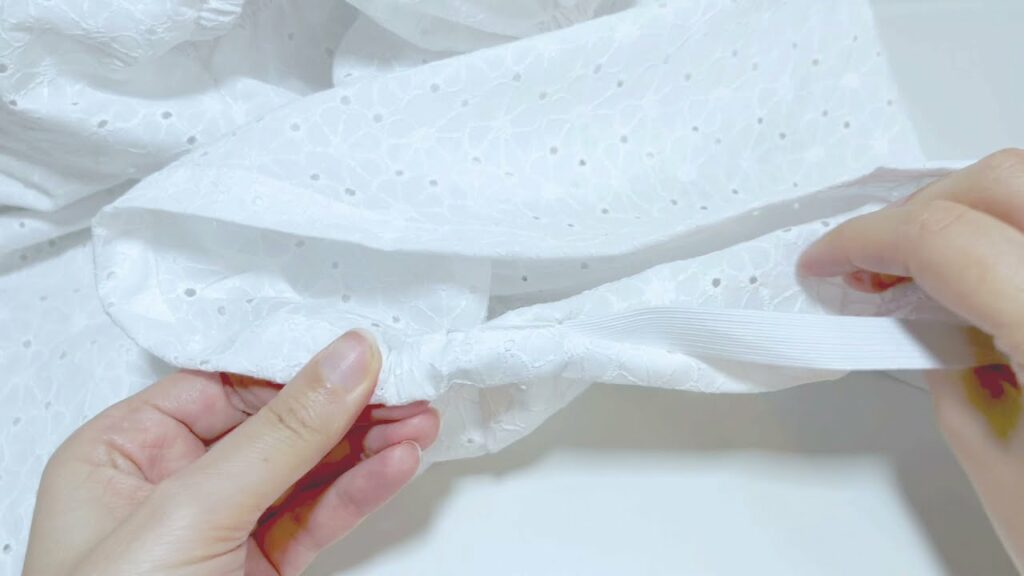
- Elastic Casing: Press the bottom raw edge of the sleeve up by 1/4″, then press up again by 1/2″ (or your elastic width + 1/4″). Stitch, leaving a 1-inch opening. Thread elastic through, overlap ends by 1″, stitch securely, then close opening.
- Cuff Band: Sew cuff band pieces into loops (RST). Attach one edge of the loop to the gathered sleeve bottom (RST). Stitch. Finish the cuff band by folding over and stitching the other edge.
Phase 4: Attach Sleeves to Bodice
- Gather Sleeve Head: Gently pull the bobbin threads of your gathering stitches until the sleeve cap circumference matches the armhole opening on the bodice. Distribute gathers evenly.
- Pin & Sew: With RST, pin the sleeve into the armhole, matching notches (center top of sleeve to shoulder seam). Ease the gathers carefully.
- Stitch the sleeve into the armhole using a 1/2″ seam allowance.
- Press the seam allowance towards the sleeve. Finish raw edges.

Phase 5: Assemble Tiered Skirt
- Run Gathering Stitches: For each lower tier (Tier 2, Tier 3, etc.), run two rows of gathering stitches along its top raw edge, just as you did for the sleeve head.
- Attach Tier 1 to Bodice:
- Gather the top edge of Tier 1 (if you added gathering there; otherwise it’s flat).
- With RST, pin the top of Tier 1 to the bottom of the bodice, matching side seams.
- Stitch using a 1/2″ seam allowance. Press seam allowance up towards the bodice. Finish raw edges.
- Attach Tier 2 to Tier 1:
- Gather the top edge of Tier 2 until its circumference matches the bottom circumference of Tier 1. Distribute gathers evenly.
- With RST, pin Tier 2 to the bottom edge of Tier 1, matching side seams.
- Stitch using a 1/2″ seam allowance. Press seam allowance up towards Tier 1. Finish raw edges.
- Attach Tier 3 to Tier 2 (and subsequent tiers): Repeat the process from step 3 for any remaining tiers.
Phase 6: Final Finishes
- Hem the Bottom Tier: Press the bottom raw edge of your final tier up by 1/4″ (0.6 cm), then press up again by 3/4″ – 1″ (1.9 – 2.5 cm) for a clean, sturdy hem. Stitch the hem in place, sewing close to the inner folded edge.
- Final Press: Give your entire dress a thorough final press. This will make all the seams crisp and help the gathers and tiers lay beautifully.
- Trim Threads: Snip any remaining loose threads.
Video Tutorial :
Tips for Success:
- Muslin/Toile the Bodice: For a custom fit, especially if you’re new to drafting, sewing a quick test bodice in inexpensive fabric (muslin or old bedsheet) is highly recommended.
- Pressing is Your Best Friend: Press every seam as you sew it. This creates crisp edges and a professional finish.
- Even Gathers: Use two rows of gathering stitches. Pull both bobbin threads simultaneously, then use your fingers to gently slide and distribute the fabric evenly along the stitch line.
- Seam Finishes: Finishing your raw edges (with a zigzag stitch on a regular machine or a serger) is crucial for durability, especially with fabrics prone to fraying.
- Needle Choice: Use a fresh universal needle appropriate for your fabric weight. If your fabric is very fine or slippery, a microtex needle can be helpful.
- Take Your Time: Don’t rush through the gathering or attaching steps. Patience leads to beautiful results.
Crafting your own tiered puff sleeve dress is a truly rewarding experience. You’ll not only gain valuable sewing skills but also create a custom-fit, stylish, and comfortable garment that is uniquely yours. Enjoy the process of bringing your vision to life!