 by
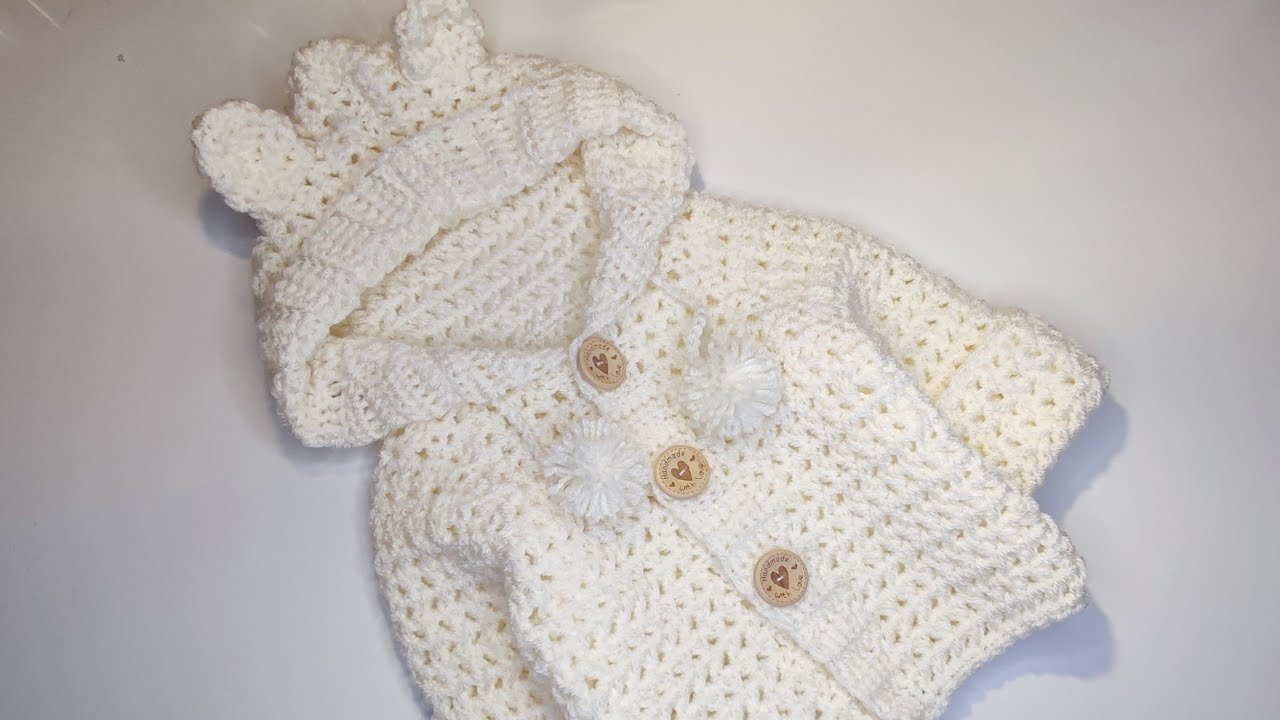
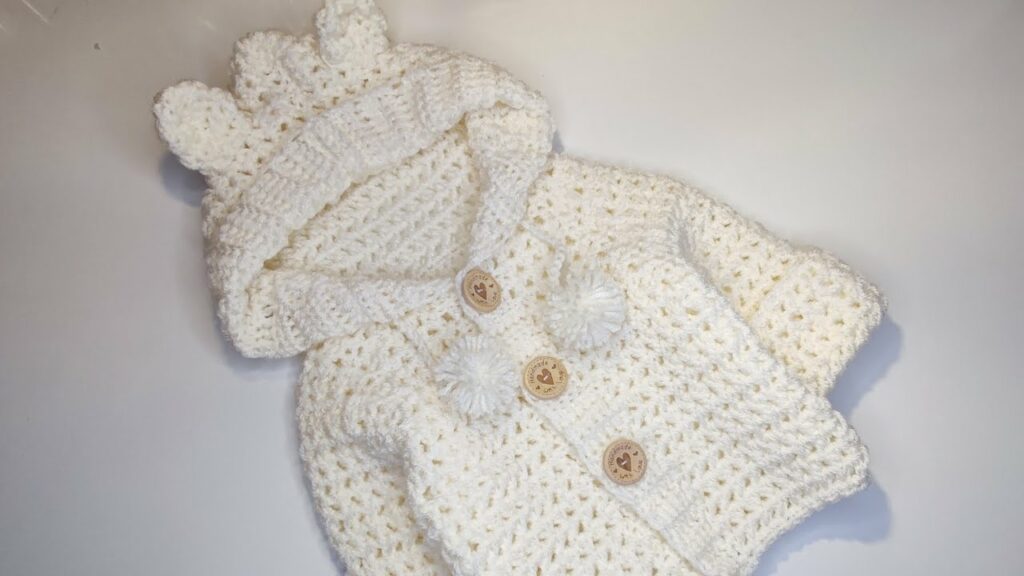
by Imagine wrapping a little one in a hooded garment so soft and sweet, it’s almost as if they’re snuggled in a bear hug. The “Cuddle Bear” baby hoodie is just that – a perfect blend of cozy warmth and undeniable cuteness, featuring playful bear ears that bring an instant smile. This project is a beloved choice for crafters wanting to create something truly special, practical, and utterly adorable for a baby.
This detailed guide will walk you through the essential steps and considerations for crocheting your very own “Cuddle Bear” baby hoodie, transforming yarn into a beloved keepsake.
What Makes the “Cuddle Bear” Hoodie Special?
The “Cuddle Bear” hoodie stands out with its charming combination of:
- Irresistible Cuteness: The hallmark feature is, of course, the pair of soft, rounded bear ears perched atop the hood, instantly transforming any baby into the sweetest little bear cub.
- Ultimate Coziness: A warm, snugly hood protects little heads from chilly drafts, while the overall garment provides comfortable layering.
- Practicality: Hoodies are versatile, easy to slip on, and provide consistent warmth for active babies. Many designs are also naturally gender-neutral.
- Handmade Charm: Each “Cuddle Bear” hoodie is unique, infused with the care and love of the maker, making it a treasured gift or family heirloom.
Why Crochet a “Cuddle Bear” Baby Hoodie?
- Maximum Adorability: Perfect for photoshoots, everyday wear, or just melting hearts.
- Comfort & Warmth: Provides essential warmth, protecting baby’s head and body.
- Personalized Gift: Choose specific colors, yarn textures, and subtle details to create a custom present.
- Skill Building: Learn garment construction, hood shaping, ear creation, and secure attachment techniques.
- Cherished Keepsake: It’s an item likely to be remembered and perhaps even passed down.
Choosing Your Tools & Materials:
The right supplies are crucial for creating a soft, safe, and adorable “Cuddle Bear” hoodie.
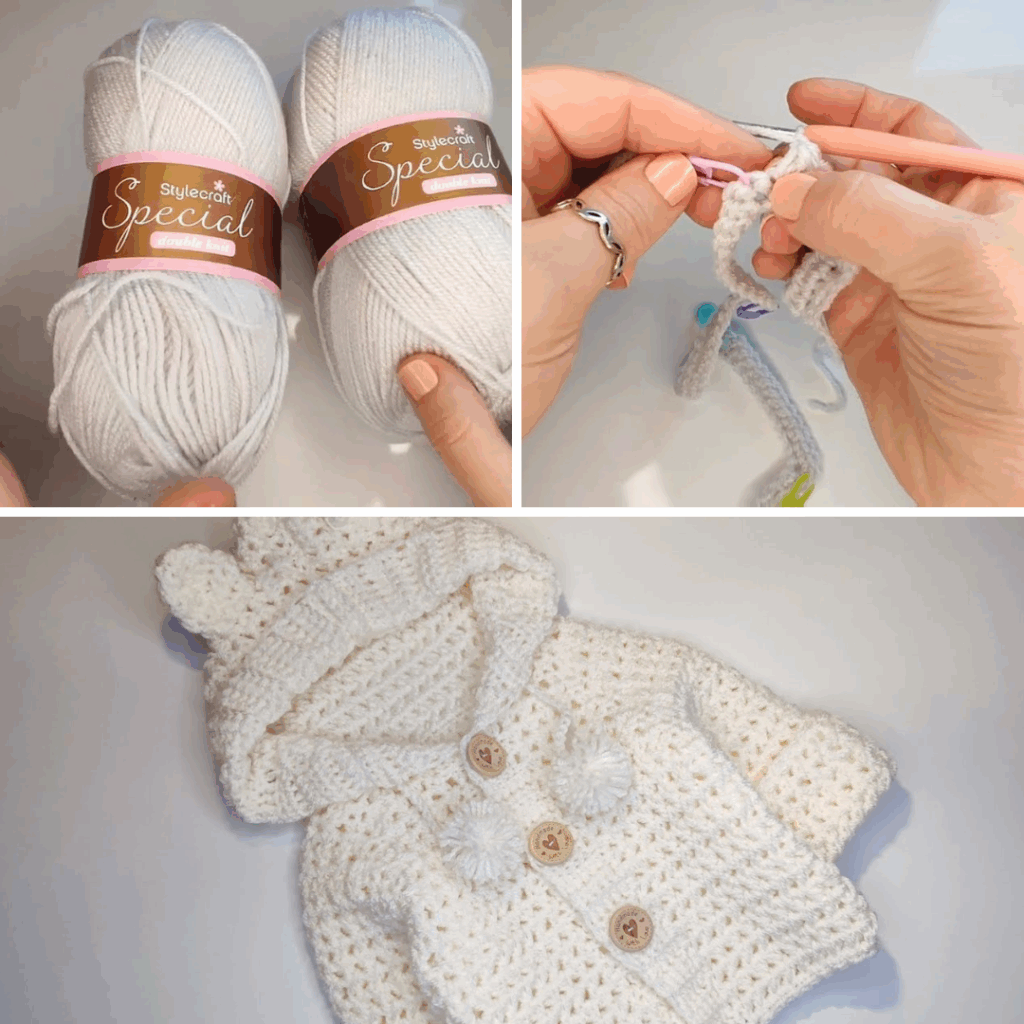
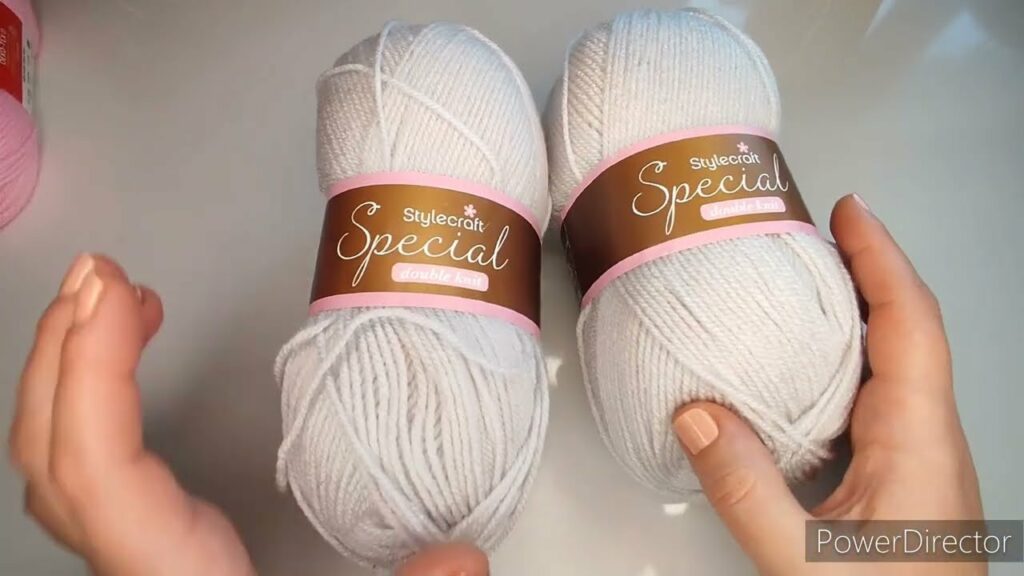
- Yarn: The Heart of the “Cuddle Bear”
- Fiber:
- Superwash Merino Wool: Excellent for warmth, breathability, and incredible softness. It’s also machine washable, which is vital for baby items.
- Baby-Specific Acrylic: Many modern acrylic yarns are incredibly soft, hypoallergenic, durable, and very easy to care for (often machine wash and dry). A fantastic, affordable choice.
- Chenille/Velvet Yarns: For an extra plush, fluffy “bear” feel. Be aware that these can be trickier to work with as stitches can be hard to see.
- Weight:
- DK (Double Knitting / Category 3): Great for a lighter, more flexible hoodie that’s still warm.
- Worsted (Aran / Category 4): Ideal for a cozier, warmer, and more substantial hoodie.
- Color Palette:
- Classic Bear Colors: Browns (light to dark), creams, greys, white, or even black for the main body.
- Accent Colors: Small amounts of contrasting yarn for the inner ears, or black/dark brown for embroidered facial features (eyes, nose).
- “Fantasy Bear” Colors: Don’t limit yourself! Pale pink, sky blue, mint green, or sunny yellow can create a uniquely charming “bear.”
- Quantity: Varies by size and yarn weight. For a 0-6 month hoodie, expect 300-500 yards; for 6-24 months, 500-800+ yards. Always check your chosen pattern’s specific recommendations.
- Fiber:
- Crochet Hook:
- Consult your chosen yarn label for a suggested hook size (e.g., 4.0mm, 4.5mm, 5.0mm, 5.5mm).
- Crucial for Garments: Your actual hook size will be determined by achieving the correct gauge for your pattern. Adjust as needed to ensure the hoodie fits properly and has the desired drape.
- Other Notions:
- Stitch Markers: Essential for marking the beginning of rounds, armholes, or shaping points.
- Tapestry Needle: For neatly weaving in all yarn ends and sewing pieces together.
- Scissors.
- Fiberfill (Polyester Stuffing): A small amount for lightly stuffing the bear ears (optional, but recommended for a plump look).
- Safety Eyes/Nose (Optional, with caution): Small plastic eyes/noses that snap into fabric. For very young babies, it is strongly recommended to EMBROIDER facial features with yarn instead, as safety eyes/noses can pose a choking hazard if they come loose.
- Sewing Needle & Thread: For attaching ears securely.
Understanding Sizing & Gauge (ABSOLUTELY CRITICAL for Garments!)
Accurate sizing is paramount for a comfortable and well-fitting hoodie. The fit of the hood itself is especially important.
General Baby Hoodie Sizing (Approximate Measurements):
| Size | Approx. Chest Circ. | Approx. Finished Body Length (Shoulder to Hem) | Approx. Sleeve Length (Underarm to Cuff) | Approx. Head Circumference |
|---|---|---|---|---|
| Newborn | 16-17 inches | 9-10 inches | 5-6 inches | 13-14 inches |
| 0-3 Months | 17-18 inches | 10-11 inches | 6-7 inches | 14-16 inches |
| 3-6 Months | 18-19 inches | 11-12 inches | 7-8 inches | 16-17 inches |
| 6-12 Months | 19-20 inches | 12-13 inches | 8-9 inches | 17-18 inches |
| 12-18 Months | 20-21 inches | 13-14 inches | 9-10 inches | 18-19 inches |
| 18-24 Months | 21-22 inches | 14-15 inches | 10-11 inches | 19-20 inches |
Export to Sheets
Disclaimer: These are general averages. Always refer to the specific pattern’s measurements and sizing chart.
How to Make a Gauge Swatch (Do NOT Skip This Step!):
- Chain: Chain about 25-30 stitches, plus any turning chains (e.g., ch 3 for dc) as per your chosen main stitch pattern.
- Work: Crochet a square of at least 6×6 inches (15×15 cm) in the main stitch pattern you’ll be using for the hoodie. A larger swatch provides a more accurate measurement.
- Wash & Block: Fasten off your swatch. Crucially, wash and block your swatch exactly as you plan to treat the finished hoodie. This step relaxes the fibers and reveals the true stitch size and drape after washing.
- Measure: Once dry, lay the swatch flat. Place a ruler over the center. Count how many stitches fit within 4 inches (10 cm) and how many rows fit within 4 inches (10 cm).
- Adjust:
- If you have more stitches per inch than your pattern (or desired gauge) states (your work is too tight), go up half a hook size and re-swatch.
- If you have fewer stitches per inch than your pattern states (your work is too loose), go down half a hook size and re-swatch.
- Repeat until your gauge precisely matches.
General Stitch Patterns for a Baby Hoodie:
- Main Body & Hood:
- Half Double Crochet (hdc): Creates a dense, warm fabric with good drape, perfect for a cozy hoodie.
- Double Crochet (dc): Works up quicker, creates a slightly softer drape.
- Single Crochet (sc): Good for a very dense, sturdy fabric, or for neat edging.
- Ribbing (for cuffs and hem):
- Front Post/Back Post Double Crochet (fpdc/bpdc): Creates a strong, elastic, and professional-looking ribbed edge.
- Single Crochet in Back Loop Only (sc blo): A simpler, stretchy ribbing option.
- Ears: Typically worked in sc or hdc, either in the round to form a cup shape or flat then sewn.
Step-by-Step Construction: The “Cuddle Bear” Baby Hoodie
This outline describes a common construction method where the body is worked first, then the hood is added. This is a general guide to the methodology; for precise stitch counts, specific increase/decrease rates for different sizes, and unique design details, you MUST use a detailed crochet pattern.
Phase 1: The Body (Bottom-Up, Flat for Seaming or In the Round for Seamless)
Most baby hoodies are worked with a ribbed band at the bottom, then the main body.
- Start with Ribbing:
- Chain the required number of stitches for the bottom band’s height (e.g., 5-7 chains).
- Work in rows of single crochet in the back loop only (sc blo) to create a stretchy, ribbed band. The length of this band will be the circumference of your hoodie’s hem.
- Sl st the ends of the ribbing together to form a loop, or leave flat if planning to seam later.
- Body Section:
- If working flat (for seamed hoodie):
- Attach yarn to the long edge of the ribbing. Work rows of your main stitch (e.g., hdc or dc) to create a separate Back panel and two Front panels.
- Shape armholes by decreasing stitches at the beginning and end of rows at armhole height.
- Shape neckline and shoulders as specified by your pattern.
- If working in the round (for seamless body):
- Attach yarn to the long edge of the ribbing. Work in continuous rounds of your main stitch up to the armhole height.
- At the armhole height, split your work for the front and back panels, and work each section flat, shaping armholes and necklines as per your pattern.
- If working flat (for seamed hoodie):
Phase 2: The Sleeves (Make 2)
Sleeves can be worked in the round or flat, then sewn.
- Start with Ribbing:
- Chain for the cuff height, then work rows of sc blo ribbing. The length of this band will be the circumference of your cuff. Sl st ends together to form a loop.
- Sleeve Section:
- Attach yarn to the long edge of the cuff ribbing. Work in rounds (for seamless sleeve) or rows (for seamed sleeve) using your main stitch.
- Gradually increase stitches evenly spaced over several rounds/rows to accommodate the arm circumference, ensuring the sleeve widens appropriately.
- If seaming, shape the sleeve cap by decreasing stitches at the top to fit into the armhole.
- Alternative (Top-Down Sleeves): If your body was worked top-down, you would attach yarn directly to the armhole opening and work downwards, decreasing stitches for tapering, then add the cuff.
Phase 3: Assembling the Main Garment (If pieces are separate)
If you worked the body and sleeves in separate pieces, now it’s time to join them.
- Seam Shoulder Seams: Use a tapestry needle to stitch the shoulder seams together neatly (e.g., mattress stitch for an invisible seam).
- Seam Side Seams: If the body was worked flat, seam the side edges of the front and back panels together.
- Seam Sleeve Seams: If sleeves were worked flat, seam their long edges.
- Attach Sleeves: Carefully sew the sleeves into the armholes, ensuring a smooth, comfortable fit.
Phase 4: The Hood
The hood is usually worked separately and then attached to the neckline.
- Foundation: Pick up stitches evenly around the entire neckline opening of your assembled hoodie body. Join to form a row.
- Hood Body: Work in rows (or rounds, then flatten) using your main stitch. Your pattern will guide you on increasing stitches at the front edge (often at the beginning/end of rows) to create the curve and fullness of the hood.
- Hood Top Seam: Once the hood reaches the desired depth for the top of the head, fold the hood in half (right sides together). Use slip stitches or a tapestry needle to neatly seam the top edge together.
- Hood Edging: Add a neat finishing edge around the entire front opening of the hood. This can be a few rows of sc, hdc, or sc blo ribbing.
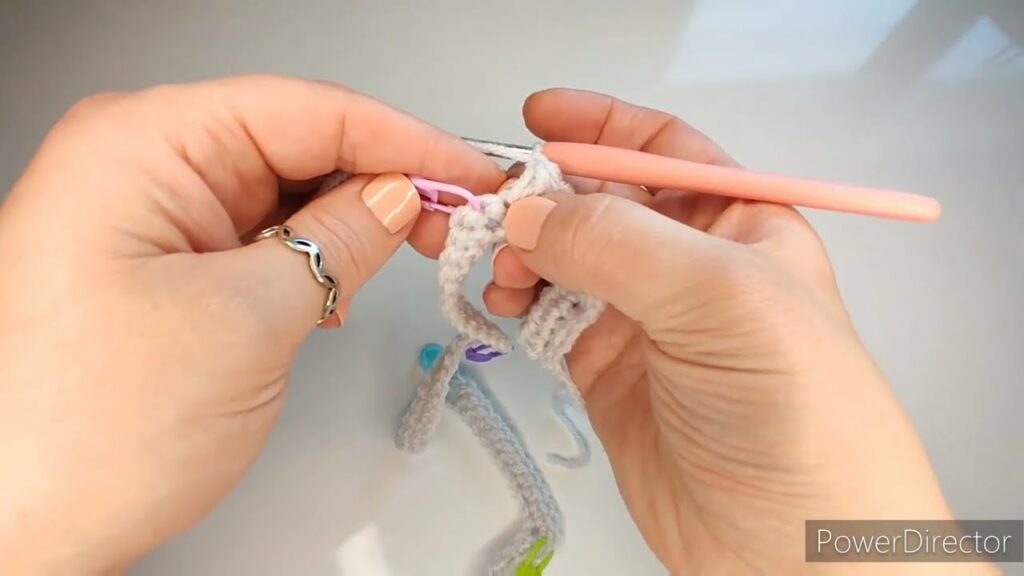
Phase 5: The “Cuddle Bear” Ears (Make 2)
These are the star of the show!
- Crochet Ear Shapes: Crochet two identical ear shapes. Most patterns use either:
- Simple Flat Circles/Ovals: Work in rounds, then pinch and fold the bottom edge slightly to give them shape.
- Cupped Shapes: Work in rounds to create a small “cup” or bowl shape that naturally resembles an ear.
- Inner Ear (Optional): If your design includes a contrasting inner ear, crochet a smaller flat circle or oval in a lighter color and sew it onto the center of the larger outer ear.
- Stuffing (Optional): Lightly stuff the ears with fiberfill (polyester stuffing) for a plump, stand-up look. Don’t overstuff; keep them soft and pliable.
- Shape: Pinch and flatten the bottom edge of each ear to create a base for attaching to the hood.
Phase 6: Attaching the Ears & Finishing Touches
This is where your “Cuddle Bear” comes to life!
- Ear Placement: This step is crucial for the “bear” look.
- Place the hoodie on a flat surface, with the hood laid out smoothly.
- Position the ears symmetrically on top of the hood. A common placement is slightly forward from the main top seam of the hood, over the forehead area. Play around with the exact spot until you like the look. Use stitch markers to hold them in place.
- Secure Attachment: Using your tapestry needle and matching yarn, firmly sew each ear onto the hood. Stitch all around the base of the ear, going through both layers of the ear and into the hood fabric, ensuring it’s very secure. Weave in all yarn tails from the ears into the hood fabric meticulously.
- Optional Face Details (Embroidery):
- For very young babies, always embroider facial features with yarn. Use black yarn to stitch small simple eyes (French knots or a few straight stitches) and a triangular or oval nose.
- Avoid safety eyes/noses for babies who might put things in their mouth, as they can be a choking hazard if they detach.
- Weave in All Remaining Ends: Go back over your entire hoodie and ensure every single yarn tail is neatly woven in and secured.
- Blocking (ABSOLUTELY CRUCIAL for Garments!):
- Gentle Wash: Gently hand wash the finished hoodie (or machine wash on a delicate cycle if your yarn allows) in cool water with a mild, baby-safe detergent.
- Remove Excess Water: Gently squeeze out excess water (do not wring or twist). Roll the hoodie in a clean, dry towel and press firmly to absorb moisture.
- Shape & Dry: Lay the hoodie flat on blocking mats. Gently stretch and shape it to the correct finished dimensions (chest, length, sleeve length, and especially the hood). Smooth out any unevenness. Carefully shape the ears to stand up or cup as desired. Use rust-proof T-pins to hold the shape firmly.
- Air Dry Completely: Allow the hoodie to air dry completely. Blocking softens the fabric, evens out stitches, enhances drape, and gives your “Cuddle Bear” hoodie a beautifully polished, professional appearance.
Tips for “Cuddle Bear” Hoodie Success:

- Yarn is KEY: Choose the softest, most comfortable, and non-irritating yarn you can find.
- Gauge Precision: Ensures a good fit for the baby’s body and a well-fitting, comfortable hood.
- Seamless vs. Seamed: Consider your skill level. Seamless (worked mostly in the round) often creates a more comfortable garment but can be trickier to shape. Seamed construction gives crisp lines but means more sewing.
- Ear Positioning: Take your time with ear placement. Pin them on, look from different angles, and adjust until they’re perfect.
- Safety First: For any baby item, avoid small, detachable parts. Embroider facial features.
- Comfort: Ensure all openings (neck, cuffs, hem) are stretchy enough to be comfortable and not too tight.
Care Instructions for Your Handmade Hoodie:
- Always follow your yarn label’s specific care instructions.
- Reshape and Lay Flat to Dry: Always gently reshape the hoodie while wet and lay it flat on a clean towel or drying rack to air dry completely. Do not hang, as this can stretch the fabric and distort its shape.
video tutorial ;
Creating a “Cuddle Bear” baby hoodie is a truly delightful experience. With every stitch, you’re crafting a garment that not only provides warmth and comfort but also brings an abundance of sweetness and joy. Prepare for endless “awws” when your little one dons their handmade bear attire! Happy hooking!
video tutorial part2