 by
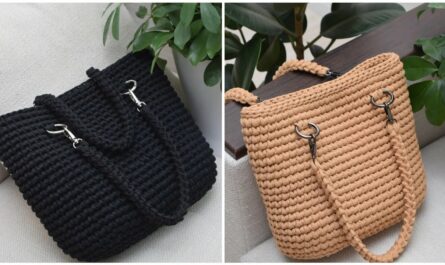
by In the bustling rhythm of modern life, the crossbody bag has cemented its place as an indispensable accessory. Its hands-free convenience, secure carrying, and effortless style make it a go-to for daily errands, adventurous travels, or leisurely strolls. For the crochet enthusiast, this practical silhouette offers a magnificent canvas to explore advanced techniques, moving beyond simple pouches to create structured, functional pieces that sing with handmade charm. The secret lies in mastering “short stitch creativity” and embracing “practical three-dimensional shaping.”
This article delves into how these two core principles converge to transform yarn into a durable, aesthetically pleasing, and utterly useful crochet crossbody bag.
The Crossbody Bag: A Modern Everyday Essential
The popularity of the crossbody bag is no mystery. It’s the ultimate expression of functionality meeting fashion:
- Unrivaled Convenience: By distributing weight evenly across the body, a crossbody bag frees your hands completely, allowing you to juggle coffee, navigate maps, or simply explore without hindrance.
- Enhanced Security: Keeping your belongings securely against your body deters pickpockets, offering peace of mind, especially when traveling or in crowded areas.
- Versatile Style: From minimalist chic to bohemian flair, a crossbody can adapt to almost any aesthetic. Its distinct silhouette ensures it’s always a statement piece.
- The Crochet Advantage: A handmade crochet crossbody bag stands out from mass-produced alternatives. Its unique texture, customizability, and inherent connection to the slow fashion movement give it unparalleled character and warmth.
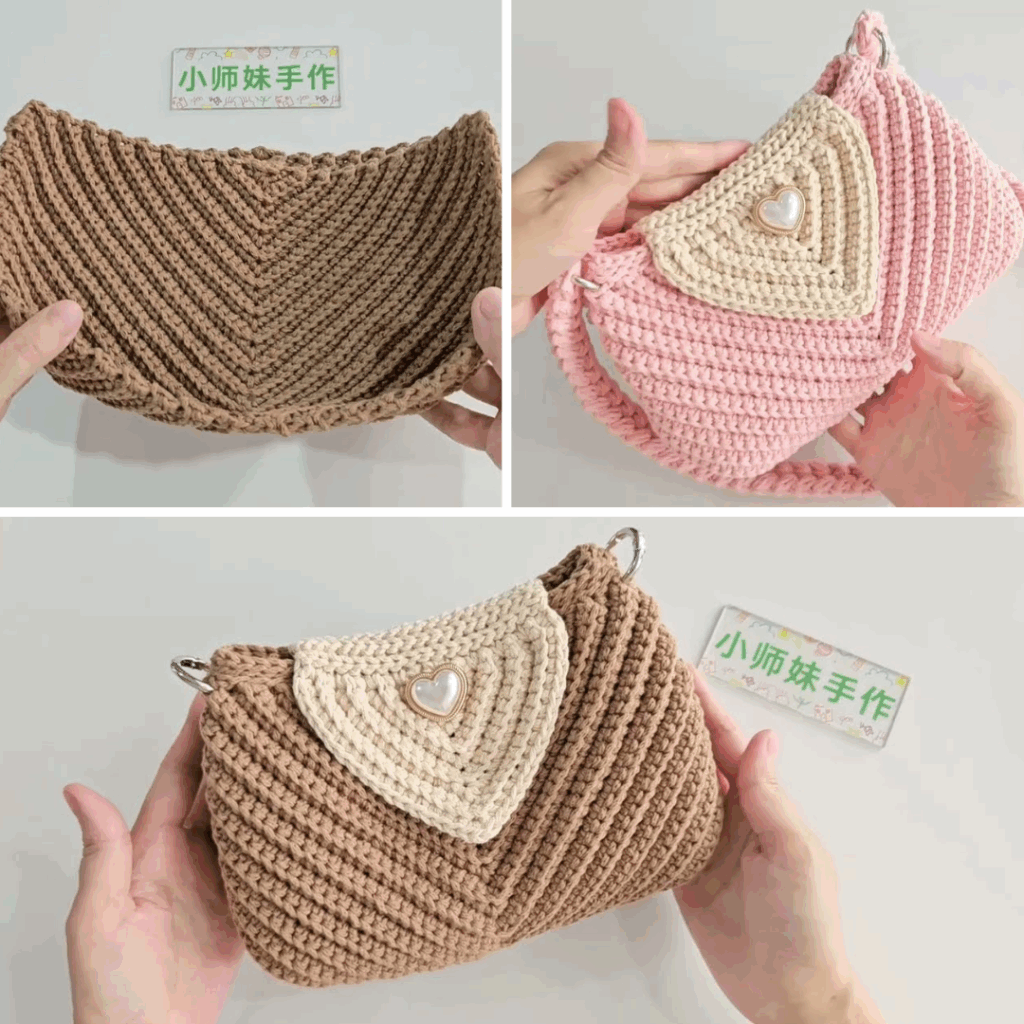
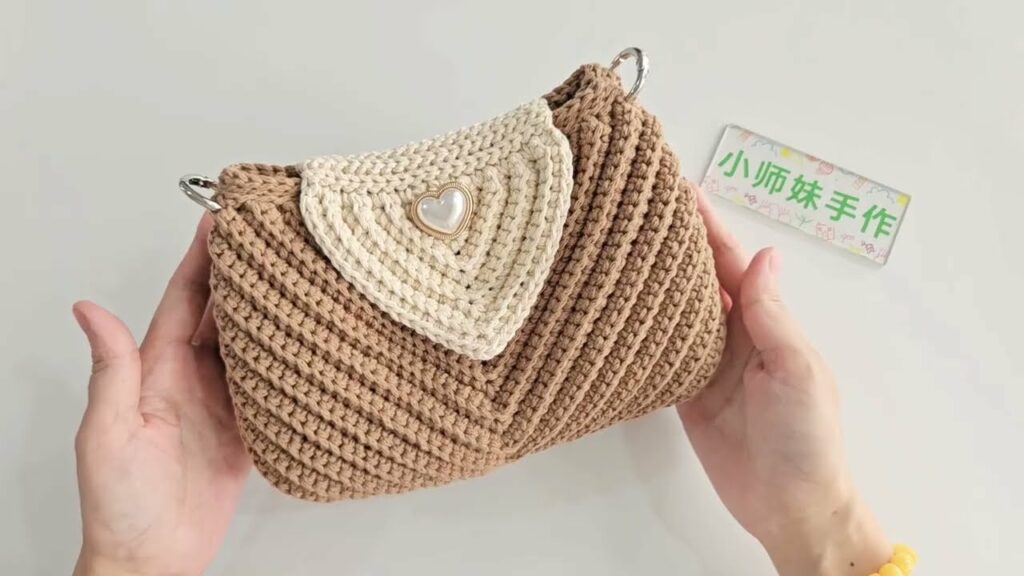
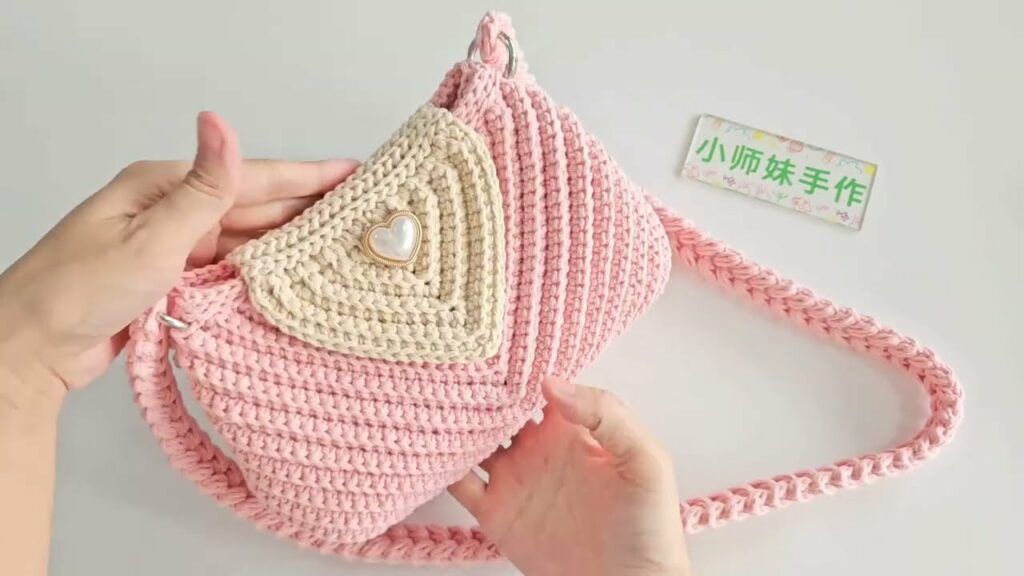
“Short Stitch Creativity”: Building Durability and Detail
When crafting a bag that needs to hold its shape and contents securely, the choice of stitch is paramount. This is where “short stitches” come into play.
- What are “Short Stitches”? These are the compact, low-height stitches of crochet, primarily:
- Single Crochet (SC): The shortest and densest basic stitch.
- Half Double Crochet (HDC): Slightly taller than SC, but still very compact.
- Variations: This includes working into specific loops (e.g., SC in the Back Loop Only for subtle ribbing), or more advanced techniques like the Waistcoat Stitch (Center Single Crochet), which creates a fabric resembling knitting.
- Why Short Stitches for Bags?
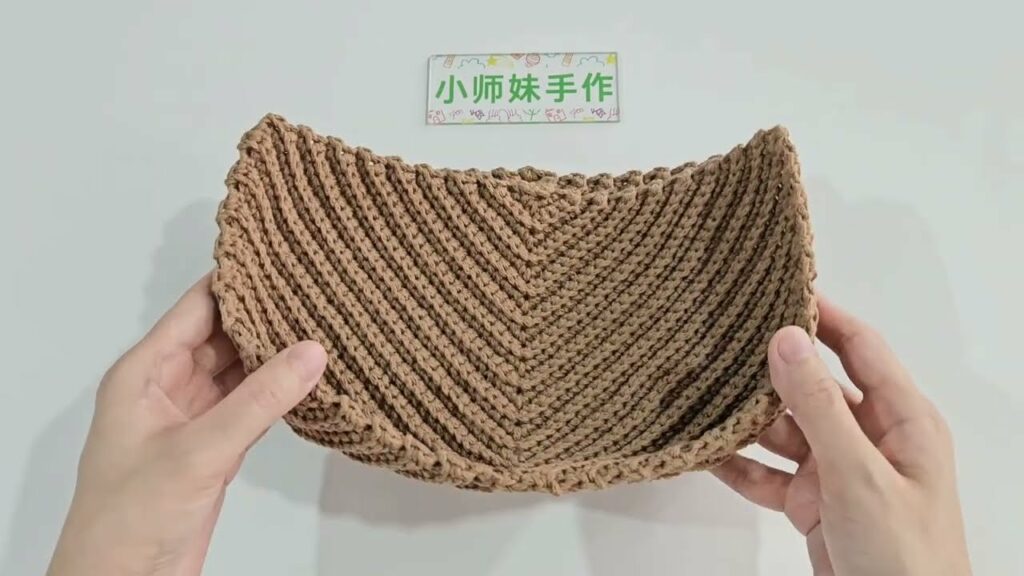
- Density & Durability: Short stitches pack tightly together, creating a thick, firm fabric. This dense construction is crucial for a bag, preventing stretching, sagging, and protecting its contents. It also provides excellent wind resistance, though less critical for a bag, it speaks to the fabric’s integrity.
- Structural Integrity: The compact nature of these stitches contributes directly to the bag’s ability to maintain its shape, allowing it to stand on its own or hold its form even when full.
- Fine Detail & Texture: The smaller stitch size allows for incredible “creativity” in patterning. You can achieve intricate textures like mock cables, subtle basketweave effects, or precise geometric designs without the bulk that taller stitches might create. They are also perfect for tapestry crochet, where sharp, detailed colorwork is desired.
- Minimal Gaps: The tight fabric ensures that small items like pens or coins won’t slip through the stitches.
- Creative Application Examples:
- Employing the moss stitch (or linen stitch) for a dense, woven-like texture.
- Using SC worked into the third loop for a subtle knit-like ridge.
- Incorporating tapestry crochet with SC or HDC to create sharp, vibrant patterns or images on the bag’s surface.
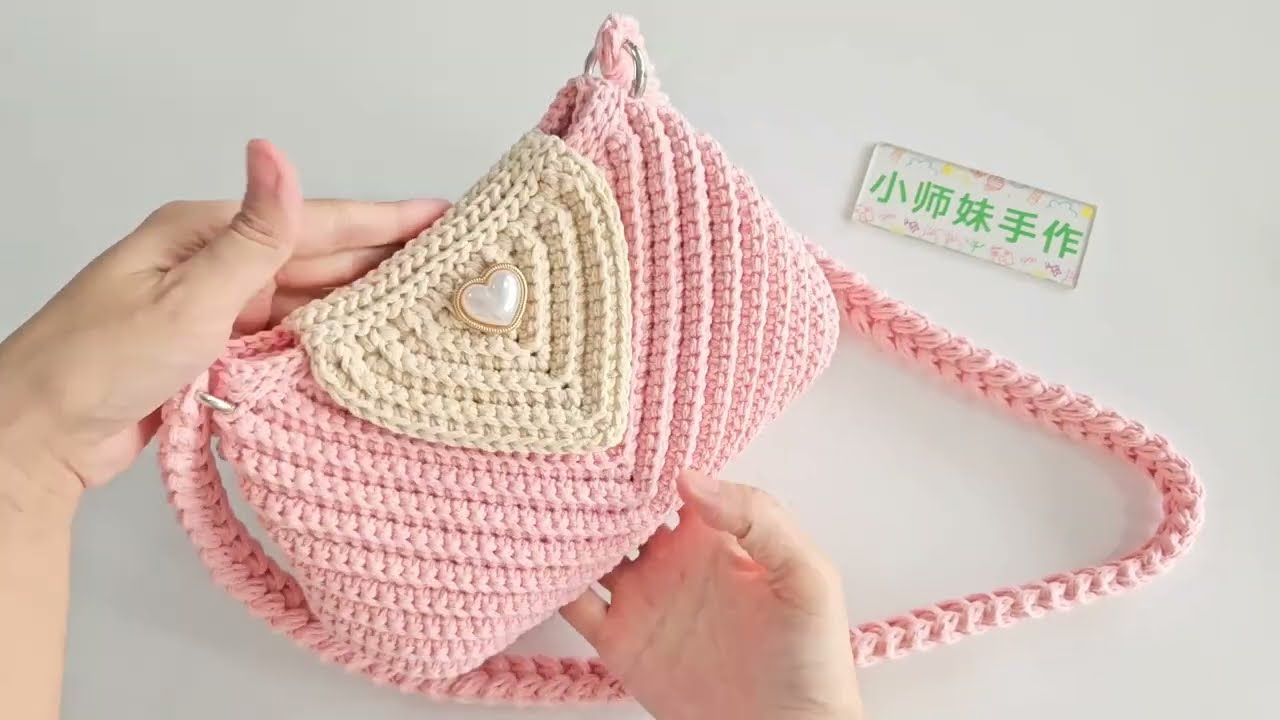
“Practical Three-Dimensional Shaping”: Form Meets Function
A truly practical bag isn’t just a flat pouch; it has volume and form. This “three-dimensional shaping” is what gives a crossbody bag its functional capacity and polished appearance.
- Beyond the Flat Pouch: The ability to hold its shape, accommodate bulkier items, and sit neatly against the body comes from intentional shaping during the crocheting process.
- Key Shaping Techniques in Crochet:
- The Base (Foundation of Shape): This is arguably the most critical element for a structured bag.
- Oval Base: Achieved by working in continuous rounds around a starting chain, creating a sturdy, flat bottom.
- Rectangular Base: Similar to an oval, but with sharper corners, often preferred for more boxy designs.
- Importance: A solid, well-shaped base prevents the bag from sagging in the middle and provides a clear foundation for its contents.
- Gussets/Sides: These create the depth of the bag.
- Integrated Sides: Often, you’ll work upwards in continuous rounds directly from the finished base, allowing the sides to naturally form.
- Separate Side Panels: For very crisp, defined corners, distinct side panels (gussets) can be crocheted separately and then meticulously seamed to the front and back main panels.
- Increases & Decreases: Strategically placed increases (for widening sections, like the base) and decreases (for tapering or shaping curves, like at the top or bottom of a curved design) are fundamental for creating complex forms.
- Stiffening (Optional but Recommended): For maximum structure, especially for larger bags, consider integrating plastic canvas, a fabric stiffener, or even a layer of dense crochet at the base and sides.
- The Base (Foundation of Shape): This is arguably the most critical element for a structured bag.
Materials & Tools for Your Crossbody Masterpiece
The right materials are essential for durability and to allow your short stitches and shaping to shine:
- Yarn:
- Fiber: Cotton (for its sturdiness, stitch definition, and minimal stretch), durable acrylics, T-shirt yarn (for very structured, chunky bags), or even macrame cord/raffia for summer styles. Avoid overly stretchy or fuzzy yarns.
- Weight: Worsted (Category 4) or Bulky (Category 5) are excellent for sturdy bags. DK (Category 3) can work for smaller, denser bags if the stitch choice is very tight.
- Colors: A single color for a minimalist look, contrasting colors for color blocking, or multiple colors for intricate tapestry crochet.
- Crochet Hook: Select a hook size appropriate for your chosen yarn, potentially one size smaller than recommended to ensure maximum stitch density.
- Notions:
- Stitch Markers: Invaluable for keeping track of rounds, increases/decreases, and panel alignment.
- Tapestry Needle: For weaving in ends and meticulously seaming panels.
- Scissors.
- Measuring Tape: For checking gauge and dimensions.
- Closure: A zipper (highly recommended for security), magnetic snap, turn lock, or a simple button and loop.
- Strap Hardware: D-rings, swivel clasps, or buckle adjusters if you plan for a detachable or adjustable strap.
- Optional: Lining fabric, bag stiffeners, bag feet.
Crafting Your Crossbody Bag: Key Construction Steps
- Phase 1: The Foundation (Base): Begin by crocheting a flat, sturdy base (oval or rectangular) using tight, even short stitches. This sets the stage for the bag’s overall shape.
- Phase 2: Building the Body:
- Work upwards from the base, often starting with a round worked into the back loop only (BLO) to create a defined edge where the base transitions to the sides.
- This is where your “short stitch creativity” comes alive – execute your chosen stitch pattern, texture, or colorwork in continuous rounds or by constructing separate front and back panels.
- Phase 3: Shaping and Assembly:
- If working in rounds for integrated shaping, carefully place increases or decreases to create the desired bag silhouette.
- If constructing with separate panels (front, back, and side gussets), meticulously seam them together using a strong, invisible seaming method (like mattress stitch) to ensure clean lines and defined corners.
- Phase 4: The Crossbody Strap:
- Length: Crucial for comfortable wear. For an adult, aim for a strap length (from end to end) of approximately 45-55 inches (114-140 cm), adjusting based on desired hang and body height.
- Construction: Crochet a dense strap using short stitches (e.g., a solid SC strip, a sturdy braid, or a textured pattern), or opt for a store-bought leather or chain strap for a mixed-media look.
- Attachment: Securely sew the strap ends to the bag, or attach with hardware like D-rings and swivel clasps for a detachable option.
- Phase 5: Finishing Touches:
- Closure Installation: Neatly sew in your chosen closure (a zipper provides the best security for a travel-friendly crossbody).
- Lining (Highly Recommended): This is essential for elevating the bag’s practicality and finish. Measure, cut, and sew a complementary fabric lining. Hand-stitch it securely into the interior of your crocheted bag. This prevents stretching, protects contents, and provides a polished look.
- Weave in All Ends: Meticulously weave in every single yarn tail for a truly professional, durable finish.
- Blocking (Optional): Light blocking can help even out stitches and set the bag’s final shape, especially if you’ve worked with cotton or natural fibers.
Styling Your Crochet Crossbody Bag
Your handmade crochet crossbody bag is incredibly versatile:
- Everyday Chic: Perfect for errands, work commutes, or casual outings.
- Travel Essential: Ideal for hands-free sightseeing, keeping passports and phones secure.
- Personal Statement: Its unique texture and thoughtful shaping make it a standout accessory that reflects your individual style and crafting prowess.
Video Tutorial;
The crochet crossbody bag, when approached with short stitch creativity and a focus on practical three-dimensional shaping, transforms from a simple craft project into a durable, functional, and deeply satisfying accessory. It’s a testament to how meticulous technique can yield not just beauty, but true utility, making it a staple in any modern wardrobe. Sources
Generate Audio Overview