 by
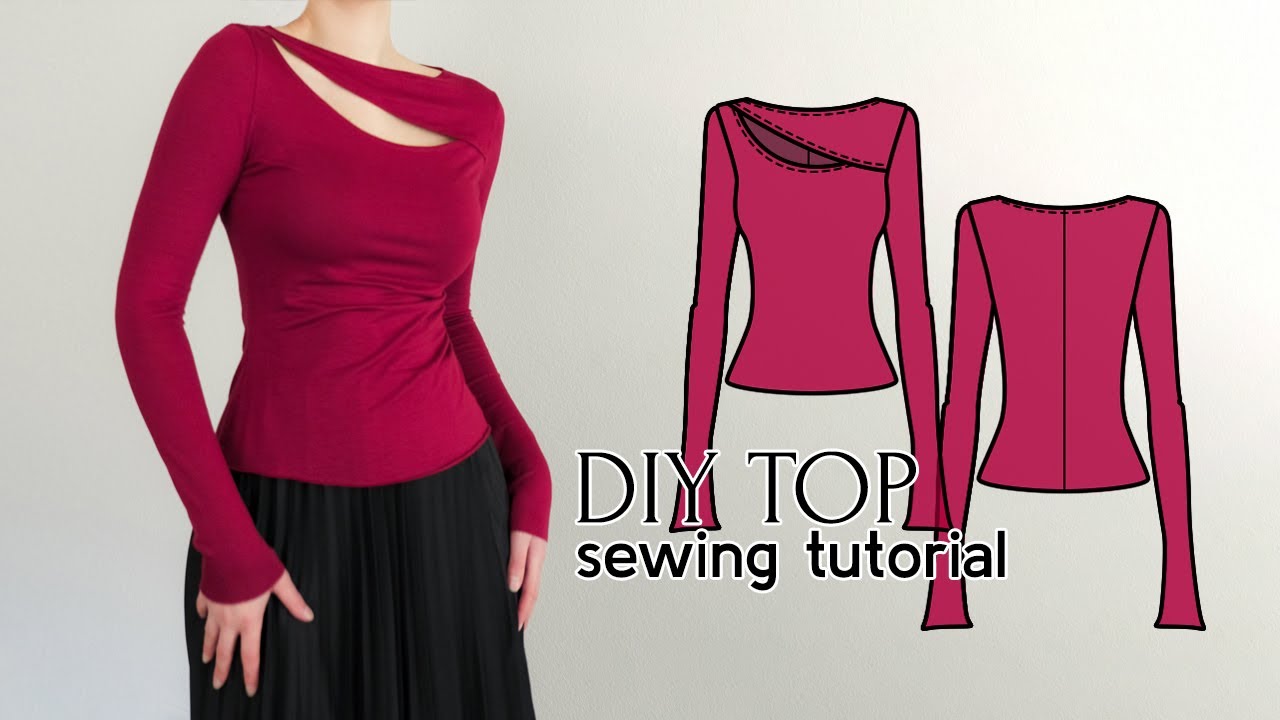
by The cut-out illusion top has captured the fashion world, offering a clever way to integrate subtle sensuality into everyday wear or evening attire. By strategically placing sheer or mesh fabric, it creates the intriguing appearance of skin peeking through, without being overly revealing. This sophisticated trend is perfect for expressing individuality, and making your own allows for unparalleled customization – from the shape of the cut-out to the transparency of the illusion fabric.
This guide will walk you through designing your own basic pattern and sewing a unique and fashion-forward cut-out illusion top, empowering you to create a piece that perfectly matches your vision and flatters your figure.
Why Sew Your Own DIY Cut-Out Illusion Top?
- Ultimate Customization: Design the exact shape, size, and placement of your cut-out. Choose your preferred sheer fabric for varying levels of illusion.
- Perfect Fit: Tailor the top to your unique body measurements, ensuring comfort and a flattering silhouette.
- Fabric Freedom: Select the main fabric that suits your style and the occasion, whether it’s a cozy knit or a luxurious woven.
- Trend-Forward: Stay current with contemporary fashion by creating a piece that reflects modern design aesthetics.
- Skill Building: This project introduces or refines precision sewing techniques, working with delicate or stretchy fabrics (like mesh), and creating clean finishes around curves.
Understanding the “Illusion” Concept:
The “illusion” in this type of top comes from a cut-out section of the main fabric being filled with a sheer, semi-sheer, or mesh material that blends subtly with the skin or provides a stark, graphic contrast.
- Placement Ideas: Common areas include:
- Shoulders/Collarbone: Often triangular, circular, or slit-like.
- Décolletage: V-shaped inserts, keyholes, or geometric shapes.
- Side Waist: Panels along the torso, particularly flattering for body-con styles.
- Back: Large panels, geometric cut-outs, or intricate designs.
- Shape Variety: Circles, squares, rectangles, diamonds, triangles, teardrops, keyholes, abstract swirls, or even custom shapes like hearts or stars.
Materials You’ll Need:
- Main Fabric:
- For Stretchy Tops (T-shirt style): Cotton Jersey, Rayon Spandex, Ponte di Roma, Rib Knit, or other stable knits. Choose something comfortable with good recovery.
- For Woven Tops (Blouse style): Cotton Poplin, Linen Blends, Rayon Challis, Crepe, Satin. Consider how the fabric will drape around the cut-out.
- Quantity: You’ll need enough for a basic top pattern. Refer to a similar commercial pattern’s yardage, or estimate based on your drafted pattern pieces (e.g., 1-1.5 yards/meters for a standard top).
- Illusion Fabric (Key Ingredient!): This is the sheer material that creates the effect. You’ll only need a small piece, often a scrap.
- Stretch Mesh/Power Mesh: Durable, stretchy, comes in various transparencies and colors. Excellent for knit tops as it moves with the body.
- Fine Tulle/Bridal Tulle: Very sheer, fine, and soft. Less stretchy.
- Organza: Crisp, sheer, holds its shape. More suitable for woven tops where a structured cut-out is desired.
- Sheer Chiffon: Very delicate and shifty, more challenging to work with.
- Stretch Lace: Adds texture and pattern to the illusion. Ensure its stretch matches your main fabric if used in a knit garment.
- Matching All-Purpose Thread: Polyester is versatile. For stretch fabrics and mesh, consider polyester or nylon thread. For very sheer fabrics, a fine polyester or silk thread can be less visible.
- Interfacing: Lightweight fusible interfacing.
- For Woven Tops: For facings around cut-outs, necklines, or button plackets.
- For Knit Tops: Knit fusible interfacing for stabilizing neckline facings or if you’re using a bound edge on a cut-out.
- Tools:
- Sewing Machine (with appropriate needles: stretch needle for knits/mesh, universal needle for wovens, fine needle for very sheer fabrics).
- Iron and Ironing Board (with a pressing cloth for delicate fabrics).
- Fabric Scissors (sharp!).
- Pins (fine pins for delicate fabrics) or Fabric Clips (highly recommended for delicate or stretchy fabrics).
- Measuring Tape, Ruler (clear acrylic ruler is great for pattern drafting).
- Tailor’s Chalk, Washable Fabric Marker, or Frixion Pen.
- Seam Ripper (inevitable!).
- Walking Foot (highly recommended for knits, mesh, or slippery fabrics) to help feed layers evenly.
DIY Pattern Design & Calculation:
The core of this project is adapting a basic top pattern to incorporate your chosen cut-out.
Step 1: Choose Your Base Pattern
- Start with a basic, well-fitting top pattern. This could be:
- A simple T-shirt pattern (for a casual, knit top).
- A woven blouse pattern (for a more structured top).
- Even a traced outline of a favorite, simple, non-stretch top you own (for a very basic woven shape).
- Ensure the pattern has a neckline, front, and back bodice pieces.

Step 2: Design and Draft Your Cut-Out
- Placement: Decide where you want your illusion cut-out.
- Example: A circular cut-out on the shoulder/décolletage of the front bodice piece.
- Sketch the Shape:
- Lay your front bodice pattern piece flat.
- Lightly sketch your desired cut-out shape directly onto the pattern paper. Use a ruler for geometric shapes, or freehand for organic ones.
- Tip: If you want perfect symmetry, fold your pattern piece in half vertically (if cutting on the fold) and draw half the shape along the fold, then cut. Or draw the full shape and fold to check.
- Add Seam Allowance to Cut-Out: This is crucial!
- Draw a second line inside your sketched cut-out shape, parallel to the first, at a consistent seam allowance (e.g., 1/4″ or 3/8″ / 0.6 – 1 cm). This inner line is your stitching line. The outer line is your cutting line for the cut-out.
- Draft the Illusion Panel Piece:
- Take a new piece of pattern paper.
- Place it over your main bodice pattern piece, aligning it over the cut-out area.
- Carefully trace the outer cutting line of your cut-out opening. This will be the shape of your illusion fabric panel.
- Add the same seam allowance (1/4″ or 3/8″) all around the outer edge of this newly traced illusion panel piece. This is where it will be sewn to the main fabric.
- Draft the Cut-Out Facing (Recommended for a Clean Finish):
- This facing will be cut from your main fabric.
- On your main bodice pattern piece, trace 1.5 to 2 inches (3.8 – 5 cm) around the outer cutting line of your cut-out, creating a “frame” shape.
- This frame shape is your facing piece. Add seam allowances all around its inner and outer edges (1/2″ or 5/8″ / 1.25 – 1.5 cm for outer edges, same as cut-out edge for inner).

Step 3: Refine Main Pattern Pieces & Calculate Fabric:
- Main Fabric: You’ll cut your regular front and back bodice pieces (and sleeves if applicable) as per your base pattern. The cut-out area will be cut after the main pieces are shaped and sewn (or just before attaching the illusion panel).
- Illusion Fabric: Cut one piece using your drafted illusion panel pattern.
- Facing: Cut one piece using your drafted facing pattern from your main fabric.
- Fabric Quantity: Estimate based on your base top pattern’s yardage. You’ll need a small scrap of illusion fabric.
Step-by-Step Sewing Tutorial:
Phase 1: Preparation
- Pre-wash & Press Main Fabric: Wash and dry your main fabric as you intend to wash the finished garment. Press thoroughly. (Pre-washing usually isn’t necessary for mesh/sheer unless you’re concerned about dyes bleeding).
- Cut All Fabric Pieces: Carefully cut your main bodice pieces, illusion panel, and facing piece(s).
- Transfer Markings: Transfer all pattern markings, especially the stitching line for your cut-out onto the wrong side of your main bodice piece.
- Apply Interfacing: Fuse lightweight interfacing to the wrong side of your cut-out facing piece. If your neckline needs facing, apply interfacing there too.
Phase 2: Prepare the Cut-Out & Attach Illusion Panel
This is the most critical step for a clean finish. We’ll use the faced method as it provides the neatest result.

- Prepare Main Bodice Cut-Out:
- Place the main bodice front piece right side up.
- Place the cut-out facing piece (cut from main fabric) right sides together (RST) onto the main bodice piece, aligning the cut-out areas. Pin securely around the inner stitching line of the cut-out.
- Stitch precisely: Using your chosen seam allowance (e.g., 1/4″ or 3/8″), stitch carefully around the inner stitching line of the cut-out. Slow down for curves.
- Trim & Clip: Trim the seam allowance very close to your stitching line (e.g., 1/8″). For curves, clip into the seam allowance almost to the stitching line to allow it to turn smoothly. For sharp corners, trim diagonally across the corner.
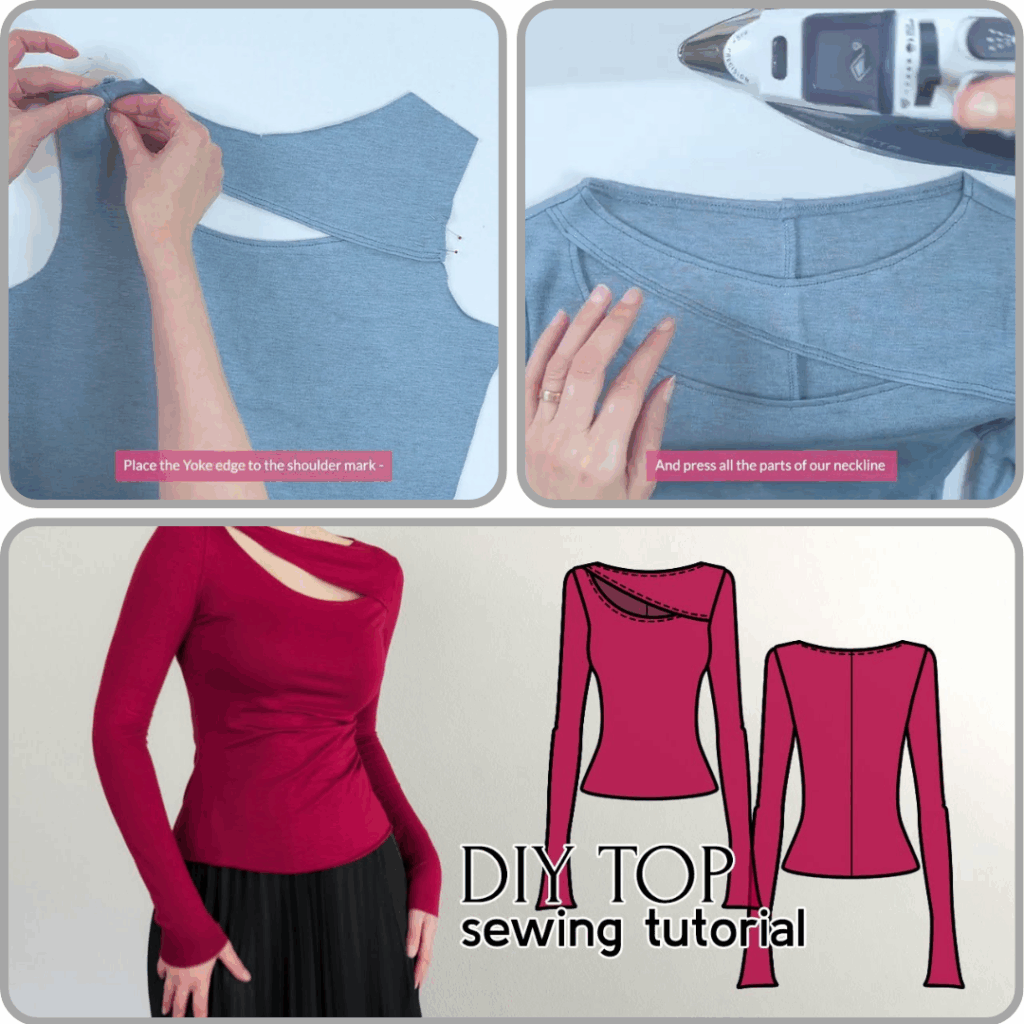
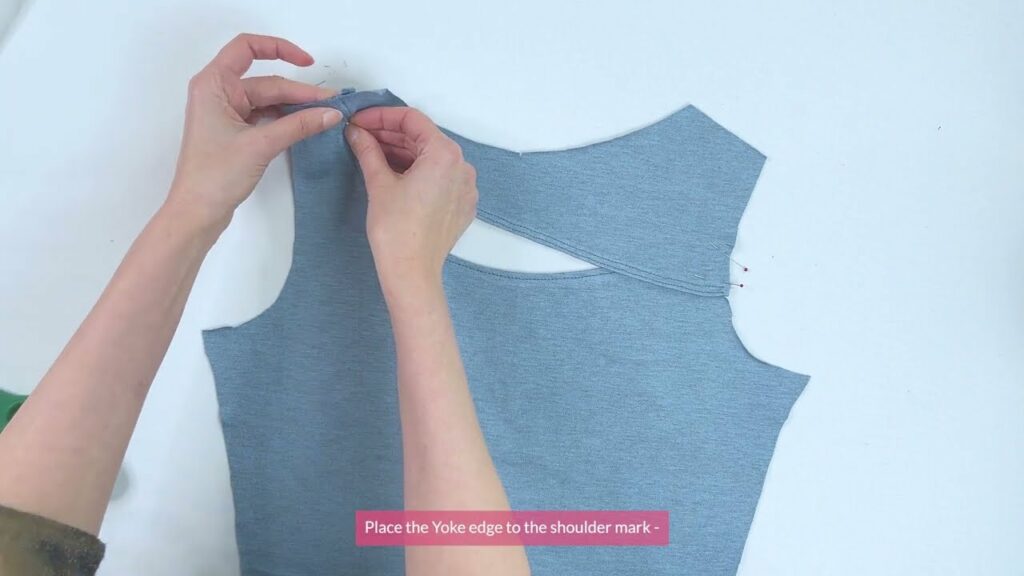
- Turn & Press: Carefully pull the facing through the cut-out opening to the wrong side of the main bodice piece. Press the opening very well, making sure the facing is hidden on the wrong side.
- Understitch (Crucial!): From the right side of the facing, stitch through the facing and the trimmed seam allowance (not through the main fabric) close to the seam line. This helps the facing stay rolled to the inside. Press again.
- Attach Illusion Panel:
- Lay your main bodice piece wrong side up.
- Place your illusion fabric panel onto the wrong side of the main bodice piece, centering it over the cut-out opening. The raw edges of the illusion panel should extend beyond the stitched edge of the cut-out. Pin or clip generously.
- Stitch from the Right Side: From the right side of your main bodice, very carefully topstitch around the edge of the cut-out opening. Stitch slowly and precisely, catching the illusion fabric underneath. Use a matching thread.
- Tip for Mesh/Sheer: Use a fine needle (e.g., size 60/8 or 70/10) and a slightly longer stitch length (e.g., 2.8-3.0). Using a walking foot can prevent stretching or shifting. For very delicate fabrics, you can use tissue paper underneath your fabric when sewing to prevent it from getting sucked into the machine, then tear it away.
- Trim Excess: On the wrong side, carefully trim away any excess illusion fabric that extends beyond your stitching line, leaving about 1/8″ – 1/4″ (0.3 – 0.6 cm) seam allowance.

Phase 3: Assemble the Top Body
- Sew Shoulder Seams: With RST, sew front bodice to back bodice at shoulder seams. Press seams open.
- Attach Neckline Facing/Binding: Prepare and attach your neckline facing (or bind the raw edge with bias tape) according to your base pattern instructions. Press and understitch.
- Attach Sleeves (if applicable): If your top has sleeves, sew them in now according to your base pattern instructions (RST, matching notches, stitching, pressing, finishing seams).
- Sew Side Seams: With RST, sew the side seams of your top. Press seams open.
Phase 4: Finishing Touches
- Hem Sleeves: If applicable, hem the sleeve openings (e.g., turn up 1/4″, press, turn up another 3/4″, press, stitch).
- Hem Bottom of Top: Hem the bottom edge of your top (e.g., turn up 1/4″, press, turn up another 1″, press, stitch).
- Final Press: Give your entire top a thorough final press. This will crisp up all the seams and make the cut-out lay beautifully.
- Trim Threads: Snip any remaining loose threads.
Tips for Success:
- Fabric Compatibility: Ensure your illusion fabric has similar stretch properties to your main fabric if sewing a knit top. For wovens, ensure they complement each other in weight and drape.
- Needle Matters: A stretch needle is essential for knits and most mesh fabrics to prevent skipped stitches and holes. A very fine universal or microtex needle works best for delicate sheer wovens.
- Use Fabric Clips: Pins can snag or distort delicate fabrics like mesh. Fabric clips are excellent for holding layers together without damage.
- Test Stitches: Always stitch a test seam on scraps of your actual fabrics before sewing on your garment. Check tension, stitch length, and needle.
- Slow and Steady: Precision is key when working with cut-outs and sheer fabrics. Sew slowly, especially around curves.
- Pressing with Care: Use a pressing cloth when pressing delicate or synthetic fabrics (like rayon, polyester mesh) to prevent melting or scorching.
- Seam Finishes: For durable, professional results, finish all raw edges (zigzag stitch on a regular machine or a serger).
Creating your own DIY cut-out illusion top is an exciting way to personalize your style and expand your sewing repertoire. With careful planning and attention to detail, you’ll produce a chic, custom-fit garment that’s sure to turn heads!