 by
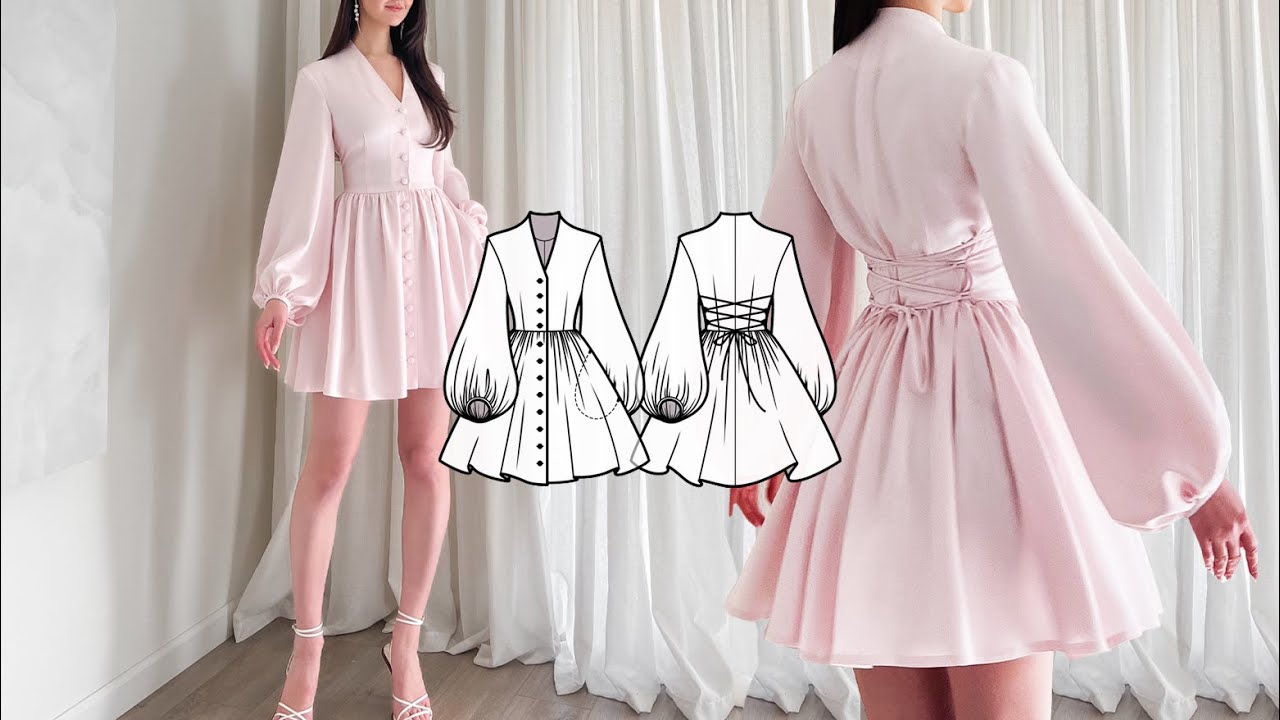
by ZIMMERMANN is synonymous with ethereal, feminine designs, often featuring intricate details, delicate fabrics, and a distinct bohemian yet sophisticated flair. Their buttoned dresses, in particular, are coveted for their flattering silhouettes and romantic charm. While an authentic ZIMMERMANN dress might be out of reach for many, you can capture that same exquisite aesthetic by sewing your own. This detailed guide will walk you through the process of creating a ZIMMERMANN-inspired buttoned dress, incorporating key design elements to achieve that signature look.

Understanding the ZIMMERMANN Aesthetic
Before diving into the sewing process, it’s crucial to understand the core elements that define a ZIMMERMANN buttoned dress:
- Fabric Choice: Think natural fibers with beautiful drape and texture. Common choices include linen, cotton voile, silk, ramie, and lightweight blends. Look for fabrics with subtle textures, eyelet details, or delicate prints.
- Silhouette: Often features a defined waist (sometimes with a belt), a full or A-line skirt, and varying sleeve lengths (puffed, bishop, or flutter sleeves are popular). Necklines are typically V-neck, scoop, or high-necked with ruffles.
- Details: This is where ZIMMERMANN truly shines. Look for:
- Buttons: Often self-fabric covered buttons, decorative buttons, or a long row of functional buttons down the front.
- Ruffles and Frills: Strategic placement on necklines, sleeve cuffs, skirt hems, or down the button placket.
- Lace and Trims: Delicate lace inserts, picot edge trims, or ladder lace.
- Puff Sleeves: Often with elasticated cuffs or a dramatic gather.
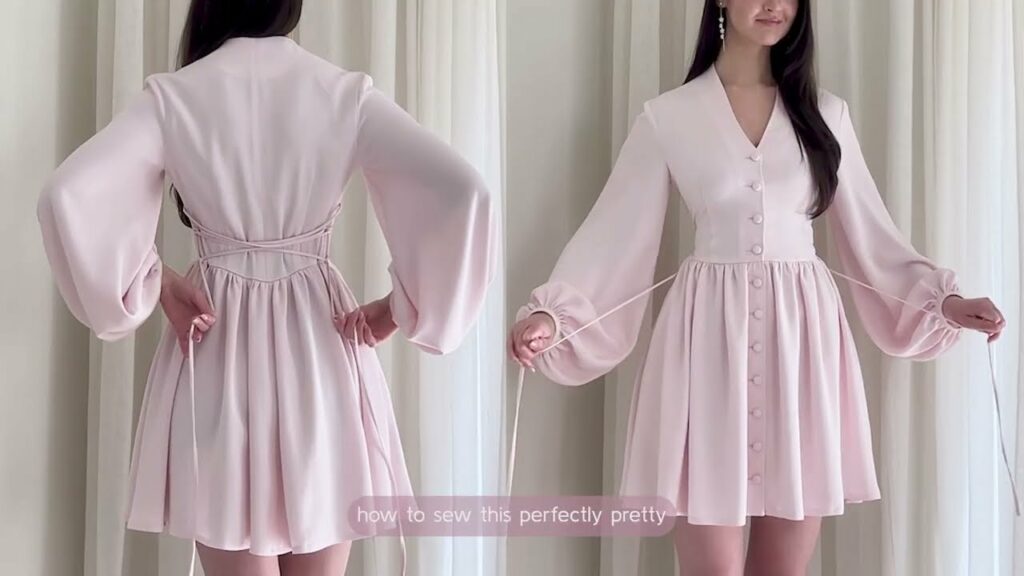
- Self-Fabric Belts: To cinch the waist and add definition.
- Pin Tucks or Gathers: Adding subtle texture and volume.
Materials You’ll Need:
- Pattern: This is the most critical component. While no pattern will be exactly ZIMMERMANN, look for commercial patterns that share similar features:
- A-line or full skirt
- Button-front closure
- Defined waistline (e.g., bodice and skirt joined at the waist)
- Options for various sleeve styles
- Look for patterns from independent designers on Etsy or established brands like McCalls, Simplicity, Vogue, or Butterick that can be hacked.
- Fabric: 3-5 yards (depending on pattern and size) of a high-quality natural fiber fabric (linen, cotton voile, ramie, silk noil, rayon challis).
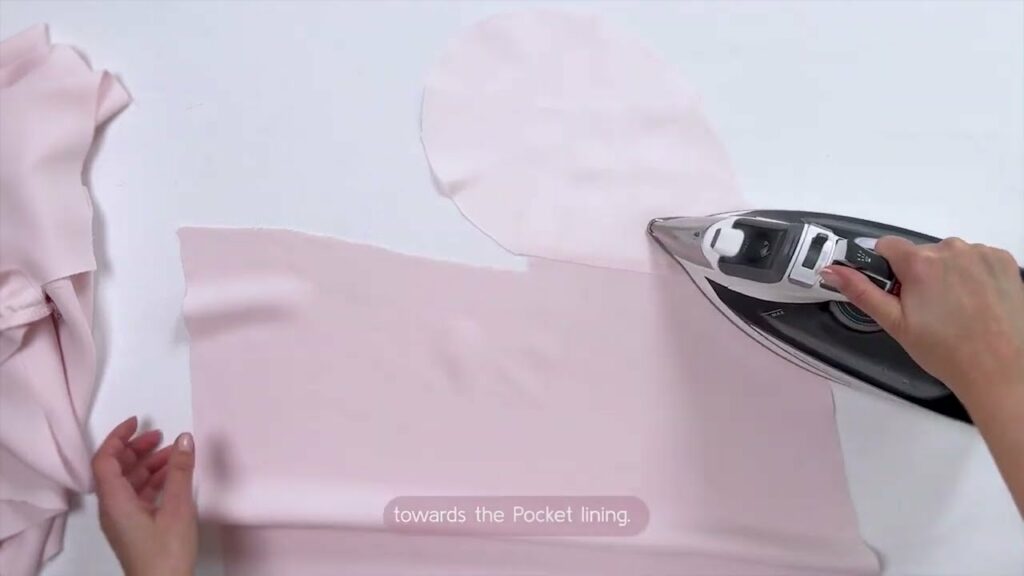
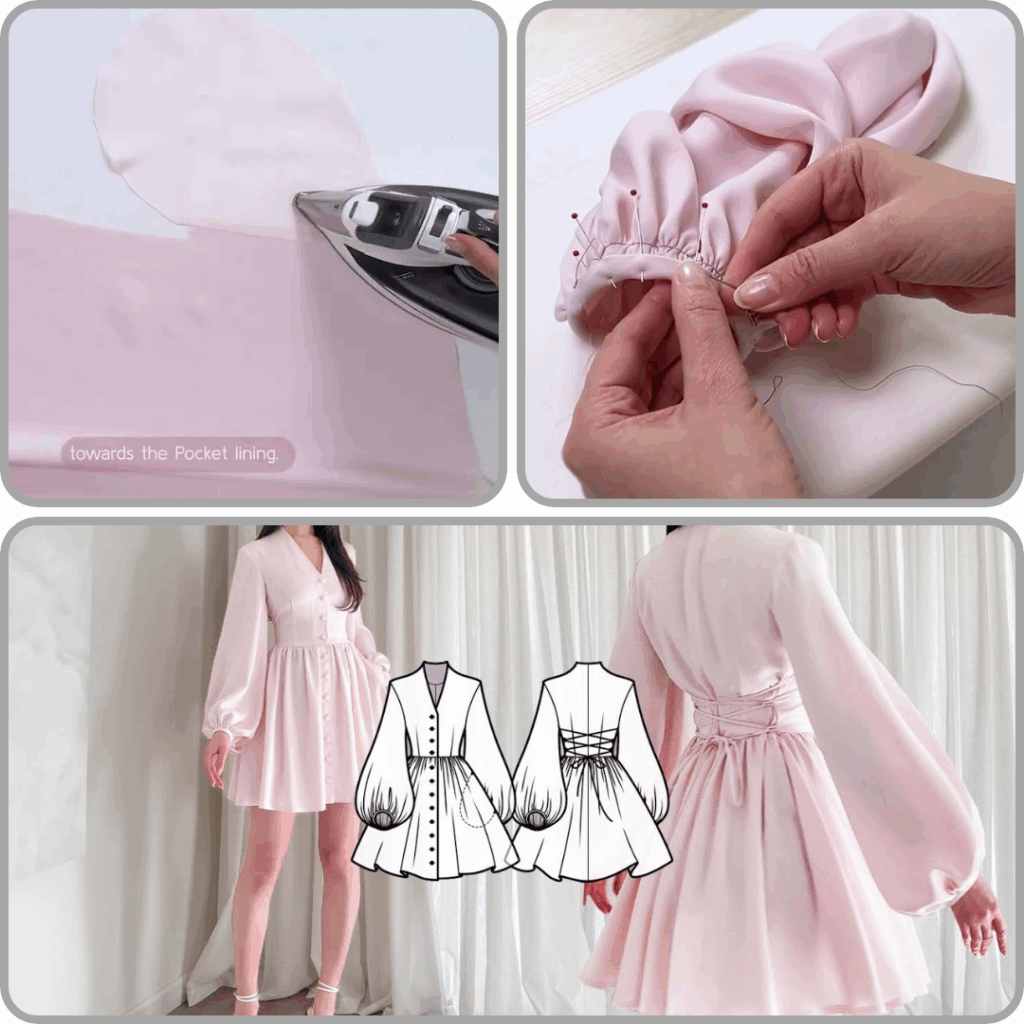
- Lining Fabric: If your main fabric is sheer (e.g., cotton voile), you’ll need a lightweight lining fabric like cotton lawn, batiste, or silk habotai.
- Buttons: Quantity as specified by your pattern, plus a few extra for testing. Consider self-fabric buttons for an authentic touch, or elegant shell/pearl buttons.
- Interfacing: Lightweight fusible interfacing for the button placket, collar (if applicable), and cuffs.
- Matching Thread
- Optional Trims: Lace trim, picot edge elastic, ruffling foot (for your sewing machine).
- Sewing Machine
- Basic Sewing Supplies: Fabric scissors, pins, measuring tape, tailor’s chalk or fabric marker, seam ripper, iron and ironing board.
Choosing and Modifying Your Pattern:
This is where you’ll infuse the ZIMMERMANN aesthetic.
- Start with a Base Pattern: Select a commercial pattern that has a button-front closure and a silhouette close to what you envision. Look for a pattern with a separate bodice and skirt, as this allows for more waist definition.
- Sleeve Hacking: If your pattern doesn’t have the desired ZIMMERMANN-esque sleeves (e.g., dramatic puff sleeves, bishop sleeves with wide cuffs), you’ll need to modify them.
- Puff Sleeves: Widen the sleeve cap and the hem of the sleeve to create volume. Gather the widened areas to fit the armhole and cuff.
- Bishop Sleeves: Lengthen the sleeve pattern and add significant width, then gather it into a long cuff.
- Adding Ruffles:
- Neckline Ruffle: Measure the neckline circumference. Cut a fabric strip twice the length and 1.5-3 inches wide (depending on desired ruffle depth). Hem one long edge, gather the other, and attach it to the neckline.
- Button Placket Ruffle: Cut two long strips of fabric, hem one edge, gather the other, and sandwich them into the button placket seam.
- Skirt Hem Ruffle: Measure the skirt hem circumference. Cut a fabric strip 1.5-2 times the length and desired width. Hem one long edge, gather the other, and attach to the skirt hem.
- Lace Inserts: If you want to add lace, plan where it will go. Common placements include:
- Along the bodice seams.
- As an insert in the skirt.
- Along the sleeve seams.
- You’ll need to cut your pattern pieces and insert the lace as you sew.
Step-by-Step Sewing Process:
(This assumes you have a basic understanding of garment construction and can follow a commercial pattern.)
- Pre-Sewing Preparation:
- Wash and Dry Your Fabric: Pre-shrink your fabric to prevent future shrinkage after your garment is sewn.
- Read Your Pattern Instructions: Familiarize yourself with the entire sewing process before you begin.
- Cut Your Fabric: Carefully cut all pattern pieces according to your chosen size and any modifications you’ve made. Transfer all pattern markings.
- Apply Interfacing: Fuse interfacing to the wrong side of your button placket pieces, collar, and cuffs as indicated by your pattern or your design.
- Bodice Construction:
- Darts/Princess Seams: Sew any darts or princess seams on the bodice pieces. Press them according to your pattern instructions.
- Shoulder Seams: Stitch the front and back bodice pieces together at the shoulder seams. Press seams open or towards the back.
- Side Seams: Sew the side seams of the bodice. Press seams open.
- Neckline Finishing: Finish the neckline as per your pattern (facing, binding, or preparing for a collar). If adding a ruffle, now is the time to attach it.
- Sleeve Construction:
- Sleeve Seams: Sew the underarm seam of each sleeve.
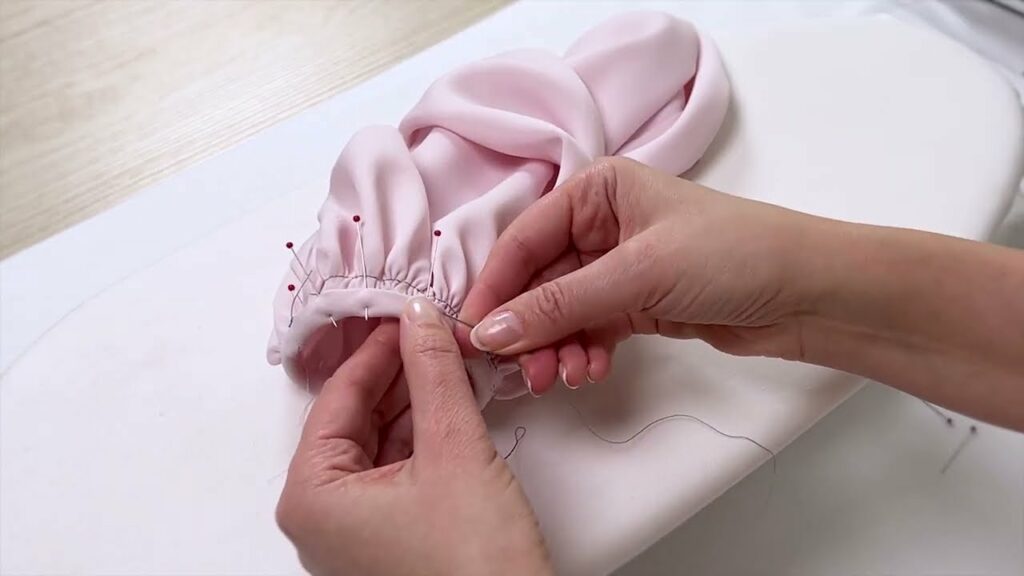
- Gathering (if applicable): If you have puff or bishop sleeves, sew two rows of gathering stitches along the top of the sleeve cap and/or the bottom edge of the sleeve.
- Attach Sleeves: With right sides together, match the sleeve notch/dot to the shoulder seam and ease the sleeve into the armhole. Pin extensively and stitch. Remove gathering stitches if visible.
- Cuffs: Prepare and attach cuffs according to your pattern. If your sleeves are gathered into a cuff, gather the sleeve hem to fit the cuff before attaching.
- Skirt Construction:
- Darts/Gathers: Sew any darts on the skirt pieces, or gather the waist edge of the skirt if it’s a gathered style.
- Side Seams: Stitch the side seams of the skirt.
- Placket Opening: If your skirt also has a button placket, finish the opening.
- Ruffle (if applicable): If adding a ruffle to the skirt hem, prepare and attach it now.
- Joining Bodice and Skirt:
- With right sides together, align the side seams of the bodice and skirt. Pin the bodice to the skirt, easing any gathers or fitting darts as needed.
- Stitch the bodice and skirt together at the waistline. Finish the seam allowance.
- Button Placket and Buttons:
- Prepare Placket: Construct your button placket according to your pattern. This usually involves folding and pressing the interfaced fabric. If you’re incorporating ruffles into the placket, sandwich them in as you sew.
- Attach Placket: Attach the finished placket to the dress front.
- Buttonholes: Carefully mark the placement of your buttonholes. Practice on a scrap piece of fabric to ensure your machine’s buttonhole setting is correct. Sew all buttonholes.
- Buttons: Sew on your buttons, aligning them with the buttonholes. If using self-fabric buttons, cover them now and then sew them on.
- Hemming:
- Try on the dress and adjust the hem length if necessary.
- Press up the hem allowance, then fold it again to create a clean double-fold hem. Stitch in place. For a ZIMMERMANN look, a wider hem (1.5-2 inches) often looks more luxurious.
- Final Touches:
- Belt Loops: If you’re adding a self-fabric belt, sew small belt loops at the waistline side seams to keep the belt in place.
- Self-Fabric Belt: Cut a long strip of fabric, fold it lengthwise, stitch, turn right side out, and press.
- Pressing: Give your entire dress a thorough final press to ensure crisp seams and a professional finish.
Tips for Achieving the ZIMMERMANN Look:
- Attention to Detail: It’s the small things that elevate a garment. Neat stitching, well-pressed seams, and precise buttonhole placement make a huge difference.
- Fabric Quality: Don’t skimp on fabric. A beautiful fabric will make your dress look expensive and high-end, even if the pattern is simple.
- Embrace the Romantic: Think about how ZIMMERMANN plays with softness and femininity. Don’t be afraid to add extra ruffles or choose a fabric with a delicate print.
- Fit is Key: A well-fitting garment is always more flattering. Take accurate measurements and make any necessary pattern adjustments before cutting your fabric.
- Patience: Sewing a detailed dress takes time and patience. Don’t rush the process, and enjoy the journey of creating something beautiful.
By carefully selecting your pattern, fabric, and incorporating those signature ZIMMERMANN details, you can create a stunning, unique buttoned dress that embodies the romance and elegance of the iconic brand. Happy sewing!
Video tutorial: