 by
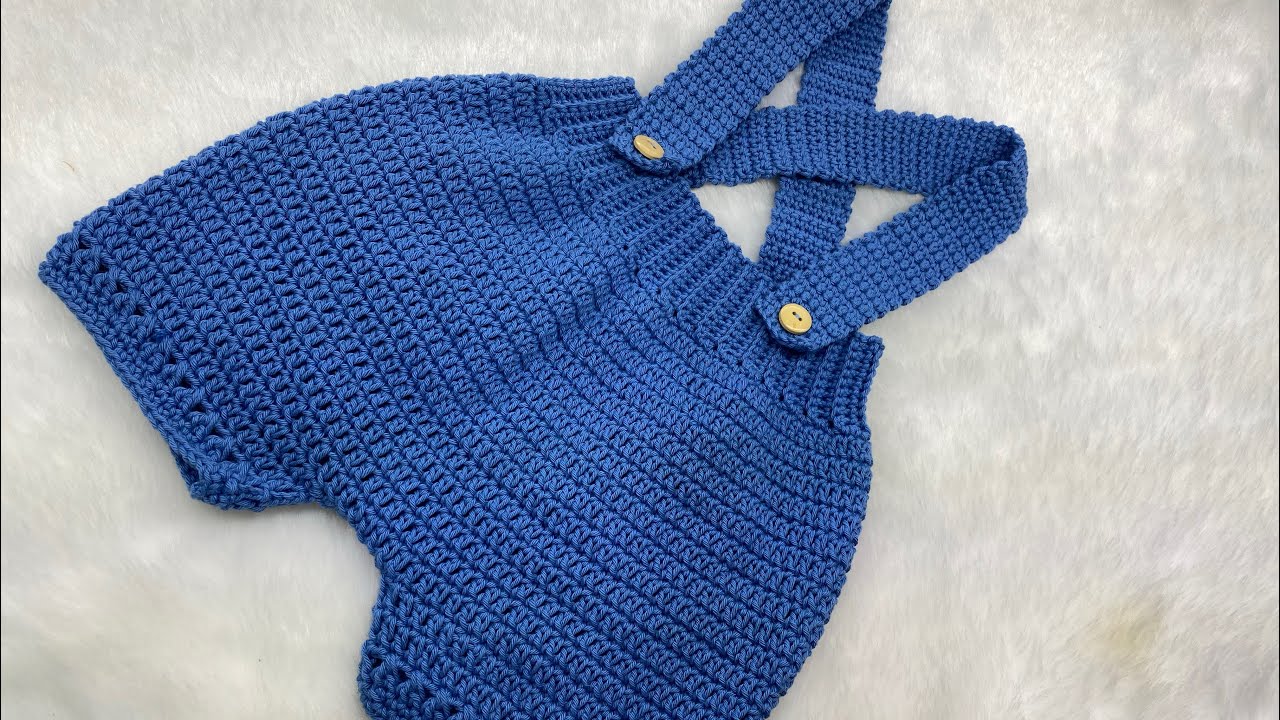
by There’s nothing quite as charming and practical for a little one’s summer wardrobe as a pair of comfortable shorts. But elevate that comfort with the handmade touch of crochet, and add the delightful detail of straps, and you have a truly irresistible garment. Crocheted strap shorts are the epitome of warm-weather cuteness, perfect for sunny days, beach trips, and playful outings. The playful emojis 🐳⚓️⛵️🐠🐬 evoke a delightful nautical or underwater theme, inspiring designs that are fresh, fun, and perfectly suited for tiny adventurers.
This detailed article will guide you through the wonderful world of crocheting strap shorts for babies and toddlers, exploring design considerations, essential techniques, and the joy of creating a unique summer staple.
Why Crochet Strap Shorts?
- Ultimate Summer Comfort: Crochet fabric, when made with the right yarn and stitch, can be wonderfully breathable, making it ideal for hot weather. The open design of shorts combined with the freedom of straps provides maximum comfort.
- Adorable Aesthetic: Straps add an undeniable element of charm, giving the shorts a playful, often vintage-inspired look. They also help keep the shorts securely in place on active little bodies.
- Custom Fit: Handmade allows you to tailor the fit perfectly, accommodating diaper bulk and ensuring comfortable movement.
- Skill Building: Learn or refine techniques for working in the round (for the leg openings), shaping the rise, creating buttonholes, and attaching straps.
- Unique Gift: A pair of handmade strap shorts makes a thoughtful and cherished gift for baby showers, birthdays, or just because.
- Sustainable Choice: Crafting your own clothes contributes to slow fashion, reducing reliance on mass-produced items.
Design Elements of Crocheted Strap Shorts 🐳⚓️⛵️🐠🐬
When planning your project, consider these features to bring your vision to life:
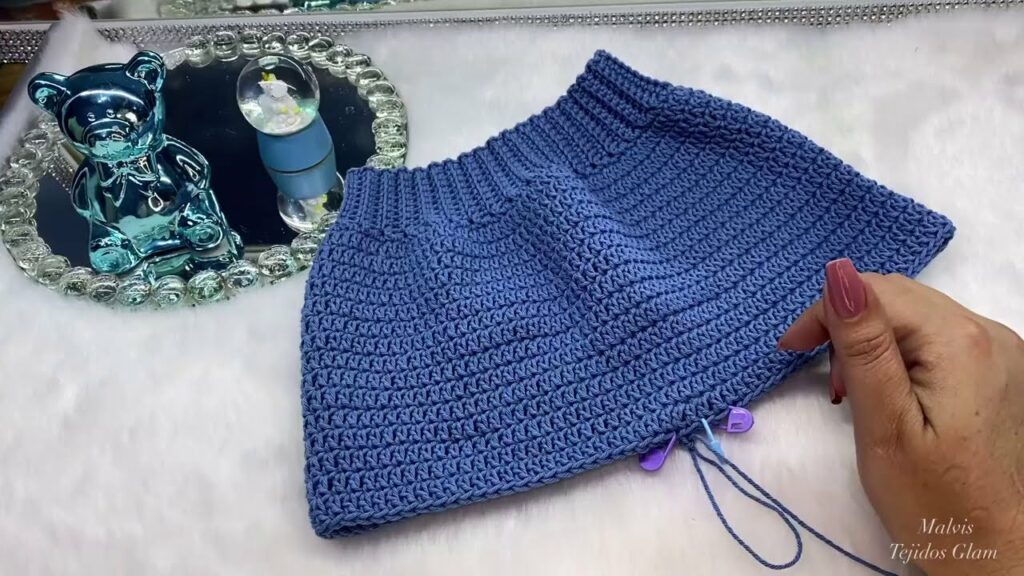
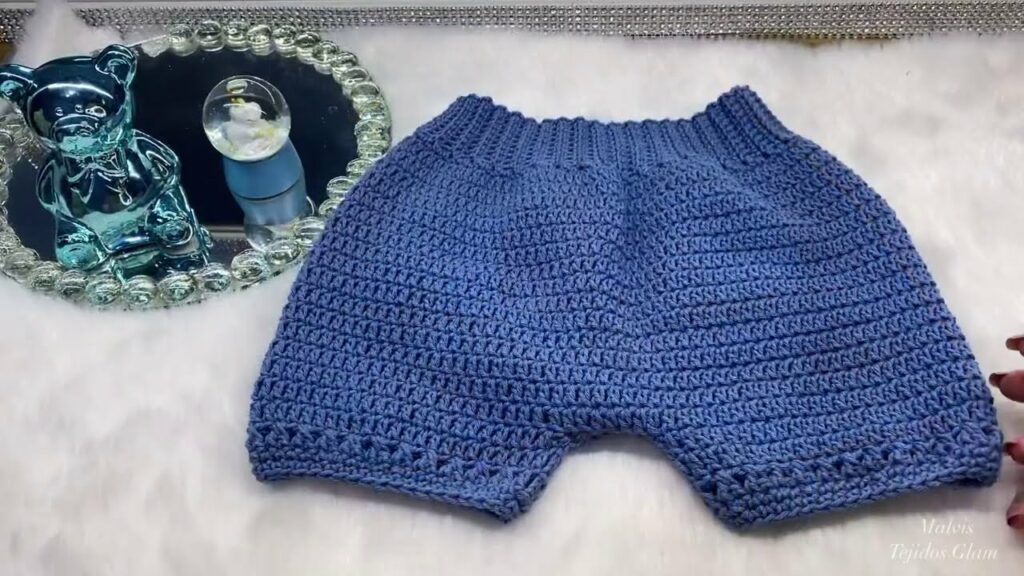
- The Short Itself:
- Construction: Most crocheted shorts are worked from the top down (starting at the waistband) or bottom up (starting with the individual leg openings and joining). Both methods offer benefits.
- Top-Down: Often preferred for seamless construction around the waist and easy length adjustment.
- Bottom-Up: Can be good for ensuring perfect leg opening fit before joining.
- Fit: Designed with enough ease to comfortably fit over a diaper (for babies) and allow for unrestricted movement during play. A slightly looser fit is usually better for summer comfort.
- Stitches:
- For the main body: Consider stitches that offer good drape and breathability. Double Crochet (DC) or Half Double Crochet (HDC) are common and quick. Moss stitch or linen stitch can create a lovely textured fabric that’s still airy.
- For the waistband: Ribbing (using front/back post stitches or BLO techniques) provides stretch and helps the shorts stay up.
- Rise: The distance from the crotch to the waistband. This needs careful shaping to ensure a good fit in the diaper area and prevent sagging.
- Construction: Most crocheted shorts are worked from the top down (starting at the waistband) or bottom up (starting with the individual leg openings and joining). Both methods offer benefits.
- The Straps:
- Attachment: Straps can be sewn onto the waistband at the back (and sometimes the front), or integrated directly into the design.
- Closure: Typically buttoned at the front of the waistband. This allows for adjustable length and easy dressing.
- Style:
- Straight Straps: Classic and simple.
- Criss-Cross Back: Provides extra security and a charming look.
- Ruffled Straps: For a more whimsical, feminine touch.
- Width: Can be narrow and delicate or wider for a bolder statement.
- Thematic Aesthetic 🐳⚓️⛵️🐠🐬:
- Colors: Embrace the nautical theme with classic navy, crisp white, vibrant red, or sunny yellow. Or lean into the “underwater” feel with ocean blues, teal, seafoam green, and sandy neutrals.
- Stitch Patterns: Subtle textures that resemble waves, fish scales, or netting could be incorporated.
- Embellishments: Tiny crocheted anchors, little fish appliqués, or even small seashell buttons can enhance the theme.
Materials: Gathering Your Summer Supplies
- Yarn:
- Fiber: Cotton, cotton blends, or bamboo yarns are highly recommended for summer garments. They are breathable, absorbent, durable, and generally machine washable. Avoid wools unless they are very lightweight and designed for warm weather, as they can be too hot.
- Weight: DK (Double Knitting, Category 3) or Sport (Category 2) are often ideal, creating a comfortable yet sturdy fabric with good stitch definition.
- Colors: As per your chosen theme – bright, cheerful, or classic.
- Quantity: Check your specific pattern, but baby shorts typically require 100-300 yards (90-275 meters) depending on size and stitch.
- Crochet Hook: The size recommended by your pattern to achieve gauge. Consider sizing up or down slightly to ensure the fabric has a good drape – not too stiff, not too gappy.
- Stitch Markers: Indispensable for marking rounds, stitch counts, and shaping points.
- Tapestry Needle (or Blunt Yarn Needle): For weaving in ends and seaming.
- Scissors.
- Measuring Tape: Crucial for checking gauge and garment dimensions.
- Buttons (2-4): For strap closures. Choose flat, baby-safe buttons that are securely sewn and too large to be a choking hazard.
- Blocking Mats & T-pins: Essential for shaping and finishing, especially for achieving crisp edges and uniform drape.
Essential Crochet Techniques for Strap Shorts
You’ll utilize a blend of fundamental and garment-specific techniques:
- Basic Stitches: Chain (ch), Slip Stitch (sl st), Single Crochet (sc), Half Double Crochet (hdc), Double Crochet (dc).
- Foundation Chains/Foundation Single Crochet (FSC)/Foundation Half Double Crochet (FHDC): FSC/FHDC are excellent for starting waistbands, as they offer more elasticity than a standard chain.
- Working in Rounds: Most shorts are worked primarily in the round for a seamless body.
- Working in Rows: For the straps, button bands, or sometimes for portions of the waistband/rise shaping.
- Increasing Stitches: Crucial for shaping the crotch/rise and creating the desired flare of the legs.
- Decreasing Stitches: Less common in basic shorts, but might be used for subtle shaping or leg tapering.
- Ribbing/Edging: For waistbands and leg openings (often achieved by working in the back loop only (BLO) or using post stitches).
- Buttonholes: Creating small chain spaces for buttons on the waistband where the straps will attach.
- Seaming (if applicable): For joining crotch seams if legs are worked separately, or for attaching straps.
- Blocking: Absolutely transformative! It evens out stitches, relaxes the fabric, and sets the final shape and drape of your garment.
Planning Your Project: Laying the Foundation for Success
- Sizing & Measurements:
- Consult your chosen pattern’s size chart. Baby sizing can vary, so it’s best to measure the baby (waist, hip, inner leg length) or a well-fitting pair of shorts they already own.
- Remember to account for diaper bulk, especially if the pattern is designed for non-diapered children.
- Gauge Swatch (Non-Negotiable!):
- This is the single most important step for garment making.
- Crochet a swatch at least 6×6 inches (15×15 cm) using your chosen yarn and hook in the main stitch pattern of the shorts.
- Crucial Step: Wash and block your swatch exactly as you plan to wash and block the finished garment. Cotton and other natural fibers can change significantly after laundering (relaxing, growing).
- Measure your stitches and rows per inch/cm accurately. If your gauge doesn’t match the pattern’s, adjust your hook size (go up a size if you have too many stitches per inch, down if you have too few) and crochet another swatch until it matches.
- Yarn Quantity: Ensure you have enough yarn of the same dye lot for consistency.
Construction Journey: Bringing Your Strap Shorts to Life (Conceptual Guides)
Most crocheted shorts are worked in one of two main ways:
Method 1: Top-Down (Seamless Body)
- Waistband: Start with a long foundation chain (or FSC/FHDC) that fits comfortably around the baby’s waist. Join to form a round. Work a few rounds of ribbing.
- Body (Hip Section): Work the main stitch pattern in the round, increasing gradually over the next few rounds to accommodate the hips and diaper area.
- Divide for Legs: Once the body reaches the crotch, you’ll divide the stitches into two equal halves (front and back). You’ll then work the front leg stitches and the back leg stitches separately for a few rows/rounds, creating the rise of the shorts.
- Join Legs: Join the front and back crotch points, creating the leg openings.
- Legs: Work each leg opening separately in the round to the desired length. Finish with a simple edge or ribbing.
- Straps: Crochet two long strips in rows. These will be sewn onto the back waistband.
- Buttonholes: Create small buttonholes on the front waistband (or on the straps themselves if they loop through).
Method 2: Bottom-Up (Legs First)
- Legs: Start by crocheting two separate leg tubes, typically beginning with a ribbed cuff. Work each leg in the round up to the crotch, increasing as needed for thigh room.
- Join Legs: Join the two leg tubes together into one continuous round, forming the crotch and body of the shorts.
- Body (Up to Waist): Continue working in the round up to the desired waistband height, decreasing slightly if necessary for shaping.
- Waistband: Work a few rounds of ribbing for the waistband.
- Straps & Buttonholes: Similar to the top-down method, crochet the straps separately and create buttonholes on the waistband or straps.
Finishing Touches: The Polish of a Pro
- Weave in All Ends: Meticulously weave in every single yarn tail using your tapestry needle. For baby items, secure them extremely well to prevent unraveling and discomfort against delicate skin.
- Attach Straps: Securely sew the straps to the back of the waistband. If they cross, ensure they are not twisted.
- Attach Buttons: Sew the chosen buttons onto the front waistband, aligning with the buttonholes on the straps. Ensure buttons are securely attached and pose no choking hazard.
- Blocking (Don’t Skip It!): This step is transformative. Gently wet your finished shorts (or steam them), carefully lay them out on blocking mats, shaping them to the correct dimensions (pinning firmly with T-pins if needed). Allow to dry completely. Blocking evens out stitches, relaxes the fabric, and sets the final shape and drape, making your stitches pop and the garment lay beautifully.
Tips for Summer Shorts Success
- Gauge for Fit: Especially for shorts that need to accommodate a diaper and allow movement, accurate gauge is crucial.
- Yarn Choice is Key: For summer, prioritize breathable, washable fibers like cotton or bamboo for maximum comfort.
- Ease for Play: Ensure sufficient positive ease in the hip and leg areas to allow for unrestricted crawling, toddling, and playing.
- Secure All Closures: Buttons should be sewn on very firmly for safety.
- Don’t Fear the Rise: Shaping the crotch can seem intimidating, but patterns usually guide you step-by-step. It’s essential for a good fit.
- Embrace the Theme: Let the 🐳⚓️⛵️🐠🐬 emojis inspire your color choices or add a small embroidered detail to tie into a summer adventure theme.
Caring for Your Crocheted Strap Shorts

- Follow Yarn Label Instructions: Always refer to your specific yarn’s care guidelines for washing and drying.
- Machine Wash (if yarn allows): Many cotton or acrylic baby yarns are machine washable on a gentle cycle with cool water. Place in a mesh laundry bag for extra protection.
- Hand Wash (Recommended for Delicates): For very delicate stitches or attached embellishments, hand wash gently in cool water with a mild detergent.
- Reshape and Lay Flat to Dry: Never wring, twist, or hang wet crocheted shorts. Gently squeeze out excess water (rolling in a towel helps), reshape the shorts to their original dimensions, and lay them flat on a clean towel or a mesh drying rack to air dry completely.
Crocheting a pair of strap shorts is a delightful project that results in an incredibly practical and undeniably adorable garment for summer. With their charming design and comfortable fit, these handmade shorts will become a beloved staple in any baby’s warm-weather wardrobe, ready for all their little adventures by the sea or in the backyard sunshine! Sources
Video Tutorial ;