 by
by Crafting Your Own Carryall: A Comprehensive Guide to DIY Bags, Handbags, Zipper Pouches, and Ladies’ Purses
The world of DIY bags is vast and rewarding, offering endless possibilities to express your personal style while creating functional accessories. Whether you’re aiming for a simple zippered pouch to organize your essentials or a more structured handbag to complement your outfits, the satisfaction of crafting your own carryall is unparalleled. This detailed guide will walk you through the essential steps, materials, and techniques to bring your dream bag to life.

Understanding the Landscape: Pouch, Purse, Handbag, and Zipper Bag
While the terms “bag,” “handbag,” “ladies’ purse,” and “pouch” are often used interchangeably, they generally refer to small to medium-sized portable containers for personal items. For DIY purposes, we’ll focus on designs that are manageable for home sewers, with a particular emphasis on the versatility of the zippered bag. A zippered closure offers security, neatness, and is a fundamental skill that can be applied to a multitude of bag styles, from a simple flat pouch to a more elaborate structured purse.
Essential Materials for Your DIY Bag Project
The beauty of DIY lies in customization. The materials you choose will dictate the look, feel, and durability of your finished bag.
- Main Fabric: This is the exterior of your bag and sets the tone.
- Cotton or Canvas: Excellent for beginners, widely available, and comes in countless prints and colors. Offers good structure for everyday bags and pouches.
- Home Decor Fabrics: Heavier weight, often more durable, and can provide a luxurious feel.
- Denim: Sturdy and casual, perfect for a relaxed look.
- Faux Leather/Vinyl: Offers a sleek, modern, and durable finish. Requires a walking foot or Teflon foot for your sewing machine.
- Quilting Cottons: Lighter weight, ideal for linings or smaller pouches where less structure is needed.
- Specialty Fabrics: Corduroy, velvet, brocade, or even upcycled textiles like old jeans or tablecloths can add unique character.
- Lining Fabric: The interior of your bag.
- Typically a lighter weight cotton (quilting cottons are perfect) or a slip-resistant fabric like nylon taffeta for certain applications.
- Choose a color or print that complements your main fabric or provides a fun contrast.
- Interfacing/Stabilizer: Crucial for adding structure, body, and durability.
- Fusible Fleece: Adds a soft, padded feel and good body, ideal for handbags.
- Pellon SF101 Shape-Flex (or similar fusible woven interfacing): Adds crispness and body without much bulk, great for pouches and straps.
- Decovil Light/Heavy: More rigid and durable, excellent for structured bags that need to stand on their own.
- Fusible Batting: Provides some softness and cushioning.
- Zippers: The star of the show for a secure closure.
- Nylon Coil Zippers: Most common and versatile. Easy to sew and trim to size. Available in a rainbow of colors.
- Metal Zippers: Offer a more robust, sometimes vintage, aesthetic.
- Zipper Length: Ensure your zipper is at least as long as the opening you’re creating. Longer zippers can be trimmed after installation.
- Hardware (Optional, but recommended for handbags):
- D-rings, O-rings, Rectangle Rings: For attaching straps.
- Swivel Clasps/Lobster Clasps: For detachable straps.
- Magnetic Snaps, Turn Locks, Twist Locks: For additional closures or decorative elements.
- Bag Feet: To protect the bottom of your bag.
- Zipper Pulls: Decorative additions to your zipper.
- Webbing/Strap Material:
- Cotton Webbing: Durable and comes in various widths and colors for shoulder straps or handles.
- Self-Fabric Straps: Can be made from your main fabric for a cohesive look.
- Faux Leather Straps: Purchased pre-made or cut from a larger piece.
- Matching Thread: Polyester all-purpose thread is suitable for most projects. Consider a heavy-duty thread for thicker fabrics like faux leather.
Essential Tools for Bag Making
- Sewing Machine: With a regular presser foot and a zipper foot (essential!). A walking foot is highly recommended for thicker fabrics.
- Fabric Scissors or Rotary Cutter and Mat: For precise cutting.
- Pins or Fabric Clips: Fabric clips are excellent for thicker materials where pins might leave holes.
- Measuring Tape or Ruler: For accurate measurements.
- Fabric Marker/Chalk: For transferring pattern markings.
- Seam Ripper: Your best friend for correcting mistakes!
- Iron and Ironing Board: Crucial for pressing seams and applying fusible interfacing.
- Pattern Weights (Optional): For holding down pattern pieces.
- Turning Tool: For turning straps or small pieces right side out.
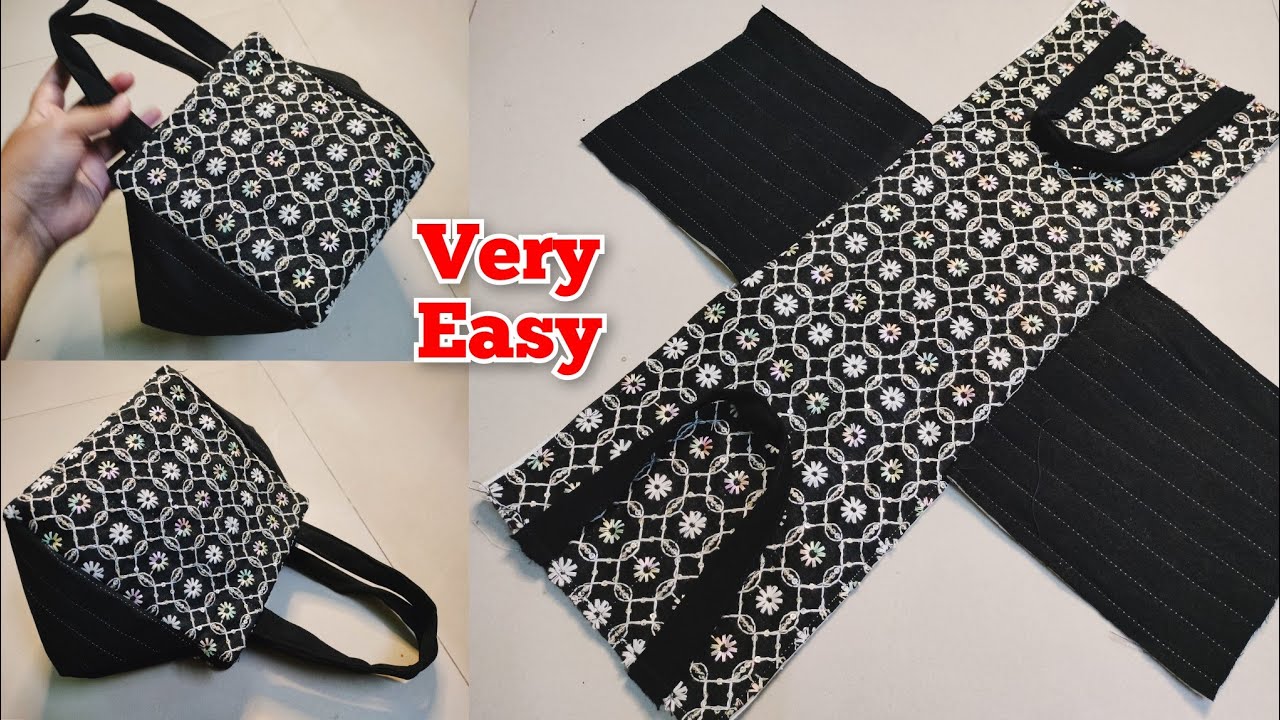
General Steps for Constructing a Zippered Bag/Pouch
While specific patterns will have detailed instructions, here’s a generalized workflow for a typical zippered bag:
- Choose Your Pattern or Design:
- For Beginners: Start with a simple flat zipper pouch pattern. These are great for mastering zipper installation.
- Intermediate: Explore patterns for cosmetic bags, boxy pouches, or small clutches.
- Advanced: Tackle structured handbags, messenger bags, or backpacks.
- Many free patterns are available online (e.g., on sewing blogs, YouTube tutorials) or you can purchase PDF patterns from independent designers.
- Prepare Your Pattern Pieces:
- Print and assemble any PDF patterns.
- Cut out all pattern pieces accurately.
- Cut Your Fabrics and Interfacing:
- Following your pattern, cut all main fabric pieces, lining fabric pieces, and interfacing pieces.
- Important: Pay attention to grainlines.
- Apply fusible interfacing to the wrong side of the designated fabric pieces (usually main fabric pieces, sometimes lining, and often strap pieces). Follow the interfacing manufacturer’s instructions for heat and steam. Allow to cool completely.
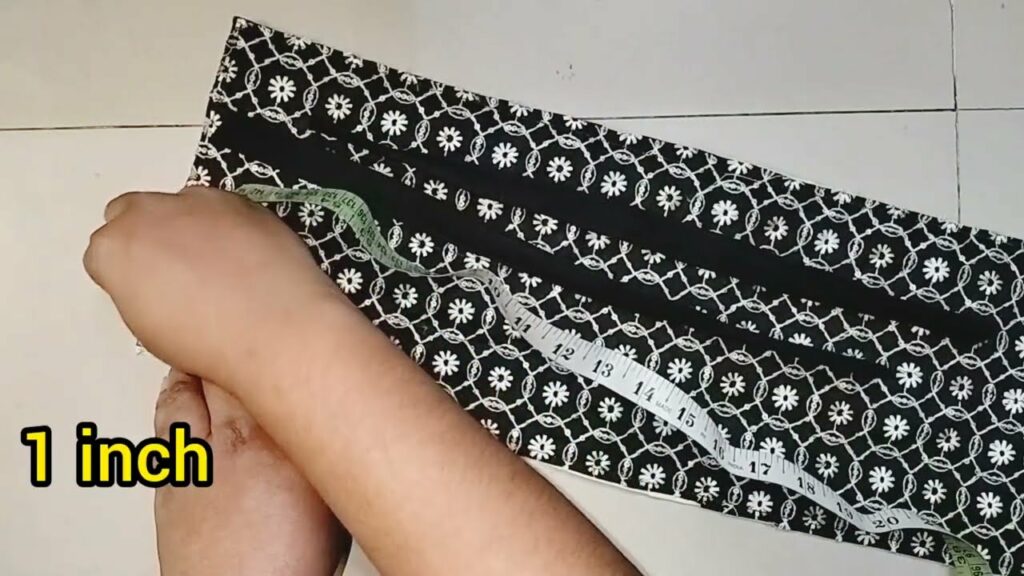
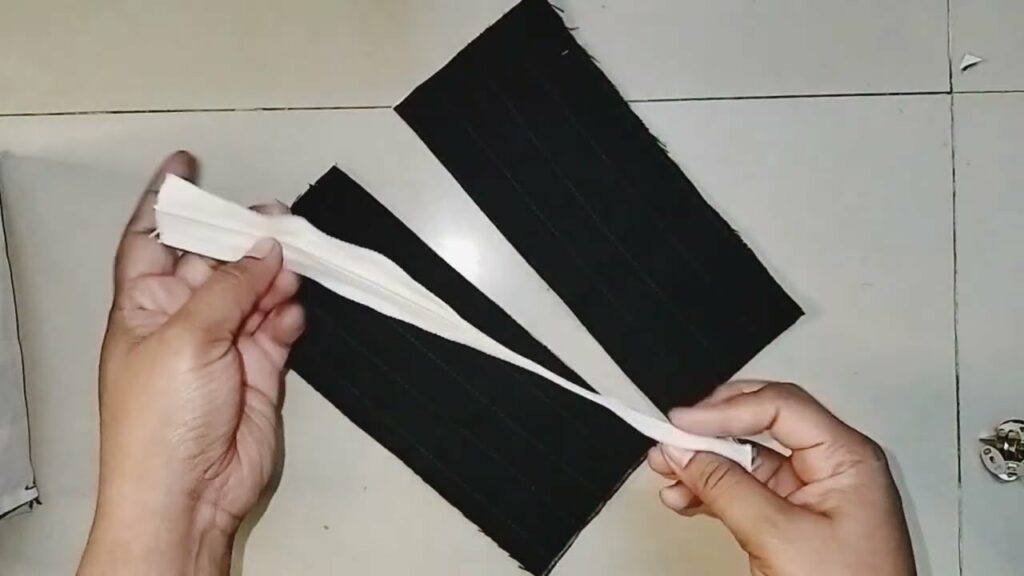
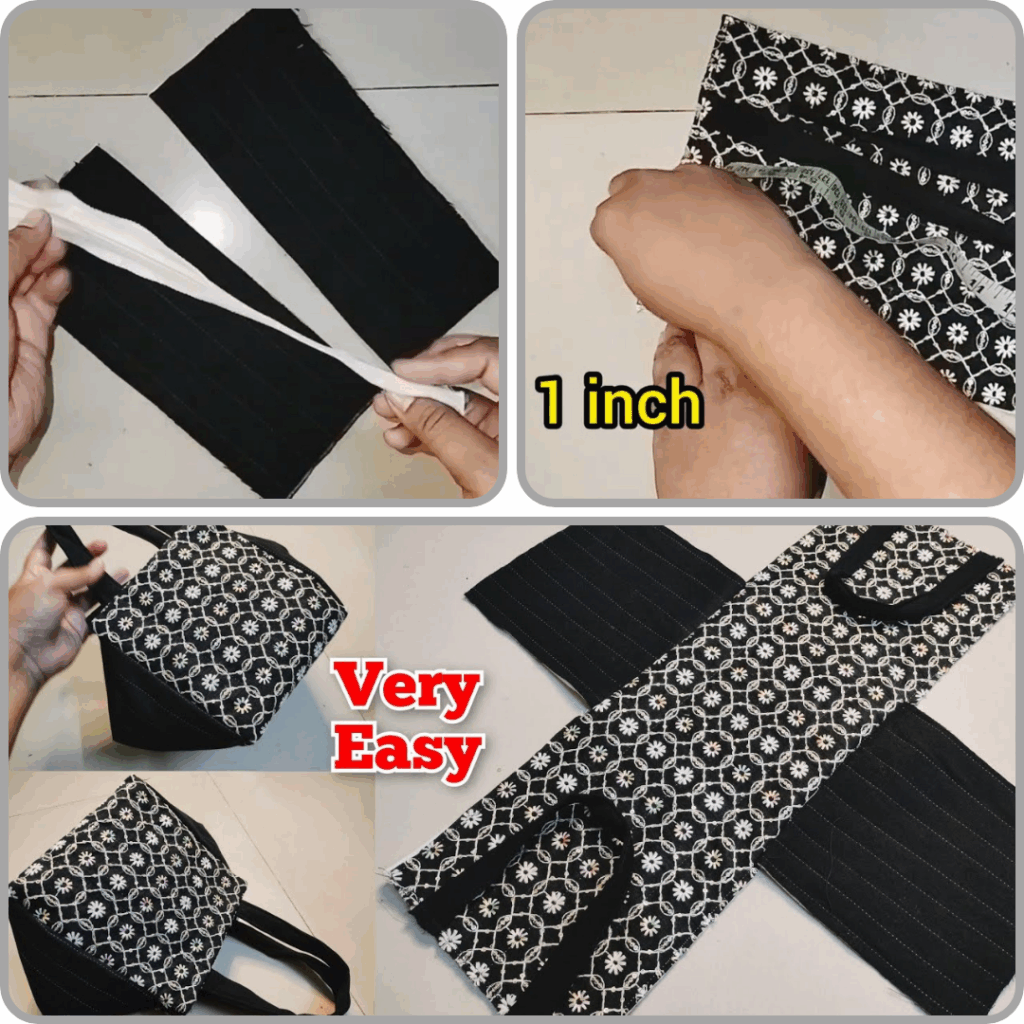
- Install the Zipper (The Most Crucial Step!):
- This is typically the first assembly step for a zippered pouch or bag top.
- Method: Place the zipper right side up. Lay the main fabric piece (right side down) on top, aligning the raw edge with one edge of the zipper tape. Then, place the lining fabric piece (right side up) on top of the main fabric, again aligning raw edges.
- Pin or clip all three layers together.
- Using your zipper foot, sew a straight line close to the zipper teeth.
- Flip the fabrics away from the zipper and press the seam.
- Repeat this process for the other side of the zipper, attaching the remaining main and lining fabric pieces.
- Topstitching: Once both sides are attached, press the fabric away from the zipper and topstitch along both sides of the zipper to give it a neat finish and prevent fabric from getting caught in the zipper.
- Assemble the Bag Body:
- Open your zipper about halfway (this is crucial for turning the bag later!).
- Lay your main fabric pieces right sides together, aligning edges.
- Lay your lining fabric pieces right sides together, aligning edges.
- Pin around the perimeter of both the main bag and the lining, leaving a turning hole in the lining (usually 3-4 inches along the bottom edge).
- If your bag has a boxed bottom: Pinch the corners of both the main bag and lining to create box corners (matching side seams to bottom seams) and stitch across these.
- Sew around the pinned edges of the main bag and the lining, remembering to backstitch at the beginning and end of seams, and at the start and end of the turning hole.
- Add Straps/Handles/Hardware (if applicable):
- If your bag has exterior pockets, straps, or hardware, these are usually attached to the main fabric pieces before sewing the bag body together, or they are incorporated into the side seams. Refer to your pattern for specific placement.
- For a simple pouch, this step might be skipped.
- Join the Main Bag and Lining:
- With the main bag still inside out, gently push the lining bag (right side out) into the main bag. The right sides of the main fabric will be facing the right sides of the lining fabric.
- Align the top edges (where the zipper is) and clip or pin them together.
- Sew around the top edge, securing the lining to the main fabric. For some patterns, the zipper installation method might eliminate this step, having already joined them.
- Turning and Finishing:
- Reach through the turning hole in the lining and pull the entire bag right side out.
- Carefully push out all corners and edges.
- Press the turning hole opening flat and stitch it closed by machine (topstitch very close to the edge) or by hand (invisible ladder stitch) for a neater finish.
- Push the lining into the bag. Give your finished bag a final press.
Design Considerations and Customization Tips
- Pockets: Add interior or exterior patch pockets, zipper pockets, or slip pockets for organization.
- Embellishments: Appliqué, embroidery, fabric paint, patches, or heat transfer vinyl can personalize your bag.
- Contrast Fabrics: Use a contrasting fabric for the bottom panel, straps, or zipper tabs to add visual interest.
- Quilting: Quilt your main fabric and interfacing together before cutting to add texture and durability.
- Tabs: Add small fabric tabs at the ends of your zipper for a professional finish and to make zipping easier.
- Key Fob: Incorporate a small loop with a D-ring inside to attach keys.
- Adjustable Straps: Use slide adjusters and hardware to create a strap that can be worn at different lengths.
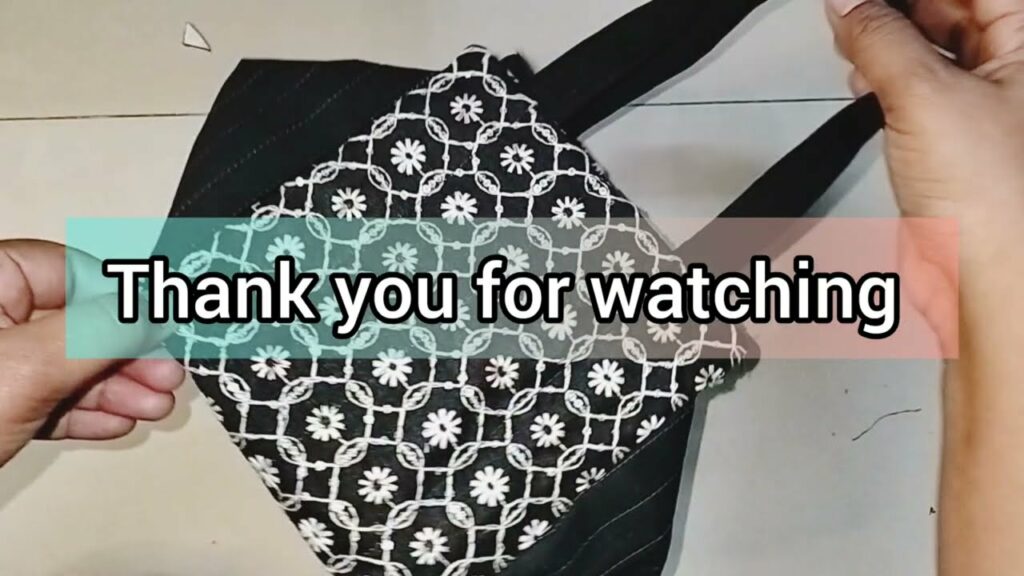
Sewing your own bag is an incredibly rewarding process that combines practicality with creative expression. Start with simpler projects to build your confidence, then gradually work your way up to more complex designs. With each stitch, you’ll not only hone your sewing skills but also create a unique accessory that reflects your individual style and personality. Happy sewing!
Video tutorial: