by
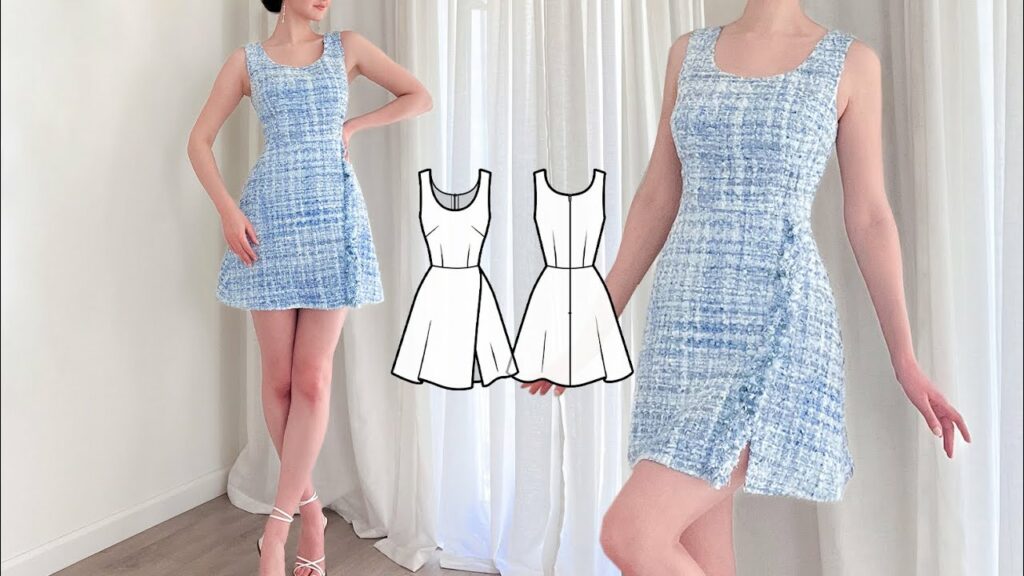
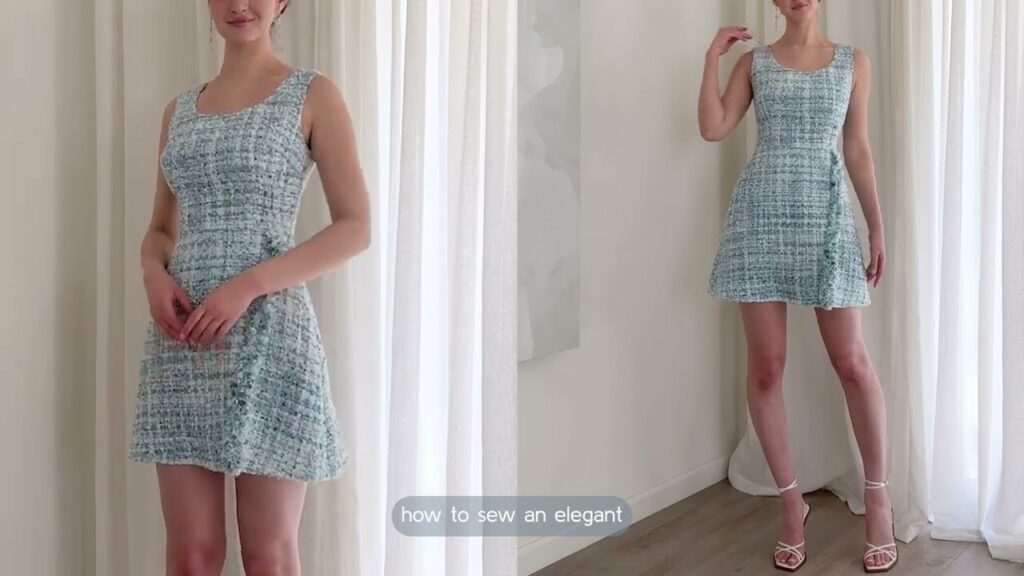
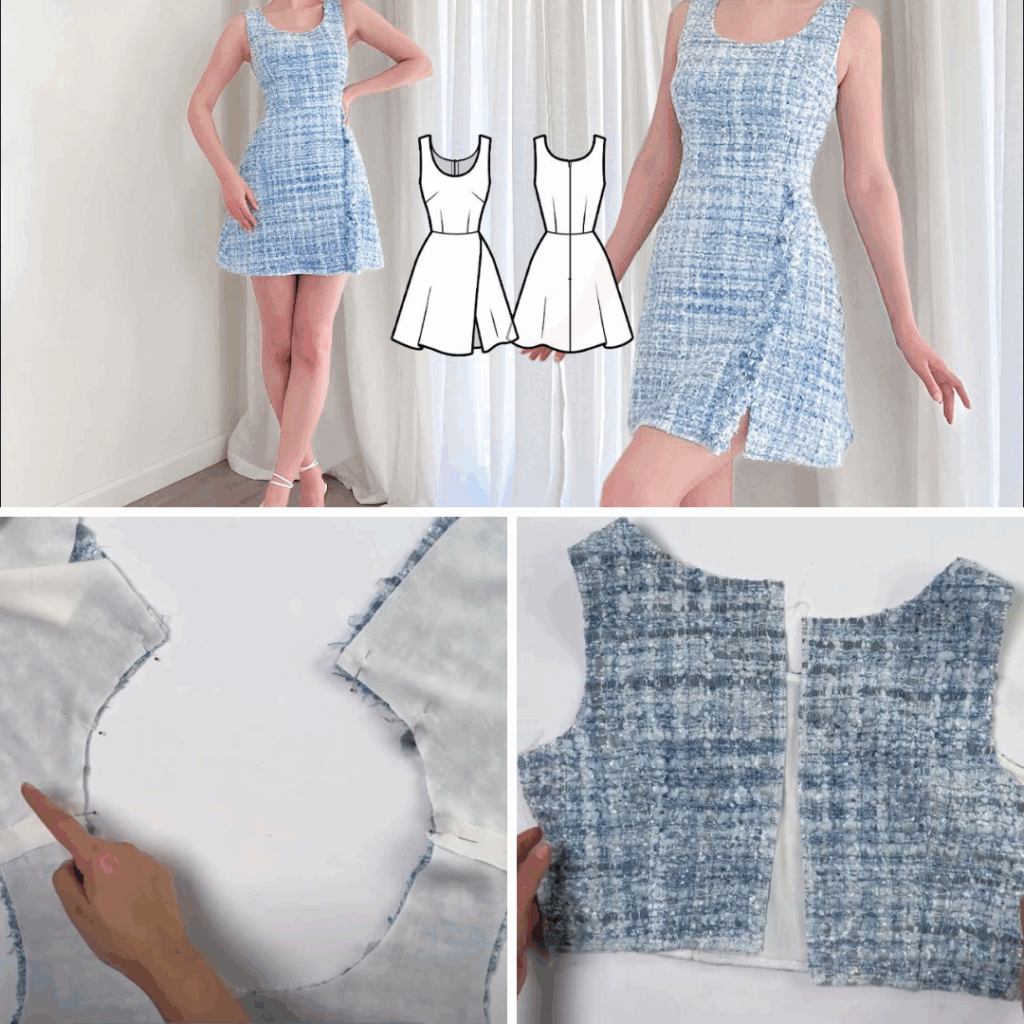
by The iconic CHANEL tweed jacket and dress are synonymous with timeless elegance, sophistication, and a touch of rebellious chic. While a genuine CHANEL piece might be out of reach for many, capturing that distinct aesthetic in your own sewing project is incredibly rewarding. This detailed guide will walk you through the process of sewing a CHANEL-inspired tweed mini dress, allowing you to create a high-fashion look with a personal touch.
Before You Begin: The CHANEL Aesthetic
Before diving into the technicalities, it’s crucial to understand the essence of the CHANEL tweed look. It’s not just about the fabric; it’s about the entire presentation:
- Fabric: The star of the show. Authentic CHANEL tweed is often a complex weave of various fibers (wool, silk, cotton, sometimes even lurex) creating a textured, multi-dimensional surface. For your inspired piece, look for high-quality bouclé tweed, textured wool blends, or even some novelty tweeds that mimic the look.
- Structure: While seemingly relaxed, CHANEL garments have a subtle, tailored structure. Think clean lines, precise seaming, and a well-fitting silhouette.
- Embellishment: Braiding, trims (often contrasting or metallic), decorative buttons, and chain detailing are hallmarks. These elements elevate the garment from simple to sublime.
- Lining: A luxurious lining (silk, Bemberg, or high-quality acetate) is essential for a comfortable and polished finish.
Materials You’ll Need:
- Tweed Fabric: Approximately 1.5 – 2.5 yards (1.4 – 2.3 meters) depending on your size and dress length.
- Lining Fabric: Same yardage as your main fabric. Opt for silk, Bemberg, or high-quality anti-static acetate.
- Interfacing: Lightweight fusible interfacing for stability, especially around necklines, armholes, and zippers.
- Matching Thread: High-quality polyester or silk thread.
- Invisible Zipper: 18-22 inches (45-55 cm) for a back closure.
- Optional Embellishments:
- Tweed trim, braided trim, or decorative ribbon for edges.
- Decorative buttons (if your design includes them).
- Small chain for the hem (optional, for weight and drape).
- Basic Sewing Supplies:
- Sewing machine
- Sharp fabric scissors
- Pins
- Measuring tape
- Fabric chalk or disappearing ink pen
- Seam ripper
- Iron and ironing board
- Hand sewing needle
Choosing Your Pattern:
For a CHANEL-inspired mini dress, look for a simple, classic silhouette. Avoid overly complicated designs. Excellent options include:
- Shift Dress: A straight, relaxed fit that hangs from the shoulders.
- A-Line Dress: Fitted at the bust and gently flares out towards the hem.
- Simple Sheath Dress: Slightly more fitted, but still with clean lines.
Pattern Modifications for a CHANEL Look:
- Sleeve Length: Consider 3/4 length sleeves or short sleeves.
- Neckline: A simple round neck, boat neck, or slight scoop neck works best.
- Length: A mini dress typically falls mid-thigh to just above the knee.
Construction Steps:
Step 1: Pre-Treat and Cut Your Fabric
- Pre-treat: Always pre-wash and dry your tweed and lining fabrics according to their care instructions. Tweed can shrink, and you want to prevent any post-sewing surprises.
- Lay out: Lay your fabric flat and smooth. Pay attention to the grainline.
- Pin Pattern Pieces: Carefully pin your pattern pieces to the tweed fabric, aligning grainlines precisely.
- Cut: Use sharp fabric scissors to cut out all your dress pieces (front, back, sleeves, facings, etc.). Transfer all pattern markings.
- Cut Lining: Using the same pattern pieces (minus any facings that will be cut from the main fabric), cut your lining pieces. If your pattern includes a separate lining pattern, use that.
Step 2: Apply Interfacing
- Following your pattern instructions and the interfacing manufacturer’s guidelines, apply lightweight fusible interfacing to the wrong side of pieces that require extra stability. This typically includes:
- Neckline facings
- Armhole facings (if applicable)
- Zipper opening edges
- Hem allowance (if you want a crisp hem)
Step 3: Construct the Dress Bodice (Tweed)
- Darts/Seams: Sew any darts on the front and back bodice pieces as indicated by your pattern. Press darts meticulously (usually towards the center back or down).
- Shoulder Seams: Pin and sew the shoulder seams of the front and back bodice pieces right sides together. Press seams open.
- Side Seams: Pin and sew the side seams. Press seams open.
- Sleeves (if applicable): If your dress has sleeves, set them in according to your pattern instructions. Press seams open or towards the sleeve.
Step 4: Construct the Lining
- Repeat Step 3 for your lining fabric. Treat the lining as a separate, identical dress. Do not sew up the back seam completely if you are inserting a zipper. Leave the zipper opening unstitched.
Step 5: Attach Facings and Prepare Neckline/Armholes
- Sew Facings: If your pattern uses facings, sew them together at the shoulder seams (right sides together). Press seams open. Finish the outer edge of the facing (e.g., with a serger, zigzag stitch, or turn and stitch).
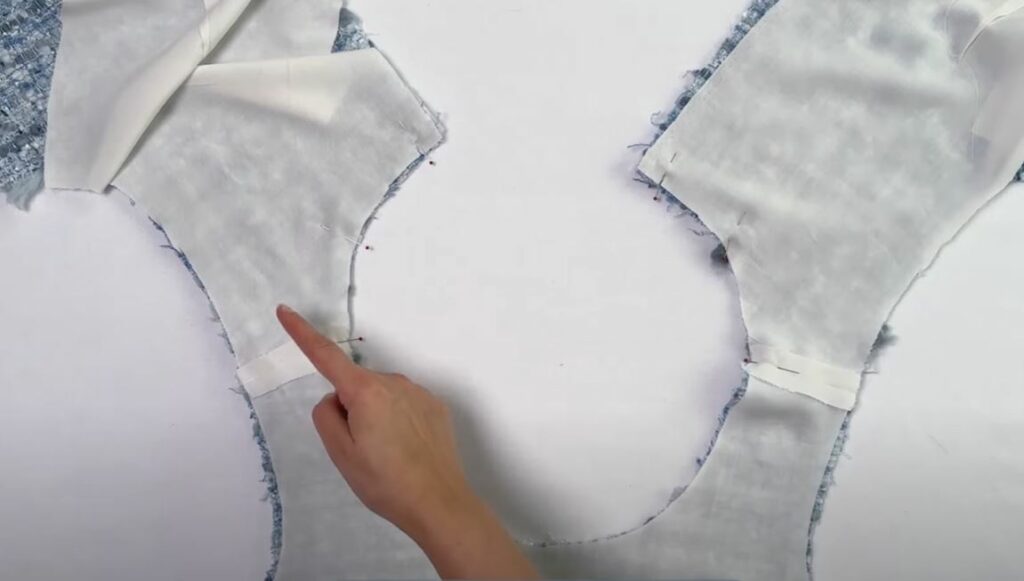
- Attach Facing to Dress: With right sides together, pin the finished facing to the neckline of your main dress fabric. Stitch carefully around the neckline. Clip curves and trim seam allowance.
- Understitch: This is a crucial step for a professional finish. Press the seam allowance towards the facing. From the right side of the facing, stitch through the facing and the seam allowance about 1/8 inch (3mm) from the seam line. This prevents the facing from rolling to the outside.
- Armholes: If your dress has armhole facings, repeat the process for the armholes. If you are bagging the lining (a technique where the lining is attached completely to the main fabric), you’ll attach the lining and main fabric at the armholes later.

Step 6: Insert the Invisible Zipper
- Press Zipper: Press the zipper coils flat with a warm iron (avoid melting the teeth).
- Position: With the dress wrong side out, open the back seam. Place the zipper face down along one raw edge of the back opening, aligning the top stop with your seam allowance or pattern marking.
- Pin: Pin the zipper in place.
- Sew: Using an invisible zipper foot on your machine, stitch along the zipper coil, getting as close as possible to the teeth. Repeat for the other side of the zipper.
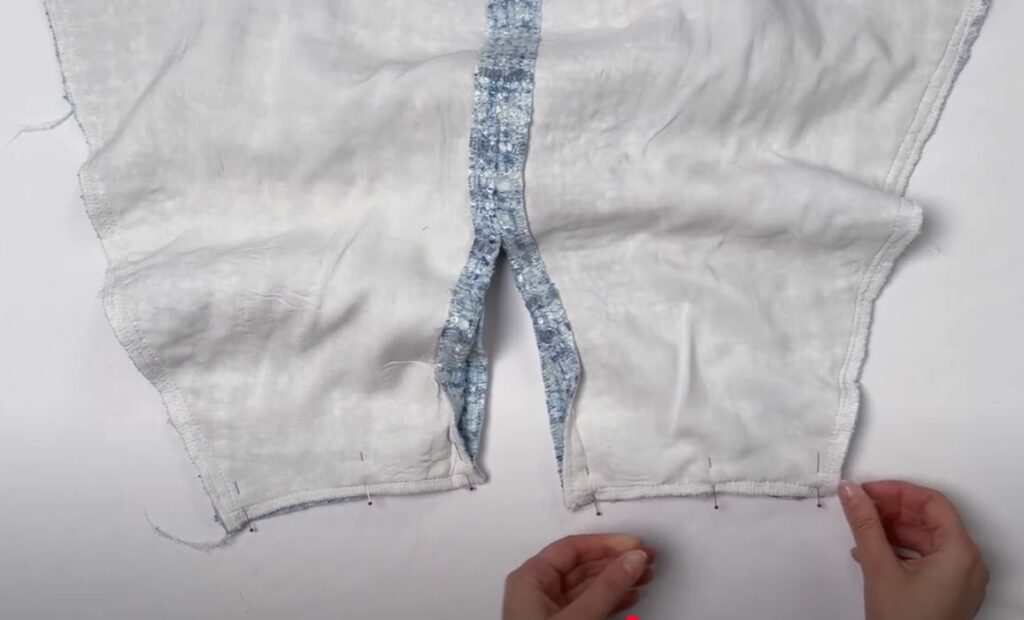
- Close Seam: Once the zipper is sewn, close the remaining portion of the back seam below the zipper, right sides together. Press the seam open.
Step 7: Attach the Lining to the Dress
There are a few methods for attaching a lining. Here’s a common and clean method often referred to as “bagging the lining”:
- Neckline: If you haven’t already, attach the lining to the dress at the neckline, right sides together. Stitch, trim, clip curves, and understitch.
- Armholes (if applicable): If your dress has sleeves, the armholes will be treated separately. If it’s a sleeveless dress, you’ll attach the lining to the armholes next.
- Turn the dress and lining right sides out.
- Carefully pull the lining over the dress, aligning raw edges at the armholes (right sides together).
- Pin and stitch around the armholes. Clip curves and trim seam allowance.
- Turn the dress right side out through the shoulder straps (for sleeveless) or through the unsewn side seam of the lining (if you left one).
- Zipper:
- Turn the dress and lining right sides out.
- Turn under the raw edge of the lining along the zipper opening by about 1/2 inch (1.2 cm). Press.
- Carefully hand stitch or machine stitch the folded edge of the lining to the zipper tape, close to the zipper teeth. Be careful not to stitch through the main fabric.
- Hem: You will hem the main dress and lining separately for a clean finish.
Step 8: Hemming
- Dress Hem: Try on the dress and mark your desired hem length. Press up the hem allowance (usually 1.5 – 2 inches / 3.8 – 5 cm). You can either hand stitch the hem for an invisible finish (catch stitch or slip stitch) or machine stitch with a narrow hem. For tweed, hand stitching often looks more luxurious.
- Lining Hem: Hem the lining about 1 inch (2.5 cm) shorter than the main dress hem. This prevents the lining from showing. You can machine stitch or hand stitch this hem.
Step 9: Embellishments (The CHANEL Touch!)
This is where you truly elevate your dress.
- Tweed Trim/Braiding:
- Measure the edges where you want to apply trim (neckline, armholes, hem, pocket edges if applicable).
- Cut your trim to size, adding a little extra for neat finishes.
- Pin the trim along the edges of your dress. For a truly authentic look, hand stitch the trim in place. This provides a couture finish. You can also machine stitch it, but hand stitching offers more control and less bulk.
- Consider creating your own “self-tweed” trim by cutting strips of your main fabric on the bias, folding and pressing them, and then stitching them to the edges.
- Decorative Buttons: If your design includes decorative buttons (even if purely ornamental), hand sew them securely.
- Chain Detail (Optional): For added weight and a professional drape, hand stitch a delicate chain to the inside of the dress hem, just above the finished hem edge. This is a signature CHANEL detail.
Step 10: Final Pressing
- Give your finished dress a thorough, gentle press. Use a pressing cloth, especially on the tweed, to avoid scorching or flattening the texture.
Tips for Success:
- Slow and Steady: Take your time with each step. Precision is key for a professional-looking garment.
- Pressing is Your Friend: Pressing seams after every stitch makes a huge difference in the final outcome.
- Test Stitches: Always test your stitch length and tension on scrap pieces of your tweed and lining before sewing on the actual garment.
- Needle Choice: Use a sharp needle suitable for your fabric weight. A universal needle might work, but a microtex or sharp needle can prevent snags on delicate tweeds.
- Consider a Walking Foot: If your tweed is thick or shifty, a walking foot can help feed the fabric evenly through your machine.
- Hand Sewing: Don’t shy away from hand sewing for details like the hem, trim application, and zipper lining attachment. It adds a touch of couture.
- Practice Embellishments: If you’re adding intricate trim, practice on a scrap piece first to get the hang of it.
Sewing a CHANEL-inspired tweed mini dress is a project that requires patience and attention to detail, but the result is a truly stunning and unique garment that embodies classic elegance. Enjoy the process of creating your own piece of timeless style!
Video tutorial: