 by
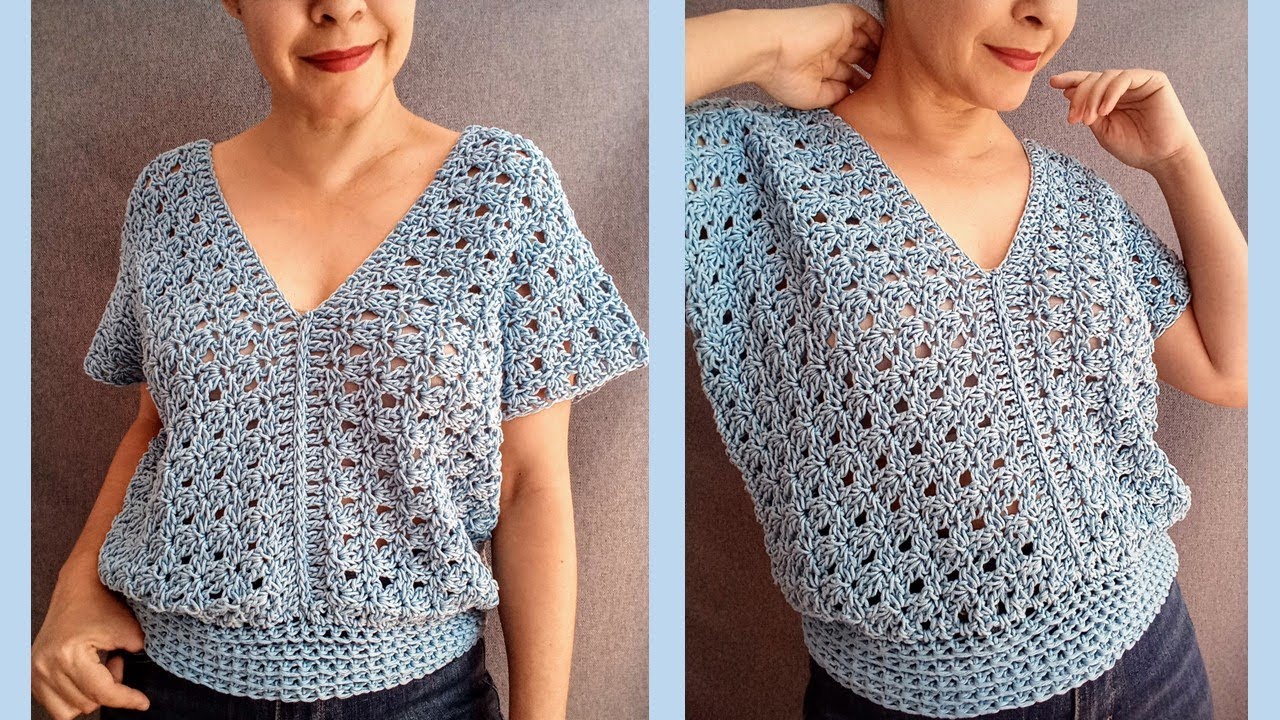
by The V-neck blouse is a timeless wardrobe staple, celebrated for its universally flattering silhouette and effortless versatility. But imagine the satisfaction of creating this elegant piece with your own hands, selecting the perfect yarn, customizing the fit, and infusing it with your unique style. A crocheted V-neck blouse offers not just a beautiful garment, but a deeply personal expression of slow fashion and creative skill.
This detailed guide will walk you through everything you need to know to crochet a stunning V-neck blouse for women, from the initial planning stages to the crucial finishing touches.
Why Crochet a V-Neck Blouse?

Choosing to crochet a V-neck blouse offers a myriad of benefits beyond just acquiring a new top:
- Flattering Silhouette: The V-neckline naturally elongates the neck and draws the eye downwards, creating a graceful and flattering line that complements a wide range of body types.
- Versatile Style: A crocheted V-neck blouse can effortlessly transition from casual to chic. Pair it with jeans for a relaxed daytime look, or dress it up with tailored trousers or a skirt for work or an evening out. It’s also perfect for layering over camisoles or under jackets.
- Custom Fit: One of the greatest advantages of handmade garments is the ability to achieve a perfect fit. You can precisely tailor the bust, waist, hip, and sleeve lengths to your specific measurements, addressing common fit issues found in ready-to-wear clothing.
- Unique & Personalized: No mass-produced item can match the individuality of a handmade piece. Select your favorite yarn fiber, color, and stitch patterns to create a blouse that perfectly reflects your personal aesthetic and stands out from the crowd.
- Skill Development: Crocheting a garment provides an excellent opportunity to practice and refine various techniques, including shaping, increasing, decreasing, and professional finishing. It’s a rewarding project that builds confidence for future apparel endeavors.
- Sustainable Fashion: Embracing handmade garments is a step towards more sustainable fashion. By investing your time and effort, you create a lasting, cherished item that reduces reliance on fast fashion and its environmental impact.
Understanding the V-Neck Blouse Aesthetic: Yarn & Stitch Choices
The success of your crocheted V-neck blouse hinges significantly on your yarn and stitch pattern choices, as these directly impact drape, texture, and overall aesthetic.
Yarn Selection: Key to Drape and Feel
For a flattering blouse, focus on yarns that offer good drape and comfort against the skin.
- Weight:
- Fingering (Category 1), Sport (Category 2), or DK (Category 3) are generally ideal. They create a fabric that is light enough for a blouse without being too bulky or stiff.
- Fiber:
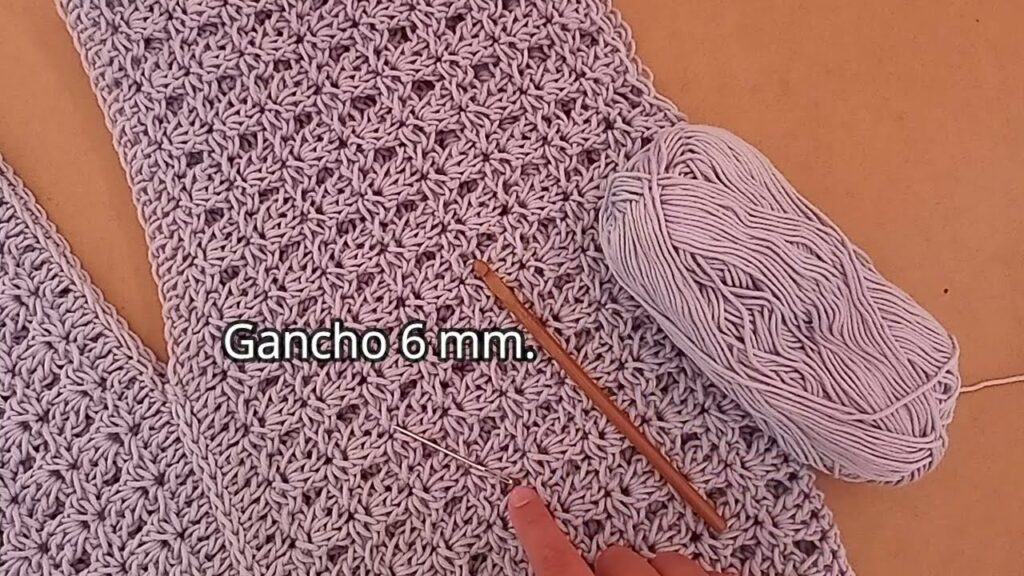
- Cotton/Linen Blends: Excellent choices for breathable, comfortable, and well-draping blouses, especially for warmer weather. They offer crisp stitch definition.
- Bamboo/Rayon Blends: Known for their beautiful drape, softness, and often a subtle sheen, making for an elegant garment.
- Mercerized Cotton: This treated cotton is smoother, stronger, and has a lovely subtle sheen, providing excellent stitch definition for more intricate patterns.
- Fine Merino Wool/Silk Blends: For a touch of luxury, these blends offer incredible softness, breathability, and warmth without bulk, making them suitable for year-round wear.
- High-Quality Acrylics: Modern acrylics have come a long way; many are now incredibly soft, have good drape, and are easy to care for (often machine washable). They offer a budget-friendly option with a vast color palette.
- Avoid: Very heavy, stiff, or highly textured yarns (like some bulky wools or novelty yarns) that would create a rigid, unflattering fabric for a blouse.
Stitch Patterns: Enhancing Drape & Texture
The right stitch pattern will elevate your blouse, providing visual interest while maintaining comfortable drape.
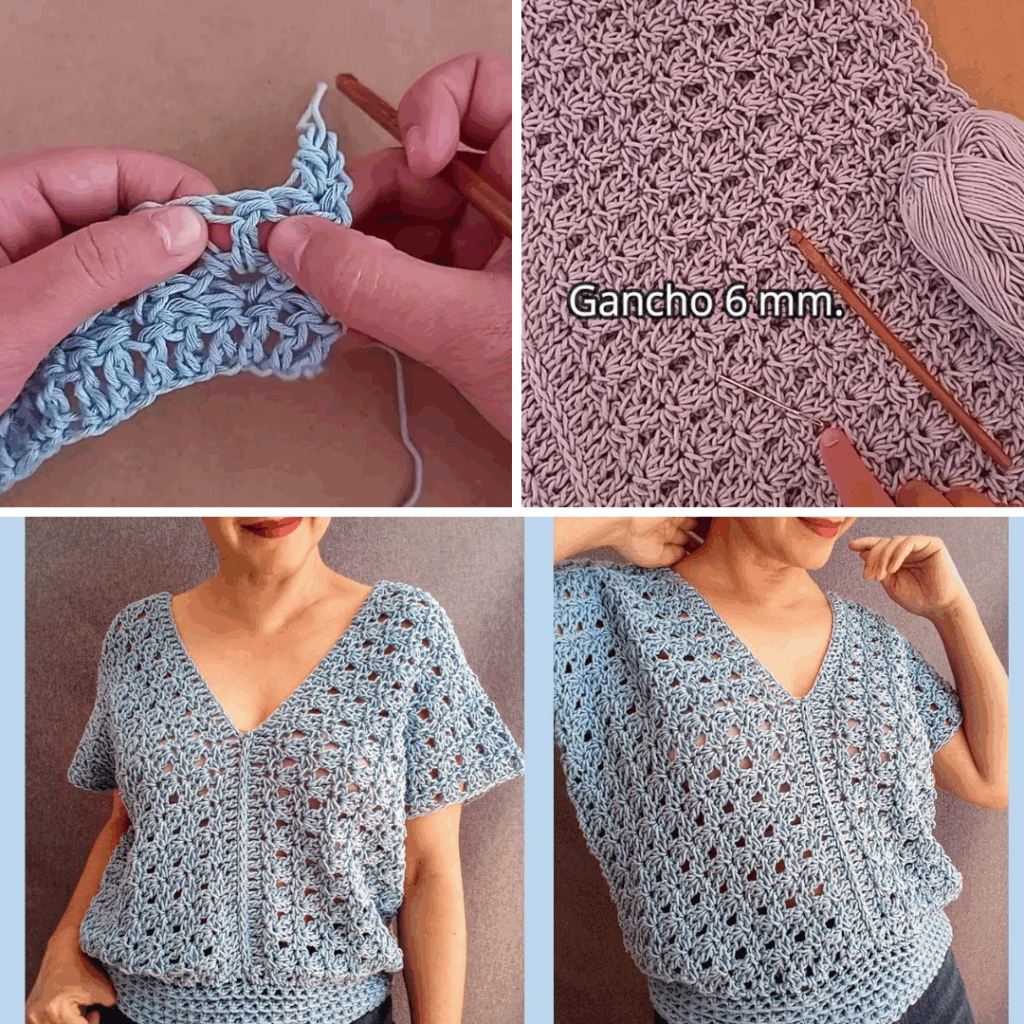
- Lace Stitches: Openwork patterns like V-stitch, shell stitch, fan stitch, or filet crochet create beautiful, airy, and elegant blouses. These are perfect for layering over a camisole or bralette.
- Textural but Drapable Stitches:
- Moss Stitch (Granite Stitch): A simple combination of single crochet and chain stitches that creates a dense yet flexible fabric with lovely texture.
- Half Double Crochet (HDC): A solid choice for a balance of speed, density, and drape.
- Extended Single/Double Crochet Stitches: These stitches are slightly taller than their standard counterparts, contributing to a looser fabric and better drape.
- Simple Combinations: Experiment with patterns that use basic stitches but aren’t overly dense, allowing the fabric to flow.
- Avoid: Very dense stitches like solid single crochet throughout the entire garment, unless worked with a very fine yarn or combined with significant openwork, as they can create a stiff fabric.
Design Elements
Consider these features to customize your V-neck blouse:
- Sleeve Style: Sleeveless, short sleeves, 3/4 sleeves, or long sleeves. Explore details like puff sleeves, bell sleeves, or simple straight sleeves.
- Fit: Will your blouse be fitted, relaxed, A-line, cropped, or a tunic length? Each choice impacts the final look and feel.
- V-Neck Depth: Decide on a shallow, medium, or deep plunge V-neck. This is a critical design choice that influences the garment’s modesty and overall aesthetic.
Planning Your V-Neck Blouse Project
A meticulous planning phase is crucial for garment success.
- Size Selection & Measurements:
- Crucial: Take accurate body measurements: Full Bust/Chest, Waist, Hips, Shoulder-to-Shoulder width, Arm Circumference (at widest point), Desired Blouse Length (from shoulder to hem), and Desired Sleeve Length.
- Compare to Pattern’s Finished Measurements: Pay close attention to the “ease” specified in the pattern. Blouses typically have “positive ease,” meaning the finished garment will be slightly larger than your body measurements for comfortable wear. Choose the size that corresponds to your measurements plus the desired ease.
- Pattern Selection (ESSENTIAL!):
- Highly Recommended: A well-written crochet pattern is paramount for a successful garment. Seek out patterns specifically designed for V-neck blouses or tops.
- Look for:
- Clear sizing charts and schematics with finished garment dimensions.
- Precise stitch counts for each row/round and each size.
- Detailed shaping instructions, especially for the V-neckline, armholes, and shoulders.
- CRITICALLY, comprehensive gauge information and clear instructions on how to achieve it.
- Clear photos and diagrams to guide you.
- Common Construction Methods for Blouses:
- Bottom-Up (Seamed Panels): You crochet the front and back panels flat from the hem upwards, then seam them together. Sleeves are crocheted separately and seamed on. This method is common for achieving very structured V-neck shaping.
- Top-Down (Seamless): You start at the shoulders/neckline and work downwards. While resulting in a seamless body, V-neck shaping can be more challenging to integrate smoothly initially.
- Side-to-Side (Seamless or Minimal Seam): The garment is crocheted horizontally. This can create interesting drape but requires careful attention to sizing and shaping.
- Gauge Swatch (NON-NEGOTIABLE!):
- This is the single most critical step in garment crocheting! It determines whether your finished blouse will match the pattern’s intended size.
- Crochet a large swatch (at least 6×6 inches / 15×15 cm) using your chosen yarn and hook in the main stitch pattern of the blouse.
- Wash and block your swatch exactly as you intend to wash and block the finished blouse. This accounts for any stretch, drape, or slight shrinkage that may occur after laundering.
- Measure your stitches and rows per inch/cm accurately. If your gauge doesn’t match the pattern’s, adjust your hook size (go up for fewer stitches per inch, down for more stitches per inch) until it matches. A small discrepancy in gauge will lead to a significant sizing error in your final garment.
Materials You’ll Need
- Yarn: (As detailed in the “Aesthetic” section). The quantity will vary based on your chosen size, blouse length, sleeve style, and yarn weight (typically 3-7 skeins for an adult women’s blouse).
- Crochet Hook(s): The size recommended by your pattern, adjusted based on your gauge swatch. You might need multiple sizes if the pattern calls for different hook sizes for ribbing or specific details.
- Notions:
- Stitch Markers: Essential for marking increase/decrease points, beginnings of rows/rounds, and specific pattern repeats.
- Tapestry Needle: For neatly weaving in all yarn ends and for seaming your panels (if applicable).
- Scissors.
- Measuring Tape: For checking gauge and garment dimensions as you progress.
- Stitch Holders or Waste Yarn (if top-down construction): To temporarily hold sleeve stitches while you work the body.
- Blocking Mats & T-pins (Highly Recommended): For professional shaping and finishing.
Key Crochet Techniques for a V-Neck Blouse
Beyond your basic crochet stitches (chain, slip stitch, single crochet, half double crochet, double crochet), you’ll focus on:
- Working in Rows: This is fundamental for crocheting the main body panels if you’re using a seamed construction, and crucial for shaping the V-neckline. You’ll turn your work at the end of each row.
- Working in the Round: Used for seamless sleeves (if working top-down) or if the main body is crocheted in the round from the bottom up. You’ll typically join each round with a slip stitch.
- Increasing Stitches: Used to shape the shoulders, bust, or expand the sleeve width. Your pattern will specify the type of increase (e.g., working two stitches into one, or more decorative increases like V-stitches).
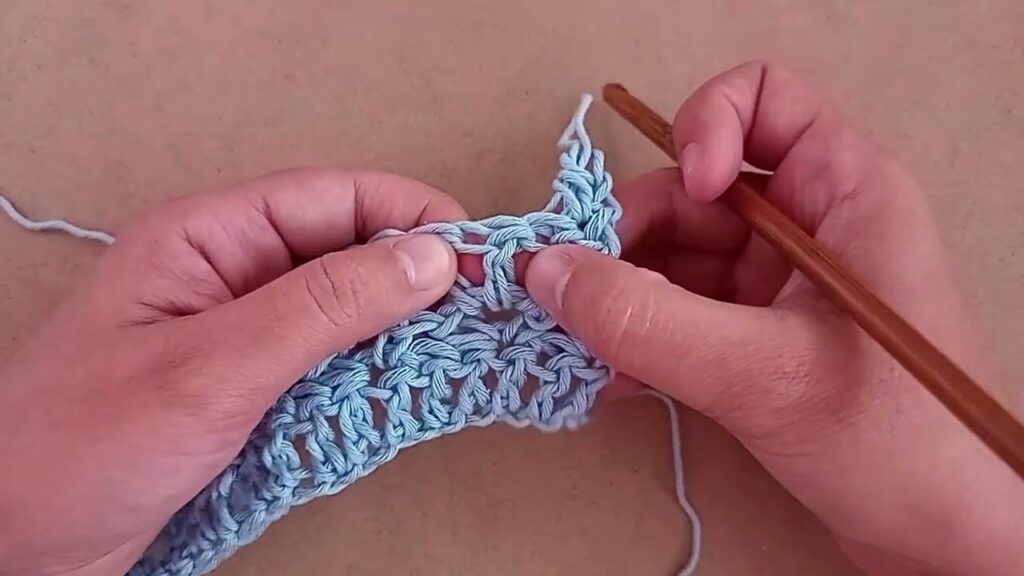
- Decreasing Stitches:Absolutely crucial for shaping the V-neckline, armholes, and tapering sleeves.
- Common Decreases:
sc2tog(single crochet two together),hdc2tog(half double crochet two together),dc2tog(double crochet two together). - Invisible Decreases: Some patterns might call for more advanced “invisible” decrease methods (like skipping stitches and working into the next, or specific stitch combinations) to create a smoother, less noticeable line, particularly important for the V-neck.
- Strategic Placement: Decreases for the V-neck will be made symmetrically along the front opening edges on specific rows/rounds to create the desired angle.
- Common Decreases:
- Edging: A neat finish for the V-neckline, armholes, and bottom hem. This can be a simple round or two of single crochet, a delicate picot edge, or a decorative border that complements your chosen stitch pattern.
- Seaming (if using panels): The Mattress Stitch is highly recommended for creating neat, almost invisible vertical seams along the sides and shoulders. A slip stitch seam is quicker but creates a slightly more raised seam line.
- Picking Up Stitches: Less common for a simple V-neck blouse, but you might use this if adding a specific neckline trim or a non-integrated collar.
Step-by-Step Construction Flows (Conceptual Guides)
Here are conceptual guides for common V-neck blouse construction methods:
A. Bottom-Up with Seamed Panels (Common for Defined V-Neck)
This method allows for very precise and structured V-neck shaping.
- Preparation: Read your pattern thoroughly, make your gauge swatch (and wash/block it!), and gather all your materials.
- Crochet the Back Panel:
- Begin by casting on the specified number of stitches for the lower back hem.
- Work in your chosen main stitch pattern upwards until the panel reaches the desired length before the armholes begin.
- Shape Armholes: Follow your pattern’s instructions to decrease stitches or skip stitches at the beginning and end of rows to create the armhole shaping.
- Continue working straight (or as per pattern for shoulder shaping) until the panel reaches the desired shoulder height. Bind off all stitches.
- Crochet the Front Panel:
- Cast on the same number of stitches as the back panel for the lower front hem.
- Work in your chosen main stitch pattern upwards until the panel reaches the specified length where the V-neck split begins (this is usually a few inches below the armholes, or as per pattern).
- V-Neck Shaping: At this point, you will typically divide your stitches for the left and right front. Work each side separately. On designated rows/rounds, make symmetrical decreases at the V-neck edge to create the V-shape. Simultaneously, continue to shape the armhole as you did for the back panel.
- Work each front shoulder section until it reaches the same height as the back shoulder. Bind off stitches for each shoulder.
- Crochet the Sleeves (Optional):
- Cast on stitches for the cuff.
- Work in your chosen stitch pattern, making increases evenly along the sides of the sleeve to achieve the desired width.
- If your pattern includes a fitted sleeve, it may also have instructions for shaping the sleeve cap (the curved top that fits into the armhole).
- Work until the desired sleeve length. Bind off.
- Seaming:
- Lay all finished panels flat.
- Shoulder Seams: Join the front and back panels together at the shoulders using the Mattress Stitch for an invisible vertical seam.
- Side Seams: Join the front and back panels along the sides from the hem up to the armholes.
- Sleeve Seams (if applicable): Join each sleeve lengthwise.
- Set in Sleeves (if applicable): Carefully attach the finished sleeves into the armholes of the body of the blouse, distributing the fabric evenly.
- Add Edging: Work a neat border (e.g., 1-2 rounds of single crochet, or a delicate picot edge) around the entire V-neckline, armholes, and the bottom hem for a clean and polished finish.
- Weave in Ends & Block: Meticulously weave in all loose yarn ends. Gently wash/wet and block the finished blouse to shape and set stitches.

B. Top-Down (Seamless – More Advanced for V-Neck Shaping)
While promising minimal seaming, integrating V-neck shaping seamlessly into a top-down construction can be more complex and is highly pattern-dependent. It often involves:
- Starting with the back shoulder sections, then chaining for the front shoulders.
- Joining these sections and working in rows for the yoke.
- Making increases along the shoulders and strategically placing decreases along the front opening edges to create the V-neck as the body grows downwards.
- Once the V-neck and armhole depths are achieved, joining the front and back sections to work the body in the round.
- Then, adding sleeves by working in the round from the armholes.
This method requires a very specific pattern to guide the V-neck shaping, as a general step-by-step might be misleading without a concrete example.
Tips for Success
- Read the Pattern Meticulously: Do not skim! Understand every instruction, abbreviation, and diagram, especially for shaping.
- Don’t Skip the Gauge Swatch! (This cannot be emphasized enough for garment success).
- Use Stitch Markers Religiously! They are invaluable for marking the points where V-neck decreases begin, increase points, the center of panels, and the start of rows/rounds.
- Count Your Stitches! After every few rows or rounds (especially where shaping occurs), verify your stitch counts. Catching errors early will save you significant time and frustration.
- Choose Yarn Carefully: The yarn truly makes the blouse. Prioritize drape, breathability, and how it feels against the skin.
- Practice Decreases: If your pattern uses specific invisible decrease methods, practice them on a small swatch until they look neat and blend well with your fabric.
- Blocking is Your Best Friend: It transforms crocheted fabric. Blocking evens out stitches, enhances drape, opens up lace patterns, and sets the final shape, making your blouse look professional and polished.
Caring for Your Crocheted Blouse
Proper care will ensure your handmade V-neck blouse remains beautiful and comfortable for years to come:
- Follow Yarn Label Instructions Strictly: This is your primary guide for appropriate washing and drying methods.
- Gentle Washing: Most fine yarn blouses will require hand washing in cool water with a mild, gentle detergent. If your yarn is machine washable, use a gentle or delicate cycle with a garment bag.
- Reshape and Lay Flat to Dry: Gently squeeze out excess water (never wring or twist!). Reshape the blouse back to its original dimensions (referencing your pattern’s schematic if needed) and lay it flat on a clean towel or a mesh drying rack to air dry completely.
- Never Hang Wet: The weight of a wet crocheted garment will cause it to stretch and distort significantly if hung to dry.
Conclusion
Crocheting a V-neck blouse for women is a deeply satisfying and rewarding project. It allows you to create a custom-fit, elegant, and uniquely personalized garment that celebrates your craft and enhances your wardrobe. By paying attention to planning, yarn choice, and the crucial techniques of shaping and finishing, you’ll be able to stitch a beautiful blouse that you’ll cherish for seasons to come. Embrace the process, and enjoy the blend of creativity and practicality that handmade fashion offers.
Video Tutorial ;