 by
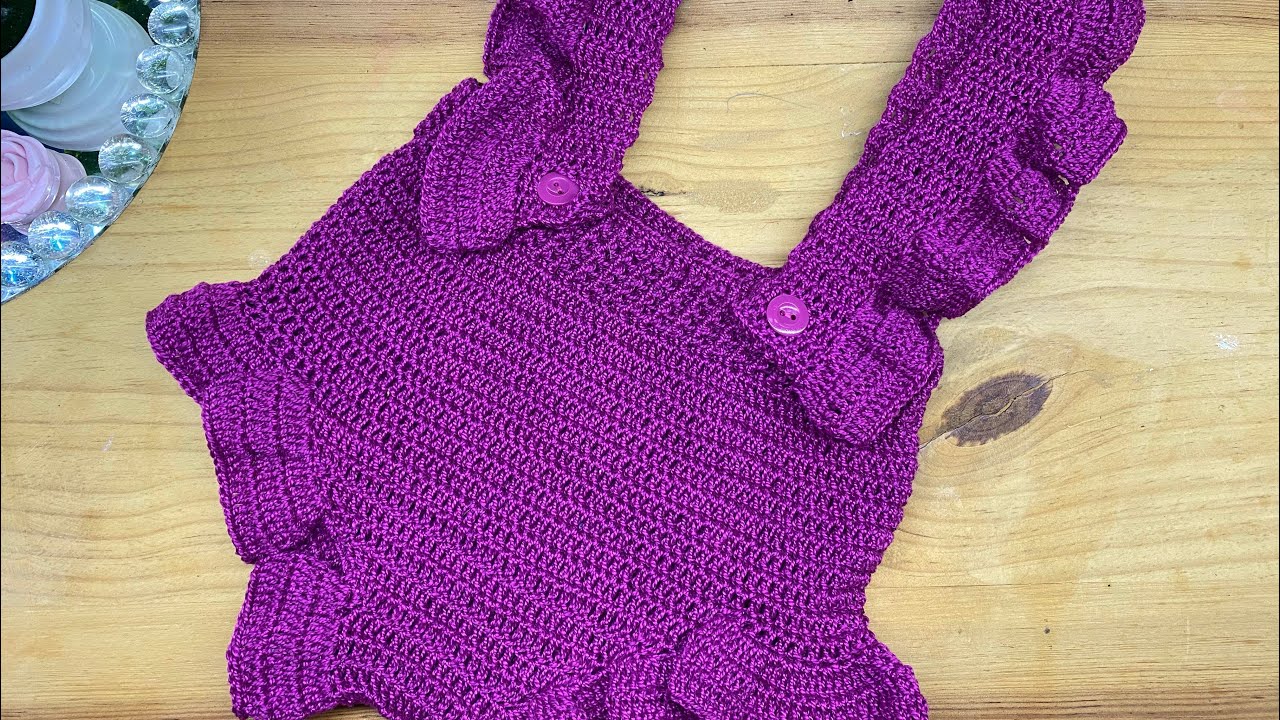
by Few things capture the heart quite like handmade baby items. From tiny booties to snuggly blankets, each stitch is imbued with love and care. Among these cherished creations, the crochet diaper cover with ruffles and straps stands out as a particularly charming and practical accessory. Combining the warmth of a little garment with an undeniable dose of cuteness, it’s perfect for photo opportunities, special occasions, or simply adding an extra layer of sweetness to everyday wear.
This detailed guide will explore everything you need to know to create this adorable piece, from selecting the perfect yarn to mastering the techniques that bring those delightful ruffles and functional straps to life.
Why Crochet a Diaper Cover with Ruffles and Straps?
The appeal of this specific baby garment goes beyond its undeniable charm:
- The Cuteness Factor is Off the Charts: The addition of ruffles around the leg openings or backside creates a whimsical, playful look that’s perfect for capturing precious memories in photos. Straps add to a charming “overall” or suspender-style aesthetic, completing the look.
- Practicality: Designed to be worn over a disposable or cloth diaper, these covers add an extra layer of warmth, coverage, and style. They can help keep a diaper snug and discreet under an outfit.
- Comfort for Little Ones: When crafted with the right yarn, a crochet diaper cover is soft, breathable, and gentle against a baby’s delicate skin, ensuring comfort.
- Customization: You have complete creative control over colors, ruffle fullness, strap design, and even button choices, making each piece unique.
- Skill Building: For crocheters looking to expand their abilities, this project offers excellent practice in working in rows or rounds, shaping with increases and decreases, creating decorative elements like ruffles, and adding functional features like straps and buttonholes.
- A Thoughtful Gift: A handmade diaper cover is a unique and heartfelt baby shower or new baby gift that will be treasured.
- Eco-Friendly Potential: When made with durable, washable yarns, these covers are reusable, aligning with more sustainable practices.
Understanding the Design Elements
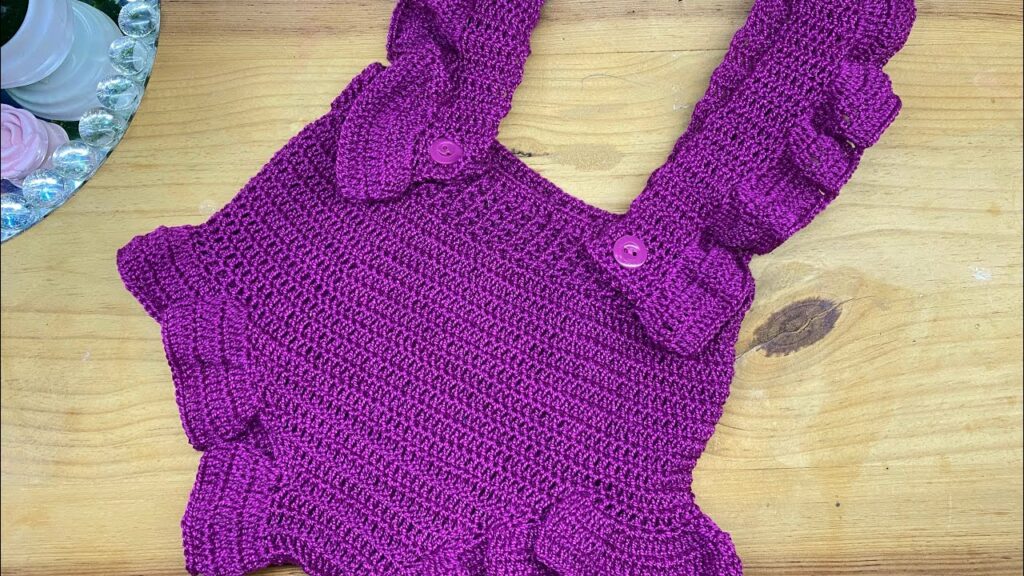
A diaper cover with ruffles and straps is essentially composed of three main parts:
- The Cover (Main Body): This forms the core of the garment, shaped to comfortably accommodate the bulk of a diaper. It’s typically wider at the bottom (for diaper room) and tapers towards the waist. Construction can vary: some patterns work flat in front and back panels that are then seamed, while others work seamlessly in the round.
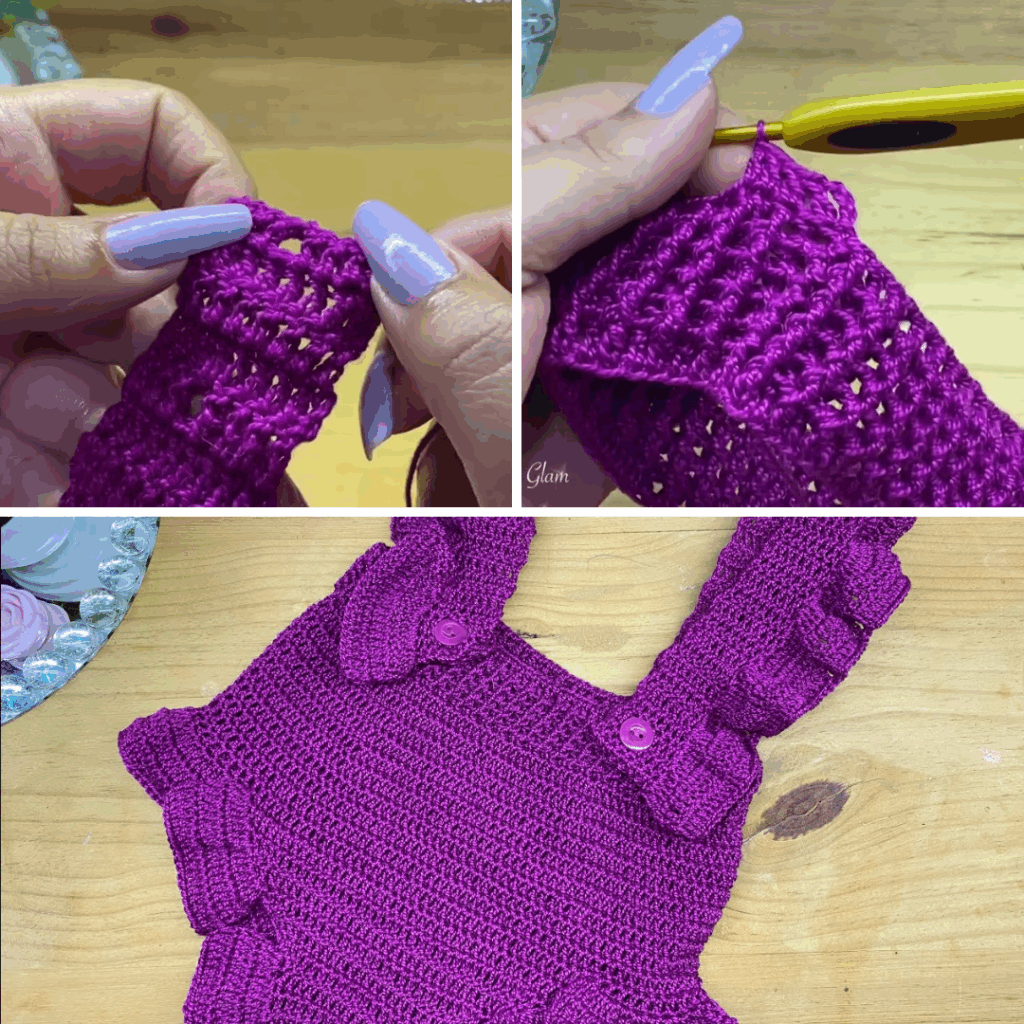
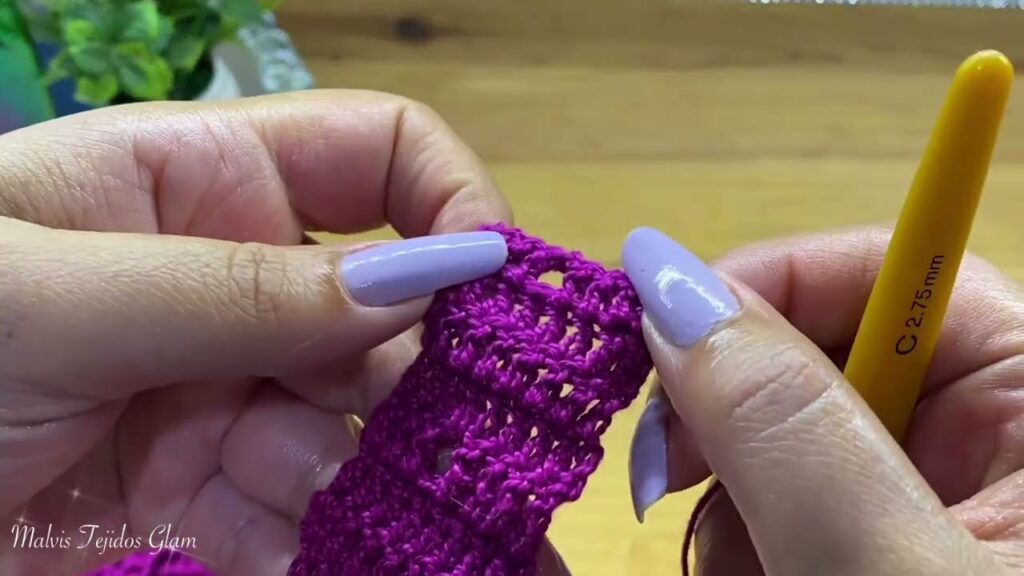
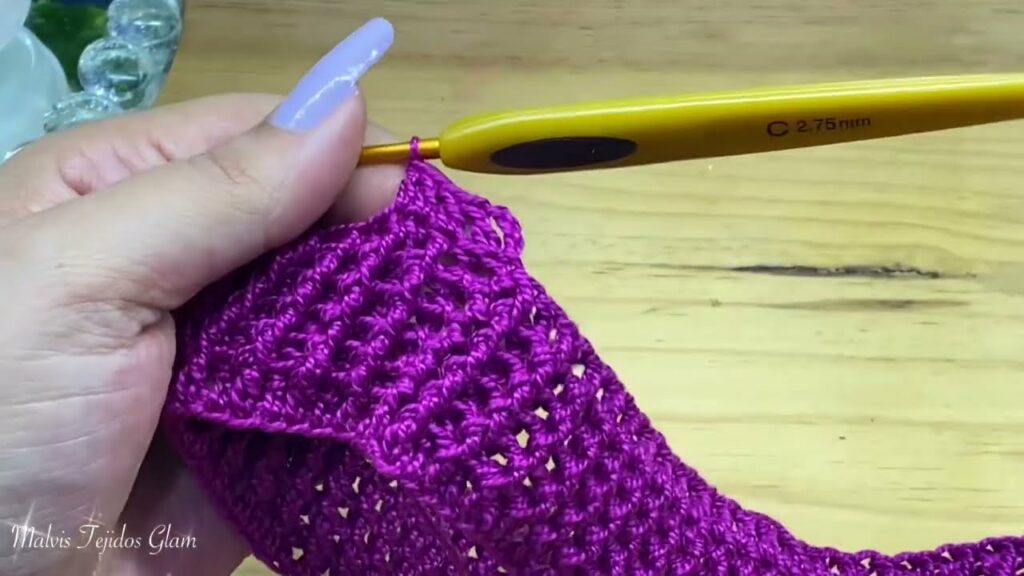
- The Ruffles: These decorative flounces are usually added to the leg openings, but can also adorn the back waist or even loop over the entire backside. Ruffles are created by significantly increasing stitches in a round or row, causing the fabric to gather and flare. They can be single-layered, or multiple layers can be added for extra volume.
- The Straps: These serve both a functional and aesthetic purpose. They help hold the diaper cover up and add to the “overall” or suspender look. Straps can be simple chains, flat bands worked in rows of single or half double crochet, or even braided elements. They are typically attached to the back waistband and fastened with buttons at the front.
Materials You’ll Need
The success of your adorable diaper cover starts with choosing the right materials.
- Yarn: This is paramount for a baby item, prioritizing softness, breathability, and washability.
- Fiber:
- Cotton or Cotton Blends (Cotton/Bamboo, Cotton/Acrylic): Excellent choices. Cotton is hypoallergenic, breathable, durable, holds stitch definition beautifully, and softens wonderfully with washing. Blends can add extra softness or drape.
- Bamboo or Viscose Blends: Very soft, silky, and have a lovely drape, making them incredibly gentle on baby’s skin.
- Baby-Specific Acrylics: Many acrylic yarns are specifically designed to be soft, easy-care, and hypoallergenic for babies. Choose a reputable brand and ensure it feels lovely to the touch.
- Avoid: Very scratchy wools (unless superwash and specifically labeled for baby), excessively fuzzy yarns (risk of shedding fibers), or very stiff yarns that won’t drape well.
- Weight: DK (Double Knitting, Category 3) or Sport (Category 2) are generally ideal for baby garments, creating a soft, lightweight fabric that’s comfortable. Worsted (Category 4) can also be used for a slightly denser or warmer cover, but ensure it’s a soft variety.
- Color: Pastels, brights, variegated yarns – the choice is yours! Consider classic baby colors or something bold and modern.
- Quantity: Typically, a small diaper cover for a newborn to 6 months might use 100-200 yards (90-180 meters) of yarn, with larger sizes requiring more. Always check your chosen pattern for specific yardage.
- Fiber:
- Crochet Hook: The size recommended by your pattern for your chosen yarn weight. The goal is a fabric that is soft and flexible, but not so gappy that the diaper shows through excessively.
- Notions:
- Stitch Markers: Useful for marking the beginning of rounds, specific shaping points, or where straps should be placed.
- Tapestry Needle (or Blunt Yarn Needle): Essential for weaving in all yarn ends securely and for any seaming.
- Scissors.
- Measuring Tape: For checking gauge and ensuring your cover is the right size.
- Buttons (2-4): For attaching the straps at the front waistband. Choose flat, sturdy, baby-safe buttons that are too large to be a choking hazard.
- Elastic (Optional): Some patterns incorporate a small piece of elastic into the back waistband or leg openings for a more snug fit.
Key Crochet Techniques for this Project
This project leverages fundamental crochet skills and introduces a few decorative elements:
- Basic Stitches: Chain (ch), Slip Stitch (sl st), Single Crochet (sc), Half Double Crochet (hdc), Double Crochet (dc).
- Working in Rows: For patterns constructed flat (front and back panels).
- Working in the Round: For seamless body construction, or for working edgings and ruffles.
- Increasing & Decreasing: Crucial for shaping the diaper cover to accommodate the diaper’s bulk and fit snugly around the waist and legs.
- Creating Ruffles: This is typically done by working multiple stitches (e.g., 2 DC or 3 HDC) into a single stitch or chain space from the previous row/round. The more stitches you add, the fuller the ruffle.
- Buttonholes: These are usually created with simple chain spaces strategically placed within a row or round.
- Attaching Buttons: Securely sewing buttons is a vital finishing touch.
- Weaving in Ends: Paramount for baby items, ensuring no loose ends can unravel or irritate delicate skin.
Sizing Considerations for Baby Garments
Achieving the right fit is crucial for comfort and wearability in baby items.
- Standard Baby Sizes: Patterns usually come in standard baby sizes (e.g., Newborn, 0-3 months, 3-6 months, 6-12 months).
- Key Measurements: Patterns will typically provide finished measurements for the waist circumference, leg opening circumference, and rise (the length from the crotch to the waistband).
- Gauge Swatch (Absolutely Essential!): This cannot be stressed enough for baby garments. Crochet a substantial swatch (at least 4×4 inches / 10×10 cm) using your chosen yarn and hook in the main stitch pattern of the cover.
- Crucial Step: Wash and block your swatch exactly as you plan to wash and block the finished diaper cover. Yarn can change significantly after laundering.
- Measure your stitches and rows per inch/cm accurately. If your gauge doesn’t match the pattern’s, adjust your hook size (go up a hook size if you have too many stitches per inch, down if you have too few) and re-swatch until it matches.
Step-by-Step Construction (Conceptual Guide)
(Note: This is a general guide to the common stages of construction. Always refer to a specific, well-written crochet pattern for exact stitch counts, row/round numbers, and detailed shaping instructions for your chosen design.)
Part 1: The Main Diaper Cover Body
- Starting Point: Many patterns begin either from the top (waistband) working down, or from the bottom (crotch/leg opening) working up. Some simpler designs might involve crocheting separate front and back panels that are then seamed.
- Waistband: If starting top-down, you’ll begin with a foundation chain for the waist circumference and work a few rows for the waistband (e.g., in single crochet or half double crochet for firmness). This is where elastic might be threaded later if desired.
- Body Shaping:
- Increases: As you work down from the waist, you’ll strategically place increases to create room for the hips and the diaper’s bulk.
- Decreases: If working from the bottom up or shaping the backside, you’ll use decreases to contour the fabric for a snug fit around the leg openings and taper towards the waist.
- Leg Openings: If working seamlessly, the pattern will instruct you on how to create the openings for the legs, often by chaining stitches and then joining back into the main body.
- Finish Main Body: Once the body is complete and shaped, fasten off.
Part 2: Adding the Ruffles
- Placement: The most common placement is around the leg openings. Some designs also feature ruffles along the back waistband for extra flair.
- Creating the Ruffles:
- Join your yarn to the edge where you want the ruffle (e.g., around a leg opening).
- Work a round or row of significantly increased stitches. For example, a common ruffle technique is to work 2-3 double crochet (DC) stitches into each stitch or chain space from the previous row/round. This abundance of stitches forces the fabric to ruffle.
- For very full or multi-layered ruffles, you might work several rounds of increases, or add multiple layers of ruffles.
- Finish Ruffles: Fasten off yarn after each ruffle.
Part 3: Crocheting the Straps
- Determine Length & Width: The pattern will guide you on the appropriate length for the straps based on the chosen size. Width is usually just a few rows.
- Crochet Method:
- Simple Straps: Chain the desired length for one strap, then work 1-2 rows of single crochet (SC) or half double crochet (HDC) along the chain to give it some width and stability.
- Braided Straps: Some patterns opt for a decorative braided look, where you make a long chain and then braid separate strands of yarn through it.
- Buttonholes: At one end of each strap, create small chain-space buttonholes (e.g., ch 2, skip 2 stitches, work into next stitch) to correspond with the size of your chosen buttons.
- Attach Straps: Securely sew the non-buttonhole end of each strap to the back waistband of the diaper cover. Ensure they are evenly spaced and won’t twist.
Part 4: Final Touches
- Weave in All Ends: This is a crucial step for any crochet project, but especially for baby items. Meticulously weave in every single yarn tail using your tapestry needle. Double-knot any initial slip knots and ensure ends are completely hidden and secure to prevent unraveling and discomfort against delicate skin.
- Attach Buttons: Sew your chosen baby-safe buttons securely to the front waistband of the diaper cover, aligning them perfectly with the buttonholes on the straps. Use sturdy thread.
- Blocking (Highly Recommended): Gently block the finished diaper cover. This process helps to set the stitches, even out any tension inconsistencies, define the shape of the ruffles and straps, and ensure the cover lays beautifully. (See caring instructions below for blocking tips).
Tips for Success
- Gauge is King (Again!): For baby garments where fit is important, a thorough gauge swatch is non-negotiable. Don’t skip it!
- Prioritize Softness: Always choose yarns that are exceptionally soft and gentle for a baby’s delicate skin.
- Safety First with Buttons: Select flat, securely attached buttons that are significantly larger than a baby’s windpipe to eliminate choking hazards.
- Secure All Ends: Take extra time to weave in all ends meticulously.
- Try On (If Possible): If you have access to a baby of the target size (or a baby doll of similar dimensions), try the cover on to check the fit before final finishing.
- Even Ruffle Distribution: When creating ruffles, pay attention to the pattern’s instructions for distributing increases evenly. This ensures the ruffles are consistently full and pretty.
Caring for Your Crochet Diaper Cover
Proper care will ensure your handmade diaper cover remains soft and beautiful for many washes.
- Follow Yarn Label Instructions: Always refer to your specific yarn’s care guidelines for washing and drying.
- Machine Wash (if yarn allows): Many baby yarns are designed to be machine washable on a gentle or delicate cycle with cool water. Place the item in a mesh laundry bag for added protection.
- Hand Wash (Recommended): For more delicate stitch patterns or if your yarn label advises against machine washing, hand wash gently in cool water with a mild, baby-friendly detergent.
- Reshape and Lay Flat to Dry: Never wring, twist, or hang a wet crocheted item. The weight of the water will cause it to stretch and distort its shape. Gently squeeze out excess water (rolling in a towel can help), reshape the diaper cover to its original dimensions, and lay it flat on a clean towel or a mesh drying rack to air dry completely. This is also how you “block” the garment.
Conclusion
Crocheting a diaper cover with ruffles and straps is a truly delightful and rewarding project that marries practicality with undeniable charm. It’s a wonderful way to create a personalized, cozy, and oh-so-adorable accessory for the little one in your life. With careful attention to yarn choice, gauge, and meticulous finishing, you’ll craft a cherished handmade piece that’s sure to bring smiles, capture precious memories, and perhaps even become a beloved family heirloom. Happy hooking!
Video Tutorial ;