 by
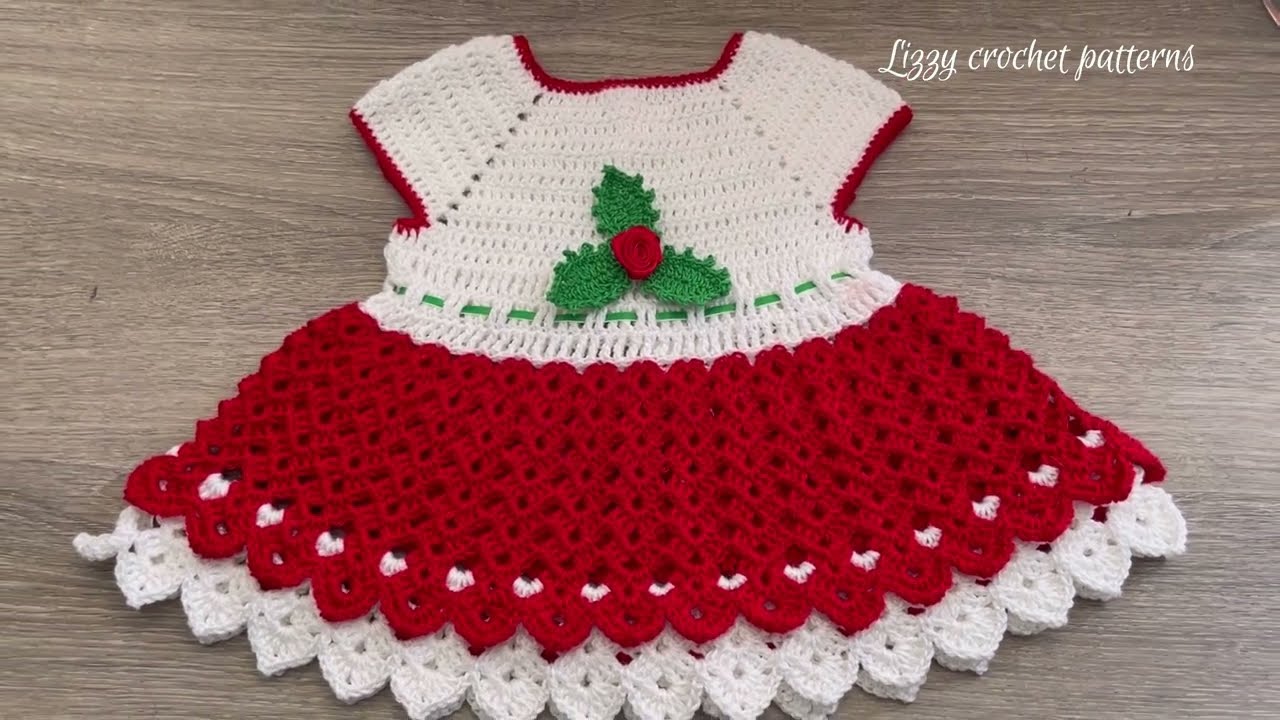
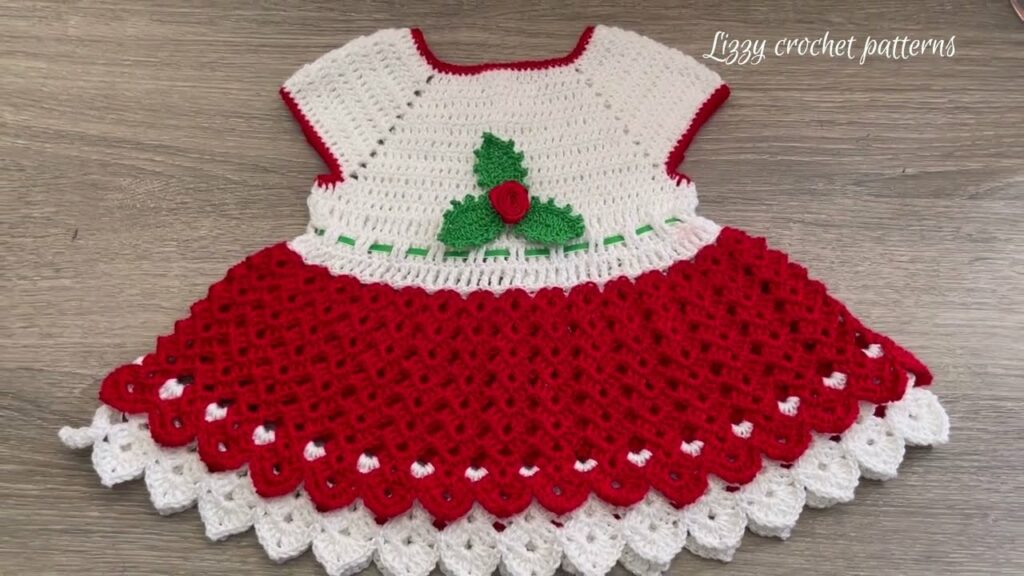
by The holiday season is a time for magic, warmth, and cherished memories. What could be more enchanting than dressing a tiny baby in a beautiful, handmade Christmas dress, a garment infused with festive spirit and crocheted with love? This project is not only a delightful undertaking but also creates a unique keepsake perfect for holiday photos, family gatherings, or a truly special gift.
While crafting a Christmas dress might seem intricate, this step-by-step guide focuses on a top-down, seamless raglan yoke construction – a popular and beginner-friendly method that yields a comfortable, beautiful garment. You’ll learn how to infuse your dress with holiday charm through color, stitch patterns, and thoughtful embellishments.
The Essence of a Christmas Baby Dress
What makes a baby dress unequivocally “Christmas”? It’s a combination of elements that evoke holiday cheer:
- Color Palette:
- Traditional: Vibrant reds, deep greens, crisp whites, and hints of gold or silver.
- Modern/Soft: Cream, ivory, blush pink, soft sage green, deep cranberry, or even a sophisticated navy with silver accents.
- Festive Touches:
- Stitch Patterns: Simple bobbles can resemble snow, delicate lace patterns can mimic snowflakes or icicles, and textured stitches add depth.
- Edgings: Picot stitch for a delicate scallop, shell stitches for a festive border, or even a faux fur yarn for a “snowy” trim.
- Embellishments: Small crocheted stars, snowflakes, tiny bows, securely sewn-on bells, subtle glitter yarn, or miniature pompoms.
- Comfort: Above all, it must be comfortable for the baby. Soft yarn, a proper fit, and a design that allows easy movement are paramount.
Choosing Your Christmas Tools & Materials
Your materials are the foundation of your festive creation.
- Yarn:
- Fiber: Prioritize softness, washability, and breathability.
- Superwash Merino Wool: Luxuriously soft, warm, breathable, and machine washable.
- Baby-Specific Acrylic: Modern acrylics are wonderfully soft, durable, hypoallergenic, and very easy to care for.
- Cotton or Cotton Blends: Excellent for breathability, softness, and crisp stitch definition, especially good for delicate lace.
- Weight: DK (Double Knitting) or Sport Weight are ideal for baby dresses. They offer a good balance of reasonable working speed, beautiful drape, and clear stitch definition.
- Christmas Sparkle: Look for yarns with a subtle shimmer, a metallic fleck, or a festive color blend to instantly elevate the holiday feel.
- Quantity: For a 0-12 month size, you’ll typically need around 200-350 yards (approx. 180-320 meters) of yarn, depending on the dress length and fullness.
- Fiber: Prioritize softness, washability, and breathability.
- Crochet Hook:
- The yarn label will provide a suggested hook size (e.g., 3.5mm, 4.0mm, 4.5mm).
- Crucial: The correct hook size for your gauge is more important than the label’s suggestion. You may need to go up or down a hook size to match your pattern’s gauge.
- Other Notions:
- Stitch Markers: Essential for marking raglan lines, the beginning of rounds, and buttonhole placements.
- Tapestry Needle: For weaving in ends neatly.
- Scissors: For cutting yarn.
- Small Festive Buttons: 3-5 small, flat buttons (approx. 0.5 inch / 1.25 cm). Choose ones that complement your Christmas theme (e.g., red, green, gold, white pearl).
- Optional Embellishments: Small bells, ribbon, small beads, or pre-made appliqués. (See safety notes below!)

Sizing & Gauge: Your Festive Fit Guarantee
For any crocheted garment, especially for babies, gauge is king! A “0-3 month” baby typically has a chest circumference of 16-18 inches (40-45 cm), while 6-12 months is around 18-20 inches (45-50 cm). Your gauge ensures your finished dress matches these dimensions.
How to Make a Gauge Swatch:
- Chain: Chain about 20-25 stitches, plus 2-3 turning chains (as per your chosen main stitch pattern).
- Work: Crochet a square of at least 4×4 inches (10×10 cm) in the main stitch pattern you’ll be using for the dress (e.g., double crochet rows).
- Wash & Block: Fasten off. Crucially, wash and block your swatch exactly as you plan to treat the finished dress. This relaxes the fibers and reveals the true stitch size and drape.
- Measure: Once dry, lay the swatch flat. Place a ruler over the center and count how many stitches fit within 4 inches (10 cm) and how many rows fit within 4 inches (10 cm).
- Adjust:
- If you have more stitches per inch than the pattern states (your work is too tight), go up half a hook size and try again.
- If you have fewer stitches per inch than the pattern states (your work is too loose), go down half a hook size and try again.
- Keep swatching until your gauge matches your pattern’s recommendation.
Step-by-Step Guide: Crocheting Your Christmas Baby Dress
This guide provides a general framework for a top-down, seamless raglan dress with a back opening. For exact stitch counts, refer to a specific pattern.
Abbreviations Used:
- ch: chain
- sc: single crochet
- hdc: half double crochet
- dc: double crochet
- sl st: slip stitch
- st(s): stitch(es)
- sk: skip
- sp: space
- inc: increase (e.g., 2 dc in one st)
- […] : repeat instructions in brackets
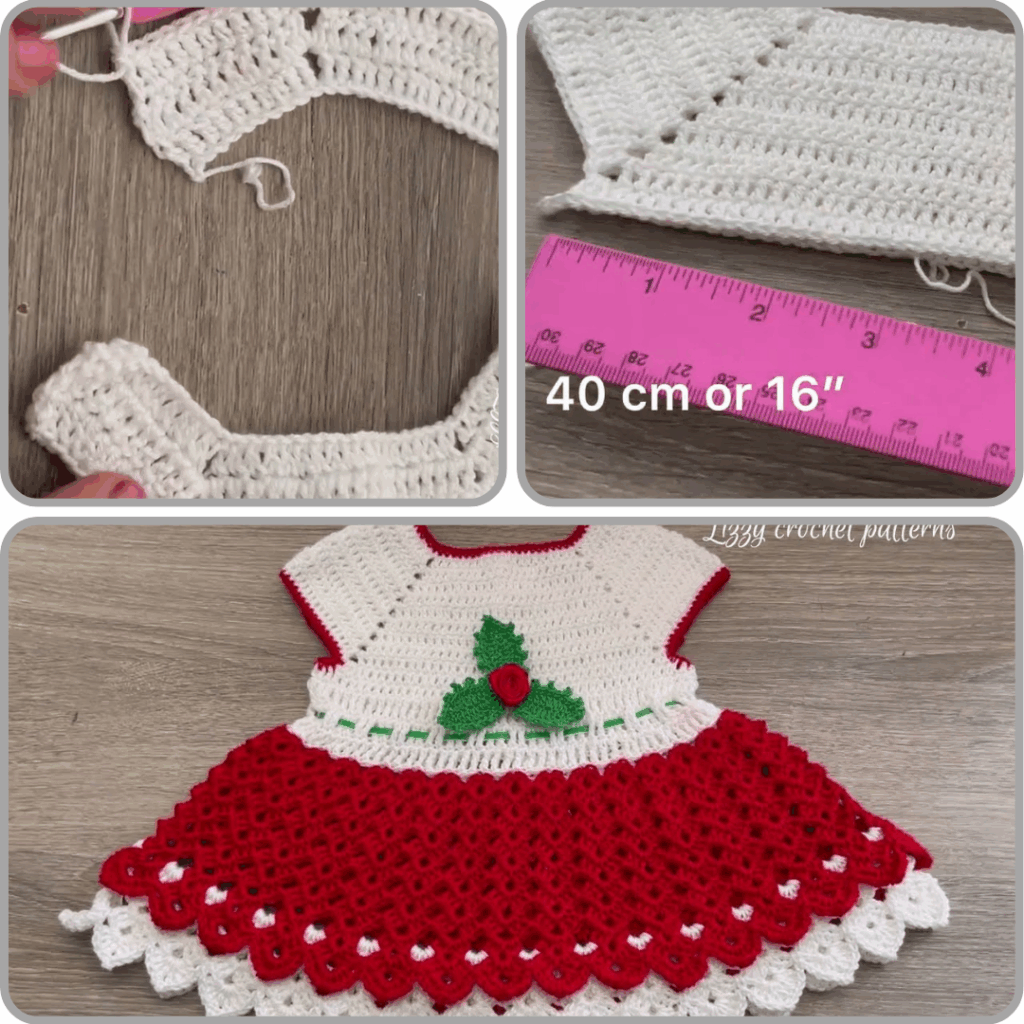
Step 1: The Neckline & Foundation (Working Flat for Back Opening)
- Foundation Chain: Chain a length (e.g., 45-60 chains, or as per your pattern) that, when worked, will be slightly longer than the desired finished neckline circumference. This forms the starting point for your back opening.
- Neckband Rows:
- Row 1: Ch 2 (counts as first hdc). Work 1 hdc in the 3rd ch from hook and in each ch across. Turn.
- Row 2-3 (or more): Ch 2, work 1 hdc in each st across. Turn.
- This creates a flat band for the back opening. You’ll work buttonholes on one of these back edges later.
Step 2: Establishing the Raglan Yoke
Now, you’ll divide your stitches and begin the increases that shape the shoulders.
- Determine Stitch Division:
- Take your total stitch count from your neckband.
- Mentally (or physically with markers) divide your stitches for: Back Panel 1, Sleeve 1, Front, Sleeve 2, Back Panel 2. You will have 4 “raglan corners” where increases happen.
- (Example for illustrative purposes: 8 sts for Back Panel 1, 10 sts for Sleeve 1, 14 sts for Front, 10 sts for Sleeve 2, 8 sts for Back Panel 2. Adjust these numbers based on your pattern’s starting chain and desired size.)
- Row 4 (Setting Up Raglan – Worked Flat):
- Ch 3 (counts as first dc).
- Work dc in first [number] of sts for Back Panel 1.
- Raglan Corner 1: [2 dc, ch 2, 2 dc] in the next st (place stitch marker in ch-2 space).
- Work dc in next [number] of sts for Sleeve 1.
- Raglan Corner 2: [2 dc, ch 2, 2 dc] in the next st (place stitch marker in ch-2 space).
- Work dc in next [number] of sts for Front.
- Raglan Corner 3: [2 dc, ch 2, 2 dc] in the next st (place stitch marker in ch-2 space).
- Work dc in next [number] of sts for Sleeve 2.
- Raglan Corner 4: [2 dc, ch 2, 2 dc] in the next st (place stitch marker in ch-2 space).
- Work dc in remaining [number] of sts for Back Panel 2. Turn.
- Raglan Yoke Rows (Continue Increasing):
- Row 5: Ch 3 (counts as dc). Dc in each dc across, working [2 dc, ch 2, 2 dc] in each ch-2 raglan space. Move stitch markers up to the new ch-2 space in each corner. Turn.
- Repeat Row 5 until the yoke measures approximately 4-6 inches (10-15 cm) from the neckline (or as specified by your pattern). This measurement is from the back of the neck down to the center of the underarm.
- Christmas Touch – Stripes/Bobbles: If you want stripes, change yarn color on a desired row. For bobbles (like snow!), incorporate them into your dc rows every few stitches or in a repeating pattern.
- Buttonholes (Important!): On one of your back panel edges, you’ll need to create buttonholes every few rows (e.g., every 1.5-2 inches or 4-5 cm).
- To make a simple horizontal buttonhole: Work to desired buttonhole position, ch 2, sk next 2 sts, then continue working dc across. On the next row, work into the ch-2 space.

Step 3: Separating for Body and Sleeves
Once your yoke is the correct depth, you’ll bring the front and back panels together to form the body, and put the sleeve stitches on hold.
- Separation Row:
- Ch 3 (counts as dc).
- Dc in each st of Back Panel 1.
- Work into Raglan Corner 1 (e.g., 1 dc).
- Skip Sleeve 1: Skip all dc stitches of Sleeve 1 (place these on a piece of scrap yarn or a stitch holder for later).
- Underarm Chain: Ch 2-4 stitches (creates the underarm space; check your pattern for specific number).
- Work into Raglan Corner 2 (e.g., 1 dc).
- Dc in each st of the Front Panel.
- Work into Raglan Corner 3 (e.g., 1 dc).
- Skip Sleeve 2: Skip all dc stitches of Sleeve 2 (place on scrap yarn/holder).
- Underarm Chain: Ch 2-4 stitches.
- Work into Raglan Corner 4 (e.g., 1 dc).
- Dc in each st of Back Panel 2. Turn.
- (You’ve now connected your front and back sections, creating the armholes.)
Step 4: Crocheting the Body/Skirt
Now you’ll work the main body of the dress, creating the festive skirt.
- First Row of Body: Ch 3 (counts as dc). Dc in each dc across, including working 1 dc into each ch of the underarm chains. Turn.
- Continuing the Body: Continue working rows of dc (keeping the back opening flat).
- Adding Flare (for a Full Skirt): To create a beautiful, full skirt, you’ll increase regularly.
- Simple Flare: On every 4th or 5th row, increase by working 2 dc into a stitch about 6-8 times evenly across the row. This will gradually widen the skirt.
- Festive Flare (Shells/Fans): For a more dramatic or lacy look, you can switch to a shell stitch (e.g., [3dc, ch1, 3dc] into a space, sk sts, repeat) or fan stitch pattern for the skirt. These naturally create a lot of flare.
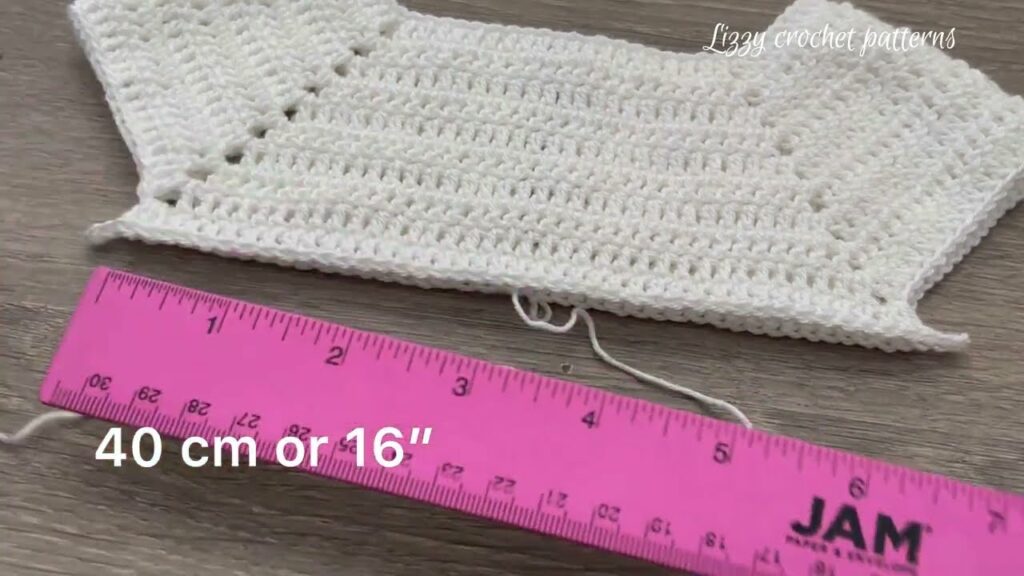
- Length: Continue working rows until the dress reaches the desired length for your baby (e.g., to the knee or mid-calf, around 12-16 inches / 30-40 cm from shoulder for 0-12 months).
- Hem: Work 2-3 rows of sc or hdc for a neat, stable hem. Fasten off.
- Christmas Touch – Hem Border: You can work these final hem rows in a contrasting Christmas color, or use a picot edging, or a simple shell border.

Step 5: Crocheting the Sleeves (Optional: Cap, Short, or Long)
- Attach Yarn: With your dress right side out, attach yarn to one of the underarm corners of a skipped sleeve.
- Pick Up Stitches: Ch 3 (counts as dc). Work dc into each dc stitch of the held sleeve stitches. Work 1 dc into each chain of the underarm chain. Join with a sl st to the top of the initial ch 3. You are now working in the round.
- Work Sleeve: Continue working dc rounds (or your desired sleeve stitch) until the sleeve reaches the desired length (e.g., 0.5-1 inch for a cap, 3-4 inches for short, 6-8 inches for long sleeves for 0-12 months).
- Cuff (Optional): For a neat cuff, work 2-3 rounds of sc or hdc.
- Christmas Touch – Cuff Embellishment: Finish the cuff in a contrasting color, add a picot edging, or sew on a tiny bell or snowflake.
- Fasten Off. Repeat for the second sleeve.
Step 6: Adding Christmas Magic (Finishing Touches)
This is where your dress truly comes to life with festive sparkle!
- Back Opening/Button Bands: If you didn’t work buttonholes directly into a flat band (Step 1), now you can pick up stitches along both back edges. Work 2-3 rows of sc or hdc for each band. On one band, create your buttonholes (e.g., ch 2, sk 2 sts).
- Neckline Edging: Reattach yarn to one corner of the neckline. Work 1-2 rounds of sc or hdc around the entire neckline for a clean finish. For a festive touch, add a picot edging (ch 3, sl st into 1st ch) or a round of contrasting color.
- Weave in Ends: This is paramount for a professional, beautiful look. Use your tapestry needle to meticulously weave in all loose yarn tails, hiding them securely within the stitches on the wrong side of your work.
- Blocking (The Magic Step!):
- Gently wash your finished dress according to your yarn’s care instructions.
- Gently squeeze out excess water (do not wring).
- Lay the dress flat on a clean towel or blocking mats. Gently shape it to the correct dimensions, smoothing out any unevenness and opening up any lace or textured patterns. Use rust-proof pins to hold it in place.
- Allow the dress to air dry completely. Blocking transforms the fabric, evening out stitches, setting the drape, and enhancing its overall beauty.
- Attach Buttons: Lay your dress flat and mark the positions for your buttons, aligning them with the buttonholes on the opposite placket. Securely sew on your chosen small, festive buttons. Ensure they are sewn on very, very tightly to prevent any choking hazard.
- Optional Embellishments:
- Crocheted Stars/Snowflakes: Make small, flat motifs and securely stitch them onto the yoke or skirt.
- Ribbon Weaving: Thread a festive ribbon through a row of dc spaces or ch-1 spaces on the yoke or skirt.
- Pompoms/Tassels: Create small, festive pompoms or tassels and securely attach them to the hem or as accents.
Safety & Care for Your Festive Creation
- Button Security: This is critical. Stitch buttons on very securely with strong thread. Check them regularly.
- Small Embellishments: Exercise extreme caution with small beads, bells, or anything that could detach. If unsure, omit. Avoid long ties or ribbons that could pose a strangulation risk.
- Washing: Always follow your yarn’s care instructions. For handmade items, gentle machine wash or hand wash and lay flat to dry are usually best to preserve shape and details.
Video Tutorial :
Crocheting a Christmas baby dress is a labor of love that results in a truly magical and unique garment. With each stitch, you’ll infuse it with holiday cheer, creating a cherished memory for years to come. Happy festive crocheting! Sources